【1】SpringBoot对SpringMVC的默认配置
官网地址如下:
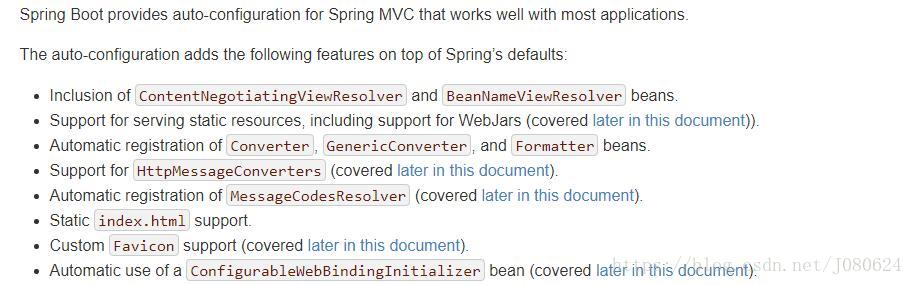
如下图所示,SpringBoot提供了SpringMVC的自动配置帮助进行Web项目开发。
翻译如下:
① 配置了视图解析器bean;
② 静态资源访问支持,包括WebJars;
③ 注册了转换器和格式化器;
④ 请求响应信息转换器;
⑤ 注册信息校验解析器–定义错误代码生成规则;
⑥ 静态页面index.html支持(欢迎页);
⑦ 项目浏览器图标支持;
⑧ 可配置web数据绑定初始化器bean的自动使用。
【2】Inclusion of ContentNegotiatingViewResolver and BeanNameViewResolver beans.
ContentNegotiatingViewResolver:组合所有的视图解析器的,源码分析如下。
首先在WebMvcAutoConfiguration配置类中添加组件ContentNegotiatingViewResolver。
@Bean
@ConditionalOnBean(ViewResolver.class)
@ConditionalOnMissingBean(name = "viewResolver", value = ContentNegotiatingViewResolver.class)
public ContentNegotiatingViewResolver viewResolver(BeanFactory beanFactory) {
    ContentNegotiatingViewResolver resolver = new ContentNegotiatingViewResolver();
    resolver.setContentNegotiationManager(
            beanFactory.getBean(ContentNegotiationManager.class));
    //注意这里
    // ContentNegotiatingViewResolver uses all the other view resolvers to locate
    // a view so it should have a high precedence
    resolver.setOrder(Ordered.HIGHEST_PRECEDENCE);
    return resolver;
}
ContentNegotiatingViewResolver类如下:
public class ContentNegotiatingViewResolver extends WebApplicationObjectSupport
        implements ViewResolver, Ordered, InitializingBean {

    private ContentNegotiationManager contentNegotiationManager;

    private final ContentNegotiationManagerFactoryBean cnmFactoryBean = new ContentNegotiationManagerFactoryBean();

    private boolean useNotAcceptableStatusCode = false;

    private List<View> defaultViews;

    private List<ViewResolver> viewResolvers;
    // 这里有一个视图解析器list

    private int order = Ordered.HIGHEST_PRECEDENCE;
    //...
}
其initServletContext方法如下:
@Override
    protected void initServletContext(ServletContext servletContext) {
        Collection<ViewResolver> matchingBeans =
                BeanFactoryUtils.beansOfTypeIncludingAncestors(getApplicationContext(), ViewResolver.class).values();
        if (this.viewResolvers == null) {
            this.viewResolvers = new ArrayList<ViewResolver>(matchingBeans.size());
            for (ViewResolver viewResolver : matchingBeans) {
                if (this != viewResolver) {
                    this.viewResolvers.add(viewResolver);
                }
            }
        }
        else {
            for (int i = 0; i < viewResolvers.size(); i++) {
                if (matchingBeans.contains(viewResolvers.get(i))) {
                    continue;
                }
                String name = viewResolvers.get(i).getClass().getName() + i;
                getApplicationContext().getAutowireCapableBeanFactory().initializeBean(viewResolvers.get(i), name);
            }

        }
        if (this.viewResolvers.isEmpty()) {
            logger.warn("Did not find any ViewResolvers to delegate to; please configure them using the " +
                    "'viewResolvers' property on the ContentNegotiatingViewResolver");
        }
        AnnotationAwareOrderComparator.sort(this.viewResolvers);
        this.cnmFactoryBean.setServletContext(servletContext);
    }
即,拿到系统中所有的视图解析器!
那么如何定制自己的视图解析器呢?
可以自己给容器中添加一个视图解析器,SpringBoot 会自动的将其组合进来。
示例如下(使用@Bean在容器中添加自己的视图解析器):
    @Bean
    public ViewResolver myViewReolver(){
        return new MyViewResolver();
    }
【3】Automatic registration of Converter, GenericConverter, and Formatter beans.
Converter:转换器;如页面表单数据到后台public String hello(User user):类型转换使用Converter。
Formatter 格式化器; 如页面表单中日期2017.12.17到后台Date。
源码如下:
@Bean
@ConditionalOnProperty(prefix = "spring.mvc", name = "date-format")
public Formatter<Date> dateFormatter() {
    return new DateFormatter(this.mvcProperties.getDateFormat());
}

@Override
public void addFormatters(FormatterRegistry registry) {
    for (Converter<?, ?> converter : getBeansOfType(Converter.class)) {
        registry.addConverter(converter);
    }
    //自己添加的格式化器转换器,我们只需要放在容器中即可
    for (GenericConverter converter : getBeansOfType(GenericConverter.class)) {
        registry.addConverter(converter);
    }
    for (Formatter<?> formatter : getBeansOfType(Formatter.class)) {
        registry.addFormatter(formatter);
    }
}

private <T> Collection<T> getBeansOfType(Class<T> type) {
    return this.beanFactory.getBeansOfType(type).values();
}
其中默认的日期格式如下:
    /**
     * Date format to use (e.g. dd/MM/yyyy).
     */
    private String dateFormat;
通常需要在配置文件中修改:
spring.mvc.date-format=yyyy-MM-dd//根据需要自定义【4】HttpMessageConverters
SpringMVC用来转换Http请求和响应的,如将User转换为Json。SpringBoot默认从容器中获取所有的HttpMessageConverter。如果自己给容器中添加HttpMessageConverter,则只需将自己的组件注册到容器中。
官方文档说明如下:
Spring MVC uses the HttpMessageConverter interface to convert HTTP requests and responses. Sensible defaults are included out of the box. For example, objects can be automatically converted to JSON (by using the Jackson library) or XML (by using the Jackson XML extension, if available, or by using JAXB if the Jackson XML extension is not available). By default, strings are encoded in UTF-8.
If you need to add or customize converters, you can use Spring Boot’s HttpMessageConverters class, as shown in the following listing:
import org.springframework.boot.autoconfigure.web.HttpMessageConverters;
import org.springframework.context.annotation.*;
import org.springframework.http.converter.*;

@Configuration
public class MyConfiguration {

    @Bean
    public HttpMessageConverters customConverters() {
        HttpMessageConverter<?> additional = ...
        HttpMessageConverter<?> another = ...
        return new HttpMessageConverters(additional, another);
    }

}
【5】修改SpringBoot的默认配置
首先说明一下几点:
1SpringBoot在自动配置很多组件的时候,先看容器中有没有用户自己配置的(@Bean、@Component)如果有就用用户配置的,如果没有,才自动配置;如果有些组件可以有多个(ViewResolver)将用户配置的和自己默认的组合起来;
2)、在SpringBoot中会有非常多的xxxConfigurer帮助我们进行扩展配置;
3)、在SpringBoot中会有很多的xxxCustomizer帮助我们进行定制配置。
其次,官网文档说明如下:
If you want to keep Spring Boot MVC features and you want to add additional MVC configuration (interceptors, formatters, view controllers, and other features), you can add your own @Configuration class of type WebMvcConfigurer but without @EnableWebMvc.
If you wish to provide custom instances of RequestMappingHandlerMapping, RequestMappingHandlerAdapter, or ExceptionHandlerExceptionResolver, you can declare a WebMvcRegistrationsAdapter instance to provide such components.
If you want to take complete control of Spring MVC, you can add your own @Configuration annotated with @EnableWebMvc.
5.1 扩展默认配置
如下,编写一个配置类,是WebMvcConfigurerAdapter类型,不能标注@EnableWebMvc:
@Configuration
public class MyMvcConfig extends WebMvcConfigurerAdapter {

    //重写方法
    @Override
    public void addViewControllers(ViewControllerRegistry registry) {
       // super.addViewControllers(registry);
       //浏览器发送 /success 请求来到 success
        registry.addViewController("/success").setViewName("success");
    }
    //添加组件
    @Bean
    public LocaleResolver localeResolver(){
        return new MyLocaleResolver();
    }
其中viewController对应以前SpringMVC的xml配置如下:
<mvc:view‐controller path="/success" view‐name="success"/>原理分析源码如下:
① WebMvcAutoConfiguration是SpringMVC的自动配置类;
② 在做其他自动配置时会导入;@Import(EnableWebMvcConfiguration.class)
@Configuration
@Import(EnableWebMvcConfiguration.class)//这里
@EnableConfigurationProperties({ WebMvcProperties.class, ResourceProperties.class })
public static class WebMvcAutoConfigurationAdapter extends WebMvcConfigurerAdapter {

    private static final Log logger = LogFactory
            .getLog(WebMvcConfigurerAdapter.class);

    private final ResourceProperties resourceProperties;

    private final WebMvcProperties mvcProperties;

    private final ListableBeanFactory beanFactory;

    private final HttpMessageConverters messageConverters;

    final ResourceHandlerRegistrationCustomizer resourceHandlerRegistrationCustomizer;
    //...
}
EnableWebMvcConfiguration类如下:
@Configuration
public static class EnableWebMvcConfiguration extends DelegatingWebMvcConfiguration {
    //...
}
同样是个配置类,继承DelegatingWebMvcConfiguration ,其类如下:
@Configuration
public class DelegatingWebMvcConfiguration extends WebMvcConfigurationSupport {

private final WebMvcConfigurerComposite configurers = new WebMvcConfigurerComposite();
//拿到系统中所有的WebMvcConfigurer
@Autowired(required = false)
public void setConfigurers(List<WebMvcConfigurer> configurers) {
    if (!CollectionUtils.isEmpty(configurers)) {
        this.configurers.addWebMvcConfigurers(configurers);
    }
}
//...
}
WebMvcConfigurerAdapter是WebMvcConfigurer的实现类,WebMvcAutoConfigurationAdapter继承自WebMvcConfigurerAdapter。
总结 : 容器中所有的WebMvcConfigurer都会一起起作用,我们的配置类也会被调用。
根据源码分析,还可以在自定义配置类中使用如下方式进行配置扩展:
 //所有的WebMvcConfigurerAdapter组件都会一起起作用
 @Bean //将组件注册在容器
 public WebMvcConfigurerAdapter webMvcConfigurerAdapter(){
     WebMvcConfigurerAdapter adapter = new WebMvcConfigurerAdapter() {
         @Override
         public void addViewControllers(ViewControllerRegistry registry) {
             registry.addViewController("/").setViewName("login");
             registry.addViewController("/index.html").setViewName("login");
             registry.addViewController("/main.html").setViewName("dashboard");
         }

         //注册拦截器
         @Override
         public void addInterceptors(InterceptorRegistry registry) {
             //super.addInterceptors(registry);
             //静态资源;  *.css , *.js
             //SpringBoot已经做好了静态资源映射
//                registry.addInterceptor(new LoginHandlerInterceptor()).addPathPatterns("/**")
//                        .excludePathPatterns("/index.html","/","/user/login");
         }
     };
     return adapter;
 }
5.2 全面接管SpringMVC
需要在配置类中添加@EnableWebMvc即可,所有的SpringMVC的自动配置都失效了,通常不这么干。
//使用WebMvcConfigurerAdapter可以来扩展SpringMVC的功能
@EnableWebMvc
@Configuration
public class MyMvcConfig extends WebMvcConfigurerAdapter {
    @Override
    public void addViewControllers(ViewControllerRegistry registry) {
    // super.addViewControllers(registry);
    //浏览器发送 /success 请求来到 success
    registry.addViewController("/success").setViewName("success");
    }
}
为什么添加该注解,就会将SpringBoot对SpringMVC的默认自动配置失效呢?
分析源码如下 :
① @EnableWebMvc的核心
@Import(DelegatingWebMvcConfiguration.class)
public @interface EnableWebMvc {
    //..
}
② DelegatingWebMvcConfiguration
@Configuration
public class DelegatingWebMvcConfiguration extends WebMvcConfigurationSupport {

    private final WebMvcConfigurerComposite configurers = new WebMvcConfigurerComposite();

    @Autowired(required = false)
    public void setConfigurers(List<WebMvcConfigurer> configurers) {
        if (!CollectionUtils.isEmpty(configurers)) {
            this.configurers.addWebMvcConfigurers(configurers);
        }
    }
    //...
}
很眼熟对不对,这货继承自WebMvcConfigurationSupport 。
③ 查看WebMvcAutoConfiguration
@Configuration
@ConditionalOnWebApplication
@ConditionalOnClass({ Servlet.class, DispatcherServlet.class,
        WebMvcConfigurerAdapter.class })
//注意这里!!!
@ConditionalOnMissingBean(WebMvcConfigurationSupport.class)
@AutoConfigureOrder(Ordered.HIGHEST_PRECEDENCE + 10)
@AutoConfigureAfter({ DispatcherServletAutoConfiguration.class,
        ValidationAutoConfiguration.class })
public class WebMvcAutoConfiguration {
只有在WebMvcConfigurationSupport不存在的情况下,WebMvcAutoConfiguration 才生效!
而@EnableWebMvc将WebMvcConfigurationSupport组件导入进来,但是WebMvcConfigurationSupport只有SpringMVC最基本的功能。