fail2ban 防止暴力破解密码
一、前言
在五一劳动节期间发现家中搭建的 unRAID 服务器的 CPU 直接被拉满了,怀疑是被暴力破解入侵了,并植入了挖矿程序。经过两天的斗智斗勇,发现在系统盘中被创建了一个名为 wireguard.go 的定时脚本,会定时下载运行 Xmrig 的挖矿程序。。。打死我也没想到伪装名用的是 wireguard。由于部分服务被我暴露到公网上,所以不可避免的会被扫描到,然后被暴力破解了 sshd 的 root 密码,从而导致了以上惨剧。因此设置高位端口和复杂密码的必要性可想而知,一旦自建服务器被黑,如果只是植入挖矿程序,还算良心,万一隐私信息的暴露,或者被勒索,那就杯具了。
由于端口的有限性,尽管设置了高位端口,但还是有可能会有意者扫描到,因此防止暴力破解也是一个非常关键的安全手段。群晖自带了多次登录失败封禁 ip 的功能,但是 unRAID 本身没有这个功能,我们可以借助安装 fail2ban 这个防入侵软件来保护我们的服务器。
二、fail2ban 简介
fail2ban 的官方开源仓库:https://github.com/fail2ban/fail2ban
这里引用 fail2ban 开源仓库的文档内容:
Fail2Ban 扫描日志文件
/var/log/auth.log并禁止 IP 地址进行过多失败的登录尝试。它通过更新系统防火墙规则以在可配置的时间内拒绝来自这些 IP 地址的新连接来实现这一点。Fail2Ban 开箱即用,可以读取许多标准日志文件,例如 sshd 和 Apache 的日志文件,并且可以轻松配置为读取您选择的任何日志文件,以获取您希望的任何错误。尽管 Fail2Ban 能够降低不正确的身份验证尝试率,但它无法消除弱身份验证带来的风险。如果您真的想保护服务,请将服务设置为仅使用两个因素或公共/私人身份验证机制。
简单来说,fail2ban 通过扫描日志文件获取相关错误,并通过改写 iptable 来阻止对应 IP 的连接,支持多种服务的保护。
fail2ban 提供了 docker 版本,因此安装配置也是相对简单的,下面就简要介绍一下如何在 unRAID 中安装 docker 版本的 fail2ban。
三、docker 安装
这里以 unRAID 为例,简单介绍一下安装和配置的过程,由于 unRAID 的 APP 市场中存在现有的 docker 应用,因此我们直接拉取市场应用,并填写相关配置即可。当然你也可以基于其 github 发布的源码或者 release 包自行编写 dockerfile 构建镜像。
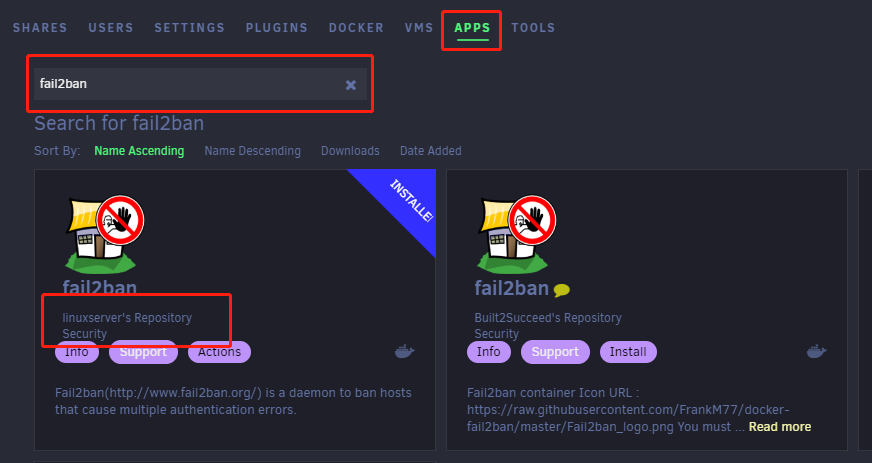
- 点击 unRAID 的 APP 按钮,进入应用市场,在搜索栏中输入 fail2ban,会出来两个应用,我们选择发布者为 linuxserver 的应用,相对安全。另一个是第三方个人构建的 docker 镜像:
- 点击安装后会跳出一个提示界面,提示当前应用将运行在特权(privilege)模式下,可能存在安全风险。由于 fail2ban 是开源的,因此放心大胆的安装吧

- 进入后是 docker 的配置界面,其实就是 docker run 的参数,填充完参数后完成创建
 如果仅仅是为了读取系统的日志,其实我们什么都不需要填写和修改,直接创建即可。但是我们也可以看到,模板中还提供了可选的、其他服务的日志监控路径的挂载配置,上图未截全,如果有对应需求的朋友可以自行配置。
 - 此时根据linuxserver的说明文档,还要手动去创建和设置一个配置文件 jail.local,否则重启容器后会丢失配置,而且默认的监控服务是被禁用的,我们直接拷贝 ta 提供的完整配置,然后手动修改其中的部分内容,并保存为 jail.local:
  [DEFAULT]

  # "bantime.increment" allows to use database for searching of previously banned ip's to increase a
  # default ban time
  bantime.increment = true

  # "bantime.maxtime" is the max number of seconds using the ban time can reach (doesn't grow further)
  bantime.maxtime = 5w

  # "bantime.factor" is a coefficient to calculate exponent growing of the formula or common multiplier
  bantime.factor = 24

  # "bantime" is the number of seconds that a host is banned.
  bantime = 1h

  # A host is banned if it has generated "maxretry" during the last "findtime"
  # seconds.
  findtime = 24h

  # "maxretry" is the number of failures before a host get banned.
  maxretry = 5

  # Prevents banning LAN subnets
  ignoreip    = 127.0.0.1/8 ::1
                10.0.0.0/8
                172.16.0.0/12
                192.168.0.0/16

  # The ban action "iptables-multiport" (default) should work for most
  # The ban action "iptables-allports" can be used if multiport causes issues
  #banaction = %(banaction_allports)s

  # Read https://github.com/sebres/PoC/blob/master/FW.IDS-DROP-vs-REJECT/README.md before changing block type
  # The block type "REJECT --reject-with icmp-port-unreachable" (default behavior) should respond to, but then instantly reject connection attempts
  # The block type "DROP" should not respond to connection attempts, resulting in a timeout
  #banaction = iptables-multiport[blocktype=DROP]

  # Add additional actions
  action  = %(action_)s
            apprise-api[host="127.0.0.1", tag="fail2ban"]
            cloudflare[cfuser="YOUR-EMAIL", cftoken="YOUR-TOKEN"]

  abuseipdb_apikey = YOUR-API-KEY

  [unraid-sshd]
  # configuration inherits from jail.d/unraid-sshd.conf
  enabled = true
  chain   = INPUT
  action  = %(known/action)s
            abuseipdb[abuseipdb_apikey="%(abuseipdb_apikey)s", abuseipdb_category="18,22"]

  [unraid-webgui]
  # configuration inherits from jail.d/unraid-webgui.conf
  enabled = true
  chain   = INPUT
  port    = http,https,YOUR-UNRAID-MY-SERVERS-WAN-PORT
  action  = %(known/action)s
            abuseipdb[abuseipdb_apikey="%(abuseipdb_apikey)s", abuseipdb_category="18,21"]

  [unifi-controller-auth]
  # configuration inherits from jail.d/unifi-controller-auth.conf
  enabled = true
  chain   = DOCKER-USER
  action  = %(known/action)s
            abuseipdb[abuseipdb_apikey="%(abuseipdb_apikey)s", abuseipdb_category="18,21"]

  [vaultwarden-auth]
  # configuration inherits from jail.d/vaultwarden-auth.conf
  enabled = true
  chain   = DOCKER-USER
  action  = %(known/action)s
            abuseipdb[abuseipdb_apikey="%(abuseipdb_apikey)s", abuseipdb_category="18,21"]
配置文件中,我们需要手动修改部分内容:
-
删除第31行行首的 “#” 取消注释,按照其说明,默认的封禁 action 是 iptables-multiport,但是不知道为什么,我这边使用默认的封禁 action 时无法生效,因此我将这行注释取消,使用 iptables-allports 封禁所有端口
-
在 39 ~ 40 行中定义了三种 action,后面两种是推送消息的,如果有需要可以自行配置一下,如果不需要则在第 40 和 41 行的行首分别加上 “#” 即可
-
从 45 行开始,就是各个待监控的服务,每个服务都以
[xxxxxx]开头,默认配置中添加了[unifi-controller-auth]和[vaultwarden-auth]的监控,如果不需要可以直接删除,并且默认的监控配置中,action 还额外增加了一条 abuseipdb 的配置,如果没有的,也可以直接将 abuseipdb 这行删除,保留默认的action = %(known/action)s即可。 -
如果需要添加其他的服务监控,可以从 docker 本身配置中复制过来,路径为
/mnt/user/appdata/fail2ban/fail2ban/jail.d下面有各个服务独立的 conf 文件,我们以 gitlab.conf 为例。直接复制粘贴到 jail.local 中即可,将 enable 修改为 true,logpath 中的 /gitlab/xxxx 修改为 docker 配置界面中的挂载路径即可:## Version 2022/08/06 # Fail2Ban jail configuration for gitlab [gitlab] enabled = false port = http,https logpath = %(logs_path)s/gitlab/gitlab-rails/application.log
- 将 jail.local 拷贝到 unRAID 的目录中
/mnt/user/appdata/fail2ban/fail2ban/jail.d,重启 docker。
四、fail2ban-client 命令和效果测试
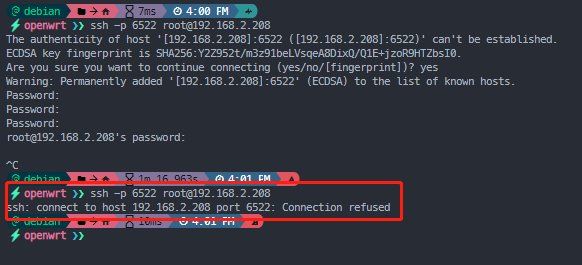
可以看到在输错几次密码后,ssh 连接直接被拒绝了。我们进 fail2ban 的控制台中看一下封禁状态 fail2ban-client status <服务名称>:

我这边开了7个监控服务,刚才被封禁的是 unraid-sshd,我们在看一下详细的监控服务状态:
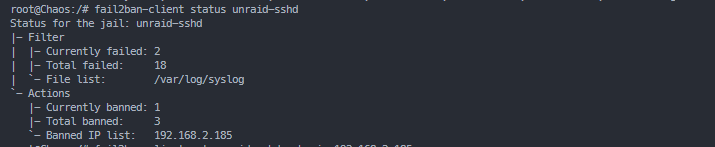
列出了当前服务失败次数和总次数,以及当前封禁的 ip 数量和总 ip 数量,并列举出了被封禁的详细 ip。
我们可以通过 fail2ban-client set <服务名称> unbanip <被封禁的 IP 地址> 来取消封禁:
