一.建议配置
1 软硬件环境建议配置
1.1 Linux 操作系统版本要求
CentOS 7.0 及以上
1.2 服务器建议配置
Linkis 支持运行在 Intel x86-64 架构的 64 位通用硬件服务器平台。对生产环境的服务器硬件配置有以下建议:

注意:
- 以上建议配置为部署 Linkis的最低配置,生产环境强烈推荐使用更高的配置
- 硬盘大小配置建议 50GB+ ,注意:系统盘和数据盘分开
1.3 软件要求
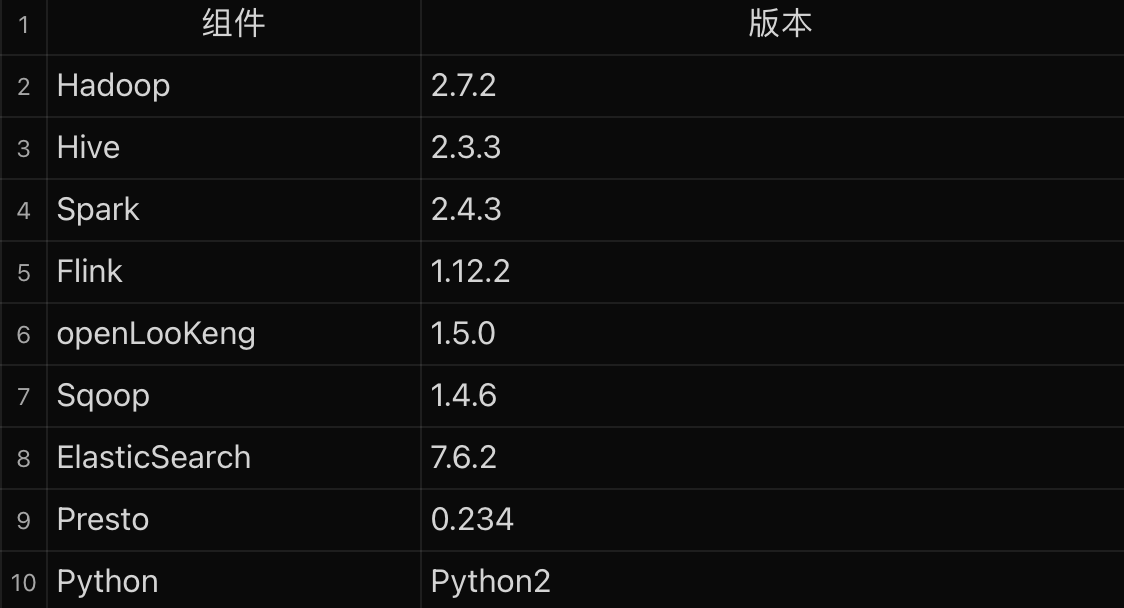
注意: 如果本地安装组件版本与上述不一致,需要进行修改对应组件版本,自行编译二进制包进行安装。
但一般是向下兼容,我这里的hadoop是3.0.1,也安装成功了。
1.4 客户端 Web 浏览器要求
Linkis推荐 Chrome 73版本进行前端访问
2.3 LDAP设置(暂时不需要)
二. 下载
1.3.2版本前后端下载地址:
https://dlcdn.apache.org/linkis/1.3.2/
包完整性校验
三. 安装部署linkis server端
1. 首次安装准备事项
1.1 Linux服务器
硬件要求

1.2 添加部署用户
部署用户:
linkis核心进程的启动用户,同时此用户会默认作为管理员权限,部署过程中会生成对应的管理员登录密码,位于conf/linkis-mg-gateway.properties文件中 Linkis支持指定提交、执行的用户。
启动引擎时会使用到部署用户
linkis主要进程服务会通过sudo -u ${linkis-user} 切换到对应用户下,然后执行对应的引擎启动命令,所以引擎linkis-engine进程归属的用户是任务的执行者(因此部署用户需要有sudo权限,而且是免密的)。
查看是否存在用户
$ id taiyi
uid=2001(taiyi) gid=2001(taiyi) groups=2001(taiyi)
$ sudo useradd taiyi -g taiyi

# 添加免密
$ vi /etc/sudoers
#免密配置
hadoop ALL=(ALL) NOPASSWD: NOPASSWD: ALL
注意:以下操作都是在(比如)taiyi用户下进行
2. 配置修改
2.1 解压
上传安装包apache-linkis-x.x.x-bin.tar.gz后,进行解压安装包
$ tar -xvf apache-linkis-x.x.x-bin.tar.gz
解压后的目录结构如下:
-rw-r--r-- 1 hadoop hadoop 518192043 Jun 20 09:50 apache-linkis-1.3.1-bin.tar.gz
drwxrwxr-x 2 hadoop hadoop      4096 Jun 20 09:56 bin
//执行环境检查和安装的脚本
drwxrwxr-x 2 hadoop hadoop      4096 Jun 20 09:56 deploy-config
// 部署时依赖的DB等环境配置信息
drwxrwxr-x 4 hadoop hadoop      4096 Jun 20 09:56 docker
drwxrwxr-x 4 hadoop hadoop      4096 Jun 20 09:56 helm
-rwxrwxr-x 1 hadoop hadoop     84732 Jan 22  2020 LICENSE
drwxr-xr-x 2 hadoop hadoop     20480 Jun 20 09:56 licenses
drwxrwxr-x 7 hadoop hadoop      4096 Jun 20 09:56 linkis-package
// 实际的软件包,包括lib/服务启动脚本工具/db的初始化脚本/微服务的配置文件等
-rwxrwxr-x 1 hadoop hadoop    119503 Jan 22  2020 NOTICE
-rw-r--r-- 1 hadoop hadoop     11959 Jan 22  2020 README_CN.md
-rw-r--r-- 1 hadoop hadoop     12587 Jan 22  2020 README.md
2.2 配置数据库信息
vim deploy-config/db.sh
### Used to store user's custom variables, user's configuration, UDFs and functions, while providing the JobHistory service
# Linkis自身业务的数据库信息
MYSQL_HOST=hostname
MYSQL_PORT=3306
MYSQL_DB=linkis
MYSQL_USER=xmanager
MYSQL_PASSWORD=XManager_360.cn


# 提供 Hive 元数据数据库的 DB 信息,如果不涉及hive引擎(或则只是简单试用),可以不配置
#主要是配合scriptis一起使用,如果不配置,会默认尝试通过$HIVE_CONF_DIR 中的配置文件获取
### Provide the DB information of Hive metadata database.
### Attention! If there are special characters like "&", they need to be enclosed in quotation marks.
HIVE_META_URL="jdbc:mysql://mysql—host:3306/hivedb?createDatabaseIfNotExist=true&useUnicode=true&characterEncoding=UTF-8&useSSL=false"
HIVE_META_USER="user"
HIVE_META_PASSWORD="password"
2.3 配置基础变量
文件位于deploy-config/linkis-env.sh
一. 部署用户
### deploy user
deployUser=taiyi
##If you don't set it, a random password string will be generated during installation
deployPwd=


二. 基础目录配置: 注意这些目录需要部署用户能够创建,
# 指定用户使用的目录路径,一般用于存储用户的脚本文件和日志文件等,是用户的工作空间。
对应的配置文件配置项为  wds.linkis.filesystem.root.path(linkis.properties)
### Specifies the user workspace, which is used to store the user's script files and log files.
### Generally local directory, path mode can be [file://] or [hdfs://]
# 注意以下配置:hdfs://后不用跟具体server信息,逻辑是:linkis识别协议(hdfs://),然后创建路径
WORKSPACE_USER_ROOT_PATH=hdfs:///tmp/linkis

# 结果集日志等文件路径,用于存储Job的结果集文件(分布式的一定是hdfs://)
wds.linkis.filesystem.hdfs.root.path(linkis.properties)
HDFS_USER_ROOT_PATH=hdfs:///tmp/linkis

# 结果集日志等文件路径,用于存储Job的结果集文件
wds.linkis.resultSet.store.path(linkis-cg-entrance.properties)
//如果未配置 使用HDFS_USER_ROOT_PATH的配置
RESULT_SET_ROOT_PATH=hdfs:///tmp/linkis

# 存放执行引擎的工作路径,需要部署用户有写权限的本地目录
wds.linkis.engineconn.root.dir(linkis-cg-engineconnmanager.properties)
ENGINECONN_ROOT_PATH=/home/taiyi/linkis1.3.2/back/appcom/tmp


三. Yarn的ResourceManager的地址
如果需要使用Spark引擎 则需要配置
##YARN REST URL  spark engine required
# Active resourcemanager address needed. Recommended to add all ha addresses. eg YARN_RESTFUL_URL="http://127.0.0.1:8088;http://127.0.0.2:8088"
YARN_RESTFUL_URL="http://hostname:8888"


四. 基础组件环境信息
可以通过用户的系统环境变量配置, 如果已经配置了系统环境变量,
deploy-config/linkis-env.sh配置文件中可以不进行配置 直接注释掉。

##如果不使用Hive、Spark等引擎且不依赖Hadoop,则不需要配置以下环境变量
##############################################################
#
#    NOTICE:
#         You can also set these variables as system environment in ~/.bashrc file
# HADOOP

HADOOP_HOME=/home/taiyi/clients/hadoop-3.0.1/
HADOOP_CONF_DIR=/home/taiyi/clients/hadoop-3.0.1/etc/hadoop
HADOOP_KERBEROS_ENABLE=${

    HADOOP_KERBEROS_ENABLE:-"false"}
HADOOP_KEYTAB_PATH=${

    HADOOP_KEYTAB_PATH:-"/appcom/keytab/"}
## Hadoop env version
HADOOP_VERSION=${

    HADOOP_VERSION:-"2.7.2"}

#Hive
HIVE_HOME=/home/taiyi/clients/hive
HIVE_CONF_DIR=/home/taiyi/clients/hive/conf

#Spark
#SPARK_HOME=/appcom/Install/spark
#SPARK_CONF_DIR=/appcom/config/spark-config


五.JVM内存配置(可选)
## java application default jvm memory
export SERVER_HEAP_SIZE="512M"

六.安装目录配置(可选)
Linkis最终会被安装到此目录下,不配置默认是与当前安装包同一级目录下
##The decompression directory and the installation directory need to be inconsistent
LINKIS_HOME=/home/taiyi/linkis1.3.2/install
无hdfs模式
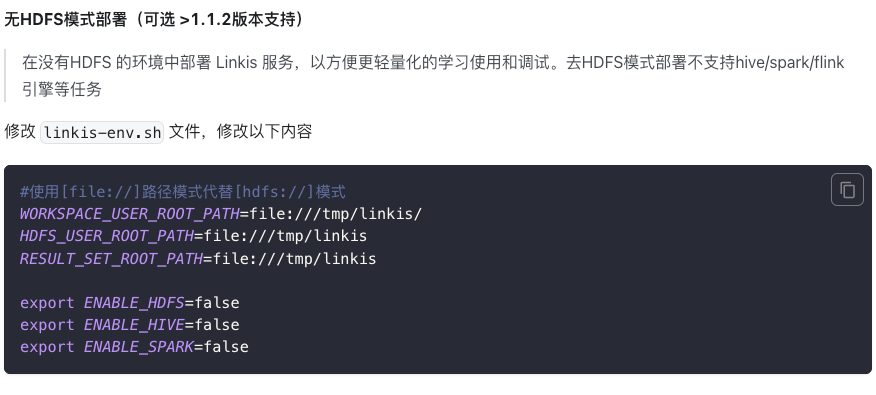
需要注意的是无HDFS模式不支持hive、spark、flink引擎等任务。
3. 安装和启动
3.1 执行安装脚本:
sh bin/install.sh
日志过程:
hadoop的版本
WARNING: log4j.properties is not found. HADOOP_CONF_DIR may be incomplete.
WARN: Your [hadoop] version is not match default support version: 2.7, there may be compatibility issues:
 1: Continue installation, there may be compatibility issues
 2: Exit installation
 other: exit
这里搭建的hadoop版本是3.0.1,我选择了继续安装,发现linkis能够与之适配。
初始化数据库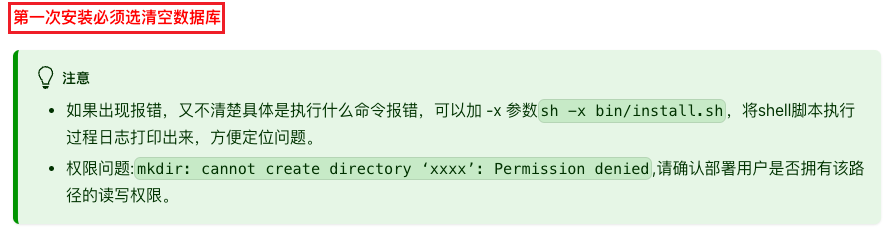
执行成功提示如下:
`Congratulations! You have installed Linkis 1.0.3 successfully, please use sh /data/Install/linkis/sbin/linkis-start-all.sh to start it!
Your default account password is [hadoop/5e8e312b4]`
3.2 添加mysql驱动包
下载mysql驱动 以5.1.49版本为例:下载链接
拷贝mysql 驱动包至lib包下
cp mysql-connector-java-5.1.49.jar  ${

    LINKIS_HOME}/lib/linkis-spring-cloud-services/linkis-mg-gateway/
cp mysql-connector-java-5.1.49.jar  ${

    LINKIS_HOME}/lib/linkis-commons/public-module/
3.3 配置调整(略)
3.4 启动服务
sh sbin/linkis-start-all.sh
3.5 安装后配置的修改或重新安装
安装完成后,如果需要修改配置(因端口冲突或者某些配置有问题需要调整配置)
- 可以重新执行安装
- 或则修改对应服务的配置${LINKIS_HOME}/conf/*properties文件后,重启对应的服务,如:sh sbin/linkis-daemon.sh start ps-publicservice。
3.6 检查服务是否正常启动
访问eureka服务页面(http://eurekaip:20303), 默认会启动6个 Linkis 微服务,其中下图linkis-cg-engineconn服务为运行任务才会启动。
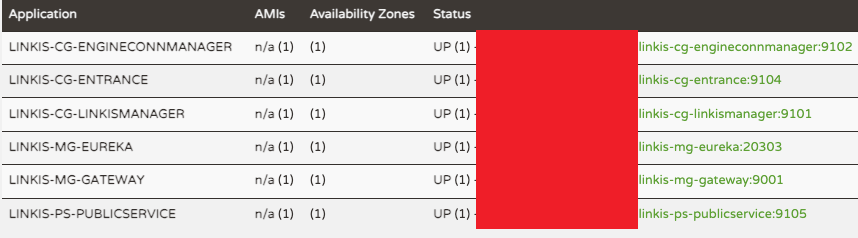
LINKIS-CG-ENGINECONNMANAGER 引擎管理服务
LINKIS-CG-ENTRANCE  计算治理入口服务
LINKIS-CG-LINKISMANAGER  计算治理管理服务
LINKIS-MG-EUREKA        微服务注册中心服务
LINKIS-MG-GATEWAY  网关服务
LINKIS-PS-PUBLICSERVICE 公共服务

注意:在 Linkis 1.3.1 中已将 LINKIS-PS-CS、LINKIS-PS-DATA-SOURCE-MANAGER、
LINKIS-PS-METADATAMANAGER服务合并到LINKIS-PS-PUBLICSERVICE,
将LINKIS-CG-ENGINEPLUGIN服务合并到LINKIS-CG-LINKISMANAGER。
如果有服务未启动,可以在对应的log/${服务名}.log文件中查看详细异常日志。
四. 验证linkis server基础功能
1. 执行命令
#引擎的engineType 拼接的版本号,一定要与实际的相匹配,以下示例是默认的版本号
#shell 引擎任务
sh bin/linkis-cli -submitUser  taiyi  -engineType shell-1 -codeType shell  -code "whoami"

#hive引擎任务
sh bin/linkis-cli -submitUser  taiyi  -engineType hive-2.3.3  -codeType hql  -code "show tables"

#spark引擎任务
sh bin/linkis-cli -submitUser  taiyi  -engineType spark-2.4.3 -codeType sql  -code "show tables"

#python引擎任务
sh bin/linkis-cli -submitUser  taiyi  -engineType python-python2 -codeType python  -code 'print("hello, world!")'
2. hive任务
#hive引擎任务
sh bin/linkis-cli -submitUser  taiyi  -engineType hive-2.3.3  -codeType hql  -code "show tables"
报错一
提交hive任务时报错:

涉及到三个组件报错

9101: gateway
9102:cg-engineconnmanager
9104:cg-entrance
查看堆栈信息
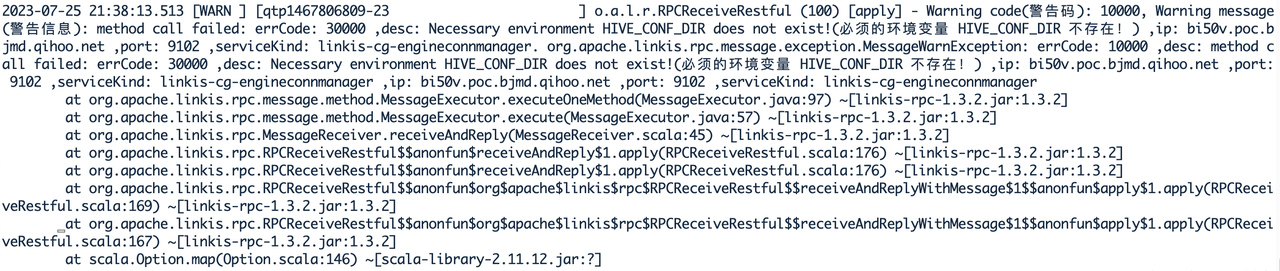
配置hive相关环境变量,注意配置好环境变量之后要记得重启服务,否则还是无法生效。
报错二:类找不到
报如下错误:ClassNotFoundException,JDOPersistenceManagerFactory,com.hadoop.compression.lzo.LzoCodec,JDOQLTypedQuery
问题描述:提交hql脚本出现如下错误:
Caused by: org.apache.hadoop.hive.metastore.api.MetaException: Class org.datanucleus.api.jdo.JDOPersistenceManagerFactory was not found.
        at org.apache.hadoop.hive.metastore.RetryingHMSHandler.<init>(RetryingHMSHandler.java:83) ~[hive-exec-2.3.3.jar:2.3.3]
        at org.apache.hadoop.hive.metastore.RetryingHMSHandler.getProxy(RetryingHMSHandler.java:92) ~[hive-exec-2.3.3.jar:2.3.3]
        at org.apache.hadoop.hive.metastore.HiveMetaStore.newRetryingHMSHandler(HiveMetaStore.java:6893) ~[hive-exec-2.3.3.jar:2.3.3]
        at org.apache.hadoop.hive.metastore.HiveMetaStoreClient.<init>(HiveMetaStoreClient.java:164) ~[hive-exec-2.3.3.jar:2.3.3]
        at org.apache.hadoop.hive.ql.metadata.SessionHiveMetaStoreClient.<init>(SessionHiveMetaStoreClient.java:70) ~[hive-exec-2.3.3.jar:2.3.3]
        at sun.reflect.NativeConstructorAccessorImpl.newInstance0(Native Method) ~[?:1.8.0_144]
        at sun.reflect.NativeConstructorAccessorImpl.newInstance(NativeConstructorAccessorImpl.java:62) ~[?:1.8.0_144]
        at sun.reflect.DelegatingConstructorAccessorImpl.newInstance(DelegatingConstructor
Caused by: java.lang.IllegalArgumentException: Compression codec com.hadoop.compression.lzo.LzoCodec not found.
        at org.apache.hadoop.io.compress.CompressionCodecFactory.getCodecClasses(CompressionCodecFactory.java:139) ~[hadoop-common-2.7.2.jar:?]
        at org.apache.hadoop.io.compress.CompressionCodecFactory.<init>(CompressionCodecFactory.java:180) ~[hadoop-common-2.7.2.jar:?]
        at org.apache.hadoop.mapred.TextInputFormat.configure(TextInputFormat.java:45) ~[hadoop-mapreduce-client-core-2.7.2.jar:?]
        at sun.reflect.NativeMethodAccessorImpl.invoke0(Native Method) ~[?:1.8.0_144]
        at sun.reflect.NativeMethodAccessorImpl.invoke(NativeMethodAccessorImpl.java:62) ~[?:1.8.0_144]
        at sun.reflect.DelegatingMethodAccessorImpl.invoke(DelegatingMethodAccessorImpl.java:43) ~[?:1.8.0_144]
        at java.lang.reflect.Method.invoke(Method.java:498) ~[?:1.8.0_144]
        at org.apache.hive.common.util.ReflectionUtil.setJobConf(ReflectionUtil.java:112) ~[hive-common-2.3.3.jar:2.3.3]
        at org.apache.hive.common.util.ReflectionUtil.setConf(ReflectionUtil.java:103) ~[hive-common-2.3.3.jar:2.3.3]
        at org.apache.hive.common.util.ReflectionUtil.newInstance(ReflectionUtil.java:87) ~[hive-common-2.3.3.jar:2.3.3]
        at org.apache.hadoop.hive.ql.exec.FetchOperator.getInputFormatFromCache(FetchOperator.java:215) ~[hive-exec-2.3.3.jar:2.3.3]
        at org.apache.hadoop.hive.ql.exec.FetchOperator.getNextSplits(FetchOperator.java:370) ~[hive-exec-2.3.3.jar:2.3.3]
        at org.apache.hadoop.hive.ql.exec.FetchOperator.getRecordReader(FetchOperator.java:304) ~[hive-exec-2.3.3.jar:2.3.3]
        at org.apache.hadoop.hive.ql.exec.FetchOperator.getNextRow(FetchOperator.java:459) ~[hive-exec-2.3.3.jar:2.3.3]
        at org.apache.hadoop.hive.ql.exec.FetchOperator.pushRow(FetchOperator.java:428) ~[hive-exec-2.3.3.jar:2.3.3]
        at org.apache.hadoop.hive.ql.exec.FetchTask.fetch(FetchTask.java:147) ~[hive-exec-2.3.3.jar:2.3.3]
        at org.apache.hadoop.hive.ql.Driver.getResults(Driver.java:2208) ~[hive-exec-2.3.3.jar:2.3.3]
        ... 49 more
[Linkis-Default-Scheduler-Thread-1] org.apache.hadoop.hive.metastore.RetryingHMSHandler
204 invokeInternal - java.lang.NoClassDefFoundError:
javax/jdo/JDOQLTypedQuery
解决方案:
把hive安装目录下的lib:
datanucleus-api-jdo-4.2.4.jar、datanucleus-rdbms-4.1.19.jar、javax.jdo-3.2.0-m3.jar
cp -f  /home/taiyi/clients/hive/lib/datanucleus-*        /home/taiyi/linkis1.3.2/install/lib/linkis-engineconn-plugins/hive/dist/2.3.3/lib
cp /home/taiyi/clients/hive/lib/javax.jdo-3.2.0-m3.jar       /home/taiyi/linkis1.3.2/install/lib/linkis-engineconn-plugins/hive/dist/2.3.3/lib
重启engineconn:,需要重启所有的linkis组件才能生效.
3. spark任务
#spark引擎任务
sh bin/linkis-cli -submitUser  taiyi  -engineType spark-2.4.3 -codeType sql  -code "show tables"

没有找到mysql驱动

下载驱动mysql-connector-java-5.1.49.jar,放入lib中
{

    linkis_install_home}/lib/linkis-engineconn-plugins/spark/dist/2.4.3/lib
重启生效。
五. 安装linkis前端
web端是使用nginx作为静态资源服务器的,访问请求流程是:
Linkis管理台请求->nginx ip:port->linkis-gateway ip:port-> 其他服务
1. 下载
tar -xvf apache-linkis-x.x.x-web-bin.tar.gz
2. 配置
#URL of the backend service of linkis-mg-gateway
linkis_url=http://hostname:9001

#linkis ip address,the http access address for linkis-web will be http://${linkis_ipaddr}:${linkis_port}
linkis_ipaddr=hostname
linkis_port=8188
3. 执行部署脚本
# nginx 需要sudo权限进行安装
sudo sh install.sh
4. 调试nginx
安装后,linkis的nginx配置文件默认是 在/etc/nginx/conf.d/linkis.conf ,如下配置
        server {


            listen       8188;# 访问端口 如果端口被占用,则需要修改
            server_name  hostname;
            #charset koi8-r;
            #access_log  /var/log/nginx/host.access.log  main;
            location / {


            root   /home/taiyi/linkis1.3.2/linkis-web/dist; # 静态文件目录
            index  index.html index.html;
            }
            location /ws {


            proxy_pass http://hostnmae:9020;#后端Linkis的地址?
            proxy_http_version 1.1;
            proxy_set_header Upgrade $http_upgrade;
            proxy_set_header Connection upgrade;
            }

            location /api {


            proxy_pass http://hostnam:9001; #gateway的地址
            proxy_set_header Host $host;
            proxy_set_header X-Real-IP $remote_addr;
            proxy_set_header x_real_ipP $remote_addr;
            proxy_set_header remote_addr $remote_addr;
            proxy_set_header X-Forwarded-For $proxy_add_x_forwarded_for;
            proxy_http_version 1.1;
            proxy_connect_timeout 4s;
            proxy_read_timeout 600s;
            proxy_send_timeout 12s;
            proxy_set_header Upgrade $http_upgrade;
            proxy_set_header Connection upgrade;
            }

            #error_page  404              /404.html;
            # redirect server error pages to the static page /50x.html
            #
            error_page   500 502 503 504  /50x.html;
            location = /50x.html {


            root   /usr/share/nginx/html;
            }
        }
nginx的日志文件在 /var/log/nginx/access.log 和/var/log/nginx/error.log
4.1 Permission denied
nginx 报错 [error] 16935#0: *5 "/home/taiyi/linkis1.3.2/linkis-web/dist/index.html" is forbidden (13: Permission denied),
这里的问题是:
nginx的启动用户(root)与linkis前端的启动用户不同导致的,修改/etc/nginx/nginx.conf
user taiyi;
检查并重新导入
[root@localhost hc]# nginx -t
nginx: the configuration file /etc/nginx/nginx.conf syntax is ok
nginx: configuration file /etc/nginx/nginx.conf test is successful
[root@localhost hc]# nginx -s reload
其他原因见:https://www.cnblogs.com/huchong/p/10031523.html
4.2. Unexpected token <
如果访问管理台出现接口502,或则Unexpected token < in JSON at position 0异常:
- 请确认linkis-mg-gateway是否正常启动
- 如果正常启动,查看nginx配置文件中配置的linkis-mg-gateway服务地址是否正确
一开始使用了配置文件的9020端口作为gateway的端口,修改为9001,重新加载配置
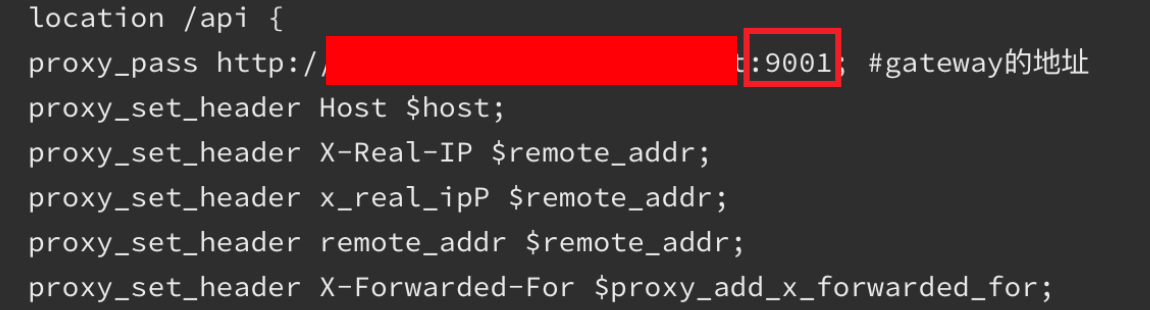
sudo nginx -s reload
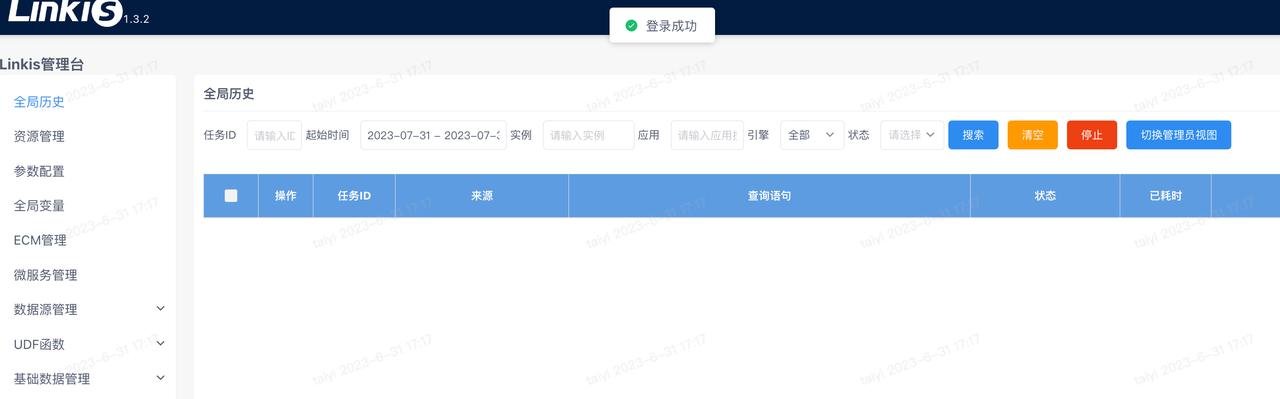
安装成功
六. linkis的问题集记录
https://docs.qq.com/doc/DUkdTTGhVSlZ0VXVt