文章目录
1. Opencv
opencv的基本图像类型可以和numpy数组相互转化,因此可以直接调用torch.from_numpy(img) 将图像转换成tensor
- 读取:
img=cv2.imread(path)
OpenCV读取图像后返回的是一个代表图像的numpy.ndarray,采用的格式是(H,W,C),通道顺序为BGR, 取值范围[0,255],dtype=uint8。
import cv2
def read_img_cv(path):
	img_cv=cv2.imread(path)
	return img_cv
- 显示:
cv2.imshow(name,img)
import cv2
def show_img_cv(img_cv):
	cv2.imshow("Image", img_cv)
	cv2.waitKey(0)  # 暂停显示图片,数字0代表按键后 0 ms执行
- 保存:
cv2.imwrite(path, img)
import cv2
def save_img_cv(img_cv,path):
	cv2.imwrite(path, img_cv)  # 保存图片
2. Matplotlib
matplotlib 是python仿照matlab绘图开发的图像绘制库。使用matplotlib绘图时,可以读取tesnor和numpy数据类型。
- 读取:
img=mpimg.imread(path)
如果是灰度图:返回(H,W)形状的数组
如果是RGB图像,返回(H, W, 3) 形状的数组,图片通道顺序为RGB
如果是RGBA图像,返回(H.W, 4) 形状的数组, 图片通道顺序为RGBA
此外,PNG 图像以浮点数组 (0-1) dtype=float32的形式返回,所有其他格式都作为 int 型数组dtype=uint8返回,位深由具体图像决定。
import matplotlib.image as mpimg
def read_img_mat(path):
	img_mat=mpimg.imread(path)
	return img_mat
- 显示:
plt.imshow(img)plt.show()
- 显示彩色图
import matplotlib.pyplot as plt
# 如果在jupyter notebook中显示,需要添加如下一行代码
%matplotlib inline

def show_img_mat(img_mat):
	plt.imshow(img_mat)
	plt.axis('off')
	plt.show()
- 显示灰度图
matplotlib显示图像,默认以三通道显示图像,我们需要在plt.imshow()里添加参数gray。
def show_img_gray(img_gray):
	plt.imshow(img_gray,cmap='gray')
	plt.axis('off')
	plt.show()
- 显示
Image类型图片
def show_img_pil(img_pil):
	plt.imshow(img_pil)
	plt.axis('off')
	plt.show()
- 保存:
plt.imsave(name,img)
def save_img_pil(img_pil,name):
	plt.imsave(name,img_pil)
3. PIL
PIL是python对于图像处理的基本库。
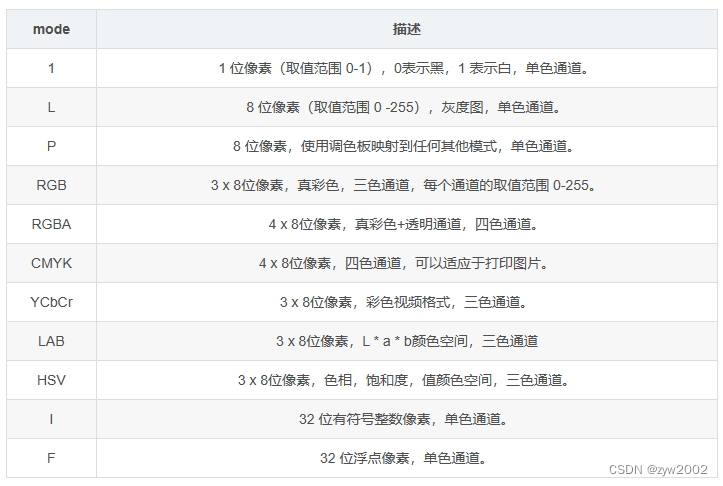
图像的模式如下图,比如1: 二值图,L灰度图,P: 8位彩色图,RGB:24位彩色图(每个通道8位)例如jpg图像,RGBA : 相比RGB多了alpha通道(不透明度)例如png图像
可以使用img.convert(mode) 转换模式。
- 读取: img=Image.open(path)
读到的是一个PIL.xxxImageFIie的类型。
import PIL
from PIL import Image
def read_img_pil(path):
	img_pil=Image.open(path) # PIL Image 类型
	return img_pil
- 显示:
image.show()
def show_img_pil(img_pil):
	img_pil.show()
- 保存:
image.save(path)
def save_img_pil(img_pil,path):
	img_pil.save(path)
4. 三者的区别和相互转换
三者的区别
- Opencv 的数据类型是
Numpy数组,通道顺序为BGR - Matplotlib 的数据类型是
Numpy数组, 通道顺序是RGB - PIL 的数据类型是
PIL.Image类,通道顺序是RGB
三种图像处理库相互转换
Opencv和Matplotlib之间的相互转换
# cv->mat
def cv2mat(img_cv):
	img_mat=cv2.cvtColor(img_cv,cv2.COLOR_BGR2RGB) # 将颜色通道从BGR改变成RGB
	# 另一种等价写法
	# img_mat=img_cv[:,:,::-1]
	return img_mat

def mat2cv(img_mat): # 将颜色通道从RGB改变成BGR
	img_cv=img_mat[:,:,::-1]
	return img_cv
Matplotlib和PIL之间的相互转换
np.asarry(img)img->array
Image.fromarray(array)array->img
# mat->PIL
#方法1:三通道的转换
def mat2PIL_RGB(img_mat):
	img_pil=Image.fromarray(img_mat.astype('uint8'))
	# unit8 是无符号的8位整形,用astype [0,255]截断处理
	# 另外一种写法
	# img_pil= Image.fromarray(np.unit8(img_mat))
	return img_pil

# 方法2: 四通道的转换
def mat2PIL_RGBA(img_mat):
	img_pil=Image.fromarray(img_mat.astype('uint8')).convert('RGB')
	return img_pil

# 方法三:使用torchvision的库函数
from torchvision import transforms
def mat2PIL_trans(img_mat):
	trans=transformers.ToPILImage()
	img_pil=trans(img_mat)
	return img_pil

'''PIL->mat'''

def PIL2mat(img_pil):
	img_mat=np.array(img_pil) # 深拷贝
	# 如果是jpg格式,通道顺序是RGB, (H,W,3)
	# 如果是png格式,通道顺序是RGBA, (H,W,4)
	# 返回的类型均是`numpy.ndarray`, `dtype=unit8`, 取值返回[0,255]
	# 或者也可以采用浅拷贝
	# img_mat=np.asarray(img_pil)
	return img_mat

'''区间变换'''
# [0,255]->[0,1]
def PIL2mat_norm(img_pil):
	img_mat=np.asarray(img_pil)/255.0
	return img_mat
# [0,1]->[0,255]
def mat_255(img_mat):
	img_mat=(np.maximum(img_mat, 0) / img_mat.max()) * 255.0
	img_mat=np.unit8(img_mat)
Opencv和PIL之间的相互转换
# cv->PIL
#方法1:三通道的转换
def cv2PIL_RGB(img_cv):
	img_rgb = img_cv[:,:,::-1] # OpenCV 的通道顺序为 BGR, 转换成RGB
	# nparray
	img_pil= Image.fromarray(np.uint8(img_rgb))
	return img_pil

# 方法2: 四通道的转换
def cv2PIL_RGBA(img_cv):
	img_rgb = img_cv[:,:,::-1]
	img_pil=Image.fromarray(img_rgb.astype('uint8')).convert('RGB')
	return img_pil

# 方法三:使用torchvision的库函数
from torchvision import transforms
def cv2PIL_trans(img_cv):
	img_rgb = img_cv[:,:,::-1]
	trans=transformers.ToPILImage()
	img_pil=trans(img_rgb)
	return img_pil

# PIL->cv
def PIL2cv(img_pil):
	img_ary=np.array(img_pil) # 深拷贝,通道顺序是 RGB, (H,W,C)
	# 或者也可以采用深拷贝
	# img_ary=np.asarray(img_pil)
	img_cv=img_ary[:,:,-1]
	return img_cv
三种格式和Tensor之间的相互转换
- numpy格式转成Tensor
import torch
def nparray2tensor(npary):
	ts=torch.from_numpy(npary)
	# 如果需要修改成浮点类型
	# ts=torch.from_numpy(npary).float()
	return ts
- PIL和numpy格式转成Tensor
可以利用torchvision 中transforms.ToTensor()
该函数可以将PIL 中的Image或者numpy.ndarray(dtype=unit8): 大小(H,W,C)、范围[0,255]转化成torch.FloatTensor: 大小(C,H,W)、范围[0.0,1.0]
from torchvision import transforms
# img_pil: Image
trans=transforms.ToTensor()
tens=trans(img_pil) # (C,H,W) [0.0,1,0]
# tens_hwc=tens.transpose((1,2,0))
5. Torchvision 中的相关转换库
5.1 ToPILImage([mode])
CLASS
torchvision.transforms.ToPILImage(mode=None)
-
功能
将tensor或ndarray转换为PIL图像——这不会缩放值。这个转换不支持torchscript。
转换形状为
C x H x W的torch.*Tensor或形状为H x W x C的numpy ndarray到PIL图像,同时保留值范围。 -
参数
mode(PIL.Image mode)输入数据的颜色空间和像素深度(可选)。mode为None时(默认)对输入数据有如下假设 :- 输入为4通道时,假设模式为RGBA。
- 如果输入为3通道,则假设为RGB模式。
- 输入为2路时,假设为LA模式。
- 如果输入有1个通道,模式由数据类型(即int、float、short)确定。
5.2 ToTensor
CLASS
torchvision.transforms.ToTensor
-
功能:
将PIL图像或ndarray转换为tensor,并相应地缩放。这个转换不支持torchscript。
转换
PIL Image或在[0,255]区间内的numpy.ndarray (H x W x C)到[0.0,1.0]区间内的torch.FloatTensor (C x H x W)。其中PIL Image属于其中一种模式(L, LA, P, I, F, RGB, YCbCr, RGBA, CMYK, 1);如果numpy.Ndarray的dtype = np.uint8
在其他情况下,张量在不缩放的情况下返回。
5.3 PILToTensor
CLASS
torchvision.transforms.PILToTensor
-
功能
将PIL图像转换为相同类型的张量-这不会缩放值。这个转换不支持torchscript。
将
PIL Image (H x W x C)转换为形状(C x H x W)的张量。