linux[armbian]环境安装
-
下载Nginx:
访问[Nginx官方网站](https://nginx.org/),在下载页面找到最新版本的Nginx。可以选择稳定版本或开发版本,然后点击相应的下载链接。 -
安装依赖项:
在安装Nginx之前,需要安装一些必要的依赖项,例如编译工具和库。对于基于Debian或Ubuntu的系统,可以使用以下命令安装依赖项:sudo apt update sudo apt install build-essential
	sudo apt install libpcre3 libpcre3-dev
	```
	- 否则,你可能遇到这样的错误
		- 错误1:HTTP rewrite module需要PCRE库。
	- 错误:make命令没有找到所需的目标'build'。
	```bash
	./configure: error: the HTTP rewrite module requires the PCRE library.
	You can either disable the module by using --without-http_rewrite_module
	option, or install the PCRE library into the system, or build the PCRE library
	statically from the source with nginx by using --with-pcre=<path> option.

	root@armbian:/usr/local/nginx# make
	make: *** No rule to make target 'build', needed by 'default'.  Stop.
	```
```bash
sudo apt install zlib1g zlib1g-dev
- 否则,你会遇到这写错误:
./configure: error: the HTTP gzip module requires the zlib library.
You can either disable the module by using --without-http_gzip_module
option, or install the zlib library into the system, or build the zlib library
statically from the source with nginx by using --with-zlib=<path> option.
-
编译成功的标志:
Configuration summary + using system PCRE library + OpenSSL library is not used + using system zlib library nginx path prefix: "/usr/local/nginx" nginx binary file: "/usr/local/nginx/sbin/nginx" nginx modules path: "/usr/local/nginx/modules" nginx configuration prefix: "/usr/local/nginx/conf" nginx configuration file: "/usr/local/nginx/conf/nginx.conf" nginx pid file: "/usr/local/nginx/logs/nginx.pid" nginx error log file: "/usr/local/nginx/logs/error.log" nginx http access log file: "/usr/local/nginx/logs/access.log" nginx http client request body temporary files: "client_body_temp" nginx http proxy temporary files: "proxy_temp" nginx http fastcgi temporary files: "fastcgi_temp" nginx http uwsgi temporary files: "uwsgi_temp" nginx http scgi temporary files: "scgi_temp" -
Nginx编译已经成功完成,并且使用了系统的PCRE库和zlib库。下面是一些重要的配置信息:
| 配置项 | 路径/文件 |
|---|---|
| Nginx路径前缀 | “/usr/local/nginx” |
| Nginx可执行文件路径 | “/usr/local/nginx/sbin/nginx” |
| Nginx模块路径 | “/usr/local/nginx/modules” |
| Nginx配置前缀 | “/usr/local/nginx/conf” |
| Nginx配置文件路径 | “/usr/local/nginx/conf/nginx.conf” |
| Nginx的pid文件路径 | “/usr/local/nginx/logs/nginx.pid” |
| Nginx错误日志文件路径 | “/usr/local/nginx/logs/error.log” |
| Nginx HTTP访问日志文件路径 | “/usr/local/nginx/logs/access.log” |
| Nginx HTTP客户端请求体临时文件目录 | “client_body_temp” |
| Nginx HTTP代理临时文件目录 | “proxy_temp” |
| Nginx HTTP FastCGI临时文件目录 | “fastcgi_temp” |
| Nginx HTTP uWSGI临时文件目录 | “uwsgi_temp” |
| Nginx HTTP SCGI临时文件目录 | “scgi_temp” |
这些路径和文件是默认配置下的设置,可以根据需要进行自定义修改。可以编辑nginx.conf文件来更改Nginx的监听端口、虚拟主机配置、代理设置等。
- 解压和编译:
- 下载完成后,将下载的Nginx压缩包解压到选择的目录中。
- 使用命令行进入解压后的目录,然后执行以下命令编译和安装Nginx:
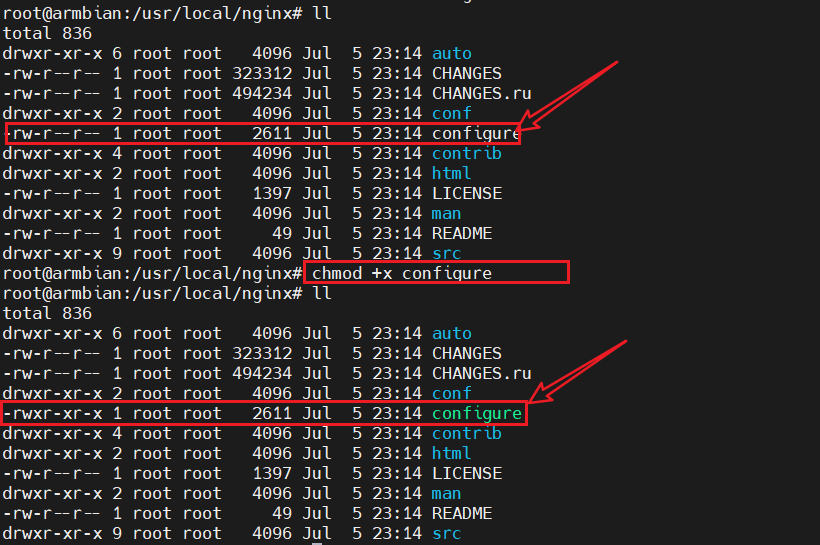
#查看文件的权限
ls -l configure
#添加执行权限
chmod +x configure
#使用sudo命令以超级用户权限运行
sudo ./configure
make
make install
-
启动Nginx:
编辑完配置文件后,使用以下命令启动Nginx(/usr/local/nginx为项目目录):sudo /usr/local/nginx/sbin/nginx -
验证安装:
打开浏览器并访问http://localhost,

常用命令
cd /usr/local/nginx/sbin/
./nginx  启动
./nginx -s stop  停止
./nginx -s quit  安全退出
./nginx -s reload  重新加载配置文件
ps aux|grep nginx  查看nginx进程
-
要停止Nginx服务器,可以使用以下命令:
- 使用
systemctl命令(适用于使用systemd的Linux系统,如Ubuntu 16.04+、CentOS 7+等):
sudo systemctl stop nginx- 或者使用Nginx自带的执行程序:
sudo /usr/local/nginx/sbin/nginx -s stop - 使用
-
如果使用的是Nginx安装包管理工具(例如apt或yum),可以使用对应的包管理命令:
使用apt(适用于Ubuntu/Debian):
sudo apt-get remove nginx- 使用yum(适用于CentOS/RHEL):
sudo yum remove nginx
遇到的问题和解决方法
问题一:conf/koi-win复制错误
root@armbian:/usr/local/nginx# make install
make -f objs/Makefile install
make[1]: Entering directory '/usr/local/nginx'
test -d '/usr/local/nginx' || mkdir -p '/usr/local/nginx'
test -d '/usr/local/nginx/sbin' \
        || mkdir -p '/usr/local/nginx/sbin'
test ! -f '/usr/local/nginx/sbin/nginx' \
        || mv '/usr/local/nginx/sbin/nginx' \
                '/usr/local/nginx/sbin/nginx.old'
cp objs/nginx '/usr/local/nginx/sbin/nginx'
test -d '/usr/local/nginx/conf' \
        || mkdir -p '/usr/local/nginx/conf'
cp conf/koi-win '/usr/local/nginx/conf'
cp: 'conf/koi-win' and '/usr/local/nginx/conf/koi-win' are the same file
make[1]: *** [objs/Makefile:1212: install] Error 1
make[1]: Leaving directory '/usr/local/nginx'
make: *** [Makefile:13: install] Error 2
- 复制
conf/koi-win文件时目标文件路径和源文件路径相同导致的。 - Nginx在编译安装时,并不需要复制
conf/koi-win文件,因此这个错误并不会影响Nginx的安装和运行。这可能是在编译过程中出现的一个小问题,通常不会影响Nginx的正常使用。
解决方法
可以尝试通过以下步骤绕过这个错误:
-
使用
sudo make命令编译Nginx,而不要使用sudo make install。 -
编译成功后,手动将编译生成的
objs/nginx二进制文件复制到/usr/local/nginx/sbin/nginx路径中。 -
手动创建Nginx配置文件目录
/usr/local/nginx/conf,并确保在该目录下有正确的配置文件,例如nginx.conf。
以下是可能的绕过方法:
# 编译Nginx
sudo make

# 复制编译生成的二进制文件
sudo cp objs/nginx /usr/local/nginx/sbin/nginx

# 创建配置文件目录(如果目录不存在)
sudo mkdir -p /usr/local/nginx/conf

# 确保在 /usr/local/nginx/conf 目录下有正确的配置文件,例如 nginx.conf

# 启动Nginx
sudo /usr/local/nginx/sbin/nginx
问题二:缺少相关的日志目录
root@armbian:/usr/local/nginx# sudo cp objs/nginx /usr/local/nginx/sbin/nginx
root@armbian:/usr/local/nginx# sudo /usr/local/nginx/sbin/nginx
nginx: [alert] could not open error log file: open() "/usr/local/nginx/logs/error.log" failed (2: No such file or directory)
2023/07/05 23:51:04 [emerg] 26667#0: open() "/usr/local/nginx/logs/access.log" failed (2: No such file or directory)
- 错误提示表明Nginx在启动时无法打开错误日志文件和访问日志文件。
解决方法
- 可能是因为在安装Nginx时缺少了相关的日志目录,或者目录的权限设置不正确。
-
创建日志目录:
首先,确保日志目录/usr/local/nginx/logs/已经存在。如果不存在,您可以使用以下命令创建该目录并设置正确的权限:sudo mkdir -p /usr/local/nginx/logs/ # 结合自己的路径进行灵活修改 sudo chown -R <your_username>:<your_group> /usr/local/nginx/logs/- 将
<your_username>和<your_group>替换为您当前用户的用户名和所属用户组。
- 将
-
检查Nginx配置文件:
- 确保您的Nginx配置文件中的错误日志和访问日志的路径正确。
- 打开Nginx的配置文件
/usr/local/nginx/conf/nginx.conf,查找并确保以下两行的路径与上面创建的日志目录相匹配:
error_log  /usr/local/nginx/logs/error.log;
access_log  /usr/local/nginx/logs/access.log;
#user nobody; worker_processes 1; #error_log logs/error.log; #error_log logs/error.log notice; #error_log logs/error.log info; #pid logs/nginx.pid; -
启动Nginx:
sudo /usr/local/nginx/sbin/nginx