Debezium日常分享系列之:定制Debezium 信号发送和通知
Debezium 2.3 在信号和通知功能方面引入了新的改进。除了 Debezium 提供的预定义信号和通知通道之外,您还可以设置新的信号和通知通道。此功能使用户能够自定义系统以满足他们的独特需求,并将其与现有基础设施或第三方解决方案相结合。它通过精确捕获和传达信号事件并通过首选渠道触发通知,实现对数据变化的有效监控和主动响应。
Debezium日常分享系列之:Debezium 信号发送和通知 - 第 1 部分
一、自定义信号和通知通道
在 Debezium 中,可以自定义信号和通知通道以满足特定要求。例如,我们可以通过为信号和通知创建 HTTP 通道来实现自定义。此 HTTP 通道从 http 端点接收信号,并且可以在信号传送后将通知发送回端点。
让我们探索一个示例,演示如何使用 Debezium Postgres 连接器、发送信号的模拟服务器以及通过 http 端点接收通知的 Postbin 来创建和利用 HTTP 信号和通知通道。
设置 HTTP 信号通道:
- 将 Debezium Postgres 连接器配置为在发生相关数据库更改时接收信号。
- 设置服务以使用 HTTP 通道向 Debezium 发送信号。该服务可以是数据库、第三方应用程序或任何其他可以发送 http 请求的系统。在此示例中,我们将使用模拟服务器向 Debezium 发送信号。 Mock Server 是一个可用于模拟 http 请求和响应的服务。
- 配置模拟服务器以使用适当的 HTTP 方法(例如 POST)通过 http 端点发送信号。
- 根据需要自定义 HTTP 通道设置以定义 http 端点 URL、身份验证、标头和任何其他参数。
设置 HTTP 通知通道:
- 一旦 Debezium 接收并处理信号,它就可以触发向 http 端点发布通知。在此示例中,我们将使用 HTTP 通道将通知发送到 Postbin bin。 Postbin是一个可以用来接收http请求并查看请求详细信息的服务。
- 自定义通知的 HTTP 通道设置,在 Postbin 中创建 bin,并根据需要定义 http 端点 URL、身份验证、标头和任何其他参数。
- 使用适当的 HTTP 方法(例如 POST)将通知事件转发到 http 端点,即 Postbin bin。可以根据需要自定义通知负载。
博客文章中此示例的完整源代码在 Debezium 示例存储库的 http-signal-notification 目录下提供。
创建一个 java 项目来构建 HTTP 信号和通知通道。运行以下命令使用 Maven 创建一个新的 java 项目:
mvn archetype:generate
    -DgroupId=io.debezium.examples
    -DartifactId=http-signaling-notification
将以下依赖项添加到 Debezium 版本(2.3 及更高版本)的 pom.xml 文件中:
<dependency>
    <groupId>io.debezium</groupId>
    <artifactId>debezium-core</artifactId>
    <version>2.3.0.Final</version>
</dependency>
要使用模拟服务器接收信号,请创建定义模拟服务器服务的 Docker Compose 文件。模拟服务器服务的配置如下:
services:
  mockServer:
    image: mockserver/mockserver:latest
    ports:
      - 1080:1080
    environment:
      - MOCKSERVER_WATCH_INITIALIZATION_JSON=true
      - MOCKSERVER_INITIALIZATION_JSON_PATH=/config/initializerJson.json
    volumes:
        - ./initializerJson.json:/config/initializerJson.json
设置环境变量 MOCKSERVER_WATCH_INITIALIZATION_JSON 和 MOCKSERVER_INITIALIZATION_JSON_PATH 以使模拟服务器能够监视初始化 JSON 文件中的更改并指定其路径。包含信号的http请求和响应信息的initializerJson.json文件被安装到模拟服务器容器中。
initializerJson.json 文件定义了一个对路径 /api/signal 的模拟 http 请求,其中查询字符串参数 code=10969。当模拟服务器收到此请求时,它将使用包含 id、类型和数据的 JSON 正文进行响应。响应的状态码为200,表示响应成功。 initializerJson.json文件的定义如下:
[
  {


    "httpRequest" : {


      "method" : "GET",
      "path" : "/api/signal",
      "queryStringParameters" : {


        "code" : ["10969"]
      }
    },
    "httpResponse" : {


      "body": "{

    \"id\":\"924e3ff8-2245-43ca-ba77-2af9af02fa07\",\"type\":\"log\",\"data\":{

    \"message\": \"Signal message received from http endpoint.\"}}",
      "statusCode": 200
    }
  }
]
- id :标识信号实例的任意唯一字符串。
- type :要发送的信号类型。在此示例中,类型为日志,它请求连接器将条目添加到连接器的日志文件中。处理信号后,连接器会在日志中打印指定的消息。
- data :传递给信号事件的 JSON 格式的参数。在此示例中,消息参数被传递给信号事件。
通过实现SignalChannelReader接口创建HTTP信号通道,如下所示:
public class HttpSignalChannel implements SignalChannelReader {


    private static final Logger LOGGER = LoggerFactory.getLogger(HttpSignalChannel.class);

    public static final String CHANNEL_NAME = "http";
    private static final List<SignalRecord> SIGNALS = new ArrayList<>();
    public CommonConnectorConfig connectorConfig;

        @Override
    public String name() {

     (1)
        return CHANNEL_NAME;
    }

    @Override
    public void init(CommonConnectorConfig connectorConfig) {

     (2)
        this.connectorConfig = connectorConfig;
    }

    @Override
    public List<SignalRecord> read() {

     (3)
        try {


            String requestUrl = "http://mockServer:1080/api/signal?code=10969";

            // send http request to the mock server
            HttpClient httpClient = HttpClient.newHttpClient();
            HttpRequest request = HttpRequest.newBuilder()
                    .uri(URI.create(requestUrl))
                    .GET()
                    .header("Content-Type", "application/json")
                    .build();

            // read the response
            HttpResponse<String> response = httpClient.send(request, HttpResponse.BodyHandlers.ofString());
           if (response.statusCode() == 200) {


               ObjectMapper mapper = new ObjectMapper();
               String responseBody = response.body();

               // parse the response body
               JsonNode signalJson = mapper.readTree(responseBody);
               Map<String, Object> additionalData = signalJson.has("additionalData") ? mapper.convertValue(signalJson.get("additionalData"), new TypeReference<>() {

    }) : new HashMap<>();
               String id = signalJson.get("id").asText();
               String type = signalJson.get("type").asText();
               String data = signalJson.get("data").toString();
               SignalRecord signal = new SignalRecord(id, type, data, additionalData);

               LOGGER.info("Recorded signal event '{}' ", signal);

               // process the signal
               SIGNALS.add(signal);
                } else {


                    LOGGER.warn("Error while reading signaling events from endpoint: {}", response.statusCode());
                }
            } catch (IOException | InterruptedException e) {


                LOGGER.warn("Exception while preparing to process the signal '{}' from the endpoint", e.getMessage());
                e.printStackTrace();
            }
        return SIGNALS;
        }

    @Override
    public void close() {

     (4)
       SIGNALS.clear();
    }
}
- name() 方法返回信号通道的名称。要使 Debezium 能够使用通道,请在连接器的 signal.enabled.channels 属性中指定名称 http。
- init() 方法可用于初始化 http 通道所需的特定配置、变量或连接。
- read() 方法从 http 端点读取信号并返回将由 Debezium 连接器处理的 SignalRecord 对象列表。
- close() 方法关闭所有分配的资源。
通过实现NotificationChannel接口创建通知通道,如下所示:
public class HttpNotificationChannel implements NotificationChannel {


    private static final Logger LOGGER = LoggerFactory.getLogger(HttpNotificationChannel.class);

    public static final String CHANNEL_NAME = "http";
    private static final String NOTIFICATION_PREFIX = "[HTTP NOTIFICATION SERVICE]";

    @Override
    public String name() {

     (1)
        return CHANNEL_NAME;
    }

    @Override
    public void init(CommonConnectorConfig config) {

     (2)
        // custom configuration
    }

    @Override
    public void send(Notification notification) {

     (3)
        LOGGER.info(String.format("%s Sending notification to http channel", NOTIFICATION_PREFIX));
        String binId = createBin();
        sendNotification(binId, notification);
    }

    private static String createBin()  {


        // Create a bin on the server
        try {


            HttpRequest request = HttpRequest.newBuilder()
                    .uri(new URI("https://www.toptal.com/developers/postbin/api/bin"))
                    .POST(HttpRequest.BodyPublishers.ofString(" "))
                    .build();

            HttpClient httpClient = HttpClient.newHttpClient();
            HttpResponse<String> response = httpClient.send(request, HttpResponse.BodyHandlers.ofString());

            if (response.statusCode() == HTTP_CREATED) {


                String binId = response.body().replaceAll(".*\"binId\":\"([^\"]+)\".*", "$1");
                LOGGER.info("Bin created: " + response.body());
                return binId;
            }
        } catch (URISyntaxException | InterruptedException | IOException e) {


            throw new RuntimeException(e);
        }
        return null;
    }

    private static void sendNotification (String binId, Notification notification) {


        // Get notification from the bin
        try {


            ObjectMapper mapper = new ObjectMapper();
            String notificationString = mapper.writeValueAsString(notification);
            HttpRequest request = HttpRequest.newBuilder()
                    .uri(new URI("https://www.toptal.com/developers/postbin/" + binId))
                    .header("Content-Type", "application/json")
                    .POST(HttpRequest.BodyPublishers.ofString(notificationString))
                    .build();

            HttpClient httpClient = HttpClient.newHttpClient();
            HttpResponse<String> response = httpClient.send(request, HttpResponse.BodyHandlers.ofString());

            if (response.statusCode() == HTTP_OK) {


                LOGGER.info("Notification received : " + response.body());
            }
        } catch (URISyntaxException | InterruptedException | IOException e) {


            throw new RuntimeException(e);
        }
    }

    @Override
    public void close() {

     (4)
    }
}
- name() 方法返回通知通道的名称。要使 Debezium 能够使用通道,请在连接器的 notification.enabled.channels 属性中指定 http。
- init() 方法可用于初始化通道所需的特定配置、变量或连接。
- send() 方法将通知发送到通道。该通知包含由 Debezium 连接器处理的 SignalRecord 对象。
- close() 方法关闭所有分配的资源。
分别在 META-INF/services 目录下的 io.debezium.pipeline.signal.SignalChannelReader 和 io.debezium.pipeline.notification.channels.NotificationChannel 文件下声明 HTTP 信号和通知通道。
编译 Java 项目并将其导出为 JAR 文件。这可以使用 Maven 或您喜欢的构建工具来完成。将 JAR 文件复制到包含要使用的 Debezium 连接器的 JAR 文件的目录。例如,如果您想要将自定义信号和通知通道与 Debezium Postgres 连接器一起使用,请将 JAR 文件复制到 /kafka/connect/debezium-connector-postgres 目录。
此示例提供了一个 Docker Compose 文件,其中定义了必要的服务,包括 Mock Server、Zookeeper、Kafka Connect 和 Postgres 数据库。
要启动服务,请运行以下命令:
export DEBEZIUM_VERSION=2.3
docker-compose up -d
确保服务已启动并正在运行,并且 Postgres 数据库已准备好接受连接后,下一步是注册连接器。这涉及创建连接器配置文件。让我们创建一个名为 register-postgres.json 的文件,其中包含以下属性:
{


  "name": "inventory-connector",
  "config": {


    "connector.class": "io.debezium.connector.postgresql.PostgresConnector",
    "tasks.max": 1,
    "database.hostname": "postgres",
    "database.port": 5432,
    "database.user": "postgres",
    "database.password": "postgres",
    "database.dbname" : "postgres",
    "topic.prefix": "dbserver1",
    "schema.include.list": "inventory",
    "signal.enabled.channels": "http", 1
    "notification.enabled.channels": "http" 2
  }
}
- signal.enabled.channels 属性指定连接器要使用的信号通道。在这种情况下,连接器使用 http 信号通道。
- notification.enabled.channels 属性指定连接器要使用的通知通道。在这种情况下,连接器使用 http 通知通道。
现在我们已经准备好了连接器配置文件,我们可以通过执行以下命令来向 Kafka Connect 注册连接器:
curl -i -X POST -H "Accept:application/json" \
    -H  "Content-Type:application/json" http://localhost:8083/connectors/ \
    -d @register-postgres.json
连接器成功注册后,您可以查看连接器日志以观察信号事件。这些日志提供了有关连接器的处理和进度的见解,包括任何与信号相关的信息。您将遇到类似于以下内容的日志消息:
Recorded signal event 'SignalRecord{id='924e3ff8-2245-43ca-ba77-2af9af02fa07', type='log', data='{

    "message":"Signal message received from http endpoint."}', additionalData={}}'    [io.debezium.examples.signal.HttpSignalChannel]
此外,您可能会注意到与发送到邮筒的通知事件相关的日志消息。例如:
[HTTP NOTIFICATION SERVICE] Sending notification to http channel   [io.debezium.examples.notification.HttpNotificationChannel]
Bin created: {

    "binId":"1688742588469-1816775151528","now":1688742588470,"expires":1688744388470}   [io.debezium.examples.notification.HttpNotificationChannel]
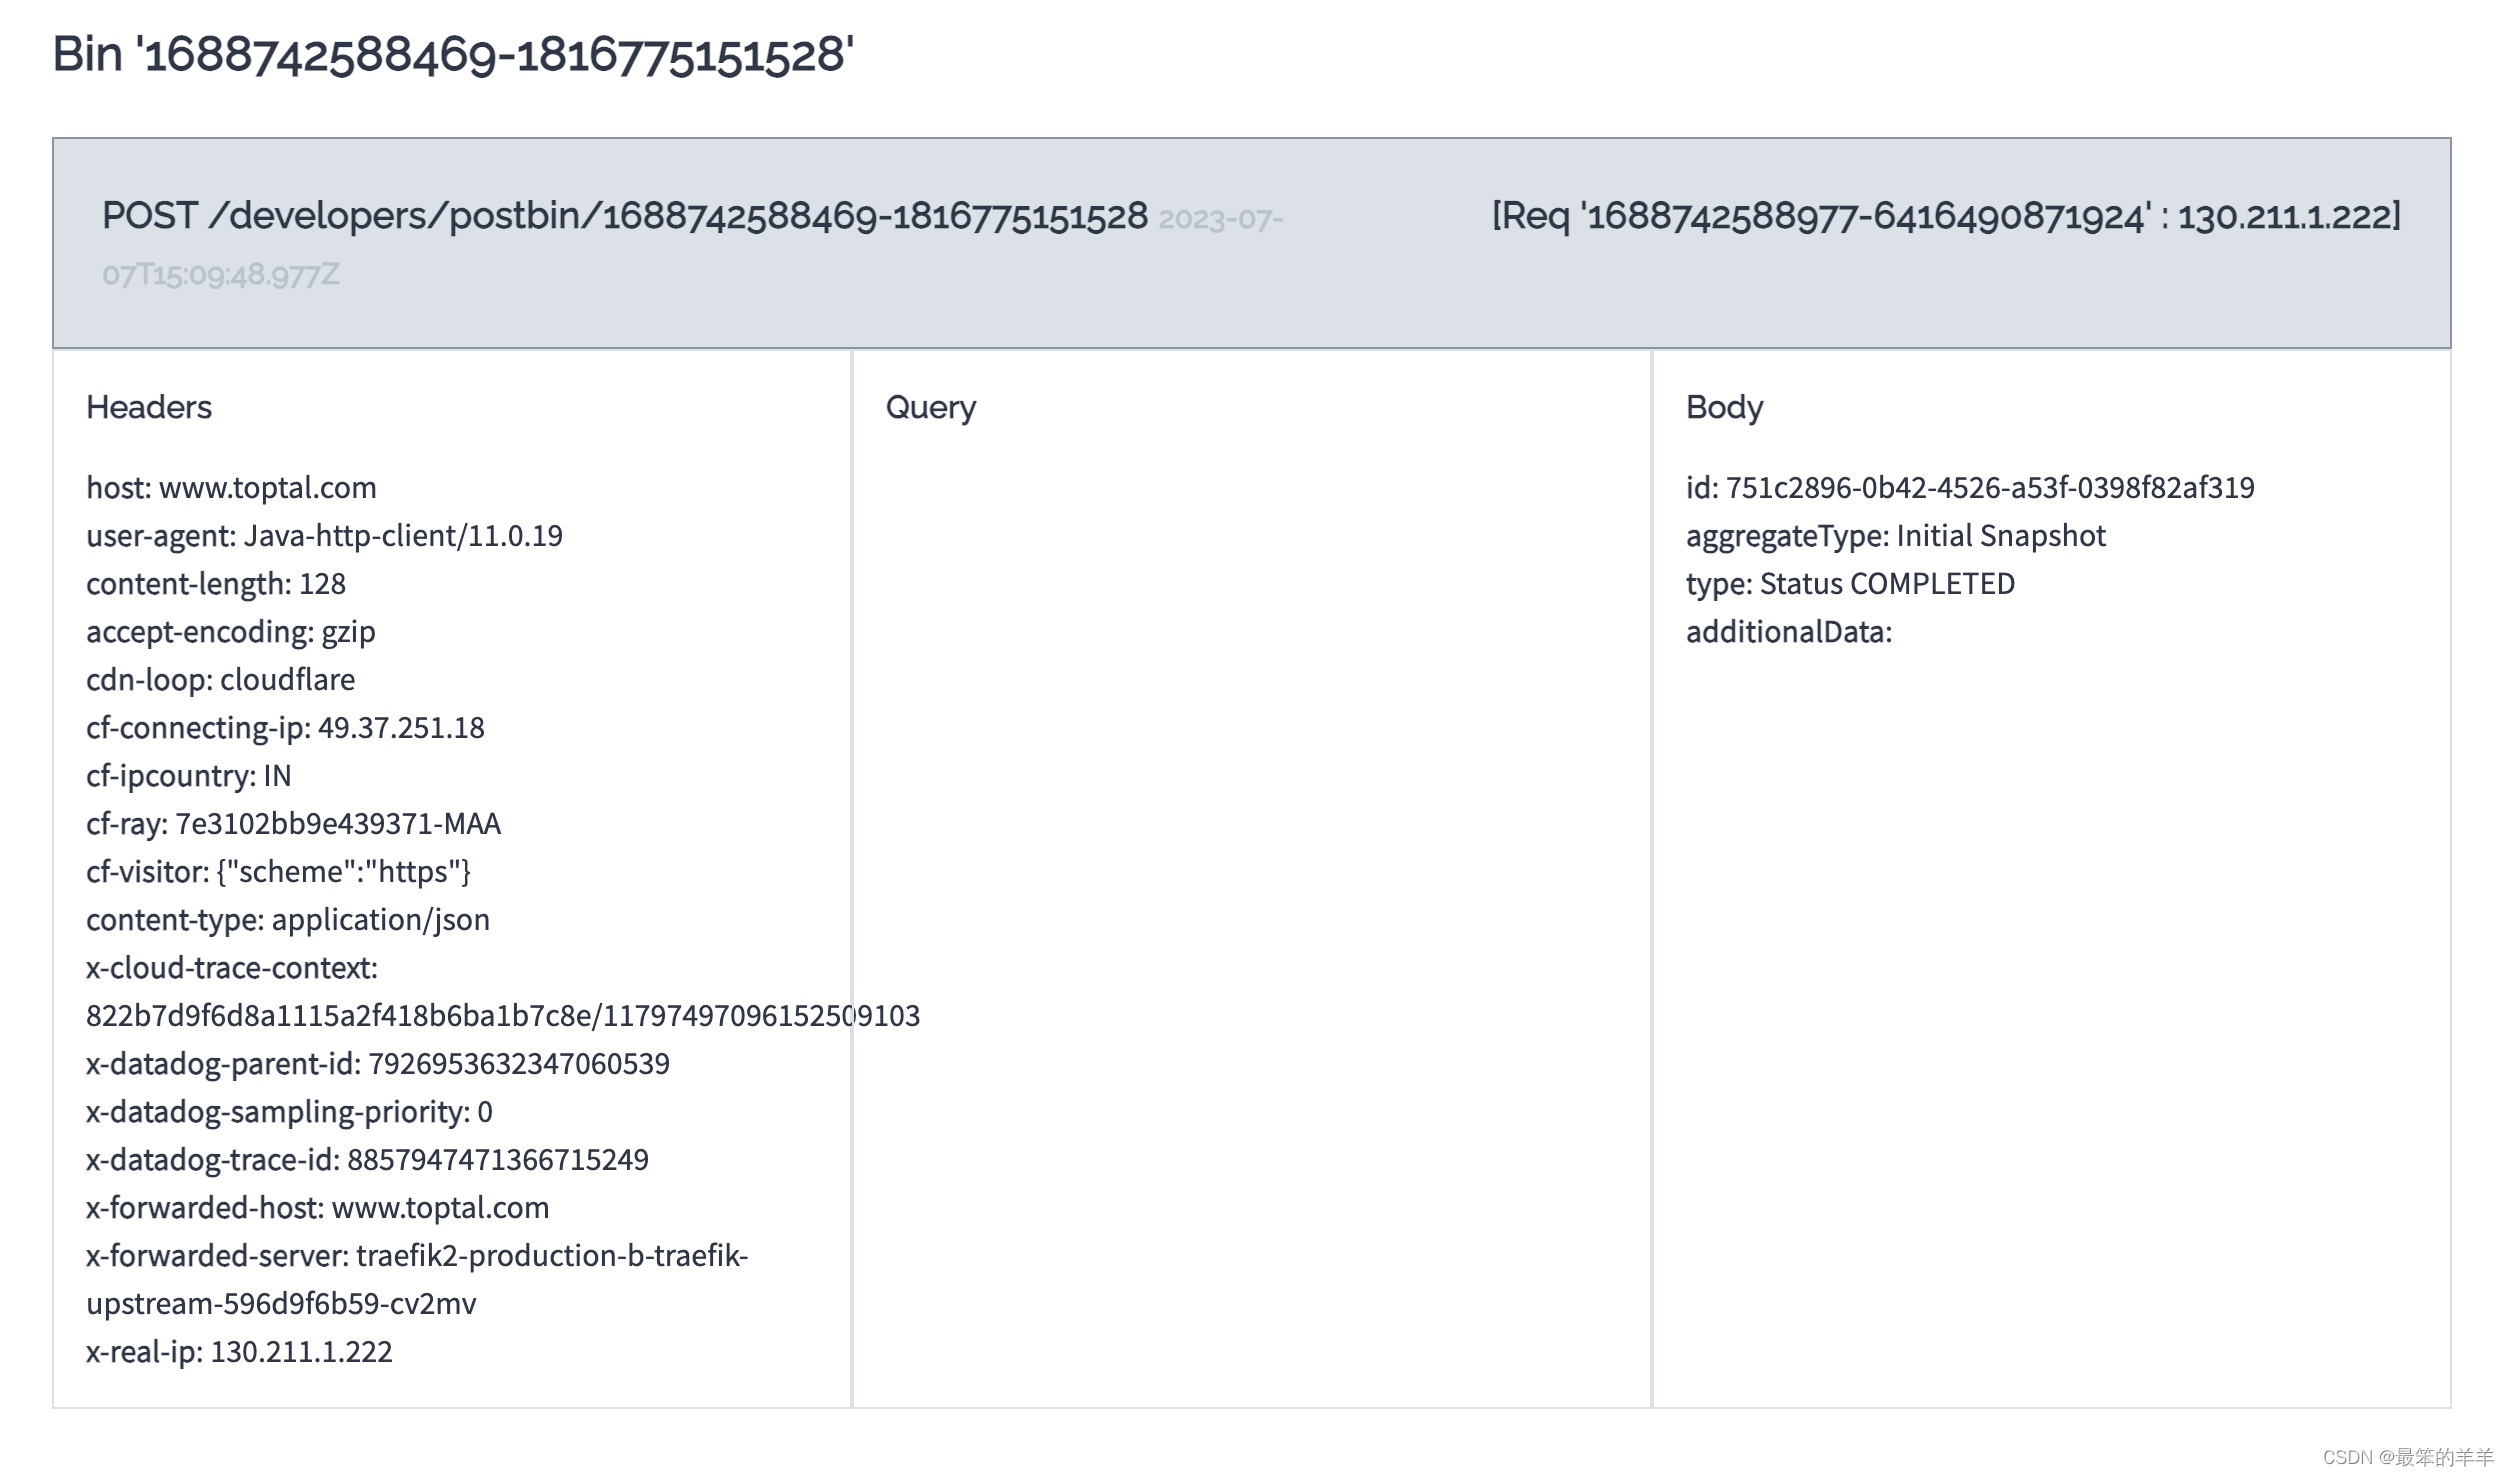
它提供有关通知事件的信息,例如创建具有唯一标识符 (binId) 的 bin 以及其他相关详细信息。要从 Postbin 检索通知事件,请从日志消息中获取 binId 并使用它从 Postbin 请求相应的通知事件。要查看通知事件,您可以使用以下 URL 访问 Postbin:https://www.toptal.com/developers/postbin/b/:binId。将 URL 中的 :binId 替换为从连接器日志中获取的实际 binId。
发送到 Postbin 的通知事件如下所示:
二、结论
在本教程中,我们探讨了如何为 Debezium 连接器创建自定义信号和通知通道。我们创建了一个自定义信号通道,用于从 HTTP 端点接收信号事件。我们还创建了一个自定义通知通道,用于将通知事件发送到 HTTP 端点。
Debezium 的综合信号和通知系统可与第三方解决方案无缝集成,使用户能够随时了解 Debezium 连接器的状态和进度。该系统的可扩展性使用户能够自定义信号和通知渠道,以满足他们的定制需求。