canvas绘制video
主要思路:
Canvas中可以使用ctx.drawImage(video, x, y,width,height)来对视频当前帧的图像进行绘制,其中video参数就是HTML5中的video标签。故我们可以通过Canvas的动态效果不断获取video当前画面,渲染到Canvas画布上。并且通过改变video标签的属性,来实现在Canvas中处理视频的一整套效果。可以理解成在Canvas中新建一个播放器,该播放器视频源是video标签创建,播放器的各种方法最终指向对video标签本身属性和方法的改变。而利用Canvas的强大功能,可以进一步进行图像处理、弹幕加载等操作。
html
<div class="videoBox">
  <img id="poster" src="http://120.77.35.150/video/video-bg.png" alt="">
  <video id="video"
    preload="auto"
    playsinline="true"
    x-webkit-airplay="true"
    webkit-playsinline="true"
    x5-video-player-type="h5"
    x-video-orientation="h5"
    x5-video-player-fullscreen="true"
    muted="false"
   src="http://120.77.35.150/video/2.mp4"></video>
  <canvas id="canvas"></canvas>
  <div id="btn">点击</div>
</div>
js
<script>
  const video = document.getElementById('video');
  const palyBtn = document.getElementById('btn');
  const canvas = document.getElementById('canvas');
  const poster = document.getElementById('poster')
  // 初始化(创建)canvas
  const ctx = canvas.getContext('2d')
  // 获取可视宽高
  const screen_W = window.innerWidth || document.body.clientWidth
  const screen_H = window.innerHeight || document.body.clientHeight
  // 设置画布宽高(画布宽高,最好是根据设计视频所做实际宽高)
  canvas.width = screen_W * 3 // 获取屏幕宽度作为canvas的宽度 这个设置的越大,画面越清晰(相当于绘制的图像大,然后被css缩小)
  canvas.height = screen_H * 3 + 12
  // 绘制视频
  palyBtn.addEventListener('touchstart', function (e) {


    e.preventDefault()
    poster.style.display = 'none'
    // 绘制背景
    ctx.fillStyle = '#000'
    ctx.fillRect(0, 0, canvas.width, canvas.height)
    ctx.drawImage(video, 0, 0, canvas.width, canvas.height);
    if (video.paused) {


      video.play()
    } else {


      video.pause()
    }
  })
  video.addEventListener('play', playCallBack)
  function playCallBack() {


    if (video.paused) {


       return;
    }
    captureFrame();
    setTimeout(playCallBack, 40);
  }
  function captureFrame() {


    ctx.drawImage(video, 0, 0, canvas.width, canvas.height)
  }
</script>
css
<style>
* {


margin: 0;
padding: 0;
}
body {


overflow: hidden;
}
.videoBox {


width: 100%;
height: 100%;
position: relative;
top: 0;
right: 0;
left: 0;
bottom: 0;
}
img {


position: absolute;
display: block;
width: 100%;
height: 100%;
}
#btn {


position: absolute;
width: 50px;
height: 50px;
background-color: #ccc;
border-radius: 50%;
bottom: 10%;
left: 50%;
transform: translateX(-50%);
line-height: 50px;
text-align: center;
}
canvas {


width: 100%;
height: 100%;
}
video {


position: absolute;
display: none;
z-index: 1;
top: 0;
left: 0;
right: 0;
bottom: 0;
width: 100%;
height: 100%;
}
</style>
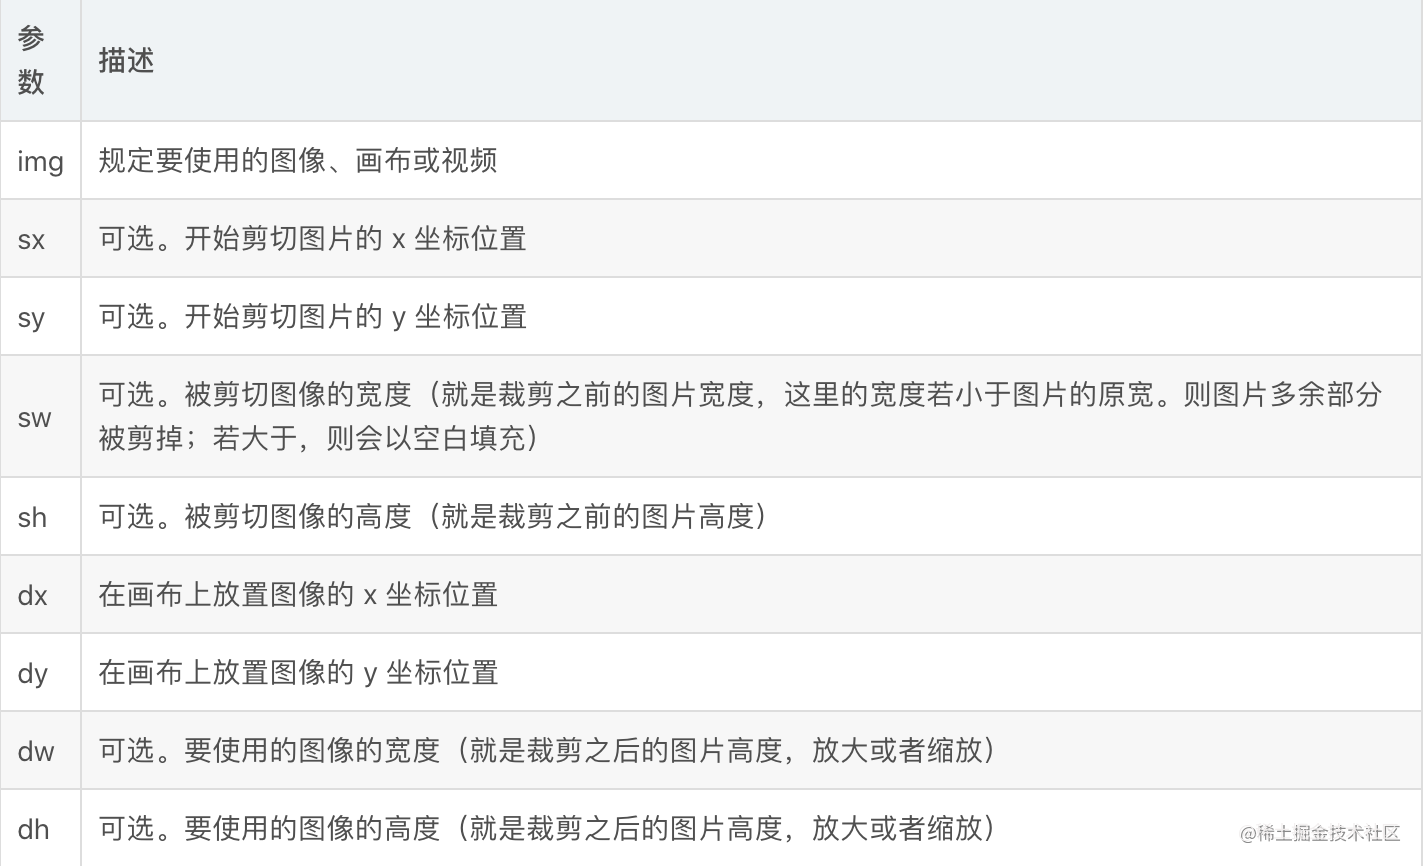
【注】drawImage
drawImage函数有三种函数原型:
drawImage(image, dx, dy) 在画布指定位置绘制原图
drawImage(image, dx, dy, dw, dh) 在画布指定位置上按原图大小绘制指定大小的图
drawImage(image, sx, sy, sw, sh, dx, dy, dw, dh) 剪切图像,并在画布上定位被剪切的部分: