文章目录
前言
本文要记录的大概内容:
上文对微服务进行了一个简单的认识和了解,本文将简单介绍一下SpringCloud及通过一个简单的案例对SpringCloud进行一个简单的入门学习。
模拟场景:
快速搭建服务提供者与服务消费者并完成两个服务之间的交互。以电影院购票为例:用户通过电影微服务系统
(服务消费者)购票,电影微服务需要调用用户微服务(服务提供者)查询用户相关信息,账户余额、是否符
合购票标准等。

提示:以下是本篇文章正文内容,下面案例可供参考
一、SpringCloud简介?
SpringCloud是在SpringBoot基础上构建的,用于快速构建分布式系统的通用模式的工具集。
使用SpringCloud开发的应用程序非常适合在Docker和PaaS上部署,所以又叫云原生应用。云原生(Cloud Native)可以理解为面向云环境的软件架构。
二、SpringCloud特点
- 约定优于/大于配置
- 适用于各种环境。开发、部署在PC Server 或者各种云环境(如阿里云、腾讯云、AWS等)均可
- 隐藏了组件的复杂性,并提供声明式、无XML的配置方式
- 开箱即用、快速搭建启动
- 轻量级的组件。Spring Cloud整合的组件大多数比较轻量级,如Eureka、Zuul等都是各自领域轻量级的实现
- 组件丰富、功能齐全。Spring Cloud为微服务架构提供了非常完整的支持,例如:配置管理、服务发现、断路器、微服务网关等
- 选型中立、丰富。例如,Spring Cloud支持使用Eureka、ZooKeeper或者Consul等实现服务发现
- 灵活。Spring Cloud的组成部分都是解耦的,开发人员可以按需灵活挑选技术选型
三、实战前提
1. 技术储备
-
SpringBoot
SpringCloud是基于SpringBoot构建的,因此它延续了SpringBoot的锲约模式以及开发方式 -
开发语言
 SpringCloud是一个基于Java语言的工具套件,所以学习它需要一定的Java基础。Spring Cloud
 支持使用Scala、Groovy等语言进行开发。
2. 开发工具
-
JDK
JDK版本需要大于等于1.8 -
IDE
使用eclipse、idea、或者Spring Tool Suite均可 -
Maven
maven的版本应该选择大于3.3.X及以上
四、编写服务消费者和提供者
1. 编写服务提供者
编写用户微服务作为服务提供者,功能:通过人员编号查询人员相关信息。服务使用Mybatis作为持久层框架,使用Mysql作为数据库。
1. 构建项目
构建项目方式除手动编写Class、yml、xml外,常用的方式有以下几种:
-
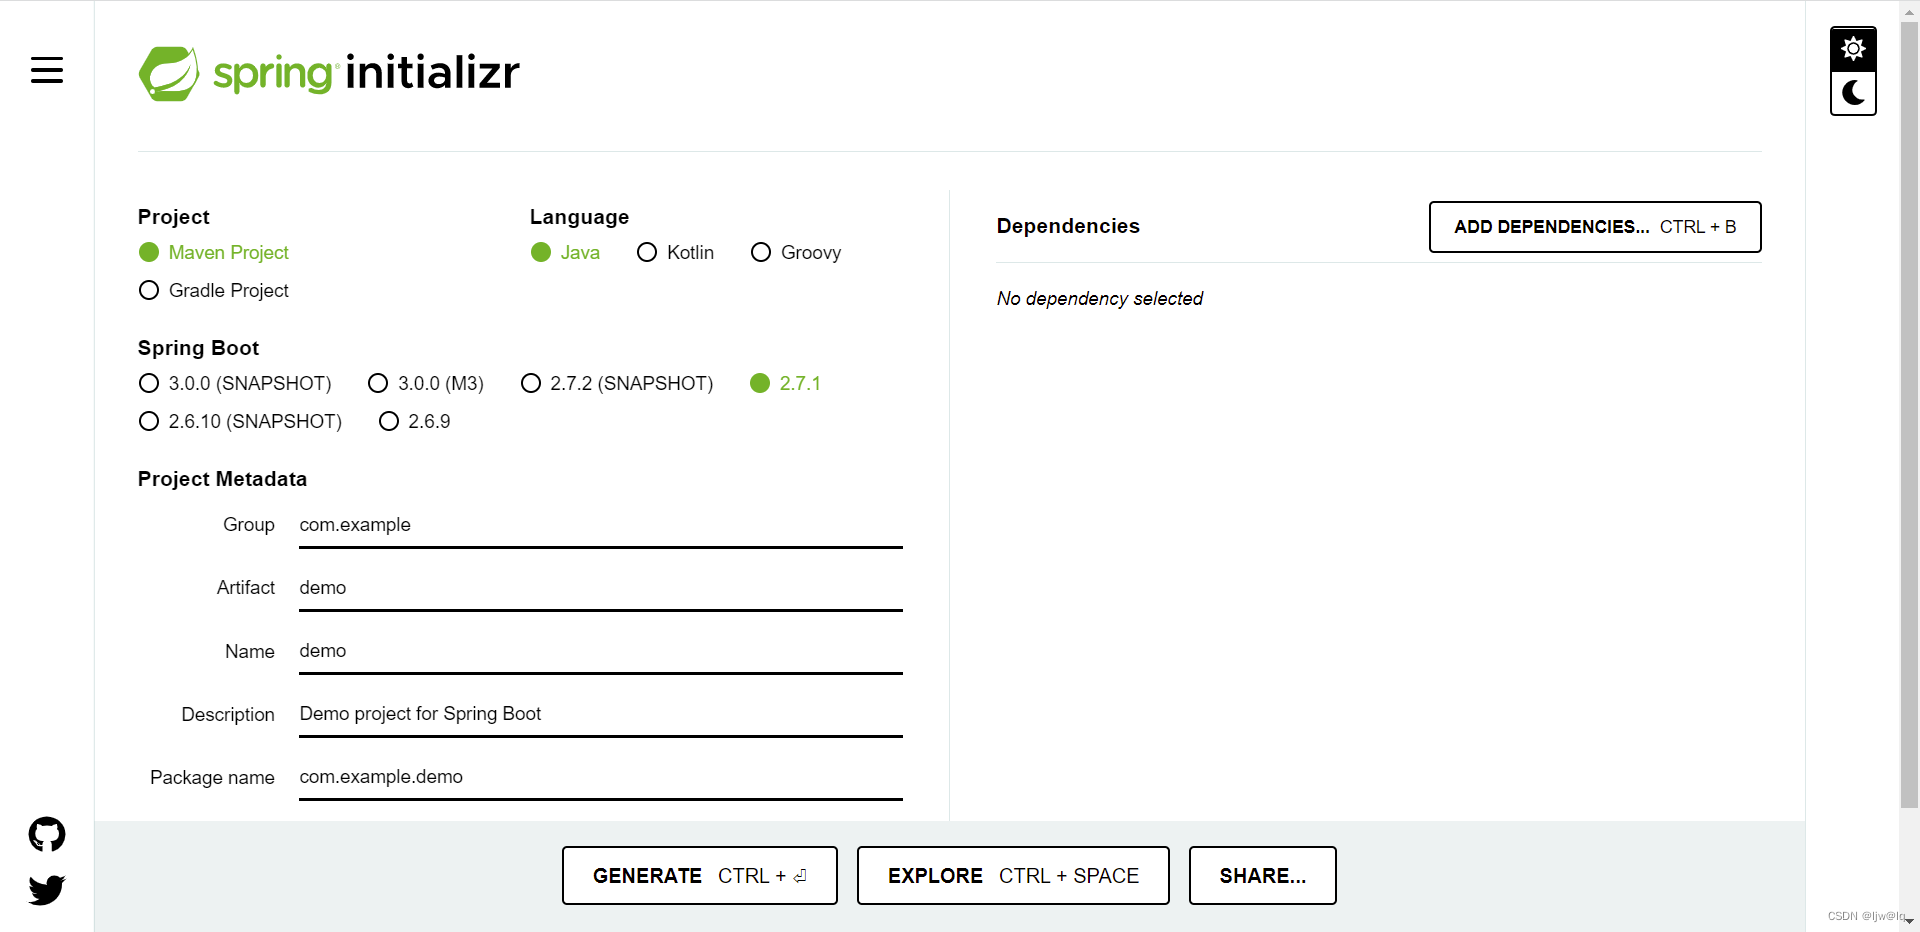
通过网页
 访问 https://start.spring.io/如下图:可以选择开发语言、版本、填写
 项目的相关信息
-
通过开发工具(本文以IDEA为例)
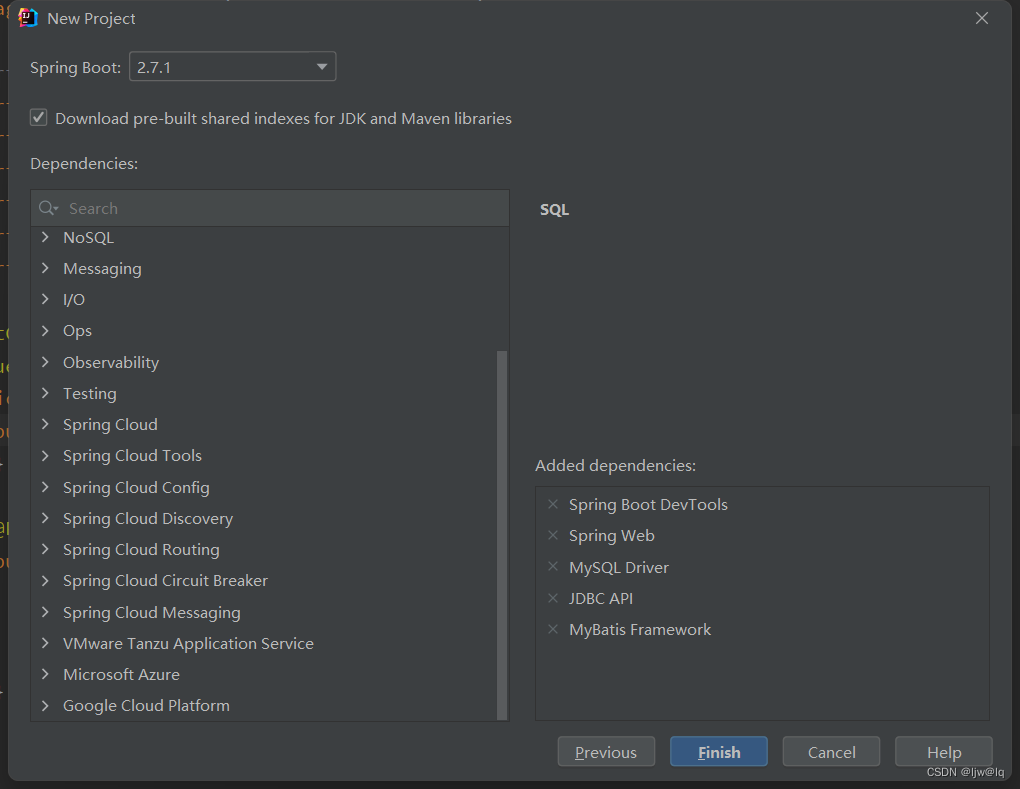
1.打开编辑器,点击导航栏File–>New–>Project,选择Spring Initializr如下图示:

项目属性说明Name:更友好的项目名,默认同Artifact保持一致 Location:项目存储位置 Language:开发语言 Type:类型,项目管理工具 Group:项目组织的唯一标识符 Artifact:项目名称 Pacjage name:包名,默认为Group+Artifact,可以手动更改。表示的main/java/目录下的包名 Project SDK:项目使用的工具包 Java:语言版本 Packing:打包方式
2.选择Next–>如下图,选择SpringBoot版本及按需选择项目依赖,右侧即是我选择的依赖包(Spring Boot DevTools提供快速应用程序重启、实时加载和配置;Spring Web使用 Spring MVC 构建 Web 应用程序,包含 RESTful 应用程序以及一些常用注解如:@Controller、@RestController;MySQL Driver提供了 MySQ 的 JDBC和 R2DBC 驱动;JDBC API 提供定义客户端如何连接、查询数据库和数据库连接API;MyBatis Framework即数据持久化框架;创建项目时未选择的依赖在项目中如若用到可以在pom.xml里灵活配置)
注意:1. 选择了MyBatis Framework其实就可以不用选JDBC API的依赖了 2. 需要配置好maven,不然依赖包会下载失败
3.点击Finish,项目就创建好了,打开pom文件报错,如下图:
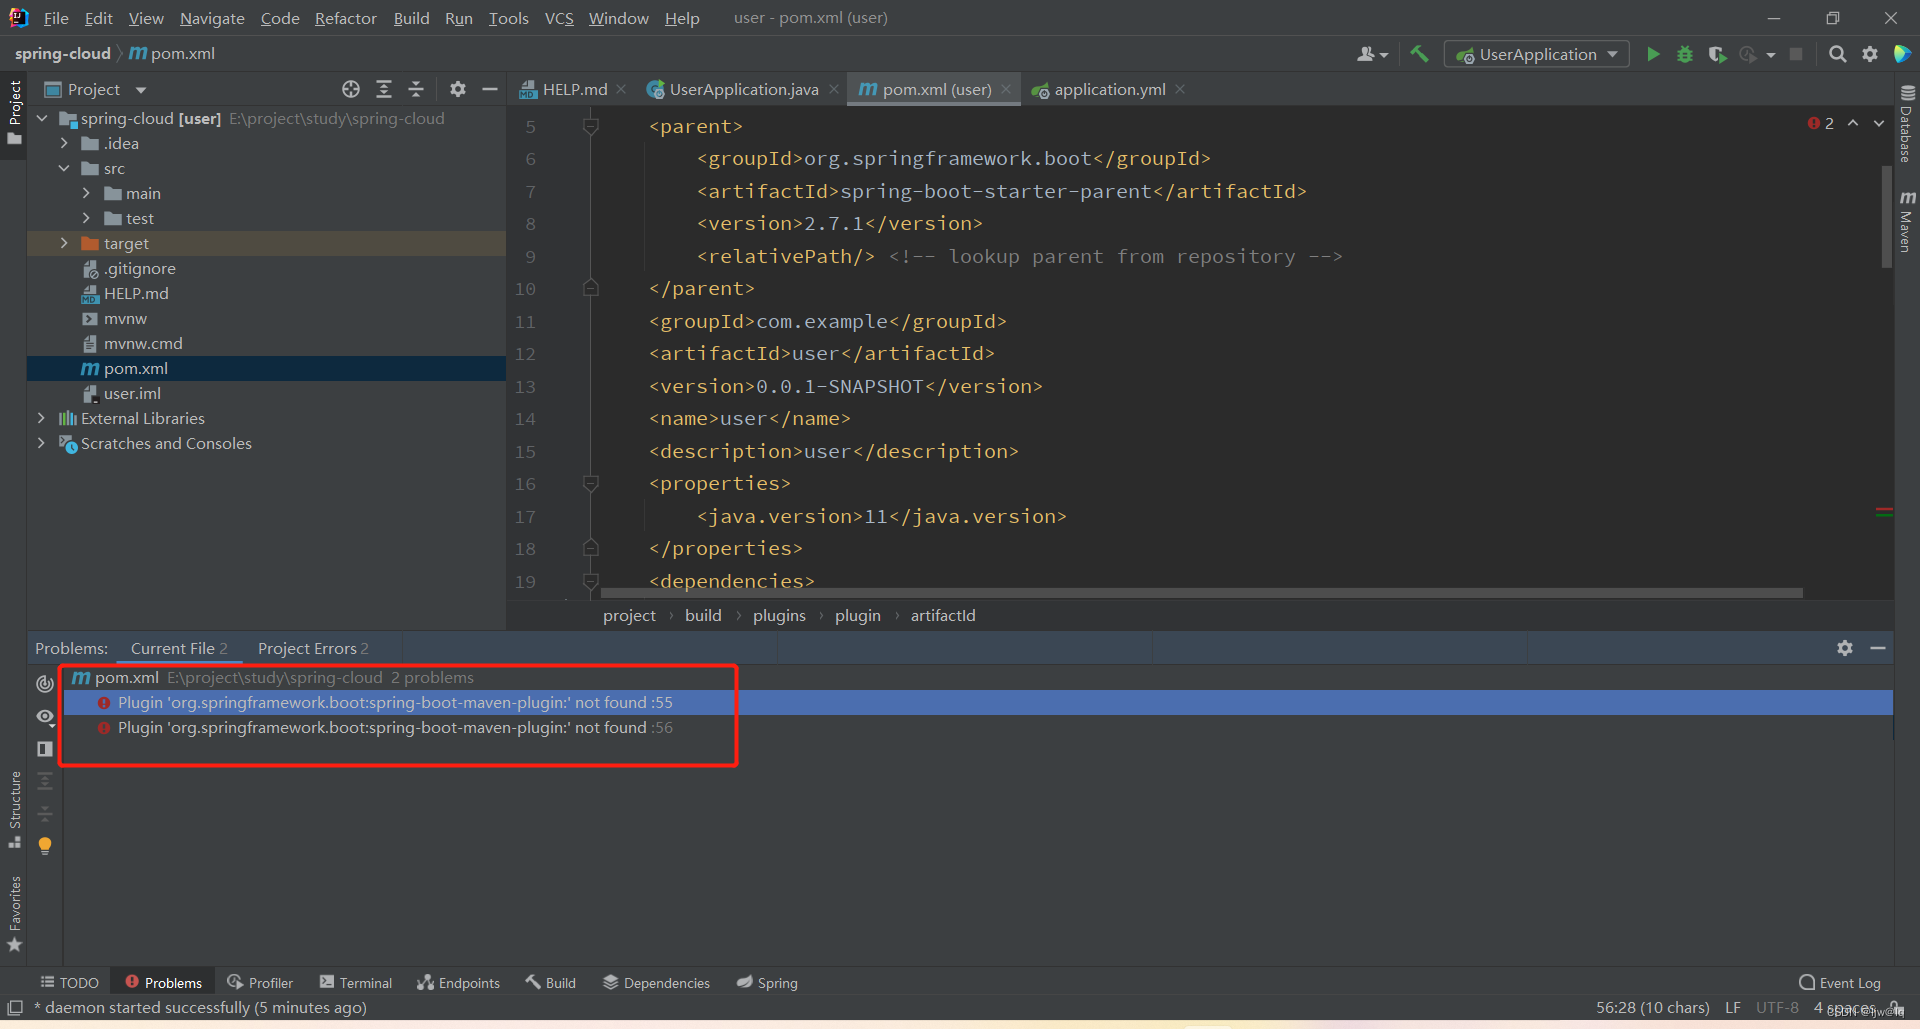
解决:手动添加版本号即可
- 通过命令行工具Spring Boot CLI
2. 编写配置文件
创建项目时会默认生成application.properties,但推荐使用yml文件作为配置文件(可读性高,但是二者只能留一个),我的配置如下:
server:
  port: 8060
  servlet:
    context-path: "/api"
spring:
  datasource:
    url: jdbc:mysql://localhost:3306/user?useUnicode=true&characterEncoding=UTF-8&serverTimezone=UTC
    username: ******
    password: ******
3.编写api、service和mapper
api接口层:
package com.example.user.api;

import com.example.user.dto.UserDto;
import com.example.user.service.UserService;
import com.example.user.util.ResponseMsg;
import org.springframework.beans.factory.annotation.Autowired;
import org.springframework.web.bind.annotation.GetMapping;
import org.springframework.web.bind.annotation.PathVariable;
import org.springframework.web.bind.annotation.RequestMapping;
import org.springframework.web.bind.annotation.RestController;

@RestController
@RequestMapping("/userApi")
public class UserApi {


    @Autowired
    private UserService userServce;

    @GetMapping("/getUserMsgById/{id}")
    public ResponseMsg<UserDto> getUserMsg(@PathVariable("id") Integer id){


        UserDto user = userServce.getUserMsgById(id);
        return ResponseMsg.success(user);

    }
}
Service层(分为接口和实现类,这里只写实现类):
package com.example.user.service.impl;

import com.example.user.dto.UserDto;
import com.example.user.entity.User;
import com.example.user.mapper.UserMapper;
import com.example.user.service.UserService;
import org.springframework.beans.BeanUtils;
import org.springframework.beans.factory.annotation.Autowired;
import org.springframework.stereotype.Service;

@Service
public class UserServiceImpl implements UserService {


    @Autowired
    private UserMapper userMapper;
    @Override
    public UserDto getUserMsgById(Integer id) {


        User user = userMapper.queryById(id);
        UserDto userDto = null;
        if(user != null){


            userDto = new UserDto();
            BeanUtils.copyProperties(user,userDto);
        }
        return userDto;
    }
}
数据层:
package com.example.user.mapper;

import com.example.user.entity.User;
import org.apache.ibatis.annotations.Mapper;

@Mapper
public interface UserMapper {


    User queryById(Integer id);
}
<?xml version="1.0" encoding="UTF-8"?>
<!DOCTYPE mapper PUBLIC "-//mybatis.org//DTD Mapper 3.0//EN" "http://mybatis.org/dtd/mybatis-3-mapper.dtd">
<mapper namespace="com.example.user.mapper.UserMapper">
    <select id="queryById" parameterType="java.lang.Integer" resultType="com.example.user.entity.User">
        select *
        from t_user
        where id = #{id}
    </select>

</mapper>
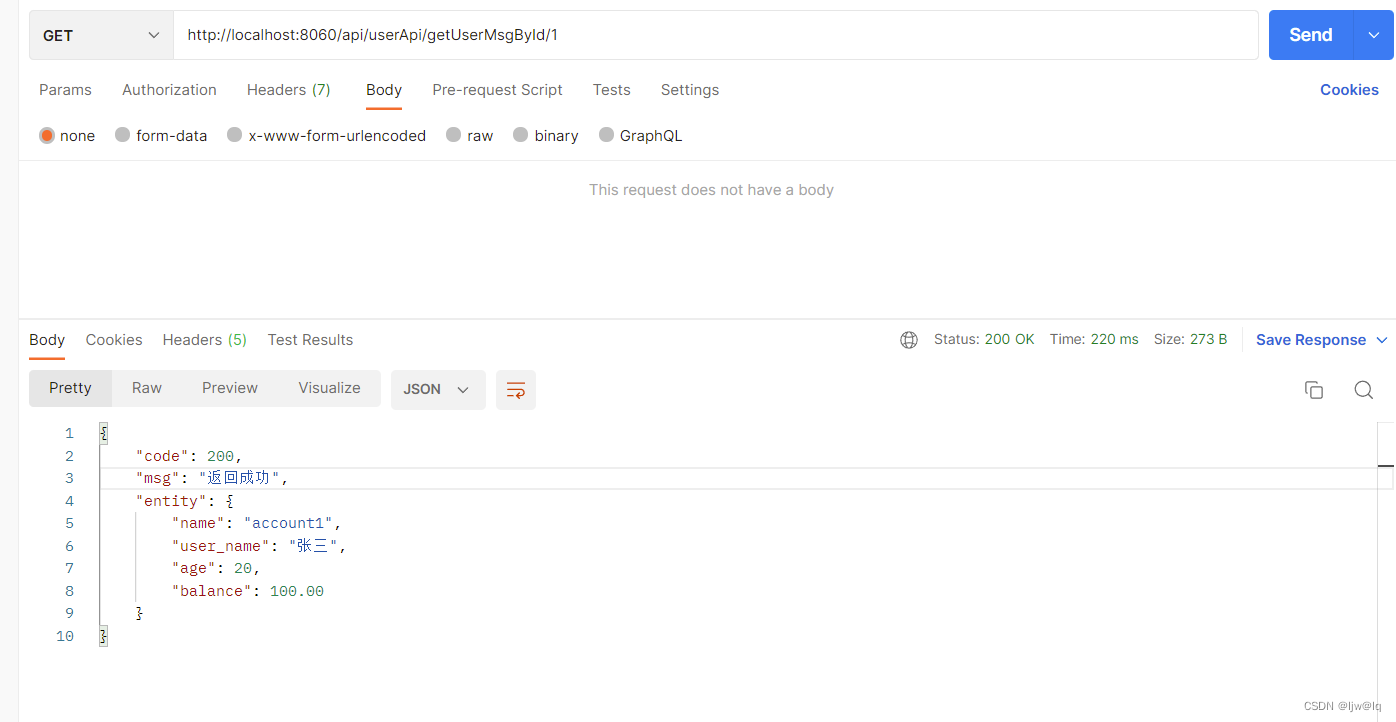
4. 测试
postman测试截图:
2.编写服务消费者
由于步骤基本一致,前面一样的步骤就省略啦!
配置文件
相对user服务只修改了端口号
server:
  port: 8061
配置类
RestTemplate是一个访问第三方 RESTful API 接口的网络请求框架,本文用来请求user微服务,配置如下:
import org.springframework.context.annotation.Bean;
import org.springframework.context.annotation.Configuration;
import org.springframework.web.client.RestTemplate;

@Configuration
public class RestTemplateConfig {


    @Bean
    public RestTemplate restTemplate(){


        return new RestTemplate();
    }
}
接口层
import com.example.movie.dto.UserDto;
import com.example.movie.util.ResponseMsg;
import org.springframework.beans.factory.annotation.Autowired;
import org.springframework.web.bind.annotation.*;
import org.springframework.web.client.RestTemplate;

import java.util.Map;

@RestController
@RequestMapping("/movieApi")
public class MovieApi {


    @Autowired
    private RestTemplate restTemplate;

    @GetMapping("/getUserMsgById")
    public ResponseMsg<UserDto> getUserMsg(@RequestParam("id") Integer id){


        UserDto user = new UserDto();
        ResponseMsg<UserDto> userResponse = restTemplate.getForObject("http://localhost:8060/api/userApi/getUserMsgById/"+id,ResponseMsg.class);
        if(userResponse != null){


            Map<String,Object> map = (Map<String, Object>) userResponse.getEntity();
            for(String key : map.keySet()){


                if(key.equals("name")){


                    user.setName((String) map.get(key));
                }else if(key.equals("user_name")){


                    user.setUser_name((String) map.get(key));
                }else if(key.equals("age")){


                    user.setAge((Integer) map.get(key));
                }else if(key.equals("balance")){


                    user.setBalance((Double) map.get(key));
                }
            }
        }
        return ResponseMsg.success(user);

    }
}
访问测试
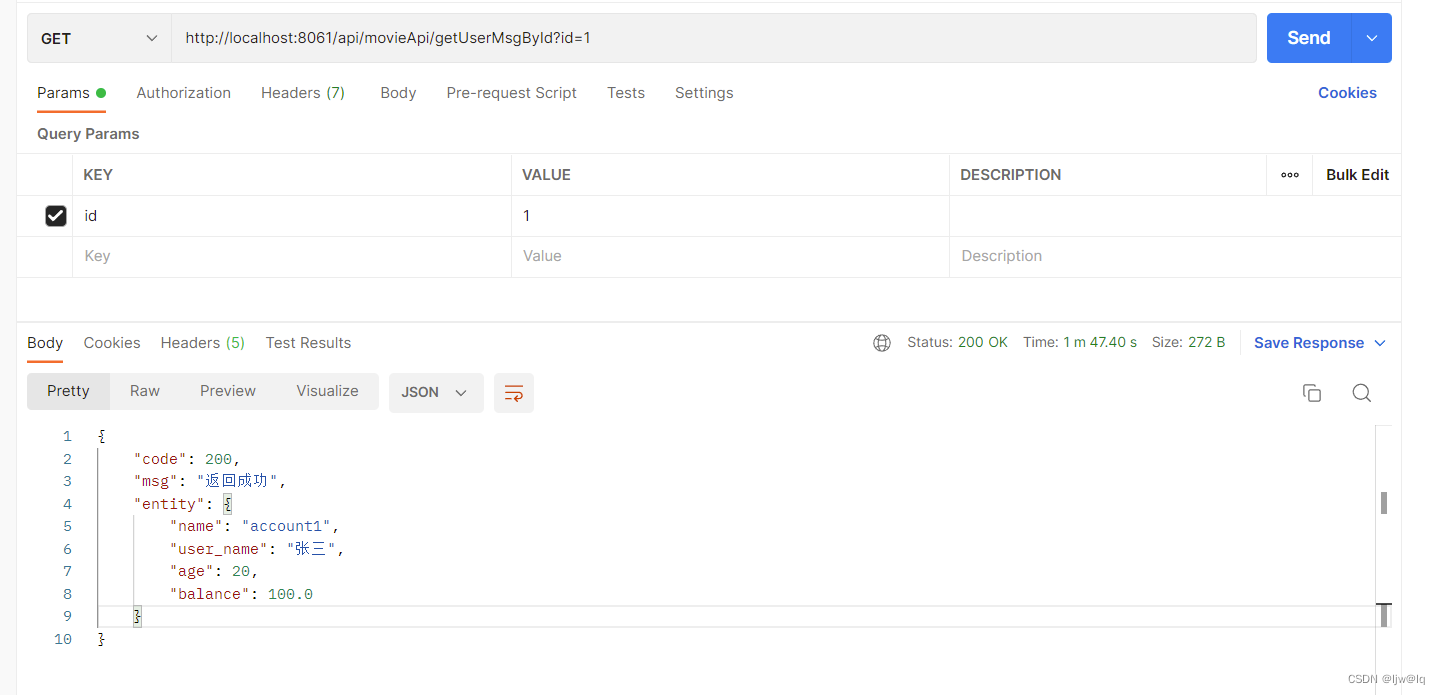
总结
提示:这里对文章进行总结:
以上就是今天学习的内容啦,最后的测试结果如上图则说明电影微服务可以正常调用用户微服务的API。