基础示例
用 Vue.js + Vue Router 创建单页应用,感觉很自然:使用 Vue.js ,我们已经可以通过组合组件来组成应用程序,当你要把 Vue Router 添加进来,我们需要做的是,将组件 (components) 映射到路由 (routes),然后告诉 Vue Router 在哪里渲染它们。下面是个基本例子:
router\index.js中:
// 该文件专门用于创建整个应用的路由器
import VueRouter from 'vue-router'
//引入组件
import About from '../components/About'
import Home from '../components/Home'

//创建并暴露一个路由器
export default new VueRouter({
	routes:[
		{
			path:'/about',
			component:About
		},
		{
			path:'/home',
			component:Home
		}
	]
})
import { createRouter, createWebHashHistory } from 'vue-router'
//createRouter用于创建路由的实例对象
//createWebHistory 用于指定路由的工作模式(hash模式)
import Home from '../components/Home'
 // 定义 hash 与组件之间的对应关系
const routes  = [
  {
    path: '/',
    name: 'Home',
    component: Home
  },
  //404页面
    //ue3重定向写法:"/:catchAll(.*)",  "/:pathMatch(.*)",   path: "/:pathMatch(.*)*",三种写法
    path: '/:catchAll(.*)',
    name: '/404',
    component: () => import('../views/404.vue')
]

 创建路由实例对象
const router = createRouter({
   // 指定路由工作模式
  history: createWebHashHistory(),
  routes
})
export default router
main.js中:
import Vue from 'vue'
import App from './App.vue'
//引入VueRouter
import VueRouter from 'vue-router'
//引入路由器
import router from './router'

//关闭Vue的生产提示
Vue.config.productionTip = false
//应用插件
Vue.use(VueRouter)

//创建vm
new Vue({
	el:'#app',
	render: h => h(App),
	router:router
})
import { createApp } from 'vue'
import App from './App.vue'
import router from './router'

const app = createApp(App)

app.use(router)
app.mount('#app')
App.vue中:
<div id="app">
  <h1>Hello App!</h1>
  <p>
    <!-- 使用 router-link 组件来导航. -->
    <!-- 通过传入 `to` 属性指定链接. -->
    <!-- <router-link> 默认会被渲染成一个 `<a>` 标签 -->
    <router-link to="/foo">Go to Foo</router-link>
    <router-link to="/bar">Go to Bar</router-link>
  </p>
  <!-- 路由出口 -->
  <!-- 路由匹配到的组件将渲染在这里 -->
  <router-view></router-view>
</div>
注意事项:
- 路由组件和基础组件应该写在不同目录下用来区分。如:路由可以写在pages下,一般组件写在components
- 组件切换时,被销毁了;需要时在挂载。
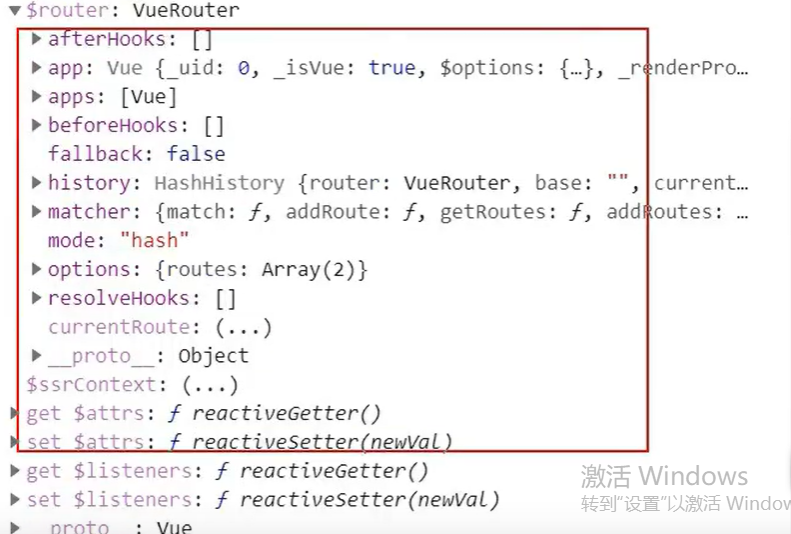
- 组件的vc对象多了两个内容 r o u t e 和 route和 route和router:
mounted()  {
  congsole.log('组件实例',this)
}

$route :定义在路由组件内的配置规则(每个路由组件的信息是不一样的):

$router:是全局路由相关信息。每个路由组件的内容都是一样的,里面有很多实用方法。
整个应用只有一个router,可以通过组件的$router属性获取到。

嵌套(多级)路由
// 该文件专门用于创建整个应用的路由器
import VueRouter from 'vue-router'
//引入组件
import About from '../pages/About'
import Home from '../pages/Home'
import News from '../pages/News'
import Message from '../pages/Message'

//创建并暴露一个路由器
export default new VueRouter({
	routes:[
		{
			path:'/about',
			component:About
		},
		{
			path:'/home',
			component:Home,
			children:[
				{
					path:'news',  //注意:news前不需要写“/”
					component:News,
				},
				{
					path:'message',
					component:Message,
				}
			]
		}
	]
})
注:访问的时候必须保持路径完成,如
<router-link to="/home/message">Message</router-link>
路由传参
query方式
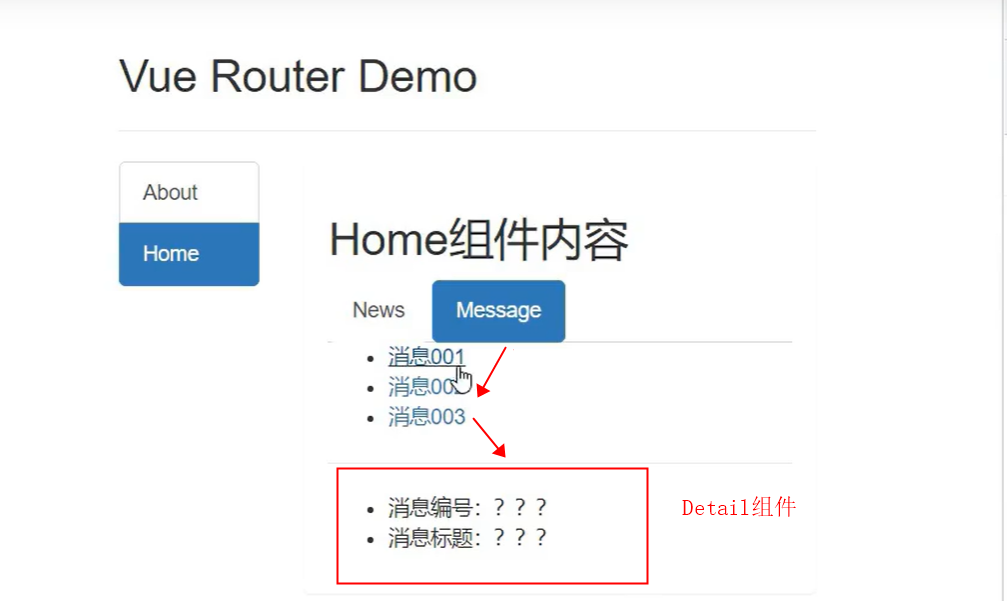
需求:选中message按钮后,点击消息001,可以向detail组件内传递参数,以动态显示消息标题等内容。

//创建并暴露一个路由器
export default new VueRouter({
	routes:[
		{
			path:'/about',
			component:About
		},
		{
			path:'/home',
			component:Home,
			children:[
				{
					path:'news',
					component:News,
				},
				{
					path:'message',
					component:Message,
					children:[
						{
							path:'detail',
							component:Detail,
						}
					]
				}
			]
		}
	]
})
<template>
<div>
<ul>
<li v-for="m in messageList" :key="m.id">
<!-- 跳转路由并携带query参数,to的字符串写法 -->
<!-- <router-link :to="`/home/message/detail?id=${m.id}&title=${m.title}`">{
{m.title}}</router-link> -->
<!-- 跳转路由并携带query参数,to的对象写法 -->
<router-link :to="{
path:'/home/message/detail',
query:{
id:m.id,
title:m.title
}
}">
{
{m.title}}
</router-link>
</li>
</ul>
<hr>
<router-view></router-view>
</div>
</template>
路由父组件向子组件传递参数

- 跳转路由并携带query参数,to的字符串写法
<router-link :to="`/home/message/detail?id=${m.id}&title=${m.title}`">跳转{

   {m.title}}</router-link>
2.跳转路由并携带query参数,to的对象写法
<router-link :to="{
    path:'/home/message/detail',
    query:{
      id:m.id,
      title:m.title
    }
  }">
跳转</router-link>
路由子组件接受父组件传递的参数
<template>
	<ul>
		<li>消息编号:{

   {$route.query.id}}</li>
		<li>消息标题:{

   {$route.query.title}}</li>
	</ul>
</template>

<script>
	export default {
		name:'Detail',
		mounted() {
			console.log(this.$route)
		},
	}
</script>
$route是每个实例化组件的一个参数,因此使用它接受参数
$route.query.id
$route.query.title
命名路由
上述示例中,访问detail组件,路径要配置为:/home/message/detail,比较繁琐,因此可以使用命名路由进行简化。
1.给路由命名
export default new VueRouter({
	routes:[
		{
			path:'/home',
			component:Home,
			children:[
				{
					path:'news',
					component:News,
				},
				{
					path:'message',
					component:Message,
					children:[
						{
							name:'gcshi',
							path:'detail',
							component:Detail,
						}
					]
				}
			]
		}
	]
})
2.简化跳转:
<router-link :to="/home/news/message/detail">跳转</router-link>
<router-link :to="{name:'gcshi'}">跳转</router-link>
<router-link :to="{name:'gcshi',query:{id:66666}">跳转</router-link>
params参数
1.配置路由,声明接受的params参数
//创建并暴露一个路由器
export default new VueRouter({
	routes:[
		{
			path:'/home',
			component:Home,
			children:[
				{
					path:'news',
					component:News,
				},
				{
					path:'message',
					component:Message,
					children:[
						{
              name:gcshi,
							path:'detail/:id/:title',//使用占位符声明接受的参数
							component:Detail,
						}
					]
				}
			]
		}
	]
})
params参数必须进行配置,:id/:title为占位符,属性名可以自定义。
2.传递参数
<router-link :to="/home/news/message/detail/6/你好">跳转</router-link>
6,你好即配置的id和title属性
<router-link :to="{name:'gcshi',params:{id:66666,title:'你好'}">跳转</router-link>
特别注意:路由携带params参数时,若使用to的对象写法,则不能使用path配置项,必须使用name配置。
3.接受参数
$route.params.id
$route.params.title
propos
复习:路由传参的两种逻辑
- 在router的index.js中配置好路由相应逻辑
- 在路由父组件中用to进行参数传递、配置
<router-link :to="{name:'gcshi',query:{id:m.id,title:m.title}}">
- 在子组件采用 r o u t e . p a r a m s 或 route.params或 route.params或route.query进行接受。
除上述两种方式外,还可以采用在子组件中使用prosps的方式进行参数接受。(query和parmas均可以)
首先,在路由父组件中用to进行参数传递、配置是不变的。
<router-link :to="{name:'gcshi',query:{id:m.id,title:m.title}}">
然后,需要在router的index.js进行配置
{
					path:'message',
					component:Message,
					children:[
						{
							name:'gcshi',
							path:'detail',
							component:Detail,
							//props的第三种写法,值为函数
							props($route){
								return {
									id:$route.query.id,
									title:$route.query.title,
								}
							}
						}
					]
				}
Detail组件是用于接受参数的组件,props配置项是返回一个函数,它代表为子组件detail进行props配置。其默认参数是message组件的$route属性,因此可以方便拿到来自父组件的属性值。
最后,在子组件中使用props进行接受参数即可。
<template>
	<ul>
		<li>消息编号:{

   {id}}</li>
		<li>消息标题:{

   {title}}</li>
	</ul>
</template>

<script>
	export default {
		name:'Detail',
		props:['id','title'],
	}
</script>
个人感觉,这种方式是真滴麻烦。。。。。。
的replace属性
- 作用:控制路由跳转时操作浏览器历史记录的模式
- 浏览器的历史记录写入方式有两种,分别为push和replace,push是追加历史记录,replace是替换当前记录。默认值为push.
push:浏览器记录可以前进后退。
repalce:浏览器上一次的历史记录被覆盖
- 如何开启repalce模式:
<router-link  :replace = "true"   :to=".....">
//或
<router-link  replace   :to=".....">
编程式路由导航
路由组件缓存
1.作用:让不展示的路由组件保持挂载,不被销毁
2.具体编码
<keep-alive>
	<router-view></router-view>
</keep-alive>
<keep-alive include="News">
	<router-view></router-view>
</keep-alive>
<keep-alive :include="['News','title']">
	<router-view></router-view>
</keep-alive>
路由的生命周期
路由被缓存后,如果在A路由内写了一个定时器,并在beforeDestory生命周期中写了清空定时器的函数。但切换到B组件时,由于使用缓存,该定时器是无法被清除的,因为beforeDestory不会生效。
那么,如果在使用缓存路由组件的同时,又能在切换组件的同时清空定时器呢?
使用路由的生命周期钩子!
作用:路由组件所独有的两个钩子,用于捕获路由组件的激活状态
具体名字:
1.activated :路由组件被激活时触发
2.deactivated :路由组件失活(切换走)时触发
路由守卫
全局路由守卫
路由跳转时,如果用户没有权限(localstorage中没有获取到token)时,路由跳转时应该返回登录页。这一功能可以借助路由守卫来实现。
路由守卫包括 前置路由 和 后置路由
前置路由是初始化、页面切换时被调用,用于拦截页面的跳转操作。
路由后置守卫是离开页面时的一个操作。
基本语法:
//创建并暴露一个路由器
const router =  new VueRouter({
	routes:[
	        {
            name:'xiaoxi',
            path:'message',
            component:Message,
            meta:{isAuth:true,title:'消息'},
          }
	]
})

//全局前置路由守卫————初始化的时候被调用、每次路由切换之前被调用
router.beforeEach((to,from,next)=>{
	console.log('前置路由守卫',to,from)
	if(to.meta.isAuth){ //判断是否需要鉴权
		if(localStorage.getItem('school')==='atguigu'){
			next()
		}else{
			alert('学校名不对,无权限查看!')
		}
	}else{
		next()
	}
})

//全局后置路由守卫————初始化的时候被调用、每次路由切换之后被调用
router.afterEach((to,from)=>{
	console.log('后置路由守卫',to,from)
	document.title = to.meta.title || '硅谷系统'//修改网页标题
})

export default router
前置路由接受三个参数,后置路由只是接受to、form参数
to、form和next中间件
to和form都是一个对象,里面包括了路由名name属性、路由前往或离开的路径path、query及parmas参数已经路由元信息meta(用户在routes中自定义的数据)

next是一个函数,next()表示放行拦截。
独享路由守卫
单个组件的路由守卫beforeEnter
//创建并暴露一个路由器
const router =  new VueRouter({
	routes:[
		{
			name:'zhuye',
			path:'/home',
			component:Home,
			meta:{title:'主页'},
			children:[
				{
					name:'xinwen',
					path:'news',
					component:News,
					meta:{isAuth:true,title:'新闻'},

					beforeEnter: (to, from, next) => {
						console.log('独享路由守卫',to,from)
						if(to.meta.isAuth){ //判断是否需要鉴权
							if(localStorage.getItem('school')==='atguigu'){
								next()
							}else{
								alert('学校名不对,无权限查看!')
							}
						}else{
							next()
						}
					}

				},
			]
		}
	]
})
export default router
组件内路由守卫
路由的哈希模式历史模式
//配置方式,默认为hash模式
//创建并暴露一个路由器
const router =  new VueRouter({
	mode:'history',
	routes:[
	  ...
	]
})
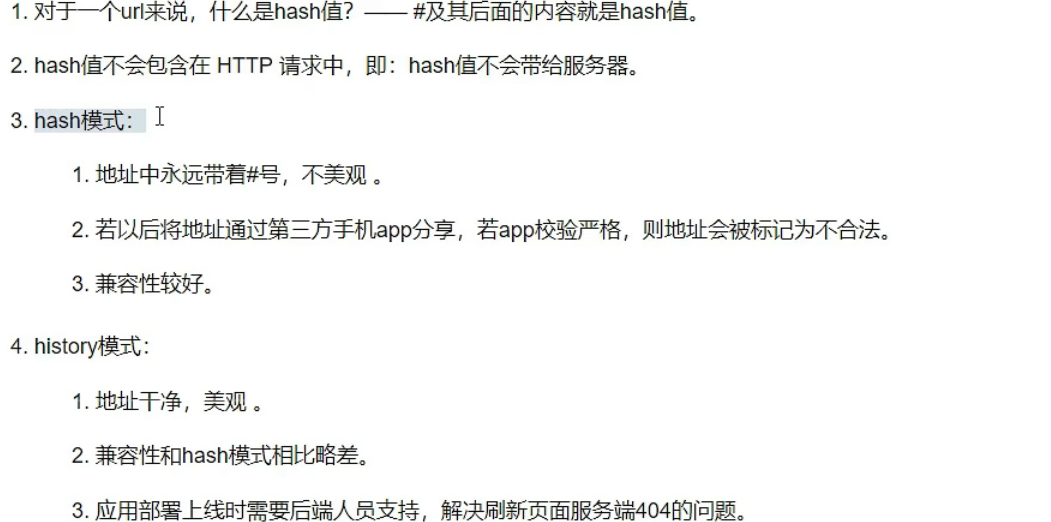
哈希模式
路径中带有#号的称为哈希模式,#号及后面的内容称为哈希值

//访问该路径,服务器接受到的路径为      /student/dema
localhost://8080/student/dema

//访问该路径,服务器接受到的路径为
localhost://8080/student/#/dema      /student
历史模式
历史模式更加美观,路径中不带#号,使用必须配合后端
