UVM前置基础:
2.UVM基础-组件(driver、monitor、agent...)
...还在更新
从零搭建一个UVM验证平台:
...还在更新
目录
在上篇博客里,我们封装了monitor来监测输入及输出的信号,还将monitor和driver封装成了一个可配置是否实例化driver的功能性agent,再将输入输出的两个agent封装到一个更大的env环境中。整个架构可以如下描述:
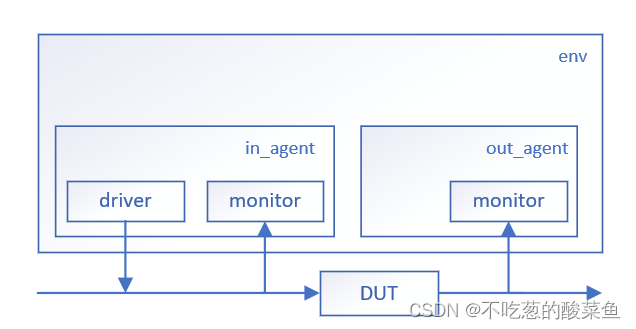
这篇文章我们将着重讲解如何给我们的验证模块添加reference model以及scoreboard。
reference model
在验证平台当中,reference model的作用是完成和DUT相同的功能,在我们不确定RTL代码结果是否正确的时候,我们要保证reference model的结果必须正确,然后再将RTL代码的结果和reference model的结果作对比,两者实现的功能是完全一致的。
reference model代码
`ifndef MY_REFERENCE_DEFINES
`define MY_REFERENCE_DEFINES

`include "uvm_macros.svh"
`include "my_transaction.sv"

import uvm_pkg::*;

class my_reference_model extends uvm_component;

  //TLM 机制
  uvm_blocking_get_port #(my_transaction) port;
  uvm_analysis_port #(my_transaction) ap;

  extern function new(string name, uvm_component parent);
  extern function void build_phase(uvm_phase phase);
  extern virtual task main_phase(uvm_phase phase);

  `uvm_component_utils(my_reference_model)
endclass

function my_reference_model::new(string name, uvm_component parent);
  super.new(name, parent);
endfunction

function void my_reference_model::build_phase(uvm_phase phase);
  super.build_phase(phase);
  port = new("port", this);
  ap = new("ap", this);
endfunction

task my_reference_model::main_phase(uvm_phase phase);

  my_transaction tr;
  my_transaction new_tr;

  super.main_phase(phase);

  while(1)begin
    port.get(tr);
    new_tr = new("new_tr");
    new_tr.my_copy(tr);
    `uvm_info("my_reference_model", "get one transaction, copy and print it:", UVM_LOW)
    new_tr.my_print();
    ap.write(new_tr);
  end
endtask

`endif
reference model的代码,在一开始使用了TLM机制:
uvm_blocking_get_port #(my_transaction) port;
uvm_analysis_port #(my_transaction) ap;
TLM通信需要两个通信的对象,这两个对象分别称为 initiator 和 target 。区分它们的方法在于,谁先发起通信请求,谁就属于initiator;谁作为发起通信的响应方,谁就属于target ,但这个分类并不代表transaction一定是initiator发起的,transaction也可能是从target流向initiator。
端口按照类型可以划分为三种:
※ port:经常作为initiator的发起端,initiator凭借port才可以访问target的TLM通信方法。
※ export:作为initiator和target中间层次的端口。
※ imp:只能作为target接收request的末端,它无法作为中间层次的端口,所以imp的连接无法再次延伸。
使用TLM机制来进行transaction的传输, 如果数据是从同一个源的TLM端口发出到达不同组件,这就要求该种端口可以满足从一端到多端的需求,analysis_port 就可以实现这个需求。按照传输方法和端口方向组合,可以将 analysis port 分为:uvm_analysis_port 、uvm_analysis_export 以及uvm_analysis_imp。
reference model 编写流程:
在reference model中,我们先定义了两个port;然后在build_phase里将两个port进行实例化;接着运行完build_phase进入main_phase后,实例化new_tr,把in_agent中得到的tr复制一份给scoreboard。my_copy是定义在transaction中的函数:
Transaction
`ifndef MY_TRANS_DEFINES
`define MY_TRANS_DEFINES

`include "uvm_macros.svh"

import uvm_pkg::*;

class my_transaction extends uvm_sequence_item;

  rand bit [63:0] password; //assume there is a 64bits password

  `uvm_object_utils(my_transaction);

  function new(string name = "my_transaction");
    super.new(name);
  endfunction

  function void my_print();
    $display("password = %0h", password);
  endfunction
  extern function void my_copy(my_transaction tr);

endclass

function void my_transaction::my_copy(my_transaction tr);
  if(tr == null)
    `uvm_fatal("my_transaction", "tr is null!!!")
  password = tr.password;
endfunction

`endif
这里实现了两个transaction的复制。不仅如此,因为添加了reference model,这个组件是搭载在env环境下的, 所以我们还需要在my_env中对其进行实例化(在env的build_phase中使用type_id::create创建实例)。
在上面,component之间transaction级别的数据通信是使用TLM机制进行的。我们现在要实现的目的其实就是在reference model中,将in_agent中的monitor发出的transaction复制到reference model中,在reference model里面我们声明了TLM机制中的uvm_blocking_get_port(),并在reference model的main_phase中对其进行了实例化,然后利用port.get()任务来得到从in_agent中的monitor发出的transaction。
但截止目前,我们只在reference model中创建了uvm_blocking_get_port,它的目的是接收monitor发出的transaction,所以我们还需要在monitor中添加发送transaction的port:
在工厂注册之前,声明:uvm_analysis_port #(my_transacion) ap;
在monitor的build_phase中将port实例化:ap = new("new", this);
在main_phase中,添加ap.write(tr);//将收集的transaction数据写入tr
这里用到的write是uvm_analysis_port的一个内建函数。
以上,在my_monitor和reference model中定义并实例化了各自的端口后,端口和端口之间并没有连接在一起,因此我们需要在env环境中,使用fifo将两个端口联系在一起,即①在my_env中定义一个fifo,②并在build_phase中将其实例化,③并在connect_phase中将fifo分别与my_monitor中的analysis_port和reference model中的blocking_get_port相连:
`include "uvm_macros.svh"
import uvm_pkg::*;

`include "my_agent.sv"
`include "my_transaction.sv"

class my_env extends uvm_env;
  my_agent i_agt;
  my_agent o_agt;

  my_reference_model mrm;

  uvm_tlm_analysis_fifo #(my_transaction) agt_mrm_fifo;

  function new(string name = "my_env", uvm_component parent);
    super.new(name, parent);
  endfunction

  virtual function void build_phase(uvm_phase phase);
    super.build_phase(phase);

    i_agt = my_agent::type_id::create("i_agt", this);
    o_agt = my_agent::type_id::create("o_agt", this);
    i_agt.is_active = UVM_ACTIVE;
    i_agt.is_active = UVM_PASSIVE;

    mrm = my_reference_model::type_id::create("mrm", this);
    agt_mrm_fifo = new("agt_mon_fifo", this);

  endfunction

  extern virtual function void connect_phase(uvm_phase phase);

  `uvm_component_utils(my_env);

endclass

function void my_env::connect_phase(uvm_phase phase);
   super.connect_phase(phase);
   in_agt.ap.connect(agt_mrm_fifo.analysis_export);
   mrm.port.connect(agt_mrm_fifo.blocking_get_export);
endfunction
connect_phase和build_phase以及main_phase类似,都是UVM内建的phase,它在build_phase执行完成之后马上执行。但是与build_phase不同的是,它执行的顺序不是从树根到树叶,而是从树叶到树根---先执行driver和monitor的connect_phase,再执行agent的connect_phase,最后执行env的connect_phase。
思路详解
为了让思路更加清晰,我们来整理一下上边my_env的代码思路:目前在我们的env环境中,有一个reference model,in_agent和out_agent,所以要将三个组件例化;然后我们在reference model中设置了一个port,在monitor中也设置了一个port,利用TLM机制来传输monitor监测到的transaction给reference model。
考虑到analysis_port是非阻塞性质的,我们实例化了一个一transaction为变量类型的fifo来存储可能会被blocking_get_port堵塞的transaction;在build_phase中创建agent实例,并设置in_agent有driver,out_agent没有driver(is_active = UVM_PASSIVE);
reference model的port连接到monitor的port时要进入到agent组件,这就需要agent组件也得有一个port供transaction传输,所以我们另外还需要在my_agent.sv中声明一个port,让reference model的port连接到in_agent上,再让in_agent的port连接到monitor上,在connect_phase中连接完所有port后,connect_phase的顺序是从树叶到树根,所以会先执行my_agent的connect_phase,接着才是执行my_env的connect_phase。

scoreboard
验证平台中已经有了reference model和agent,最后一步就是给我们的平台添加scoreboard。scoreboard要比较的数据,一个是来自reference model,一个是来自out_agent的monitor。
`include "uvm_macros.svh"

import uvm_pkg::*;

`include "my_transaction.sv"

class my_scoreboard extends uvm_scoreboard;
  my_transaction expect_queue [$];
  uvm_blocking_get_port #(my_transaction) exp_port;
  uvm_blocking_get_port #(my_transaction) act_port;
  `uvm_component_utils(my_scoreboard)

  extern function new(string name, uvm_component parent = null);
  extern virtual function void build_phase(uvm_phase phase);
  extern virtual task main_phase(uvm_phase phase);
endclass

function my_scoreboard::new(string name, uvm_component parent = null);
  super.new(name, parent);
endfunction

function void my_scoreboard::build_phase(uvm_phase phase);
  super.build_phase(phase);
  exp_port = new("exp_port", this);
  act_port = new("act_port", this);
endfunction

task my_scoreboard::main_phase(uvm_phase phase);
  my_transaction get_expect, get_actual, temp_tran;
  bit result;

  super.main_phase(phase);
  fork
    while(1)begin
      exp_port.get(get_expect);
      expect_queue.push_back(get_expect);
    end
    while(1)begin
      act_port.get(get_actual);
      if(expect_queue.size()>0)begin
        temp_tran = expect_queue.pop_front();
        result = get_actual.my_compare(temp_tran);//比较
        if(result)begin
          `uvm_info("my_scoreboard", "Compare SUCCESSFULLY", UVM_LOW)
        end
        else begin
          `uvm_error("my_scoreboard", "Compare FALLED")
          $display("the expect password is");
          temp_tran.my_print();
          $display("the actual password is");
          get_actual.my_print();
        end
      end
      else begin
        `uvm_error("my_scoreboard", "Received from DUT, while Expect queue is empty")
        $display("the unexpected password is");
        get_actual.my_print();
      end
    end
  join
endtask
在上面这段代码中通过fork建立了两个进程,一个进程处理exp_port的数据,当收到数据后,把数据放到expect_queue中;另外一个进程处理act_port数据,这是DUT的输出数据,当收集到这些数据后,从expect_queue中弹出之前从exp_port收到的数据,并调用my_transaction中的my_compare函数。这样处理的前提是exp_port要比act_port先收到数据,由于DUT处理数据需要延时,而reference model是基于高级语言的处理,一般不需要延时,因此可以保证exp_port的数据在act_port的数据之前到来。
另外别忘了,写了scoreboard之后,我们还需要在env环境中创建并实例化该组件,然后在connect_phase中,将组件与组件之间的port连接好。
`ifndef MY_ENV_SV
`define MY_ENV_SV

`include "uvm_macros.svh"
import uvm_pkg::*;

`include "my_agent.sv"
`include "my_transaction.sv"
`include "my_reference_model.sv"
`include "my_scoreboard.sv"

class my_env extends uvm_env;
  my_agent in_agt;
  my_agent out_agt;

  my_reference_model mrm;
  my_scoreboard scb;

  uvm_tlm_analysis_fifo #(my_transaction) agt_mrm_fifo;
  uvm_tlm_analysis_fifo #(my_transaction) agt_scb_fifo;
  uvm_tlm_analysis_fifo #(my_transaction) mrm_scb_fifo;

  function new(string name = "my_env", uvm_component parent);
    super.new(name, parent);
  endfunction

  virtual function void build_phase(uvm_phase phase);
    super.build_phase(phase);

    in_agt = my_agent::type_id::create("in_agt", this);
    out_agt = my_agent::type_id::create("out_agt", this);
    in_agt.is_active = UVM_ACTIVE;
    out_agt.is_active = UVM_PASSIVE;

    mrm = my_reference_model::type_id::create("mrm", this);
    scb = my_scoreboard::type_id::create("scb", this);

    agt_mrm_fifo = new("agt_mon_fifo", this);
    agt_scb_fifo = new("agt_scb_fifo", this);
    mrm_scb_fifo = new("mrm_scb_fifo", this);
  endfunction

  extern virtual function void connect_phase(uvm_phase phase);

  `uvm_component_utils(my_env);

endclass

function void my_env::connect_phase(uvm_phase phase);
   super.connect_phase(phase);

   //connect input agent with reference model
   in_agt.ap.connect(agt_mrm_fifo.analysis_export);
   mrm.port.connect(agt_mrm_fifo.blocking_get_export);

   //connect reference model with scoreboard
   mrm.ap.connect(mrm_scb_fifo.analysis_export);
   scb.exp_port.connect(mrm_scb_fifo.blocking_get_export);

   //connect output agent with scoreboard
   out_agt.ap.connect(agt_scb_fifo.analysis_export);
   scb.act_port.connect(agt_scb_fifo.blocking_get_export);

endfunction

`endif
在transaction中定义一个compare函数,很简单,比较发送的transaction中的password是否一致即可,但这一步compare函数可以通过field_automation机制省略自定义的过程,但为了体现field_automation机制的优越性,我们还是先使用自定义的compare方法:
`ifndef MY_TRANS_DEFINES
`define MY_TRANS_DEFINES

`include "uvm_macros.svh"

import uvm_pkg::*;

class my_transaction extends uvm_sequence_item;

  rand bit [63:0] password; //assume there is a 64bits password

  `uvm_object_utils(my_transaction);

  function new(string name = "my_transaction");
    super.new(name);
  endfunction

  function void my_print();
    $display("password = %0h", password);
  endfunction
  extern function void my_copy(my_transaction tr);
  extern function bit my_compare(my_transaction);

endclass

function void my_transaction::my_copy(my_transaction tr);
  if(tr == null)
    `uvm_fatal("my_transaction", "tr is null!!!")
  password = tr.password;
endfunction

function bit my_transaction::my_compare(my_transaction tr);
  bit result;
  if(tr == null)
    `uvm_fatal("my_transaction", "tr is null!");
  result = (password == tr.password);
  return result;
endfunction

`endif
field_automation 机制
在transaction.sv中我们在transaction里定义了很多的function,譬如my_print、my_compare 函数,它们都有一个特点就是需要逐字段地对transaction进行某些操作。但其实这些函数我们可以不用自己定义,而是使用UVM中的field_automation机制,使用uvm_field来自动预定义好这些常用的函数,而不需要自己额外定义了。
由宏定义`uvm_object_utils_begin和`uvm_object_utils_end包起来的部分,为域自动化部分。UVM_ALL_ON是一个用于数据操作的内容
`ifndef MY_TRANS_DEFINES
`define MY_TRANS_DEFINES

`include "uvm_macros.svh"

import uvm_pkg::*;

class my_transaction extends uvm_sequence_item;

  rand bit [63:0] password; //assume there is a 64bits password

  `uvm_object_utils_begin(my_transaction);
    `uvm_field_int(password, UVM_ALL_ON)
  `uvm_object_utils_end

  function new(string name = "my_transaction");
    super.new(name);
  endfunction

endclass

`endif
使用了域的自动化后,我们的transaction的代码量就大大减小了。当上述宏注册之后,可以直接调用copy、compare、print等函数,极大的简化了验证平台的搭建,提高了效率。
加入scoreboard 以及 reference model之后,我们现在的整个验证框架如图所示:
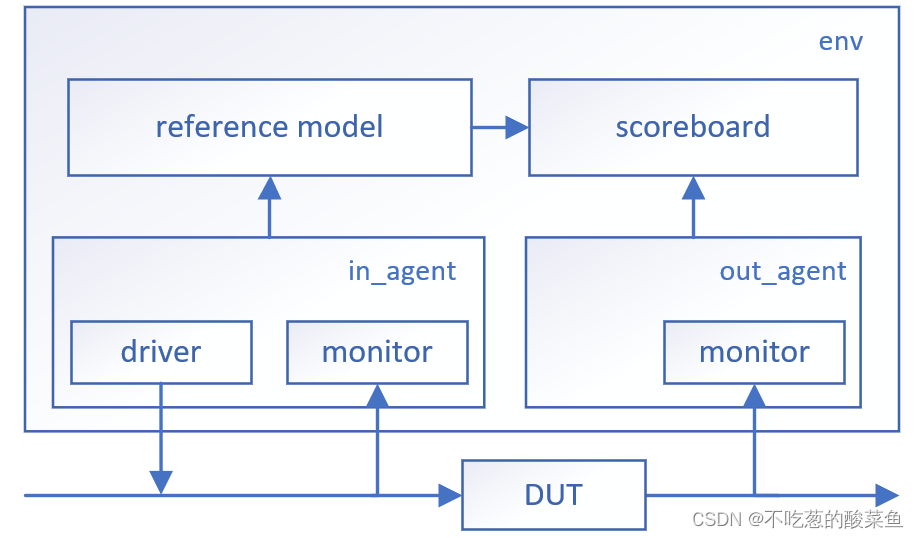
在这篇文章里,我们在env环境中添加了reference model 以及 scoreboard并在各个组件的connect_phase中,将组件与组件之间的port连接在了一起,并且利用UVM的field_automation机制,可以调用自定义的函数print、copy、compare等,极大的简化了我们transaction的代码。下篇博客我们将着重讲解如何给我们的验证环境添加sequencer。