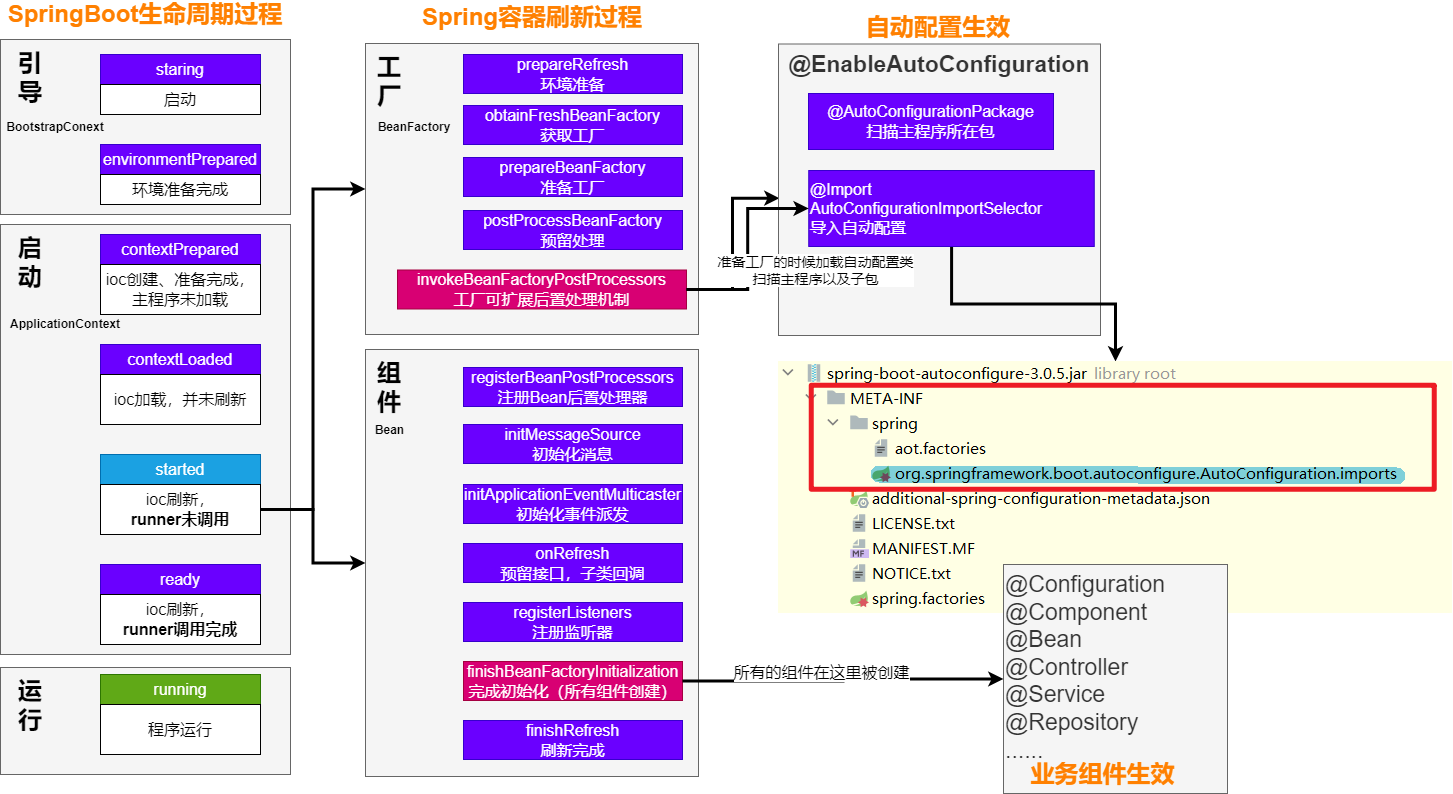
1. 自动配置流程
- 导入
starter - 依赖导入
autoconfigure - 寻找类路径下
META-INF/spring/org.springframework.boot.autoconfigure.AutoConfiguration.imports文件 - 启动,加载所有
自动配置类xxxAutoConfiguration- 给容器中配置功能
组件 组件参数绑定到属性类中。xxxProperties属性类和配置文件前缀项绑定@Contional派生的条件注解进行判断是否组件生效
- 给容器中配置功能
所有场景自动配置好可以直接使用,修改配置文件,就会修改底层参数,例如:通过修改yaml配置server.port,就可以修改tomcat运行端口,注入SpringBoot配置好的组件可以随时使用。
2. SPI机制
- Java中的SPI(Service Provider Interface)是一种软件设计模式,用于 在应用程序中动态地发现和加载组件 。SPI的思想是,定义一个接口或抽象类,然后通过在classpath中定义实现该接口的类来实现对组件的动态发现和加载。
SPI的主要目的是解决在应用程序中使用 可插拔组件 的问题。例如,一个应用程序可能需要使用不同的日志框架或数据库连接池,但是这些组件的选择可能取决于运行时的条件。通过使用SPI,应用程序可以在运行时发现并加载适当的组件,而无需在代码中硬编码这些组件的实现类。
在Java中,SPI的实现方式是通过在META-INF/services目录下创建一个以服务接口全限定名为名字的文件,文件中包含实现该服务接口的类的全限定名。当应用程序启动时,Java的SPI机制会自动扫描classpath中的这些文件,并根据文件中指定的类名来加载实现类。
通过使用SPI,应用程序可以实现更灵活、可扩展的架构,同时也可以避免硬编码依赖关系和增加代码的可维护性。
在SpringBoot中,文件位置位于:META-INF/spring/org.springframework.boot.autoconfigure.AutoConfiguration.imports
场景:抽取聊天机器人场景,它可以打招呼.
效果:任何项目导入此starter都具有打招呼功能,并且问候语中的人名需要可以在配置文件中修改
- 创建自定义starter项目,引入spring-boot-starter基础依赖
- 编写模块功能,引入模块所有需要的依赖。
- 编写
xxxAutoConfiguration自动配置类,帮其他项目导入这个模块需要的所有组件 - 编写配置文件
META-INF/spring/org.springframework.boot.autoconfigure.AutoConfiguration.imports指定启动需要加载的自动配置 - 其他项目引入即可使用
3. @EnableXxxx 功能开关
自动配置,项目一启动,SPI文件中指定的所有类都会加载。通过@EnableXxxx手动控制哪些功能的开启; 手动导入。都是利用 @Import 把此功能要用的组件导入进去。
4. SpringBoot核心注解
1. @SpringBootApplication
@SpringBootConfiguration
就是: @Configuration ,容器中的组件,配置类。spring ioc启动就会加载创建这个类对象
@EnableAutoConfiguration:开启自动配置
开启自动配置
@AutoConfigurationPackage:扫描主程序包:加载自己的组件
- 利用
@Import(AutoConfigurationPackages.Registrar.class)想要给容器中导入组件。 - 把主程序所在的包的所有组件导入进来。
@Import(AutoConfigurationImportSelector.class):加载所有自动配置类:加载starter导入的组件
org.springframework.boot.autoconfigure.AutoConfigurationImportSelector:
protected List<String> getCandidateConfigurations(AnnotationMetadata metadata, AnnotationAttributes attributes) {


		List<String> configurations = ImportCandidates.load(AutoConfiguration.class, getBeanClassLoader())
			.getCandidates();
		Assert.notEmpty(configurations,
				"No auto configuration classes found in "
						+ "META-INF/spring/org.springframework.boot.autoconfigure.AutoConfiguration.imports. If you "
						+ "are using a custom packaging, make sure that file is correct.");
		return configurations;
	}
扫描SPI文件:
META-INF/spring/org.springframework.boot.autoconfigure.AutoConfiguration.imports
@ComponentScan
组件扫描:排除一些组件(哪些不要)
排除前面已经扫描进来的配置类、和自动配置类。
@ComponentScan(excludeFilters = {

     @Filter(type = FilterType.CUSTOM, classes = TypeExcludeFilter.class),
      @Filter(type = FilterType.CUSTOM, classes = AutoConfigurationExcludeFilter.class) })
2. 完整启动加载流程
5. 自定义starter
1. 创建robot-boot-starter模块
这个模块作为公有的聊天机器人模块,也就是有很多项目模块都需要引入它
引入依赖
<parent>
    <artifactId>spring-boot-starter-parent</artifactId>
    <groupId>org.springframework.boot</groupId>
    <version>3.0.5</version>
</parent>

<dependencies>
    <dependency>
        <groupId>org.springframework.boot</groupId>
        <artifactId>spring-boot-starter-web</artifactId>
    </dependency>
    <!-- https://mvnrepository.com/artifact/org.projectlombok/lombok -->
    <dependency>
        <groupId>org.projectlombok</groupId>
        <artifactId>lombok</artifactId>
        <version>1.18.10</version>
        <scope>provided</scope>
    </dependency>
    <!--        导入配置处理器,配置文件自定义的properties配置都会有提示-->
    <dependency>
        <groupId>org.springframework.boot</groupId>
        <artifactId>spring-boot-configuration-processor</artifactId>
        <optional>true</optional>
    </dependency>
</dependencies>
自定义配置有提示。导入以下依赖重启项目,再写配置文件就有提示
@ConfigurationProperties(prefix = "robot", ignoreInvalidFields = true)  //此属性类和配置文件指定前缀绑定
@Component
@Data
public class RobotProperties {


    private String name;
}
<!--        导入配置处理器,配置文件自定义的properties配置都会有提示-->
<dependency>
    <groupId>org.springframework.boot</groupId>
    <artifactId>spring-boot-configuration-processor</artifactId>
    <optional>true</optional>
</dependency>
@Service
public class RobotService {


    @Autowired
    private RobotProperties robotProperties;

    public String hello(){


        return "你好," + robotProperties.getName();
    }
}
2. 创建spring-user模块
引入聊天机器人模块(
robot-boot-starter)
<dependency>
    <groupId>org.robot</groupId>
    <artifactId>robot-boot-starter</artifactId>
    <version>1.0-SNAPSHOT</version>
</dependency>
@RequestMapping(value = "/user")
@RestController
public class UserController {


    //这个组件是在robot-boot-starter模块中定义的
    @Autowired
    private RobotController robotController;

    public String robot(){


        return robotController.hello();
    }
}
yml配置
robot:
  name: chatgpt
6. 如何在业务模块中实现公有模块中的组件注册
方式一(指定包扫描)
Spring默认只扫描启动类目录下和子包下边的组件,所以这里要指定扫描robot-boot-starter包
@ComponentScan(value = {

    "org.robot"}) //扫描机器人模块下的组件
@SpringBootApplication
public class UserApplication {


    public static void main(String[] args) {


        SpringApplication.run(UserApplication.class, args);
    }
}
方式二(XxxAutoConfiguration)
在robot-boot-starter模块写一个RobotAutoConfiguration,给容器中导入这个场景需要的所有组件
@Import({

    RobotController.class, RobotProperties.class, RobotService.class})
public class RobotAutoConfiguration {


}
在spring-user模块中,导入RobotAutoConfiguration.class
@Import(RobotAutoConfiguration.class)
@SpringBootApplication
public class UserApplication {


    public static void main(String[] args) {


        SpringApplication.run(UserApplication.class, args);
    }
}
方式三(@EnableXxx)
使用
@EnableXxx机制,只要使用这个注解 就会开启这个功能
在robot-boot-starter模块自定义@EnableRobot注解
@Retention(RetentionPolicy.RUNTIME)
@Target({

    ElementType.TYPE})
@Documented
//以上元注解直接找个@EnableXxx类 拷贝进来即可
@Import(RobotAutoConfiguration.class)
public @interface EnableRobot {


}
在spring-user模块中启用注解,相当于导入了RobotAutoConfiguration.class中导入的组件
@EnableRobot
@SpringBootApplication
public class UserApplication {


    public static void main(String[] args) {


        SpringApplication.run(UserApplication.class, args);
    }
}
别人引入starter需要使用 @EnableRobot开启功能,灵活配置
方式四(完全自动配置)
- 依赖SpringBoot的SPI机制
META-INF/spring/org.springframework.boot.autoconfigure.AutoConfiguration.imports文件中编写好我们自动配置类的全类名即可- 项目启动,自动加载我们的自动配置类
在
robot-boot-starter类路径下新建META-INF/spring/org.springframework.boot.autoconfigure.AutoConfiguration.imports,里边放入指定要扫描的配置类
org.robot.config.RobotAutoConfiguration
这样只要别的项目引入了robot-boot-starter模块,里边的组件都会自动注入