一、检测股价线性趋势
安装
pip install tushare
或者访问:https://pypi.python.org/pypi/Tushare/下载
常用方法
1*ts.get_k_data()获取个股历史的数据
2*ts.get_h_data()获取全部历史或者某段历史的数据
3*ts.get_today_all()` 一次性获取当前所有股票的数据
详情请见http://tushare.org/index.html
二、事例解析
2.1电影票房显示事例—ts.realtime_boxoffice
from scipy import stats
from matplotlib import pyplot as plt
#用scipy生成一个正太分布
dianying=ts.realtime_boxoffice()
dianying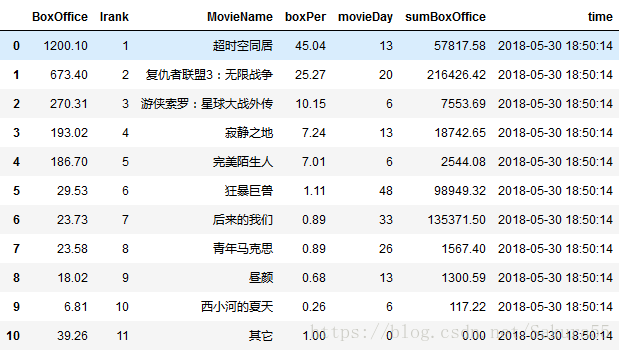
2.2 股票线性趋势
# 1导入模块
from datetime import datetime
from datetime import timedelta
import matplotlib.pyplot as plt
import tushare as ts
from scipy import signal
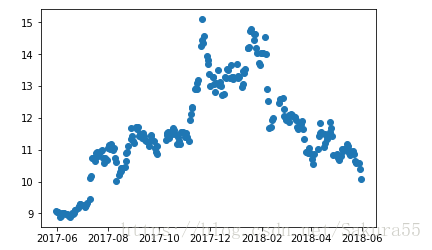
all=ts.get_h_data("000001",start="2017-05-30",end="2018-05-30")#“000001”是股票代码
x=all.index #索引是X轴
x
>>DatetimeIndex(['2018-05-30', '2018-05-29', '2018-05-28', '2018-05-25',
'2018-05-24', '2018-05-23', '2018-05-22', '2018-05-21',
'2018-05-18', '2018-05-17',
...
'2017-06-13', '2017-06-12', '2017-06-09', '2017-06-08',
'2017-06-07', '2017-06-06', '2017-06-05', '2017-06-02',
'2017-06-01', '2017-05-31'],
dtype='datetime64[ns]', name='date', length=246, freq=None)
#Y轴获取
y=all["close"]
#利用得到的X,Y轴
plt.plot(x,y,"o")
plt.show()
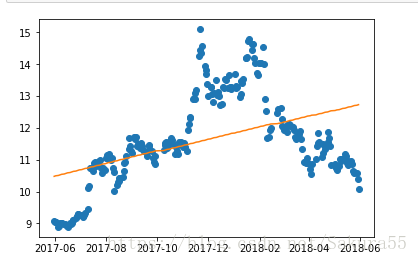
#去曲线
d=signal.detrend(y)
plt.plot(x,y,"o",x,y-d,"-")
plt.show()》》·修改前
》》·修改后
2.3图像处理
import numpy as np
from matplotlib import pyplot as plt
from scipy import ndimage
#创建图像
from scipy import misc
#用ascent创建图片
image=misc.ascent()
2.3.1划分区域—plt.subplot()
plt.subplot(221)  #划分2行2列  占据第一格
plt.title("oldimage")
plt.imshow(image)
plt.axis("off")    #元组单独显示坐标,不再图上显示
2.3.2中值虑—ndimage.median_filter
plt.subplot(222)
plt.title("oldfilter")
filter=ndimage.median_filter(image,size=10)
plt.imshow(filter)
plt.axis("off")
2.3.3旋转—ndimage.rotate()
plt.subplot(223)
plt.title("oldfilter")
rotate=ndimage.rotate(image,100)
plt.imshow(rotate)
plt.axis("off")
2.3.4边缘检测—ndimage.prewitt()
plt.subplot(224)
plt.title("oldfilter")
prewitt=ndimage.prewitt(image)
plt.imshow(prewitt)
plt.axis("off")
#效果如下: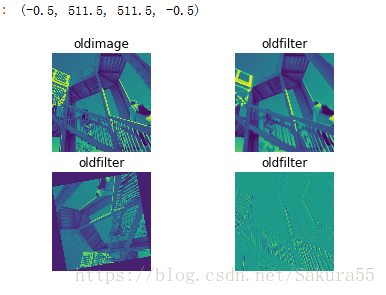
2.4声音处理简介
from scipy.io import wavfile
import numpy as np
simple,data=wavfile.read("t1.wav")
#读取文件
simple,data
'''
(22050, array([[0, 0],
        [0, 0],
        [0, 0],
        ...,
        [0, 0],
        [0, 0],
        [0, 0]], dtype=int16)
    '''
#将原有的声音数据复制一份
repeat=np.array(list(data)*2)
wavfile.write("w1.wav",simple,repeat)
#保存文件