注意:需要能访问外网的权限,脚本内容如下:
#!/bin/bash
. /etc/init.d/functions

# IP地址,默认为本机第一块网卡IP地址(不包含lo网卡)
ip=
# 主机名称,默认为当前主机名称
hostName=master
# Docker版本
dockerVersion=20.10.6
# Kubernetes版本
k8sVersion=1.23.0
# Pod网段
podSubnet="10.244.0.0/16"
# Service网段
serviceSubnet="10.10.0.0/16"

networkCheck(){


ping -c 1 www.baidu.com > /dev/null 2>&1

if [ $? -eq 0 ];then
	action "外网权限检查:"
else
	action "外网权限检查:"
	echo "此脚本需要访问外网权限才可成功执行,退出脚本"
	exit 5
fi
}
cpuCheck(){


cpuCores=$(grep -c ^processor /proc/cpuinfo)
if [[ ${cpuCores} -lt 2 ]];then
	action "CPU配置检查:" false
	echo -e "\033[32m# 当前主机CPU ${cpuCores}核 < 2核,不满足安装K8s最低需求,请检查配置\033[0m"
	exit 5
else
	action "CPU配置检查:"
fi
}

menoryCheck(){


menorySize=$(free -m|grep -i mem|awk '{print $2}')

if [[ ${menorySize} -lt 1800 ]];then
        action "内存配置检查:" false
        echo -e "\033[32m# 当前主机内存 ${menorySize}M < 1800M(2G),不满足安装K8s最低需求,请检查配置\033[0m"
	exit 5
else
        action "内存配置检查:"
fi
}


stopFirewall(){


systemctl disable firewalld --now &>/dev/null
setenforce 0 &>/dev/null
sed  -i.$(date +%F) -r 's/SELINUX=[ep].*/SELINUX=disabled/g' /etc/selinux/config

if (grep SELINUX=disabled /etc/selinux/config) &>/dev/null;then
	action "关闭防火墙:"
else
	action "关闭防火墙:" false
fi
}

hostName(){


if [[ -z ${ip} ]];then
	ip=$(ip addr | grep -oP '(?<=inet\s)\d+\.\d+\.\d+\.\d+'|egrep -v "127.0.0.1|172.17.0.1"|awk NR==1)
fi

if [[ -z ${hostName} ]];then
	hostName="${

     HOSTNAME}"
fi

if ! (egrep -w "${ip} +${hostName}" /etc/hosts) &>/dev/null;then
	hostnamectl set-hostname ${hostName}
	echo "${ip} ${hostName}" >> /etc/hosts
fi

if (egrep -w "${ip} +${hostName}" /etc/hosts) &>/dev/null;then
	action "添加本地域名解析:"
else
        action "添加本地域名解析:" false
fi
}

timeSync(){


if ! (which ntpdate &>/dev/null);then
	echo -e "\033[32m# ntpdate未安装,开始进行安装....\033[0m"
	(yum -y install ntpdate) &>/dev/null;sleep 0.3
	if (which ntpdate &>/dev/null);then
		action "ntpdate安装成功:"
	fi
fi

if (ntpdate ntp1.aliyun.com &>/dev/null);then
	if ! (egrep "ntpdate +ntp1.aliyun.com" /var/spool/cron/root &>/dev/null);then
		echo "0 1 * * * ntpdate ntp1.aliyun.com" >> /var/spool/cron/root
	fi
		action "时间同步:"
else
	action "时间同步:" false
	fi
}

swapOff(){


swapoff --all
sed -i -r '/swap/ s/^/#/' /etc/fstab

if [[ $(free | grep -i swap | awk '{print $2}') -eq 0 ]]; then
    action "关闭交换分区:"
else
    action "关闭交换分区:" false
fi
}

addKernelArg(){


KernelArg=("net.bridge.bridge-nf-call-ip6tables" "net.bridge.bridge-nf-call-iptables" "net.ipv4.ip_forward")

# 判断内核参数是否存在,如果不存在则添加
for ((i=0;i<${#KernelArg[@]};i++))do
	if [[ $(sysctl -n ${

     KernelArg[i]}) -ne 1 ]];then
		echo "${KernelArg[i]} = 1" >> /etc/sysctl.d/kubernetes.conf
	fi
done
modprobe br_netfilter &>/dev/null
sysctl -p /etc/sysctl.d/kubernetes.conf &>/dev/null

if [[ $(sysctl -n ${

     KernelArg[0]}) -eq 1 && $(sysctl -n ${

     KernelArg[1]}) -eq 1 && $(sysctl -n ${

     KernelArg[2]}) -eq 1 ]]; then
		action "添加内核参数:"
	else
		action "添加内核参数:" false
fi

}

ipvs(){


if (command -v ipset &>/dev/null && command -v ipvsadm &>/dev/null);then
cat > /etc/sysconfig/modules/ipvs.modules <<EOF
modprobe -- ip_vs
modprobe -- ip_vs_rr
modprobe -- ip_vs_wrr
modprobe -- ip_vs_sh
modprobe -- nf_conntrack_ipv4
EOF
	chmod +x /etc/sysconfig/modules/ipvs.modules
	/etc/sysconfig/modules/ipvs.modules
else
	echo -e "\033[32m# ipvs未安装,开始进行安装....\033[0m"
	yum -y install ipset ipvsadm &>/dev/null
	if (command -v ipset &>/dev/null && command -v ipvsadm &>/dev/null);then
		action "ipvs安装成功:"
cat > /etc/sysconfig/modules/ipvs.modules <<EOF
modprobe -- ip_vs
modprobe -- ip_vs_rr
modprobe -- ip_vs_wrr
modprobe -- ip_vs_sh
modprobe -- nf_conntrack_ipv4
EOF
	        chmod +x /etc/sysconfig/modules/ipvs.modules
        	/etc/sysconfig/modules/ipvs.modules

	fi
fi
modprobe br_netfilter &>/dev/null

if (lsmod | grep -q -e ip_vs -e nf_conntrack_ipv4)&>/dev/null; then
	action "启用ipvs模块:"
else
	action "启用ipvs模块:" false
fi
}
dockerInstall(){


if ! (command -v docker &>/dev/null);then
	echo -e "\033[32m# Docker未安装,开始进行安装....\033[0m"
	(curl -o /etc/yum.repos.d/CentOS-Base.repo https://mirrors.aliyun.com/repo/Centos-7.repo) &>/dev/null
	(wget -O /etc/yum.repos.d/epel.repo http://mirrors.aliyun.com/repo/epel-7.repo) &>/dev/null
	(yum install -y yum-utils) &>/dev/null
	(yum-config-manager --add-repo http://mirrors.aliyun.com/docker-ce/linux/centos/docker-ce.repo) &>/dev/null
	(yum install docker-ce-${dockerVersion} docker-ce-cli-${dockerVersion} -y) &>/dev/null
	if (command -v docker &>/dev/null);then
		action "Docker安装成功:"
	else
		action "Docker安装成功:" false
	fi
fi


mkdir /etc/docker &>/dev/null
if [[ -f /etc/docker/daemon.json ]];then
	mv /etc/docker/daemon.json{

    ,.$(date +%F)}
fi

cat <<EOF > /etc/docker/daemon.json
{
  "registry-mirrors": ["https://aoewjvel.mirror.aliyuncs.com"],
  "exec-opts": ["native.cgroupdriver=systemd"]
}
EOF
(systemctl enable docker --now) &>/dev/null

if [[ -f /etc/docker/daemon.json ]];then
	action "Docker镜像加速源:"
else
	action "Docker镜像加速源:"
fi
}

k8sInstall(){


k8scommand=("kubeadm" "kubelet" "kubectl")

if [[ -f /etc/yum.repos.d/kubernetes.repo ]];then
	mv /etc/yum.repos.d/kubernetes.repo{

    ,.$(date +%F)}
fi

cat <<EOF > /etc/yum.repos.d/kubernetes.repo
[kubernetes]
name=Kubernetes
baseurl=https://mirrors.aliyun.com/kubernetes/yum/repos/kubernetes-el7-x86_64/
enabled=1
gpgcheck=0
EOF

echo -e "\033[32m# 正在安装K8S,请耐心等待......\033[0m"
(yum -y install --setopt=obsoletes=0 kubeadm-${k8sVersion} kubelet-${k8sVersion} kubectl-${k8sVersion}) &>/dev/null
systemctl enable kubelet.service --now  &>/dev/null

for ((i=0;i<${#k8scommand[@]};i++))do
	if (command -v ${k8scommand[i]} &>/dev/null);then
		action "安装${k8scommand[i]}组件:"
	else
		action "安装${k8scommand[i]}组件:" false
	fi
done
}

k8sInit(){


# 通过hosts文件获取IP地址
if [[ -z ${ip} ]];then
	ip=$(grep ${

     HOSTNAME} /etc/hosts|awk '{print $1}'| awk NR==1)
fi

if [[ -f /root/kubeadm-config.yaml ]];then
	mv /root/kubeadm-config.yaml{

    ,.$(date +%F)}
fi

cat >> /root/kubeadm-config.yaml << EOF
apiVersion: kubeadm.k8s.io/v1beta3
bootstrapTokens:
- groups:
  - system:bootstrappers:kubeadm:default-node-token
  token: abcdef.0123456789abcdef
  ttl: 24h0m0s
  usages:
  - signing
  - authentication
kind: InitConfiguration
localAPIEndpoint:
  advertiseAddress: ${ip}
  bindPort: 6443
nodeRegistration:
  imagePullPolicy: IfNotPresent
  name: ${hostName}
  taints: null
---
apiServer:
  timeoutForControlPlane: 4m0s
apiVersion: kubeadm.k8s.io/v1beta3
certificatesDir: /etc/kubernetes/pki
clusterName: kubernetes
controllerManager: {}
dns: {}
etcd:
  local:
    dataDir: /var/lib/etcd
imageRepository: registry.aliyuncs.com/google_containers
kind: ClusterConfiguration
kubernetesVersion: ${k8sVersion}
networking:
  dnsDomain: cluster.local
  serviceSubnet: ${serviceSubnet}
  podSubnet: ${podSubnet}
scheduler: {}
---
apiVersion: kubeproxy.config.k8s.io/v1alpha1
kind: KubeProxyConfiguration
mode: ipvs
---
apiVersion: kubelet.config.k8s.io/v1beta1
kind: KubeletConfiguration
cgroupDriver: systemd
EOF

if [[ -f /root/kubeadm-config.yaml ]];then
        action "生成K8s初始化文件:"
else
        action "生成K8s初始化文件:" false
fi
echo -e "\033[32m# K8s初始化中,时间可能较长,可以使用 tailf k8s_init.log 可追踪整个过程....\033[0m"
echo
kubeadm init --config /root/kubeadm-config.yaml --ignore-preflight-errors=SystemVerification &>k8s_init.log
if [[ $? -eq 0 ]];then
	action "K8s初始化:"
	mkdir -p $HOME/.kube
	sudo cp -i /etc/kubernetes/admin.conf $HOME/.kube/config
	sudo chown $(id -u):$(id -g) $HOME/.kube/config
else
	action "K8s初始化:" false
	exit 5
fi
}

k8sNetwork(){


(wget -O /root/calico.yaml https://gitee.com/qinziteng/K8S/raw/master/YMAL/calico.yaml) &>/dev/null
(kubectl apply -f  /root/calico.yaml) &>/dev/null

if [[ $? -eq 0 ]];then
	action "K8s网络插件:"
else
	action "K8s网络插件:"  false
fi
}

k8sTaint(){


(kubectl taint nodes --all node-role.kubernetes.io/master-) &>/dev/null

if [[ $? -eq 0 ]];then
        action "设置Master节点可调度:"
else
        action "设置Master节点可调度:" false
fi
}


confCheck(){


cpuCheck
menoryCheck
networkCheck
}

initEnv(){


clear;echo "一键部署单机版K8S脚本"
hostName
stopFirewall
swapOff
timeSync
ipvs
addKernelArg
dockerInstall
}

k8s(){


clear;k8sInstall
k8sInit
k8sNetwork
k8sTaint

echo
echo -e "\033[32m# K8s单机版部署完成,等待Pod全部运行成功即可使用 使用 kubectl get pods -n kube-system 关注Pod状态...\033[0m"
bash
}
confCheck
initEnv
k8s
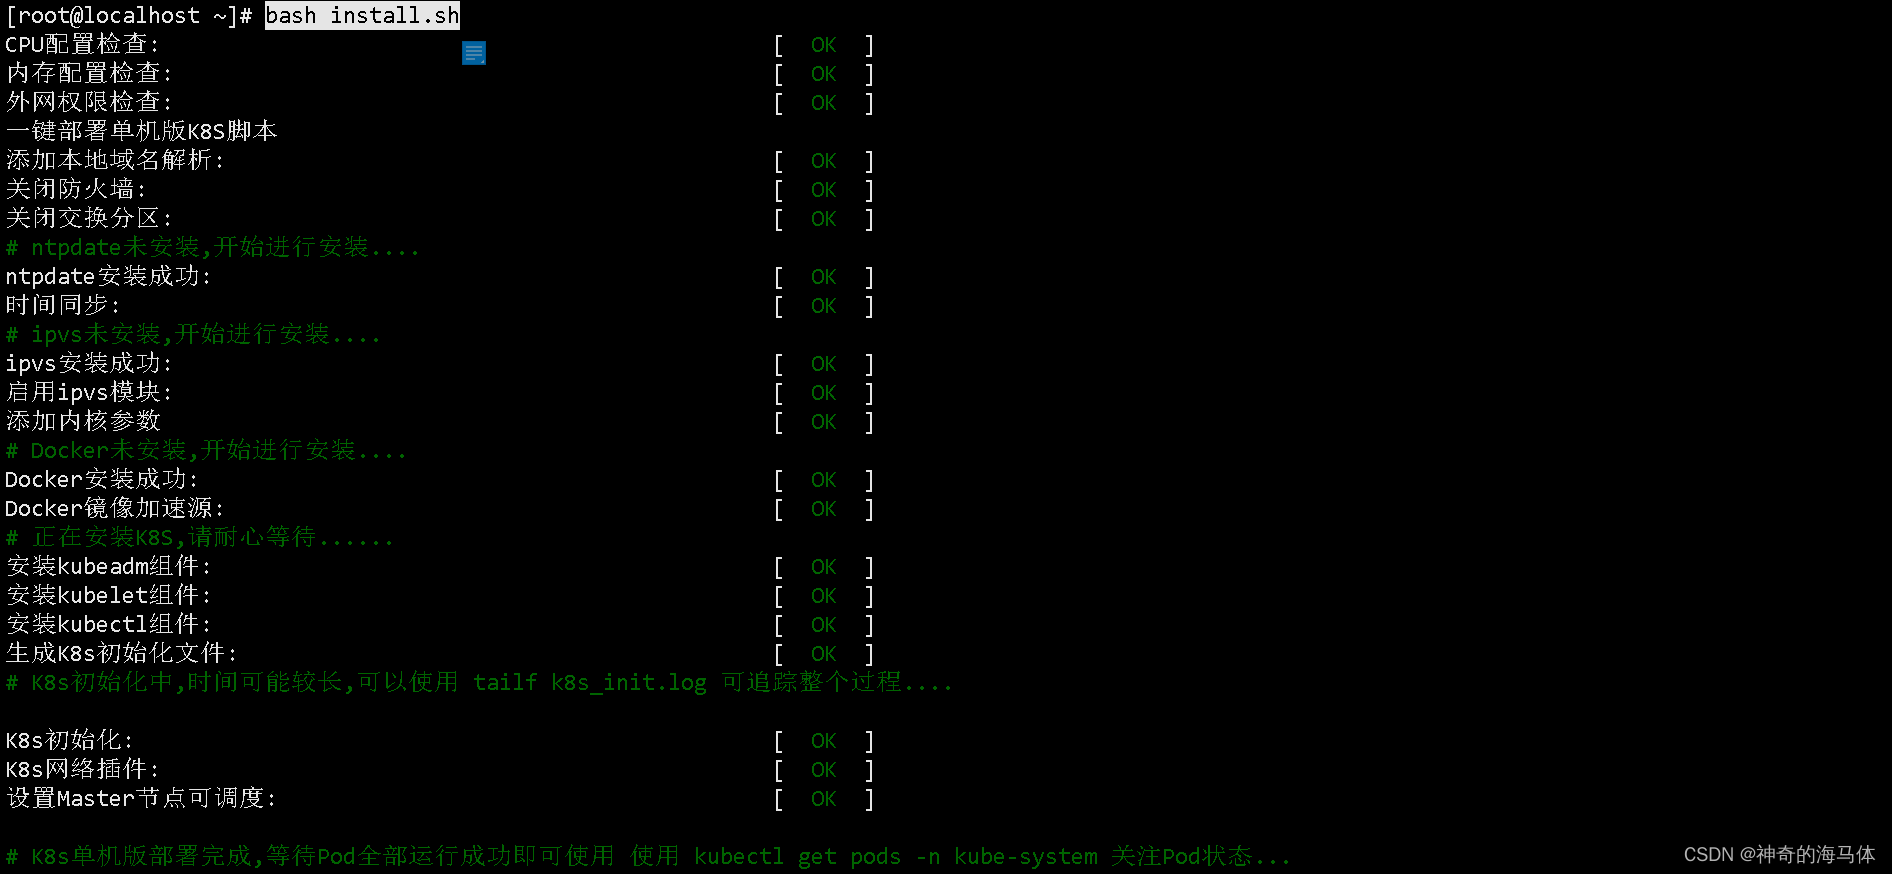
1、执行脚本:
bash install.sh
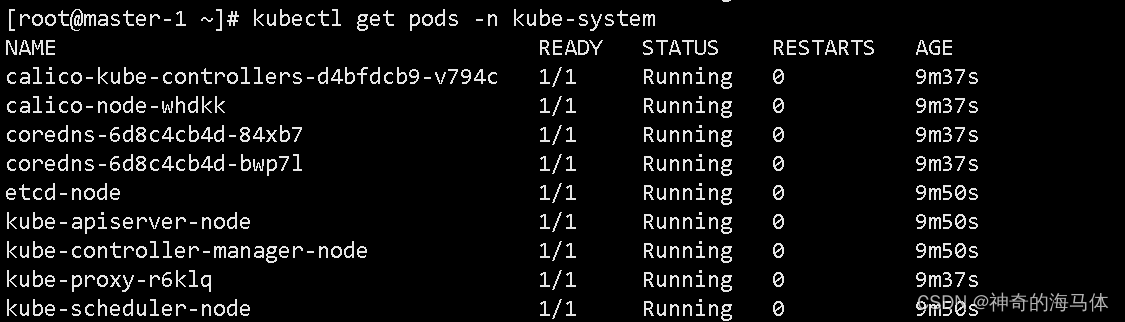
2、查看Pod状态:如果不是Running状态,请耐心等待。
kubectl get pods -n kube-system
3、查看节点状态:
kubectl get nodes

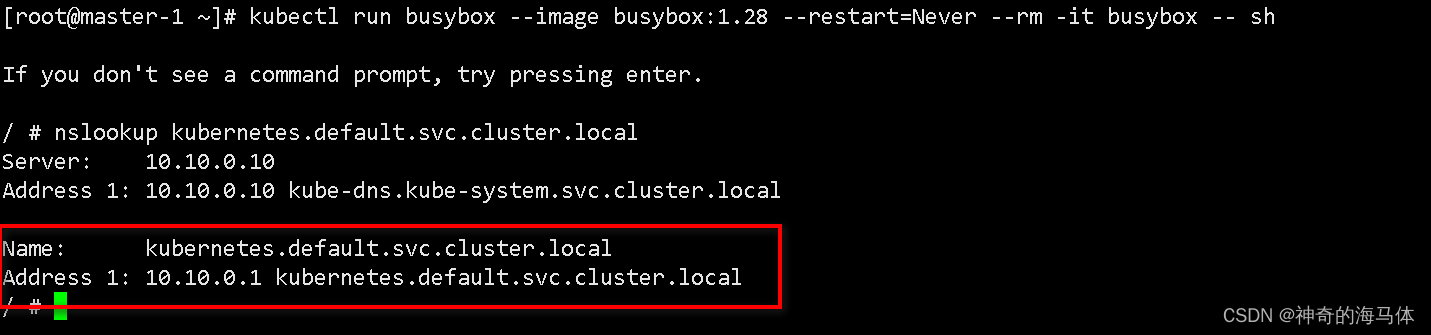
4、验证是否可调度 及 CoreDNS解析
kubectl run busybox --image busybox:1.28 --restart=Never --rm -it busybox -- sh

/ # nslookup kubernetes.default.svc.cluster.local