目录
一、建立模型
1.为什么会有 ‘模型’ ?
在工厂里,工人为了方便持续生产,就有了模型、模具。而在编程中我们为了提高代码的复用性也有了 ‘模型’
2.建模的由来
如果说当对一个指定的xml格式字符串完成了建模操作,好处在于,只需要调用指定的方法就可以完成预定的字符串获取;
3.建模的思路
- 分析被建模的文件有哪几个对象
- 每个对象拥有的属性及行为
- 定义对象从小到大(从里到外)
- 通过23种设计模式的工厂模式,解析xml文件生产出指定对象
好处:提高代码复用性
二、建模实例分析
1.下面我们对这个config.xml文件进行建模
<?xml version="1.0" encoding="UTF-8"?>
<config>
	<action path="/registerAction" type="test.action.RegisterAction">
		<forward name="success" path="/index.jsp" redirect="true" />
		<forward name="failed" path="/register.jsp" redirect="false" />
	</action>
	<action path="/loginAction" type="test.action.LoginAction">
		<forward name="a" path="/index.jsp" redirect="false" />
		<forward name="b" path="/welcome.jsp" redirect="true" />
	</action>
</config>
2. 分析:
首页我们要看一下这个里面有几个标签;
- 里面有三个标签 forward action config
- action标签有path、type属性,config标签有name、path、redirect属性
- 然后我们要把这些标签当做对象来进行操作,定义对象从里到外的
- 也就是要创建三个类 最后我们用config来建一个工厂,来解析所有对象的属性。
forwardModel类
package com.xml.jm.text;

/**
 * <forward name="success" path="/index.jsp" redirect="true" />
 *
 * @author 云村小威
 *
 */
public class ForwardModel {
	private String name;
	private String path;
	private boolean redirect;

	public String getName() {
		return name;
	}

	public void setName(String name) {
		this.name = name;
	}

	public String getPath() {
		return path;
	}

	public void setPath(String path) {
		this.path = path;
	}

	public boolean isRedirect() {
		return redirect;
	}

	public void setRedirect(boolean redirect) {
		this.redirect = redirect;
	}

}
ActionModel类
package com.xml.jm.text;

import java.util.HashMap;
import java.util.Map;

/**
 * <action path="/loginAction" type="test.action.LoginAction">
 *
 * @author 云村小威
 *
 */
public class ActionModel {
	private String path;
	private String type;
	private Map<String, ForwardModel> fMap = new HashMap<>();

	public String getPath() {
		return path;
	}

	public void setPath(String path) {
		this.path = path;
	}

	public String getType() {
		return type;
	}

	public void setType(String type) {
		this.type = type;
	}

	// 获取action中和forward标签的内容(获取方法),建模需要使用添加的方法
	public void push(ForwardModel forwardModel) {
		// 让forward标签在当前所在的action标签唯一
		fMap.put(forwardModel.getName(), forwardModel);
	}

	public ForwardModel pop(String name) {
		return fMap.get(name);
	}

}
configModel类
package com.xml.jm.text;

import java.util.HashMap;
import java.util.Map;

/**
 * config最大节点类
 *
 * @author 云村小威
 *
 */
public class ConfigModel {
	private Map<String, ActionModel> aMap = new HashMap<>();

	public void push(ActionModel actionModel) {
		// path="/bookAction"标识在当前config中唯一
		aMap.put(actionModel.getPath(), actionModel);
	}

	public ActionModel pop(String path) {
		return aMap.get(path);
	}
}
ConfigModelFactory工厂类
package com.xml.jm.text;
import java.io.InputStream;
import java.util.List;
import org.dom4j.Document;
import org.dom4j.Element;
import org.dom4j.io.SAXReader;
/**
* 利用工厂模式对mvc.xml进行建模 建模: 就是以面向对象的思想去操作xml里面的内容
*
* @author 云村小威
*
*/
public class ConfigModelFactory {
public static ConfigModel build() throws Exception {
return build("config.xml");
}
public static ConfigModel build(String xPath) throws Exception {
// 先实例化最大节点模型类
ConfigModel config = new ConfigModel();
// xml文件读取流
InputStream in = ConfigModelFactory.class.getResourceAsStream(xPath);
SAXReader saxReader = new SAXReader();// 用到了dom4j解析方法
Document doc = saxReader.read(in);// 解析
/**
* 接下来就是建模(将xml中的内容填充到空白的模型对象configModel)
*/
List<Element> nodes1 = doc.selectNodes("/config/action");
for (Element actionEle : nodes1) {
// 实例化子节点模型类
ActionModel action = new ActionModel();
action.setPath(actionEle.attributeValue("path"));// 给2节点里的属性path赋值
action.setType(actionEle.attributeValue("type"));// 给2节点里的属性type赋值
// 找到2节点下的子节点
List<Element> nodes2 = actionEle.selectNodes("forward");
for (Element forwardEle : nodes2) {
// 实例化子节点模型类
ForwardModel forward = new ForwardModel();
forward.setName(forwardEle.attributeValue("name"));// 给3节点里的属性name赋值
forward.setPath(forwardEle.attributeValue("path"));// 给3节点里的属性path赋值
/**
* redirect 填false 意味着转发 不填默认重定向(注意:只有填false才是转发)
*/
forward.setRedirect(!"false".equals(forwardEle.attributeValue("redirect")));// 给3节点里的属性redirect赋值
// 将内容添加到actionModel
action.push(forward);
}
// 将内容添加到configModel
config.push(action);
}
return config;
}
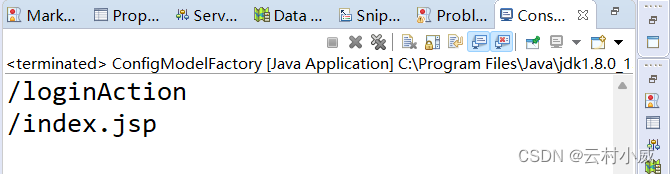
public static void main(String[] args) throws Exception {
// 测试
ConfigModel model = ConfigModelFactory.build();
// 第二个action标签
ActionModel pop = model.pop("/loginAction");
System.out.println(pop.getPath());
// action下forward标签name值为a的元素
ForwardModel pop2 = pop.pop("a");
System.out.println(pop2.getPath());
}
}
运行结果:
三、案例
要求:
- 对web.xml进行建模
- 写一个servlet
- 通过url-pattern读取到servlet-class的值
<?xml version="1.0" encoding="UTF-8"?>
<web-app>
	<servlet>
		<servlet-name>小黑宝</servlet-name>
		<servlet-class>com.xml.jm.WebServlet</servlet-class>
	</servlet>
	<servlet-mapping>
		<servlet-name>小黑宝</servlet-name>
		<url-pattern>/小黑宝</url-pattern>
	</servlet-mapping>
	<servlet>
		<servlet-name>小黑子</servlet-name>
		<servlet-class>com.xml.jm.WebServlet</servlet-class>
	</servlet>
	<servlet-mapping>
		<servlet-name>小黑子</servlet-name>
		<url-pattern>/小黑子</url-pattern>
	</servlet-mapping>
</web-app>
分析:
- 从外到里 有:web-app servlet servlet-mapping servlet-name servlet-class url-pattern 六个标签
- web-app对servlet、servlet-mapping有增加行为
- servlet对servlet-name、servlet-class有增加行为
- servlet-mapping对servlet-name、url-pattern有增加行为
- 然后我们要把这些标签当做对象来进行操作,定义对象从里到外
- 最后我们用web-app来建一个工厂,来解析所有对象的属性。
ServletNameModel类
package com.xml.jm;
/**
 *
 * @author 云村小威
 *
 */
public class ServletNameModel {
	private String context;

	public String getContext() {
		return context;
	}

	public void setContext(String context) {
		this.context = context;
	}

}
ServletClassModel类
package com.xml.jm;
/**
 *
 * @author 云村小威
 *
 */
public class ServletClassModel {
	private String context;

	public String getContext() {
		return context;
	}

	public void setContext(String context) {
		this.context = context;
	}

}
UrlpatternModel类
package com.xml.jm;
/**
 *
 * @author 云村小威
 *
 */
public class UrlpatternModel {
	private String context;

	public String getContext() {
		return context;
	}

	public void setContext(String context) {
		this.context = context;
	}

}
ServletModel类
package com.xml.jm;

/**
 * @author 云村小威
 */
public class ServletModel {
	private ServletNameModel servletName;
	private ServletClassModel servletClass;

	public ServletNameModel getServletName() {
		return servletName;
	}

	public void setServletName(ServletNameModel servletName) {
		this.servletName = servletName;
	}

	public ServletClassModel getServletClass() {
		return servletClass;
	}

	public void setServletClass(ServletClassModel servletClass) {
		this.servletClass = servletClass;
	}

}
ServletMappinModel类
package com.xml.jm;

import java.util.ArrayList;
import java.util.List;

/**
 * @author 云村小威
 */
public class ServletMappingModel {
	private ServletNameModel servletName;
	private List<UrlpatternModel> urlpattern = new ArrayList<>();

	public ServletNameModel getServletName() {
		return servletName;
	}

	public void setServletName(ServletNameModel servletName) {
		this.servletName = servletName;
	}

	public List<UrlpatternModel> getUrlpattern() {
		return urlpattern;
	}

	public void setUrlpattern(UrlpatternModel urlpattern) {
		this.urlpattern.add(urlpattern);
	}

}
WebAppModel类
package com.xml.jm;

import java.util.ArrayList;
import java.util.List;

/**
 *
 * @author 云村小威
 *
 */
public class WebAppModel {
	private List<ServletModel> serlvet = new ArrayList<>();
	private List<ServletMappingModel> servletmapping = new ArrayList<>();

	public void pushServletModel(ServletModel servletModel) {
		serlvet.add(servletModel);
	}

	public List<ServletModel> getServletModel() {
		return serlvet;
	}

	public void pushServletMappingModel(ServletMappingModel servletMappingModel) {
		servletmapping.add(servletMappingModel);
	}

	public List<ServletMappingModel> getServletMappingModel() {
		return servletmapping;
	}
}
WebAppModelFactory工厂类
package com.xml.jm;

import java.io.InputStream;
import java.util.List;

import org.dom4j.Document;
import org.dom4j.Element;
import org.dom4j.io.SAXReader;

/**
 * 利用工厂类进行mvc.xml建模
 *
 * @author 云村小威
 *
 */
public class WebAppModelFactory {
	public static WebAppModel build() throws Exception {
		return build("web.xml");
	}

	public static WebAppModel build(String xmlpath) throws Exception {
		InputStream Stream = WebAppModelFactory.class.getResourceAsStream(xmlpath);
		// 实例化DOM4J核心类
		SAXReader sr = new SAXReader();
		// 读取流对象
		Document read = sr.read(Stream);
		// 实例化最大节点模型
		WebAppModel wm = new WebAppModel();
		// 获取servlet节点
		List<Element> list = read.selectNodes("/web-app/servlet");
		for (Element element : list) {
			// 实例化第二大的节点
			ServletModel sm = new ServletModel();
			/**
			 * 给ServletModel填充xml内容
			 */
			// 获取指定节点
			Element node1 = (Element) element.selectSingleNode("servlet-name");
			Element node2 = (Element) element.selectSingleNode("servlet-class");
			ServletNameModel servletNameModel = new ServletNameModel();
			ServletClassModel servletClassModel = new ServletClassModel();
			// 添加内容
			servletNameModel.setContext(node1.getText());
			servletClassModel.setContext(node2.getText());

			// 父节点添加内容
			sm.setServletClass(servletClassModel);
			sm.setServletName(servletNameModel);

			// 最大节点添加
			wm.pushServletModel(sm);
		}

		/**
		 * 将servlet-mapping的标签内容填充进WebApp
		 */
		List<Element> sme = read.selectNodes("web-app/servlet-mapping");
		for (Element element : sme) {
			// 实例化第二大的节点
			ServletMappingModel smm = new ServletMappingModel();
			/**
			 * 给给ServletMappingModel填充xml的内容
			 */
			Element selecNameEle = (Element) element.selectSingleNode("servlet-name");
			// 实例化子节点并添加指定内容
			ServletNameModel servletNameModel = new ServletNameModel();
			servletNameModel.setContext(selecNameEle.getText());

			// 添加到父节点
			smm.setServletName(servletNameModel);

			List<Element> urlPatternEles = element.selectNodes("url-pattern");
			for (Element urlPatternEle : urlPatternEles) {
				// 实例化子节点并添加指定内容
				UrlpatternModel urlPatternModel = new UrlpatternModel();
				urlPatternModel.setContext(urlPatternEle.getText());
				// 添加到父节点
				smm.setUrlpattern(urlPatternModel);
			}
			wm.pushServletMappingModel(smm);
		}
		return wm;
	}

}
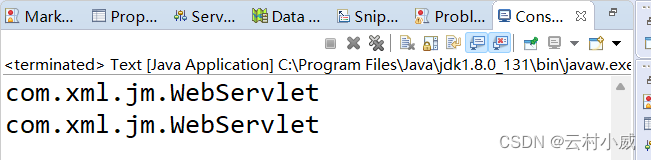
测试结果:
package com.xml.jm;

import java.util.List;

/**
 * 调用工厂类测试结果 通过url-pattern读取到servlet-class的值
 *
 * @author 云村小威
 *
 */
public class Text {
	public static void main(String[] args) throws Exception {
		WebAppModel model = WebAppModelFactory.build();
		// 先获取servlet标签对象
		List<ServletModel> servletModel = model.getServletModel();
		for (ServletModel sm : servletModel) {

			// 再获取servletmappind标签对象
			List<ServletMappingModel> list = model.getServletMappingModel();
			for (ServletMappingModel smm : list) {
				// 获取到urlpattern对象(集合)
				List<UrlpatternModel> urlpattern = smm.getUrlpattern();
				// 遍历得到urlpattern对象
				for (UrlpatternModel um : urlpattern) {
					// 判断servlet-mapping节点下url-pattern标签的内容是否等于servlet节点下的servlet-name值
					if (um.getContext().equals(sm.getServletName().getContext())) {
						// 等于就输出servle-class的内容
						/**
						 * 因为url-pattern的内容等于servlet-name的内容
						 */
						System.out.println(sm.getServletClass().getContext());
					}
				}
			}
		}
	}
}
输出结果: