目录
前言
目前我们所学习到的Vue、React都是组件化开发,在这些项目中,一个页面会被拆分成很多组件,组件之间层层嵌套形成所谓的“祖组件”、“父组件”和“子组件”,而这些组件之间往往需要数据信息传递,即组件通信。下文内容,是我在学习react的过程中总结的几种通信方法:
1、props父子组件通信
2、Context跨组件通信
3、消息订阅与发布
4、redux与react-redux集中式管理
父子组件通信
父子组件案例
首先,在实现父子组件通信前,我们需要先写一个父子组件的案例:
App.jsx:根组件
import React, {

     Component } from 'react'
import Parent from './components/Parent'

export default class App extends Component {


  render() {


    return (
      <div>
        <Parent />
      </div>
    )
  }
}
Parent.jsx:父组件
import React, {

     Component } from 'react'
import Son from './Son'
import './index.css'

export default class Parent extends Component {


  render() {


    return (
      <div className='parent'>
        <h2>你好,我是Parent组件!</h2>
        <Son />
      </div>
    )
  }
}
Son.jsx:子组件
import React, {

     Component } from 'react'

export default class Son extends Component {


  render() {


    return (
      <div className='son'>
        <h2>你好,我是Son组件!</h2>
      </div>
    )
  }
}
index.css:写个样式便于观察
.parent {


  background-color: black;
  color: #fff;
  padding: 10px;
}

.son {


  background-color: pink;
  padding: 10px;
}

props-父传子
父组件通过在子标签上添加
属性=值的方式来给子组件传递数据;
子组件通过this.props获取父组件传递的数据,且可以限制父组件传递数据的类型。
类式组件——父组件给子组件传递数据:
import React, {

     Component } from 'react'
import Son from './Son'
import './index.css'

export default class Parent extends Component {


  state = {


    info: '我是父组件要传给子组件的数据!'
  }
  render() {


    //解构赋值
    const {

     info } = this.state
    return (
      <div className='parent'>
        <h2>你好,我是Parent组件!</h2>
        {

    /* 父组件通过在子标签中添加 属性=值 将数据传递给子组件 */}
        <Son info={

    info} />
      </div>
    )
  }
}
类式组件——子组件接收父组件传递过来的数据:
import React, {

     Component } from 'react'

export default class Son extends Component {


  render() {


    const {

     info } = this.props
    return (
      <div className='son'>
        <h2>你好,我是Son组件!</h2>
        <h3>我接受到父组件传递过来的数据是:{

    info}</h3>
      </div>
    )
  }
}
函数式组件——父组件给子组件传递数据:
import React from 'react'
import Son from './Son'
import './index.css'

export default function Parent() {


  const info = '我是父组件要传给子组件的数据!'
  return (
    <div className='parent'>
      <h2>你好,我是Parent组件!</h2>
      {

    /* 父组件通过在子标签中添加 属性=值 将数据传递给子组件 */}
      <Son info={

    info} />
    </div>
  )
}
函数式组件——子组件接收父组件传递过来的数据:
import React from 'react'

export default function Son(props) {


  const {

    info} = props
  return (
    <div className='son'>
      <h2>你好,我是Son组件!</h2>
      <h3>我接受到父组件传递过来的数据是:{

    info}</h3>
    </div>
  )
}
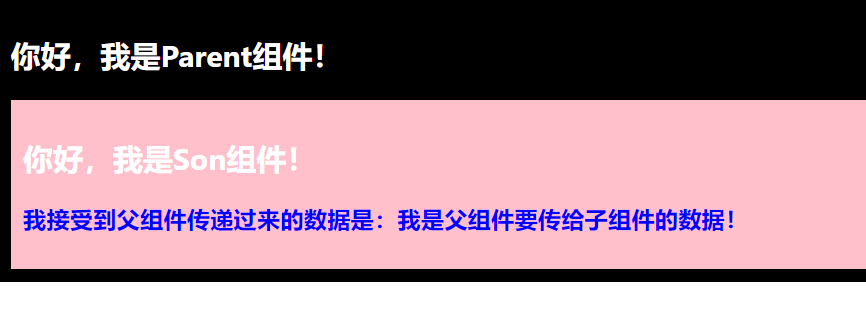
成功获取到数据:
在写项目过程中,我们有时要对父组件传递给子组件的数据进行类型限制或类型验证和必要性限制,此时需要借助 prop-types 库,来添加类型限制。
使用 PropTypes 进行类型检查
第一步:安装 prop-types 库 npm install --save prop-types
第二步:导入 prop-types 库 import PropTypes from 'prop-types';
第三步:使用代码如下:
类式组件——
import React, {

     Component } from 'react'
import PropTypes from 'prop-types';  //导入prop-types库

export default class Son extends Component {


  render() {


    const {

     info } = this.props
    //此处 propTypes 首字母必须小写
    Son.propTypes = {


      //限制info必传,且为字符串(PropTypes首字母必须大写)
      info: PropTypes.string.isRequired
    }
    return (
      <div className='son'>
        <h2>你好,我是Son组件!</h2>
        <h3>我接受到父组件传递过来的数据是:{

    info}</h3>
      </div>
    )
  }
}
函数式组件——
import React from 'react'
import PropTypes from 'prop-types';

Son.propTypes = {


  info: PropTypes.string
}
export default function Son(props) {


  const {

    info} = props
  return (
    <div className='son'>
      <h2>你好,我是Son组件!</h2>
      <h3>我接受到父组件传递过来的数据是:{

    info}</h3>
    </div>
  )
}
如果值没有传递的话,可以设置默认值:
defaultProps
Son.defaultProps = {


    info: '我是默认值'  //限制info必传,且为字符串
}
props-子传父
子组件通过
回调函数向父组件传递数据
类式组件——父组件给子组件绑定回调函数:
import React, {

     Component } from 'react'
import Son from './Son'
import './index.css'

export default class Parent extends Component {


  state = {


    info: '我是父组件要传给子组件的数据!'
  }
  changeInfo = (info) => {


    this.setState({

     info })
  }
  render() {


    const {

     info } = this.state
    return (
      <div className='parent'>
        <h2>你好,我是Parent组件!</h2>
        {

    /* 父组件给子组件绑定一个回调函数changeInfo */}
        <Son changeInfo={

    info => {

     this.changeInfo(info) }} />
        <h3>info信息是:{

    info}</h3>
      </div>
    )
  }
}
类式组件——子组件回调父组件传递过来的函数,并传入参数返回给父组件:
import React, {

     Component } from 'react'

export default class Son extends Component {


  btnClick = () => {


    const info2 = '我是子组件改变之后传给父组件的数据!'
    this.props.changeInfo(info2 )
  }
  render() {


    return (
      <div className='son'>
        <h2>你好,我是Son组件!</h2>
        <button onClick={

    () => this.btnClick()}>点击改变父组件展示的info</button>
      </div>
    )
  }
}
函数式组件需要借助
Hooks-useState(React16.8.0版本增加的新特性),实现在函数组件中使用state及setState的功能。
函数式组件——父组件给子组件绑定回调函数:
import React, {

     useState } from 'react'
import Son from './Son'
import './index.css'

export default function Parent() {


  const [info, setInfo] = useState('我是父组件要传给子组件的数据!')
  function changeInfo(info) {


    setInfo(info)
  }
  return (
    <div className='parent'>
      <h2>你好,我是Parent组件!</h2>
      {

    /* 父组件给子组件绑定一个回调函数changeInfo */}
      <Son changeInfo={

    info => changeInfo(info)} />
      <h3>info信息是:{

    info}</h3>
    </div>
  )
}
函数式组件——子组件回调父组件传递过来的函数,并传入参数返回给父组件:
import React from 'react'

export default function Son(props) {


  function btnClick() {


    const info2 = '我是子组件改变之后传给父组件的数据!'
    props.changeInfo(info2)
  }
  return (
    <div className='son'>
      <h2>你好,我是Son组件!</h2>
      <button onClick={

    btnClick}>点击改变父组件展示的info</button>
    </div>
  )
}
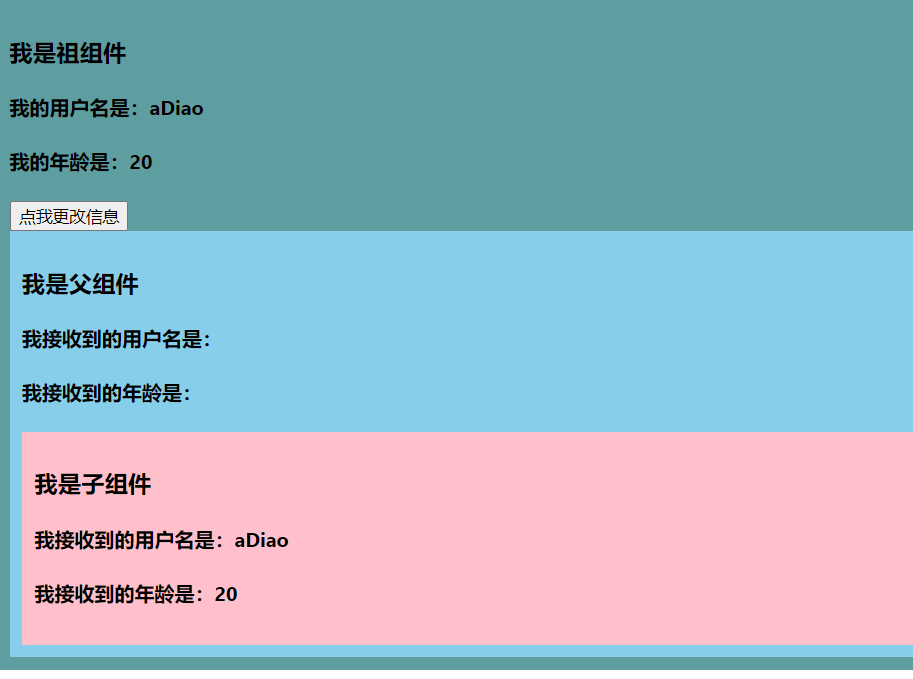
成功传递数据:

非父子组件通信
非父子组件案例
照旧,在实现非父子组件通信前,我们需要先准备一个案例:
Grandps.jsx:祖组件
import React, {

     Component } from 'react'
import Parent from './Parent'
import './index.css'

export default class Grandpa extends Component {


  state = {

     username: 'aDiao', age: 20 }
  changeMessage = () => {


    this.setState({

     username: '啊叼', age: 18 })
  }
  render() {


    const {

     username, age } = this.state
    return (
      <div className='grandpa'>
        <h3>我是祖组件</h3>
        <h4>我的用户名是:{

    username}</h4>
        <h4>我的年龄是:{

    age}</h4>
        <button onClick={

    this.changeMessage}>点我更改信息</button>
        <Parent />
      </div>
    )
  }
}
Parent .jsx:父组件
import React, {

     Component } from 'react'
import Son from './Son'

export default class Parent extends Component {


  render() {


    return (
      <div className='parent'>
        <h3>我是父组件</h3>
        <h4>我接收到的用户名是:</h4>
        <h4>我接收到的年龄是:</h4>
        <Son />
      </div>
    )
  }
}
Son .jsx:子组件
import React, {

     Component } from 'react'

export default class Son extends Component {


  render() {


    return (
      <div className='son'>
        <h3>我是子组件</h3>
        <h4>我接收到的用户名是:</h4>
        <h4>我接收到的年龄是:</h4>
      </div>
    )
  }
}
index.css:写个样式便于观察
.grandpa {


  background-color: cadetblue;
  padding: 10px;
}

.parent {


  background-color: skyblue;
  padding: 10px;
}

.son {


  background-color: pink;
  padding: 10px;
}
Context跨组件通信
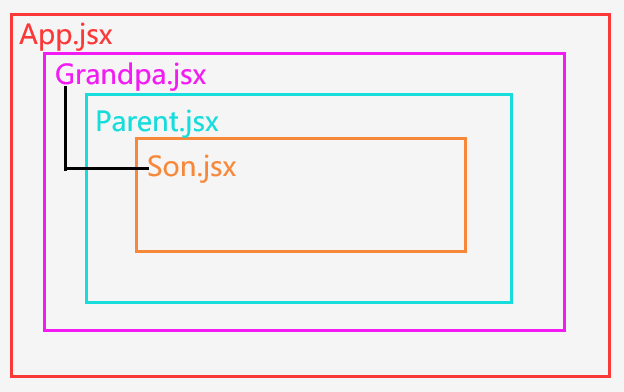
案例的嵌套关系如下图所示,此时我们想要Grandpa中的数据传递给它所嵌套的Parent组件和Son组件,该如何传递呢?阅读上文可以得知一个非常简便的方法——props一层一层传递接收,再传递再接收…但是在写项目过程中,当组件过多,嵌套层级过多时,这种方法显然不太适用了。
在react中,非父子组件(【祖组件与后代组件】、【兄弟组件】)通信需要借助Context来实现。
使用步骤:
1、创建Context容器对象:
const XxxContext = React.createContext()
或
const {

    Provider,Consumer} = React.createContext()
2、渲染子组件时,外面包裹<XxxContext.Provider>,通过value属性给后代组件传递数据:
<XxxContext.Provider value={

    数据}>
	<Son />
</XxxContext.Provider>
或
<Provider value={

    数据}>
	<Son />
</Provider>
3、后代组件读取数据:
  //第一种方式:仅适用于类式组件
  static contextType = XxxContext  // 声明接收context
  this.context  //读取context中的value数据

  //第二种方式:类式组件与函数式组件均适用
  <XxxContext.Consumer>
	{


	  value =>(
	    要显示的内容
	  )
	}
  </XxxContext.Consumer>
  或
  <Consumer>
	{


	  value =>(
	    要显示的内容
	  )
	}
  </Consumer>
代码展示:
类式组件——Grandpa.jsx:祖组件
import React, {

     Component } from 'react'
import Parent from './Parent'
import './index.css'

// 创建并暴露Context对象
export const {

     Provider, Consumer } = React.createContext()

export default class Grandpa extends Component {


  state = {

     username: 'aDiao', age: 20 }
  changeMessage = () => {


    this.setState({

     username: '啊叼', age: 18 })
  }
  render() {


    const {

     username, age } = this.state
    return (
      <div className='grandpa'>
        <h3>我是祖组件</h3>
        <h4>我的用户名是:{

    username}</h4>
        <h4>我的年龄是:{

    age}</h4>
        <button onClick={

    this.changeMessage}>点我更改信息</button>
        <Provider value={

    {

     username, age }}>
          <Parent />
        </Provider>
      </div>
    )
  }
}
类式组件——Son.jsx:后代组件
import React, {

     Component } from 'react'
// 导入Grandpa组件中暴露出来的Context对象的Consumer
import {

     Consumer } from './Grandpa'

export default class Son extends Component {


  render() {


    return (
      <Consumer>
        {


          (value) => {


            return (<div className='son' >
              <h3>我是子组件</h3>
              <h4>我接收到的用户名是:{

    value.username}</h4>
              <h4>我接收到的年龄是:{

    value.age}</h4>
            </div >)
          }
        }
      </Consumer >

    )
  }
}
函数式组件——Grandpa.jsx:祖组件
import React, {

     useState } from 'react'
import Parent from './Parent'
import './index.css'

export const {

     Provider, Consumer } = React.createContext()

export default function Grandpa() {


  const [user, setUser] = useState({

     username: 'aDiao', age: 20 })
  function changeMessage() {


    setUser({


      username: '啊叼',
      age: 18
    })
  }
  return (
    <div className='grandpa'>
      <h3>我是祖组件</h3>
      <h4>我的用户名是:{

    user.username}</h4>
      <h4>我的年龄是:{

    user.age}</h4>
      <button onClick={

    changeMessage}>点我更改信息</button>
      <Provider value={

    user}>
        <Parent />
      </Provider>
    </div>
  )
}
函数式组件——Son.jsx:后代组件
import React from 'react'
import {

     Consumer } from './Grandpa'

export default function Son() {


  return (<div className='son' >
    <h3>我是子组件</h3>
    <h4>我接收到的用户名是:
      <Consumer>
        {

    value => {


          return `${

      value.username}`
        }}
      </Consumer>
    </h4>
    <h4>我接收到的年龄是:
      <Consumer>
        {

    value => {


          return `${

      value.age}`
        }}
      </Consumer></h4>
  </div >)
}
为了更好展示效果,Parent组件中我并没有传递任何参数,也没有做任何改动。
import React, {

     Component } from 'react'
import Son from './Son'

export default class Parent extends Component {


  render() {


    return (
      <div className='parent'>
        <h3>我是父组件</h3>
        <h4>我接收到的用户名是:</h4>
        <h4>我接收到的年龄是:</h4>
        <Son />
      </div>
    )
  }
}
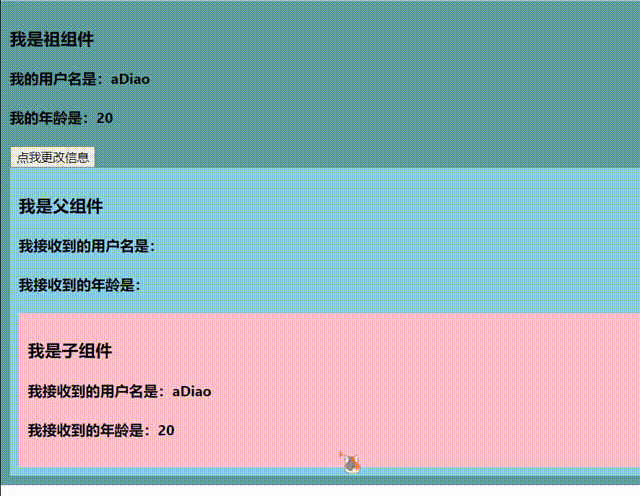
接收参数效果:
Context的用法还是很多的,也有很多API组合使用,在这里就不过多赘述。且在应用开发中一般不用Context,一般都用它的封装react插件。
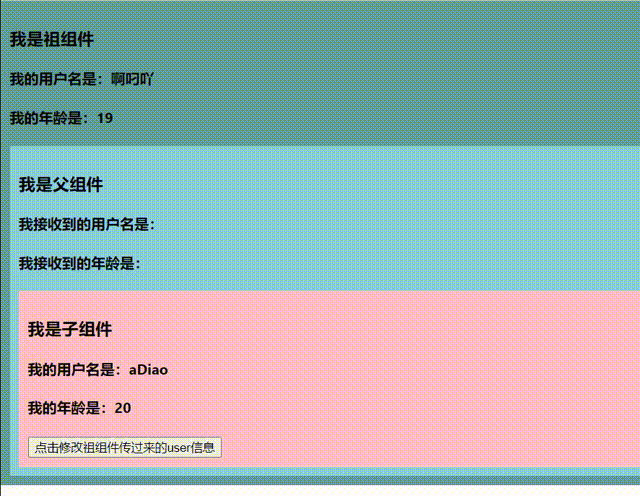
消息订阅-发布机制
同Vue一样,React也可以使用消息订阅与发布的工具库,即
PubSubJS。它允许不同部分之间的松散耦合,提高代码的可重用性和可维护性。通过在应用程序中使用事件,PubSubJS可以帮助开发人员处理复杂的异步代码流,并简化跨组件通信。PubSubJS支持多个订阅者和多个发布者,使其成为一个非常灵活和可扩展的库。
1、PubSubJS安装: npm install pubsub-js --save
2、使用代码(案例和上一个差不多):
函数式组件——Grandpa.jsx:祖组件
import React, {

     useState } from 'react'
import PubSub from 'pubsub-js'
import Parent from './Parent'
import './index.css'

export default function Grandpa() {


  const [user, setUser] = useState({

     username: '啊叼吖', age: 19 })
  React.useEffect(() => {


    const token = PubSub.subscribe('changeUser', (msg, user) => {


      setUser(user)
    })
    return () => {


      PubSub.unsubscribe(token)
    }
  }, [])
  return (
    <div className='grandpa'>
      <h3>我是祖组件</h3>
      <h4>我的用户名是:{

    user.username}</h4>
      <h4>我的年龄是:{

    user.age}</h4>
      <Parent />
    </div>
  )
}
函数式组件——Parent.jsx:父组件
import React from 'react'
import Son from './Son'

export default function Parent() {


  return (
    <div className='parent'>
      <h3>我是父组件</h3>
      <h4>我接收到的用户名是:</h4>
      <h4>我接收到的年龄是:</h4>
      <Son />
    </div>
  )
}
函数式组件——Son.jsx:子组件
import React from 'react'
import PubSub from 'pubsub-js'

export default function Son() {


  const user = {

     username: 'aDiao', age: 20 }
  function changeUserinfo() {


    PubSub.publish('changeUser', user)
  }
  return (<div className='son' >
    <h3>我是子组件</h3>
    <h4>我的用户名是:{

    user.username}</h4>
    <h4>我的年龄是:{

    user.age}</h4>
    <button onClick={

    changeUserinfo}>点击修改祖组件传过来的user信息</button>
  </div >)
}
效果展示:
redux通信
学过Vue的朋友们应该会更容易理解redux,就跟vuex差不多,都是专门用于做集中式状态管理的。
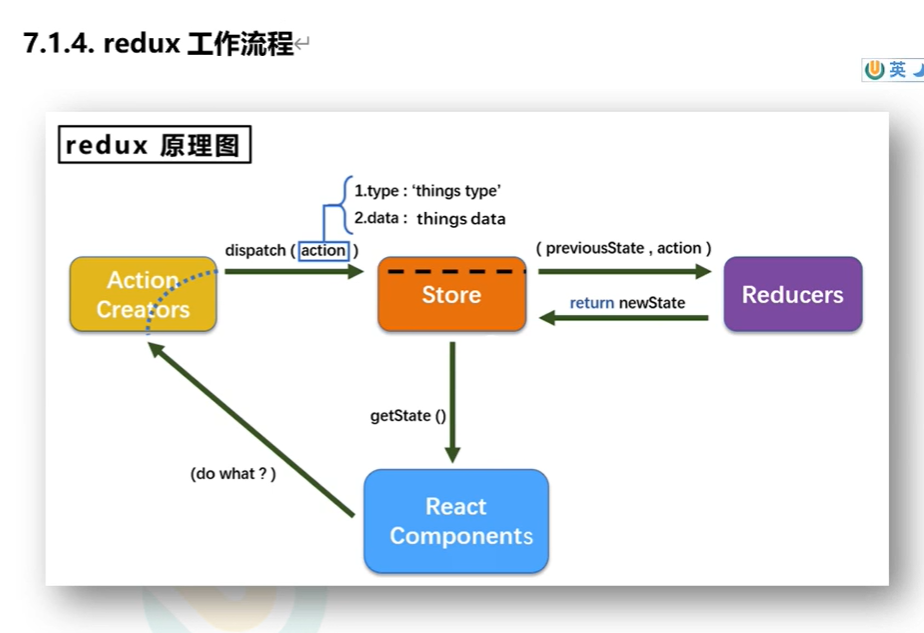
从上方流程图中大家也能看出来,redux有三个基本的概念:
- action:
- 动作的对象
- 包含2个属性:
- type:标识属性,值为字符串,唯一,必要属性
- data:数据属性,值任意类型,可选属性
- reducer:
- 用于初始化状态、加工状态
- 加工时,根据就的state和action,产生新的state的纯函数
- store:
- 将state、action、reducer联系在一起的对象
- 导入方式:
import {createStore} from 'redux'import reducer from './reducers'const store = createStore(reducer)
- 功能:
getState():得到statedispatch(action):分发action,触发reducer调用,产生新的statesubscribe(listener):注册监听,当产生了新的state时,自动调用
这个redux使用起来还是稍微有些复杂的,想深入理解的话可以去官网上看看 Redux 中文文档。
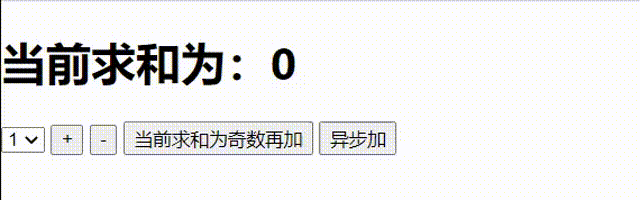
案例(求和案例)代码附上:
App.jsx
// 创建外壳组件App
import React, {

     Component } from 'react'
import Count from './components/Count';
// 引入样式
import './App.css';

class App extends Component {


  render() {


    return (
      <div className="app" >
        <Count />
      </div>
    )
  }
}
export default App;
components/Count.jsx
import React, {
Component } from 'react'
import store from '../../redux/store'
import {
createIncrementAction, createDecrementAction } from '../../redux/count_action'
export default class Count extends Component {
addCount = () => {
store.dispatch(createIncrementAction(this.selectNumber.value * 1))
}
subCount = () => {
store.dispatch(createDecrementAction(this.selectNumber.value * 1))
}
oddCount = () => {
const number = store.getState()
if (number % 2 !== 0) {
store.dispatch(createIncrementAction(this.selectNumber.value * 1))
}
}
asynCount = () => {
setTimeout(() => {
store.dispatch(createIncrementAction(this.selectNumber.value * 1))
}, 500);
}
render() {
return (
<div>
<h1>当前求和为:{
store.getState()}</h1>
<select ref={
c => this.selectNumber = c} name="" id="">
<option value="1">1</option>
<option value="2">2</option>
<option value="3">3</option>
</select>
<button onClick={
this.addCount}>+</button>
<button onClick={
this.subCount}>-</button>
<button onClick={
this.oddCount}>当前求和为奇数再加</button>
<button onClick={
this.asynCount}>异步加</button>
</div>
)
}
}
redux/constant.js
/**
 * 该模块是用于定义action对象中type类型的常量值
 */
export const INCREMENT = 'increment'
export const DECREMENT = 'decrement'
redux/store.js
import {

     legacy_createStore as createStore } from "redux";
import countReducer from "./count_reducer"

const store = createStore(countReducer)

export default store
redux/count_action.js
/**
 * 该文件专门为Count组件生成action对象
 */
import {

     INCREMENT, DECREMENT } from "./constant"
export function createIncrementAction(data) {


  return {

     type: INCREMENT, data }
}
export const createDecrementAction = data => ({

     type: DECREMENT, data })
redux/count_reducer.js
/**
 * 该文件是用于创建一个为Count组件服务的reducer,reducer的本质是一个函数
 * reducer函数会接到两个参数,分别为之前的状态(preState)和动作对象(action)
 */
import {

     INCREMENT, DECREMENT } from "./constant";
function countReducer(preState, action) {


  if (preState === undefined) preState = 0
  const {

     type, data } = action
  switch (type) {


    case INCREMENT:
      return preState + data;
    case DECREMENT:
      return preState - data;

    default:
      return preState
  }
}
export default countReducer
index.js
// 入口文件
// 引入react核心库
import React from 'react';
// 引入ReactDOM核心库
import ReactDOM from 'react-dom/client';
import {

     BrowserRouter } from 'react-router-dom'

import store from './redux/store';
import './index.css';
import App from './App';
import reportWebVitals from './reportWebVitals';


// 渲染App到页面
const root = ReactDOM.createRoot(document.getElementById('root'));
root.render(
  <React.StrictMode>
    <BrowserRouter><App /></BrowserRouter>
  </React.StrictMode>
);
// 检测redux状态改变,并作出实时数据更新
store.subscribe(() => {


  root.render(
    <React.StrictMode>
      <BrowserRouter><App /></BrowserRouter>
    </React.StrictMode>
  );
})
reportWebVitals();
效果展示:
react-redux通信

从上图中可以看出react-redux的工作原理,使用时需要注意:
- UI组件不能使用任何redux的api,只负责页面的呈现、交互等
- 容器组件负责和redux通信,将结果交给UI组件
- 通过
connect(mapStateToProps,mapDispatchToProps)(UI组件)来连接- mapStateToProps:映射状态,返回值是一个对象
- mapDispatchToProps:映射操作状态的方法,返回值是一个对象
- 容器组件中的store是靠props传进去的,而不是在容器组件中直接引入
使用步骤及代码(案例同上-求和案例):
1、 安装 npm i react-redux
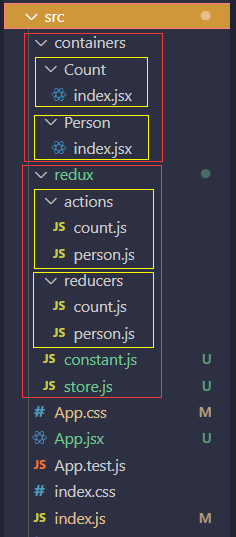
案例代码结构:
2、 在App.jsx中引入/containers/Count、/containers/Person
// 创建外壳组件App
import React, {

     Component } from 'react'
import Count from './containers/Count';
import Person from './containers/Person';
// 引入样式
import './App.css';

class App extends Component {


  render() {


    return (
      <div className="app" >
        <Count />
        <br /><hr /><hr /><br />
        <Person />
      </div>
    )
  }
}

export default App;
3、创建一个containers/Count/index.jsx容器,引入react-redux连接、引入action中生成操作对象的方法。
import {
connect } from 'react-redux'
import {
createIncrementAction, createDecrementAction, createIncrementAsyncAction } from '../../redux/actions/count'
import React, {
Component } from 'react'
class Count extends Component {
addCount = () => {
const {
value } = this.selectNumber
//通过props使用react-redux中的操作状态的方法
this.props.increment(value * 1)
}
subCount = () => {
const {
value } = this.selectNumber
//通过props使用react-redux中的操作状态的方法
this.props.decrement(value * 1)
}
oddCount = () => {
const {
value } = this.selectNumber
if (this.props.count % 2 !== 0) {
//通过props使用react-redux中的操作状态的方法
this.props.increment(value * 1)
}
}
asynCount = () => {
const {
value } = this.selectNumber
//通过props使用react-redux中的操作状态的方法
this.props.asyncincrement(value * 1, 500)
}
render() {
return (
<div>
<h1>我是Count组件,当前求和为:{
this.props.count},下方总人数为:{
this.props.personObj.length}</h1>
<select ref={
c => this.selectNumber = c} name="" id="">
<option value="1">1</option>
<option value="2">2</option>
<option value="3">3</option>
</select>
<button onClick={
this.addCount}>+</button>
<button onClick={
this.subCount}>-</button>
<button onClick={
this.oddCount}>当前求和为奇数再加</button>
<button onClick={
this.asynCount}>异步加</button>
</div>
)
}
}
export default connect(
state => ({
count: state.countReducer, personObj: state.personReducer }),
{
increment: createIncrementAction,
decrement: createDecrementAction,
asyncincrement: createIncrementAsyncAction
}
)(Count)
4、创建一个containers/Person/index.jsx容器,引入react-redux连接、引入action中生成操作对象的方法。
import React, {
Component } from 'react'
import {
nanoid } from 'nanoid'
import {
createAddPersonAction } from '../../redux/actions/person'
import {
connect } from 'react-redux'
class Person extends Component {
addPerson = () => {
const name = this.nameNode.value
const age = this.ageNode.value
const personObj = {
id: nanoid(), name, age }
this.props.addperson(personObj)
this.nameNode.value = ''
this.ageNode.value = ''
}
render() {
return (
<div>
<h2>我是Person组件,上方求和为:{
this.props.count}</h2>
<input ref={
c => this.nameNode = c} type="text" placeholder='请输入名字' />
<input ref={
c => this.ageNode = c} type="text" placeholder='请输入年龄' />
<button onClick={
this.addPerson}>添加</button>
<ul>
{
this.props.personObj.map((person) => {
return (<li key={
person.id}>{
person.name}--{
person.age}</li>)
})
}
</ul>
</div>
)
}
}
export default connect(
state => ({
personObj: state.personReducer, count: state.countReducer }),
{
addperson: createAddPersonAction
}
)(Person)
5、redux/constant.js
/**
 * 该模块是用于定义action对象中type类型的常量值
 */
export const INCREMENT = 'increment'
export const DECREMENT = 'decrement'

export const ADD_PERSON = 'add_person'
6、redux/store.js
import {

     legacy_createStore as createStore, applyMiddleware, combineReducers } from "redux";
import countReducer from "./reducers/count"
import personReducer from "./reducers/person";
import thunk from 'redux-thunk'

// 汇总所有的reducers
const allReducer = combineReducers({

     countReducer, personReducer })

const store = createStore(allReducer, applyMiddleware(thunk))

export default store
7、redux/actions/count.js
/**
 * 该文件专门为Count组件生成action对象
 */
import {

     INCREMENT, DECREMENT } from "../constant"
import store from "../store"

export const createIncrementAction = data => ({

     type: INCREMENT, data })

export const createDecrementAction = data => ({

     type: DECREMENT, data })

// 异步action就是指action的值为函数,异步action中一般都会调用同步action,异步action不是必须要用的
export const createIncrementAsyncAction = (data, time) => {


  return () => {


    setTimeout(() => {


      store.dispatch(createIncrementAction(data))
    }, time)
  }
}
8、redux/reducers/count.js
/**
 * 该文件是用于创建一个为Count组件服务的reducer,reducer的本质是一个函数
 * reducer函数会接到两个参数,分别为之前的状态(preState)和动作对象(action)
 */
import {

     INCREMENT, DECREMENT } from "../constant";
function countReducer(preState, action) {


  if (preState === undefined) preState = 0
  const {

     type, data } = action
  switch (type) {


    case INCREMENT:
      return preState + data;
    case DECREMENT:
      return preState - data;

    default:
      return preState
  }
}
export default countReducer
9、redux/actions/person.js
import {

     ADD_PERSON } from "../constant";

export const createAddPersonAction = personObj => ({

     type: ADD_PERSON, data: personObj })
10、redux/reducers/person.js
import {

     ADD_PERSON } from "../constant";

const initState = [{

     id: '001', name: 'tom', age: 18 }]
export default function personReducer(preState = initState, action) {


  const {

     type, data } = action
  switch (type) {


    case ADD_PERSON:
      return [data, ...preState]
    default:
      return preState
  }
}
11、index.js 使用react-redux之后,index.js入口文件中不需要再添加store.subscribe()监听。
// 入口文件
// 引入react核心库
import React from 'react';
// 引入ReactDOM核心库
import ReactDOM from 'react-dom/client';

import store from './redux/store';
import {

     Provider } from 'react-redux';
import './index.css';
import App from './App';

// 渲染App到页面
const root = ReactDOM.createRoot(document.getElementById('root'));
root.render(
  <Provider store={

    store}>
    <App />
  </Provider>
);
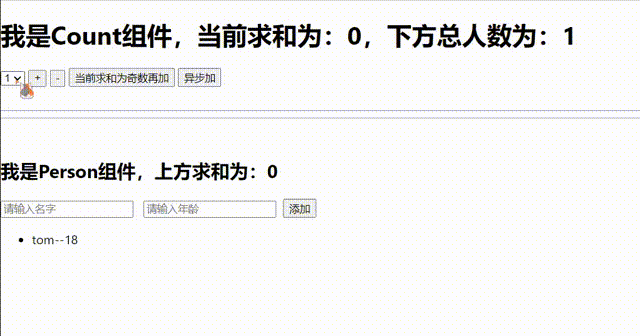
效果展示:
总结
组件间的关系:
- 父子组件
- 兄弟组件(非嵌套组件)
- 祖孙组件(跨级组件)
通信方式:
- props父子组件通信
- Context跨组件通信
- 消息订阅与发布
- redux与react-redux集中式管理
搭配方式:
- 父子组件:props
- 兄弟组件:消息订阅与发布、集中式状态管理
- 祖孙组件:消息订阅与发布、集中式状态管理、Context
以上就是我在学习react中总结到的react组件传参方法,可能哪些案例写的不太好,但是希望能对各位有用。
其实还有一类特殊的传参——路由传参,但是路由的知识点也挺多的,就不在本篇中总结了,可能会单独写一篇来总结路由组件中的知识点。
如有误,请批评指正!