Table of Contents
- Table of Contents
- 一、TensorFlow 相关常用的数据处理
- 1、test_first
- 2、Matrix Operator
- 3、约简 (reduction) 一种跨维度张量操作,结果比原张量减少一个维度
- 4、张量分割(segment) 指张量的某一个维度减小的过程,并且根据是否是同一类的索引而进行相关操作(类似合并相同类项的过程)
- 5、序列 (argmin和 argmax 分别显示维度的最小和最大值) ,listdiff(显示列表之间的交集的补集),where(显示张量上的真实值的索引),unique(去除列表重复元素)
- 6、张量形状的变换 (如 squeeze 或者 expand_dims)
- 7、张量的切片、拆分、添加填充(add padding)、打包(pack)、解包(unpack) ==> 针对行
- 二、数据流结果和可视化 —> Tensorboard
- 三、从磁盘中导入数据
- 一、TensorFlow 相关常用的数据处理
一、TensorFlow 相关常用的数据处理
1、test_first
注: 此学习文档采用 Jupyter 文稿,涉及代码的地方以代码块,和后面便是运行结果。以后系列文章均是如此。
import tensorflow as tf
tesor1 = tf.constant([[[1,2],[2,3],[3,4],[4,5]]])
sess = tf.Session()   # Start a new Session Object
print tf.Operation.inputs
# print sess.run(tesor1)[1,1,0]
<property object at 0x106173838>
b = tf.Variable(tf.zeros(5))
print b
Tensor("Variable/read:0", shape=(5,), dtype=float32)
import tensorflow as tf
g = tf.Graph()
# with g.as_default():
import tensorflow as tf
sess = tf.Session()
W_m = tf.Variable(tf.zeros([10, 5]))
x_v = tf.placeholder(tf.float32,[None,10])
result = tf.matmul(x_v,W_m)
print g.as_graph_def()
versions {
producer: 21
}
2、Matrix Operator
import tensorflow as tf

# 这里调用 InteractiveSession() 而不是 Session() ,
# 原因是在以交互方式运行 TensorFlow 会话时,
# 建议使用第一个,这样不用传递一个 Session 对象来指定它所引用的会话

sess = tf.InteractiveSession()

x = tf.constant([[2,5,3,-5],
                [0,3,-2,5],
                [4,3,5,3],
                [6,1,4,0]])

y = tf.constant([[4, -7, 4, -3, 4],
                 [6, 4,-7,  4, 7],
                 [2, 3, 2,  1, 4],
                 [1, 5, 5,  5, 2]])

floatx = tf.constant([[2., 5., 3., -5.],
                      [0., 3.,-2.,  5.],
                      [4., 3., 5.,  3.],
                      [6., 1., 4.,  0.]])

# 注意在 TensorFlow 中对张量调用 eval( ) 时,会返回 numpy 对象
print '矩阵转置: \n'
print tf.transpose(x).eval()  # Transpose matrix
# type (tf.transpose(x).eval())
print '矩阵相乘: \n'
print tf.matmul(x,y).eval()   # Matrix multiplication
print '获取矩阵行列式: '
print tf.matrix_determinant(floatx).eval()
print '矩阵的求逆:\n'
print tf.matrix_inverse(floatx).eval()
print '矩阵方程求解:\n'
# 第一个为系数矩阵S,第二个为结果矩阵 y,求解 X
# === > S * X = y
print tf.matrix_solve(floatx,[[1],[1],[1],[1]]).eval()
矩阵转置:

[[ 2  0  4  6]
 [ 5  3  3  1]
 [ 3 -2  5  4]
 [-5  5  3  0]]
矩阵相乘:

[[ 39 -10 -46  -8  45]
 [ 19  31   0  35  23]
 [ 47  14  20  20  63]
 [ 38 -26  25 -10  47]]
获取矩阵行列式:
818.0
矩阵的求逆:

[[-0.00855745  0.10513447 -0.18948655  0.29584354]
 [ 0.12958434  0.12224938  0.01222495 -0.05134475]
 [-0.01955992 -0.18826404  0.2811736  -0.1809291 ]
 [-0.08557458  0.05134474  0.10513448 -0.0415648 ]]
矩阵方程求解:

[[ 0.202934  ]
 [ 0.21271393]
 [-0.10757945]
 [ 0.02933985]]
3、约简 (reduction) 一种跨维度张量操作,结果比原张量减少一个维度
import tensorflow as tf
sess = tf.InteractiveSession()
x = tf.constant([[1, 2, 3],
                   [3, 2, 1],
                   [-1,-2,-3]])
boolean_tensor = tf.constant([[True,  False, True],
                 [False, False, True],
                 [True, False, False]])

# product 乘 按照给定的坐标方向
tf.reduce_prod(x,reduction_indices=1).eval()
array([ 6, 6, -6], dtype=int32)
# reduce min, and axis = 1 纵向
tf.reduce_min(x,reduction_indices=1).eval()
array([ 1, 1, -3], dtype=int32)
# reduce max
tf.reduce_max(x,reduction_indices=1).eval()
array([ 3, 3, -1], dtype=int32)
# 均值
tf.reduce_mean(x,reduction_indices=1).eval()
array([ 2, 2, -2], dtype=int32)
# 逻辑与 and,指定 axis
tf.reduce_all(boolean_tensor,reduction_indices=1).eval()
array([False, False, False])
# 逻辑或 or
tf.reduce_any(boolean_tensor,reduction_indices=1).eval()
array([ True, True, True])
4、张量分割(segment) 指张量的某一个维度减小的过程,并且根据是否是同一类的索引而进行相关操作(类似合并相同类项的过程)
import tensorflow as tf
sess = tf.InteractiveSession()

seg_indexs = tf.constant([0,1,1,2,2])  # Group indexes : 0| 1,2| 3,4
tens1 = tf.constant([[2, 5, 3, -5],
                    [0, 3,-2,  5],
                    [4, 3, 5,  3],
                    [6, 1, 4,  0],
                    [6, 1, 4,  0]])  # 常量矩阵

# 相同 Gruop 的 index 的维度进行相关操作,下同(此处为 sum)
tf.segment_sum(tens1,seg_indexs).eval()   # 此为将1,2 和 3,4 进行了 sum
array([[ 2, 5, 3, -5],
[ 4, 6, 3, 8],
[12, 2, 8, 0]], dtype=int32)
tf.segment_prod(tens1,seg_indexs).eval() # 乘array([[ 2, 5, 3, -5],
[ 0, 9, -10, 15],
[ 36, 1, 16, 0]], dtype=int32)
tf.segment_min(tens1,seg_indexs).eval()array([[ 2, 5, 3, -5],
[ 0, 3, -2, 3],
[ 6, 1, 4, 0]], dtype=int32)
tf.segment_max(tens1, seg_indexs).eval() # maximum value goes to grouparray([[ 2, 5, 3, -5],
[ 4, 3, 5, 5],
[ 6, 1, 4, 0]], dtype=int32)
tf.segment_mean(tens1, seg_indexs).eval() # mean value goes to grouparray([[ 2, 5, 3, -5],
[ 2, 3, 1, 4],
[ 6, 1, 4, 0]], dtype=int32)
5、序列 (argmin和 argmax 分别显示维度的最小和最大值) ,listdiff(显示列表之间的交集的补集),where(显示张量上的真实值的索引),unique(去除列表重复元素)
import tensorflow as tf
sess = tf.InteractiveSession()
x = tf.constant([[2, 5, 3, -5],
                 [0, 3,-2,  5],
                 [4, 3, 5,  3],
                 [6, 1, 4,  0]])
listx = tf.constant([1,2,3,4,5,6,7,8])
listy = tf.constant([4,5,8,9])

boolx = tf.constant([[True,False], [False,True]])

# 维度为 1 即输出每一行最小的值得列索引
tf.argmin(x,1).eval()
array([3, 2, 1, 3])
# 维度为 1 即输出每一行最大的值得列索引
tf.argmax(x,1).eval()
array([1, 3, 2, 0])
# last different
tf.setdiff1d(listx,listy)[0].eval()
array([1, 2, 3, 6, 7], dtype=int32)
# show true value
tf.where(boolx).eval()
array([[0, 0],
[1, 1]])
# 去重
tf.unique(listx)[0].eval()
array([1, 2, 3, 4, 5, 6, 7, 8], dtype=int32)
6、张量形状的变换 (如 squeeze 或者 expand_dims)
import tensorflow as tf
sess = tf.InteractiveSession()
x = tf.constant([[2, 5, 3, -5],
                 [0, 3,-2,  5],
                 [4, 3, 5,  3],
                 [6, 1, 4,  0]])

tf.shape(x).eval()  # Shape of the tensor
array([4, 4], dtype=int32)
tf.size(x).eval()16
# rank of the tensor 张量的阶
tf.rank(x).eval()
2
print 'shape: (8,2):\n',tf.reshape(x,[8,2]).eval(), '\n' # converting to a 8 * 2 matrix
print 'shape: (2,2,4):\n',tf.reshape(x,[2,2,4]).eval(), '\n'
print 'shape: (4,1,4):\n',tf.reshape(x,[4,1,4]).eval(), '\n' # converting to a 4 * 1 * 4 tensor
shape: (8,2):
[[ 2 5]
[ 3 -5]
[ 0 3]
[-2 5]
[ 4 3]
[ 5 3]
[ 6 1]
[ 4 0]]
shape: (2,2,4):
[[[ 2 5 3 -5]
[ 0 3 -2 5]]
[[ 4 3 5 3]
[ 6 1 4 0]]]
shape: (4,1,4):
[[[ 2 5 3 -5]]
[[ 0 3 -2 5]]
[[ 4 3 5 3]]
[[ 6 1 4 0]]]
# squeezing dims 消除张量中维度为 1,的方向
# remove 1 之后,就与原矩阵相同了
print tf.squeeze(tf.reshape(x,[4,1,4])).eval()
[[ 2 5 3 -5]
[ 0 3 -2 5]
[ 4 3 5 3]
[ 6 1 4 0]]
# Expanding dims 指定轴方向扩充一个维度
print 'axis=0:\n',tf.expand_dims(x,0).eval(),'\n'
print 'axis=1:\n',tf.expand_dims(x,1).eval(),'\n'
print 'axis=2:\n',tf.expand_dims(x,2).eval(),'\n'
axis=0:
[[[ 2 5 3 -5]
[ 0 3 -2 5]
[ 4 3 5 3]
[ 6 1 4 0]]]
axis=1:
[[[ 2 5 3 -5]]
[[ 0 3 -2 5]]
[[ 4 3 5 3]]
[[ 6 1 4 0]]]
axis=2:
[[[ 2]
[ 5]
[ 3]
[-5]]
[[ 0]
[ 3]
[-2]
[ 5]]
[[ 4]
[ 3]
[ 5]
[ 3]]
[[ 6]
[ 1]
[ 4]
[ 0]]]
7、张量的切片、拆分、添加填充(add padding)、打包(pack)、解包(unpack) ==> 针对行
import tensorflow as tf
sess = tf.InteractiveSession()
t_matrix = tf.constant([[1,2,3],
                       [4,5,6],
                       [7,8,9]])
t_array = tf.constant([1,2,3,4,9,8,6,5])
t_array2 = tf.constant([2,3,4,5,6,7,8,9])
# 切片 从[1,1] 开始,横竖都切两个
tf.slice(t_matrix,[1,1],[2,2]).eval()
array([[5, 6],
[8, 9]], dtype=int32)
# list split 拆分
tf.split(t_array,2,0)
[<tf.Tensor 'split_7:0' shape=(4,) dtype=int32>,
<tf.Tensor 'split_7:1' shape=(4,) dtype=int32>]
# tile 平铺 , tf.tile()应用于需要张量扩展的场景,具体说来就是:
#如果现有一个形状如[width, height]的张量,需要得到一个基于原张量的,
#形状如[batch_size,width,height]的张量,其中每一个batch的内容都和原张量一模一样。

tf.tile([1,2],[3]).eval()  # 将这个小 tensor 拼接 3 次
# tf.tlle 当数据多维时的应用
import tensorflow as tf
raw = tf.Variable(tf.random_normal(shape=(1, 3, 2)))
multi = tf.tile(raw, multiples=[2, 1, 1])
with tf.Session() as sess:
sess.run(tf.global_variables_initializer())
print(raw.eval())
print('-----------------------------')
print(sess.run(multi))输出为 :
[[[-0.50027871 -0.48475555]
[-0.52617502 -0.2396145 ]
[ 1.74173343 -0.20627949]]]
-----------------------------
[[[-0.50027871 -0.48475555]
[-0.52617502 -0.2396145 ]
[ 1.74173343 -0.20627949]]
[[-0.50027871 -0.48475555]
[-0.52617502 -0.2396145 ]
[ 1.74173343 -0.20627949]]]
由此可见,multi重复了raw的0 axes两次,1和2 axes不变。array([1, 2, 1, 2, 1, 2], dtype=int32)
# pading 按照每一个维度在其前后来进行填充的
tf.pad(t_matrix,[[0,1],[1,3]]).eval()
array([[0, 1, 2, 3, 0, 0, 0],
[0, 4, 5, 6, 0, 0, 0],
[0, 7, 8, 9, 0, 0, 0],
[0, 0, 0, 0, 0, 0, 0]], dtype=int32)
tf.pad(t_matrix,[[2,1],[1,3]]).eval()array([[0, 0, 0, 0, 0, 0, 0],
[0, 0, 0, 0, 0, 0, 0],
[0, 1, 2, 3, 0, 0, 0],
[0, 4, 5, 6, 0, 0, 0],
[0, 7, 8, 9, 0, 0, 0],
[0, 0, 0, 0, 0, 0, 0]], dtype=int32)
# concatenating list ,拼接 list
print tf.concat([t_array,t_array2],0).eval()
# stack 堆叠
print tf.stack([t_array,t_array2],0).eval()
[1 2 3 4 9 8 6 5 2 3 4 5 6 7 8 9]
[[1 2 3 4 9 8 6 5]
[2 3 4 5 6 7 8 9]]
# unstack 其他版本可能是unpack
tf.unstack(t_matrix)
[<tf.Tensor 'unstack_11:0' shape=(3,) dtype=int32>,
<tf.Tensor 'unstack_11:1' shape=(3,) dtype=int32>,
<tf.Tensor 'unstack_11:2' shape=(3,) dtype=int32>]
# 如果想看结果,我们需要 run method 方法
sess.run(tf.unstack(t_matrix))
[array([1, 2, 3], dtype=int32),
array([4, 5, 6], dtype=int32),
array([7, 8, 9], dtype=int32)]
# Reverse matrix
print tf.reverse(t_matrix,[0]).eval(), '\n'
print tf.reverse(t_matrix,[1]).eval(), '\n'
print tf.reverse(t_matrix,[0,1]).eval(), '\n'
[[7 8 9]
[4 5 6]
[1 2 3]]
[[3 2 1]
[6 5 4]
[9 8 7]]
[[9 8 7]
[6 5 4]
[3 2 1]]
二、数据流结果和可视化 —> Tensorboard
1、TensorBoard简介
- 它是 TensorFlow 框架下一个实用的数据可视化的软件,它根据记录的日志数据信息将其数据流图显示出来,并且可以在仪表盘上(dashboard)解释结果。也可以在会话运行的过程中实时查看。 TensorBoard 涉及到的运算,通常是在训练庞大的深度神经网络中出现的复杂而又难以理解的运算。为了方便 TensorFlow 程序的理解、调试与优化而产生,你可以绘制图像生成的定量指标图以及附加数据等。
- 数据序列化 : TensorBoard 通过读取 TensorFlow 的事件文件来运行。TensorFlow 的事件文件包括了你会在 TensorFlow 运行中涉及到的主要数据。下面是 TensorBoard 中汇总数据(Summary data)的大体流程:
首先,创建你想汇总数据的 TensorFlow 图,然后再选择你想在哪个节点进行汇总(summary)操作。
比如,假设你正在训练一个卷积神经网络,用于识别 MNISt 标签。你可能希望记录学习速度(learning rate)的如何变化,以及目标函数如何变化。通过向节点附加scalar_summary操作来分别输出学习速度和期望误差。然后你可以给每个 scalary_summary 分配一个有意义的 标签,比如 ‘learning rate’ 和 ‘loss function’。
或者你还希望显示一个特殊层中激活的分布,或者梯度权重的分布。可以通过分别附加 histogram_summary 运算来收集权重变量和梯度输出。
- 所有可用的 summary 操作详细信息,可以查看 summary_opearator文档以进行学习。
- 在TensorFlow中,所有的操作只有当你执行,或者另一个操作依赖于它的输出时才会运行。我们刚才创建的这些节点(summary nodes)由于没有依赖(单独节点的外设),故我们需要运行所有这些节点。如果一一操作,肯定是很乏味的,故你可以使用tf.merge_all_summaries来将他们合并为一个操作 。然后执行它,它会将所有数据生成一个序列化的Summary protobuf对象。由于 TensorFlow 会话的汇总都是由 SummaryWriter 对象写入的,故为了将汇总数据写入磁盘,我们需要将汇总的 protobuf 对象传递给 tf.train.Summarywriter(logdir,graphdef=None)构造函数所返回的 SummaryWriter。
- 参数 logdir : 非常重要,所有事件都会写到它所指的目录下
- 参数 graphdef :是一个可选参数,默认为 None ,若在构造时出入,它也会加入到事件文件,相当于之后调用 SummaryWriter.add_graph( ) 进行添加操作
- 有了 SummaryWriter,你就可以运行神经网络了 !你可以每一步执行一次 Summary 操作,当然如果你嫌数据太多,也可以每 n 步汇总一次 。如下是 n = 100 的情况:
merged_summary_op = tf.merge_all_summaries()
summary_writer = tf.train.SummaryWriter('/tmp/mnist_logs', sess.graph)
total_step = 0
while training:
    total_step += 1
    session.run(training_op)
    if total_step % 100 == 0:
    summary_str = session.run(merged_summary_op)
    summary_writer.add_summary(summary_str, total_step)
2、启动 TensorBoard
- 经过上述的数据的 summary 之后,你便可以打开终端通过如下命令来开启 TensorBoard :
python tensorflow/tensorboard/tensorboard.py --logdir= .
# 此处的 . 表示你的日志数据的目录就是当前目录,若不是请自行修改目录。

或者: 直接运行命令如下(并且,你还可以指定端口):
tensorboard  --logdir=./  --port=8000
当返回 : Starting TensorBoard 41 on port 8000 的时候,
你便可以通过在浏览器中输入 localhost:6006 来查看 TensorBoard 的实际运行情况了 。
- 关闭直接 ctrl + c 打断即可。
3、TensorBoard: 图表可视化和 GUI 交互简述
TensorFlow 图表计算强大而又复杂,图表可视化在理解和调试时非常有用。
下图是它运作的一个小例子:

为了显示自己的图表,需将 TensorBoard 指向此工作的日志目录并运行,点击图表顶部窗格的标签页,然后在左上角的菜单中选择合适的运行
名称域(Name scoping)和节点(Node)
- 常见的 TensorFlow 都可能有数以千计的节点,如此多甚至无法用一般图表工具来展示。故 TensorFlow 采用为变量名划定范围,并且可视化把该信息用于在图表中的节点上定义一个层级来解决。默认时,只有顶层节点会显示。下面这个例子使用tf.name_scope在hidden命名域下定义了三个操作:
import tensorflow as tf

with tf.name_scope('hidden') as scope:
    a = tf.constant(5, name='alpha')
    W = tf.Variable(tf.random_uniform([1, 2], -1.0, 1.0), name='weights')
b = tf.Variable(tf.zeros([1]), name='biase - 接着
- 结果是得到了下面三个操作名: hidden/alpha hidden/weights hidden/biases
默认地,三个操作名会折叠为一个节点并标注为hidden。其额外细节并没有丢失,你可以双击,或点击右上方橙色的+来展开节点,然后就会看到三个子节点alpha,weights和biases了。
- 结果是得到了下面三个操作名: hidden/alpha hidden/weights hidden/biases
- 通过名称域把节点分组来得到可读性高的图表很关键的。如果你在构建一个模型,名称域就可以用来控制可视化结果。你的名称域越好,可视性就越好。
- TensorFlow 图表有两种连接关系:数据依赖和控制依赖。数据依赖显示两个操作之间的tensor流程,用实心箭头指示,而控制依赖用点线表示。在已展开的视图中,除了用点线连接的CheckNumerics和control_dependency之外,所有连接都是数据依赖的。
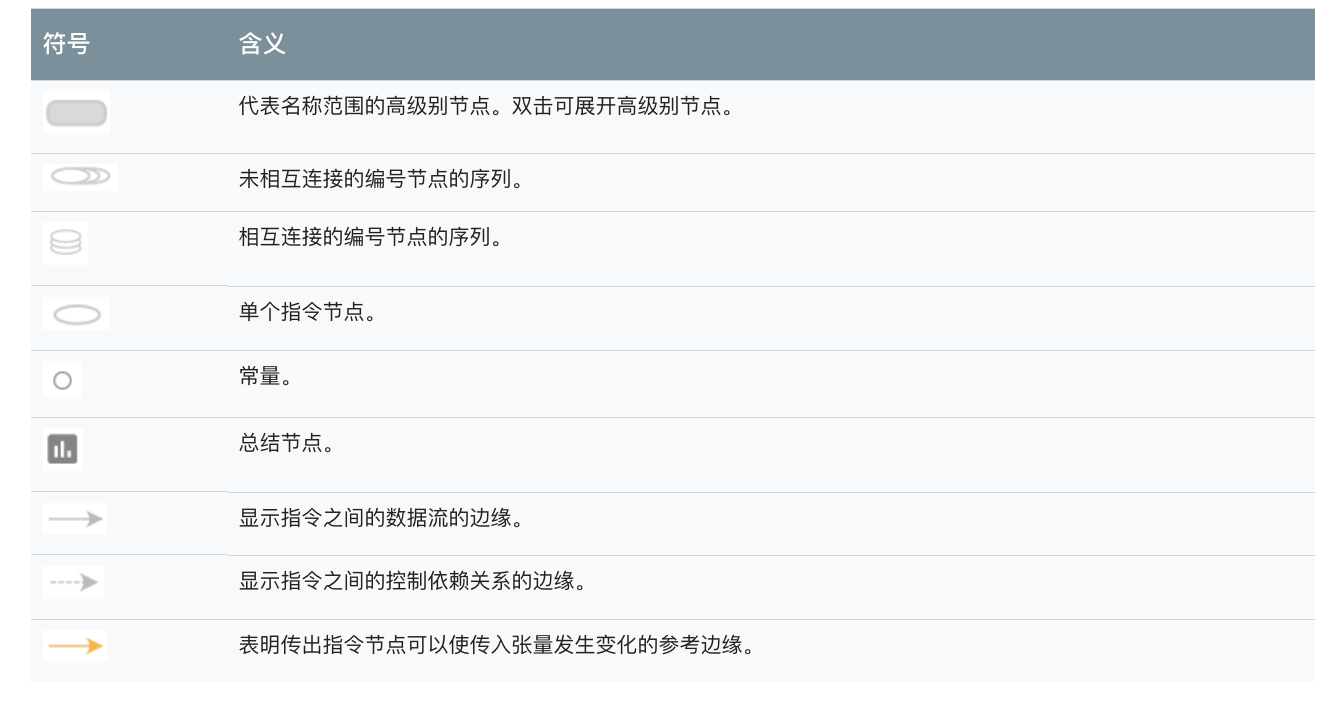
- 之外,可视化为常节点和摘要节点使用了特别的图标,总结起来有下面这些节点符号:
三、从磁盘中导入数据
1、列表格式 CSV
- Tensorflow 可以读取很多常用数据,如 csv 、图像数据(JPG和 PNG)以及标准的 tf 的格式
- 用 TensorFlow 读取 CSV 时,需要如下几个准备步骤 :
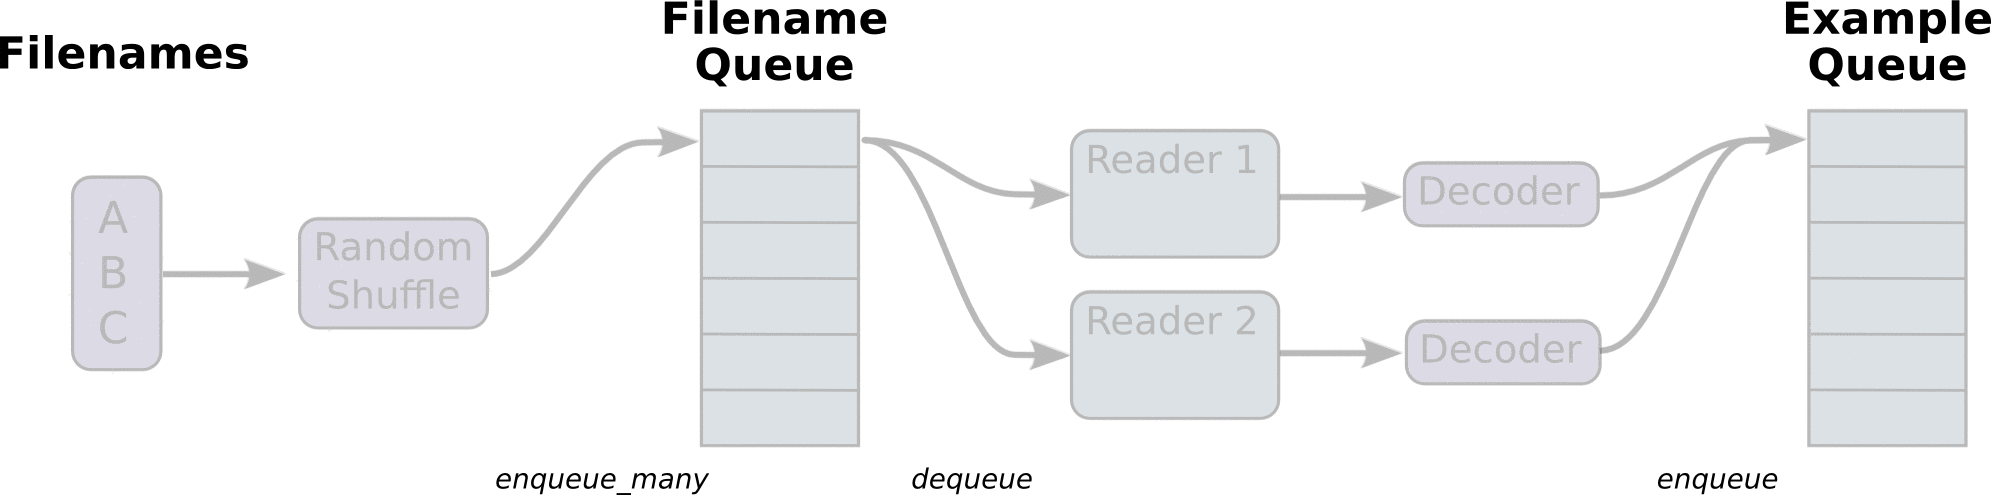
- 创建一个文件名队列对象以及用到的文件列表。
- 然后将文件名队列传给使用 tf.TextLineReader创造的 reader 的read方法, 它会输出一个key来表征输入的文件和其中的纪录(key对于调试很有用),同时得到一个字符串标量 。
- 这个字符串标量可以被一个或多个解析器,或者转换操作将其解码为张量并且构造成为样本。 示例代码如下 :
- 用 TensorFlow 读取 CSV 时,需要如下几个准备步骤 :
import tensorflow as tf
sess = tf.Session()
# 注意此处使用 match_filenames_once 可以一下加载所有当前目录下的 CSV
filename_queue = tf.train.string_input_producer(tf.train.match_filenames_once("./*.csv"),shuffle=True)
reader = tf.TextLineReader(skip_header_lines=1)
key, value = reader.read(filename_queue)
# Default values, in case of empty columns. Also specifies the type of the decoded result.
record_default = [[0.],[0.],[0.],[0.],[""]]
# Convert CSV records to tensors, Each column maps to one tensor.
col1, col2, col3, col4, col5 = tf.decode_csv(value,record_defaults=record_default)
features = tf.stack([col1, col2, col3, col4] ,0)

tf.initialize_all_variables().run(session=sess)
# 见注释一
coord = tf.train.Coordinator()
threads = tf.train.start_queue_runners(coord=coord,sess=sess)

for iteration in range(0, 5):
    example = sess.run([features])
    print example
    coord.request_stop()
    coord.join(threads)
- 注释 :TensorFlow的Session对象是支持多线程的,可以在同一个会话(Session)中创建多个线程,并行执行。在Session中的所有线程都必须能被同步终止,异常必须能被正确捕获并报告,会话终止的时候, 队列必须能被正确地关闭。
- TensorFlow提供了两个类来实现对Session中多线程的管理:tf.Coordinator和 tf.QueueRunner,这两个类往往一起使用。Coordinator类用来管理在Session中的多个线程,可以用来同时停止多个工作线程并且向那个在等待所有工作线程终止的程序报告异常,该线程捕获到这个异常之后就会终止所有线程。使用 tf.train.Coordinator()来创建一个线程管理器(协调器)对象。
- QueueRunner类用来启动tensor的入队线程,可以用来启动多个工作线程同时将多个tensor(训练数据)推送入文件名称队列中,具体执行函数是 tf.train.start_queue_runners , 只有调用 tf.train.start_queue_runners 之后,才会真正把tensor推入内存序列中,供计算单元调用,否则会由于内存序列为空,数据流图会处于一直等待状态。
- tf 数据读取机制如下 :
1、调用 tf.train.slice_input_producer,从 本地文件里抽取tensor,准备放入Filename Queue(文件名队列)中;
2、调用 tf.train.batch,从文件名队列中提取tensor,使用单个或多个线程,准备放入文件队列;
3、调用 tf.train.Coordinator() 来创建一个线程协调器,用来管理之后在Session中启动的所有线程;
4、调用tf.train.start_queue_runners, 启动入队线程,由多个或单个线程,按照设定规则,把文件读入Filename Queue中。函数返回线程ID的列表,一般情况下,系统有多少个核,就会启动多少个入队线程(入队具体使用多少个线程在tf.train.batch中定义);
5、文件从 Filename Queue中读入内存队列的操作不用手动执行,由tf自动完成;
6、调用sess.run 来启动数据出列和执行计算;
7、使用 coord.should_stop()来查询是否应该终止所有线程,当文件队列(queue)中的所有文件都已经读取出列的时候,会抛出一个 OutofRangeError 的异常,这时候就应该停止Sesson中的所有线程了;
8、使用coord.request_stop()来发出终止所有线程的命令,使用coord.join(threads)把线程加入主线程,等待threads结束。