python pytest全面解析:
运行pytest的三种方式
import pytest

@pytest.mark.finished
def test_add():
   print("测试函数:test_add")


@pytest.mark.finished
def test_subtract():
   print("测试函数:test_subtract")


@pytest.mark.unfinished
def test_no_finish():
   pass
if __name__ == "__main__":
   pytest.main(["-s", "pt_test1.py"])
方式一
pytest.main(["-s", "pt_test1.py"])
方式二
-
在pycharm中新建pytest
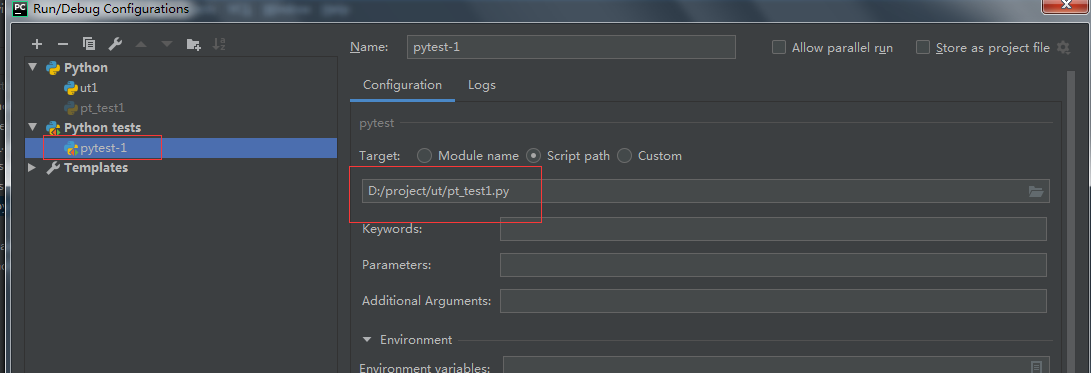
image.png
-
点击运行即可
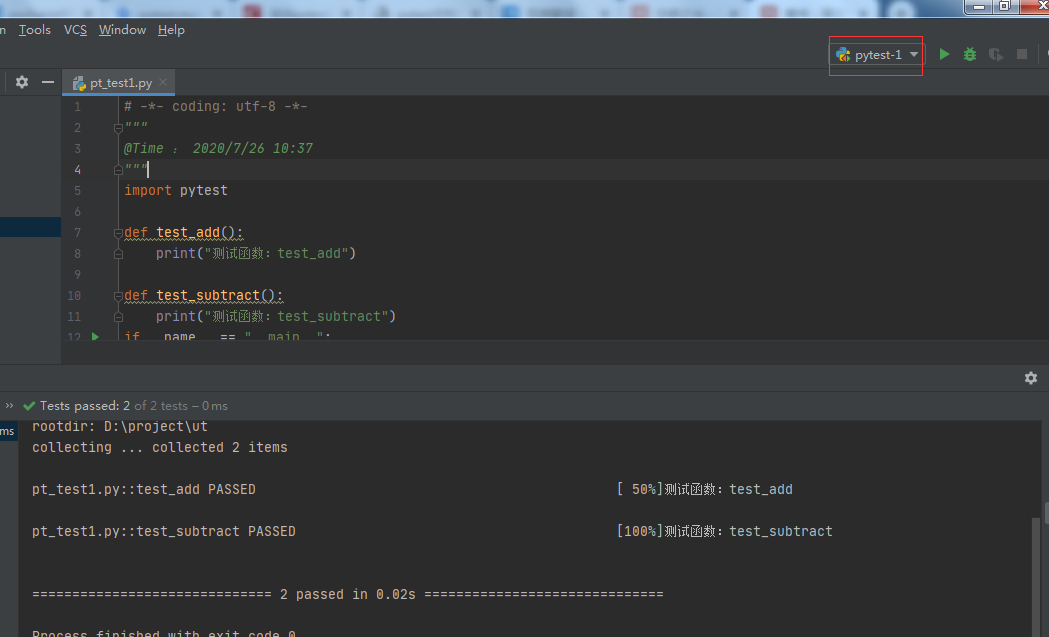
image.png
方式三
- 使用命令执行
D:\project\ut>pytest pt_test1.py
======================================================================= test session starts ========================================================================
platform win32 -- Python 3.6.6, pytest-5.4.3, py-1.9.0, pluggy-0.13.1
rootdir: D:\project\ut
collected 2 items

pt_test1.py ..                                                                                                                                                [100%]

======================================================================== 2 passed in 0.02s =========================================================================
测试制定的函数
::制定测试函数
pytest pt_test1.py::test_add
pytest.main(["pt_test1.py::test_add"])
-k模糊搜索,模糊搜索add的测试函数
pytest -k add pt_test1.py
pytest.main(["-s", "pt_test1.py", "-k", "add"])
- 使用
pytest.mark标注后,使用-m参数
@pytest.mark.finished
def test_add():
    print("测试函数:test_add")

pytest -m finished pt_test1.py
- 一个函数可以打多个标记;多个函数也可以打相同的标记,运行逻辑:
pytest -m "finished and commit"
跳过测试
pytest.mark.skip
# test_skip.py
@pytest.mark.skip(reason='out-of-date api')
def test_connect():
    pass

pytest tests/test-function/test_skip.py
pytest.mark.skipif为测试函数指定被忽略的条件
@pytest.mark.skipif(conn.__version__ < '0.2.0',
                    reason='not supported until v0.2.0')
def test_api():
    pass

pytest tests/test-function/test_skip.py
参数化
- 密码长度的测试函数
# test_parametrize.py

@pytest.mark.parametrize('passwd',
                      ['123456',
                       'abcdefdfs',
                       'as52345fasdf4'])
def test_passwd_length(passwd):
    assert len(passwd) >= 8

$ pytest tests/test-function/test_parametrize.py
============================= test session starts =============================
platform win32 -- Python 3.6.4, pytest-3.6.1, py-1.5.2, pluggy-0.6.0
rootdir: F:\self-repo\learning-pytest, inifile:
collected 3 items

tests\test-function\test_parametrize.py F..                              [100%]

================================== FAILURES ===================================
- 再看一个多参数的例子,用于校验用户密码:
# test_parametrize.py

@pytest.mark.parametrize('user, passwd',
                         [('jack', 'abcdefgh'),
                          ('tom', 'a123456a')])
def test_passwd_md5(user, passwd):
    db = {
        'jack': 'e8dc4081b13434b45189a720b77b6818',
        'tom': '1702a132e769a623c1adb78353fc9503'
    }

    import hashlib

    assert hashlib.md5(passwd.encode()).hexdigest() == db[user]

$ pytest -v tests/test-function/test_parametrize.py::test_passwd_md5_id
============================= test session starts =============================
platform win32 -- Python 3.6.4, pytest-3.6.1, py-1.5.2, pluggy-0.6.0 -- c:\anaconda3\python.exe
cachedir: .pytest_cache
rootdir: F:\self-repo\learning-pytest, inifile:
collected 2 items

tests/test-function/test_parametrize.py::test_passwd_md5_id[User<Jack>] PASSED [ 50%]
tests/test-function/test_parametrize.py::test_passwd_md5_id[User<Tom>] PASSED [100%]

========================== 2 passed in 0.07 seconds ===========================
固件
- 固件(
Fixture)是一些函数,pytest会在执行测试函数之前(或之后)加载运行它们
-Pytest使用pytest.fixture()定义固件,下面是最简单的固件,只返回北京邮编
@pytest.fixture()
def postcode():
    return '010'


def test_postcode(postcode):
    assert postcode == '010'
预处理和后处理
- 很多时候需要在测试前进行预处理(如新建数据库连接),并在测试完成进行清理(关闭数据库连接)。
Pytest使用yield关键词将固件分为两部分,yield 之前的代码属于预处理,会在测试前执行;yield 之后的代码属于后处理,将在测试完成后执行
# test_db.py

@pytest.fixture()
def db():
    print('Connection successful')

    yield

    print('Connection closed')


def search_user(user_id):
    d = {
        '001': 'xiaoming'
    }
    return d[user_id]


def test_search(db):
    assert search_user('001') == 'xiaoming

============================= test session starts =============================
platform win32 -- Python 3.6.4, pytest-3.6.1, py-1.5.2, pluggy-0.6.0
rootdir: F:\self-repo\learning-pytest, inifile:
collected 1 item

tests\fixture\test_db.py Connection successful
.Connection closed
作用域
在定义固件时,通过 scope 参数声明作用域,可选项有:
function: 函数级,每个测试函数都会执行一次固件;默认的作用域为 functionclass: 类级别,每个测试类执行一次,所有方法都可以使用;module: 模块级,每个模块执行一次,模块内函数和方法都可使用;session: 会话级,一次测试只执行一次,所有被找到的函数和方法都可用。
@pytest.fixture(scope='function')
def func_scope():
    pass


@pytest.fixture(scope='module')
def mod_scope():
    pass


@pytest.fixture(scope='session')
def sess_scope():
    pass


@pytest.fixture(scope='class')
def class_scope():
    pass
- 对于类使用作用域,需要使用 pytest.mark.usefixtures (对函数和方法也适用):
# test_scope.py

@pytest.mark.usefixtures('class_scope')
class TestClassScope:
    def test_1(self):
        pass

    def test_2(self):
        pass

$ pytest --setup-show tests/fixture/test_scope.py::TestClassScope
============================= test session starts =============================
platform win32 -- Python 3.6.4, pytest-3.6.1, py-1.5.2, pluggy-0.6.0
rootdir: F:\self-repo\learning-pytest, inifile:
collected 2 items

tests\fixture\test_scope.py
    SETUP    C class_scope
        tests/fixture/test_scope.py::TestClassScope::()::test_1 (fixtures used: class_scope).
        tests/fixture/test_scope.py::TestClassScope::()::test_2 (fixtures used: class_scope).
    TEARDOWN C class_scope
使用命令行在pytest中传递多个参数
- 配置conftest.py
# conftest.py
import pytest
def pytest_addoption(parser):
    parser.addoption("--input1", action="store", default="default input1")
    parser.addoption("--input2", action="store", default="default input2")

@pytest.fixture
def input1(request):
    return request.config.getoption("--input1")

@pytest.fixture
def input2(request):
    return request.config.getoption("--input2")
- 编写测函数
# test.py
import pytest

@pytest.mark.unit
def test_print_name(input1, input2):
    print ("Displaying input1: %s" % input1)
    print("Displaying input2: %s" % input2)
- 执行命令
>py.test -s test.py --input1 tt --input2 12
================================================= test session starts =================================================
platform win32 -- Python 3.7.0, pytest-4.1.1, py-1.7.0, pluggy-0.8.1
rootdir: pytest, inifile:
collected 1 item

test.py Displaying input1: tt
Displaying input2: 12
.

============================================== 1 passed in 0.04 seconds ====================================
其他的一些参数总结
-v, --verbose
详细结果
--q, --quiet
极简结果显示,简化控制台的输出,可以看出输出信息和之前不添加-q不信息不一样, 下图中有两个..点代替了pass结果
--s
输入我们用例中的调式信息,比如print的打印信息等,我们在用例中加上一句 print(driver.title),我们再运行一下我们的用例看看,调试信息输出
--V
可以输出用例更加详细的执行信息,比如用例所在的文件及用例名称等--junit-xml=path
输出xml文件格式,在与jenkins做集成时使用--result-log=path
将最后的结果保存到本地文件中
2020-8-21 新增
- 使用
setup,setup_cass,teardown_class
class TestCase():
    def setup(self):
        print("setup: 每个用例开始前执行")
    def teardown(self):
        print("teardown: 每个用例结束后执行")
    def setup_class(self):
        print("setup_class:所有用例执行之前")
    def teardown_class(self):
        print("teardown_class:所有用例执行之前")
    def setup_method(self):
        print("setup_method: 每个用例开始前执行")
    def teardown_method(self):
        print("teardown_method: 每个用例结束后执行")
    def test_one(self):
        print("正在执行----test_one")
        x = "this"
        assert 'h' in x
    def test_three(self):
        print("正在执行test_two")
        a = "hello"
        b = "hello word"
        assert a in b
    def add(self,a, b):
        print("这是加减法")
        return a + b
if __name__ == '__main__':
    pytest.main(['-s', 'test_fixt_class'])
如果大家对于学习Python有任何问题,学习方法,学习路线,如何学习有效率的问题,可以随时来咨询我,或者缺少系统学习资料的,我做这行年头比较久,自认为还是比较有经验的,可以帮助大家提出建设性建议,这是我的Python交流qun:785128166,有任何问题可以随时来咨询我。