一、统一配置管理
需求: 微服务配置能实现统一的管理,比如希望改动多个配置,但不希望逐个配置,而是在一个位置中改动,并且服务不用重启即用(热更新)。
(一)使用配置管理
通过Nacos控制台——配置列表,创建统一配置项。
1、需要填写的几个信息:
- Data ID —— 配置文件ID:[服务名称]-[profile].[后缀名]
- Group —— 分组,默认即可
- 格式 —— 配置格式,一般使用YAML
- 配置内容 —— 根据配置格式进行配置
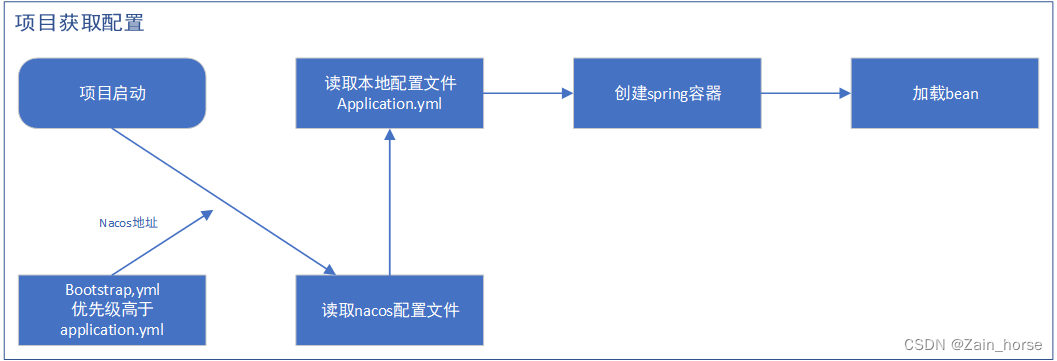
2、配置获取的步骤如下:
项目启动 —— 读取nacos配置文件 —— 读取本地配置文件appliaction.yml —— 创建Spring容器 —— 加载bean

3、具体使用方式
(1)引入Nacos的配置管理客户端依赖
<dependency>
	<groupId>com.alibaba.cloud</groupId>
	<artifactId>spring-cloud-starter-alibaba-nacos-config</artifactId>
</dependency>
(2)在resource目录中添加bootstrap.xml文件,这个文件是引导文件,优先级高于application.xml
bootstrap.xml
spring:
	applicaiton:
		name: userservice #服务名
	profiles:
		active: dev #配置环境
	cloud:
		nacos:
			server-addr: localhost:8848 #Nacos 地址
			config:
				file-extension: yaml #文件后缀名
二、配置热更新
(一)实现方式
方式一:@Value注释的变量所在类上添加@RefreshScope
@Slf4j
@RestController
@RequestMapping("/user")
@RefreshScope
public class UserController {


	@Value("${pattern.dateformat}")
	private String dateformat;
}
方式二: 在配置类中使用@ConfigurationProperties注解
@Component
@Data
@ConfigurationProperties(prefix = "pattern") #自动注入关于pattern相关的配置信息
public class PatternProperties {


	private String dateformat;
}
三、配置共享
(一)需求: 在开发、生产、测试的环境下,配置文件参数是相同的,但不想在每个环境下都做修改,需要共享配置。
(二)实现:
Nacos可以读取多个配置文件,例如我们有 userservice-dev.yml 和 userservice.yml 两个配置文件,当我们在Java配置文件中,配置了服务名称,服务环境,后缀名后,Java服务是能够读取上述两个配置文件的。
在Nacos控制台中,增加一个以 [服务名称].[后缀名] 命名的配置文件即可。
(三)配置文件的优先级 : 服务名-profile.yml > 服务名称.yml > 本地配置
四、搭建Nacos集群
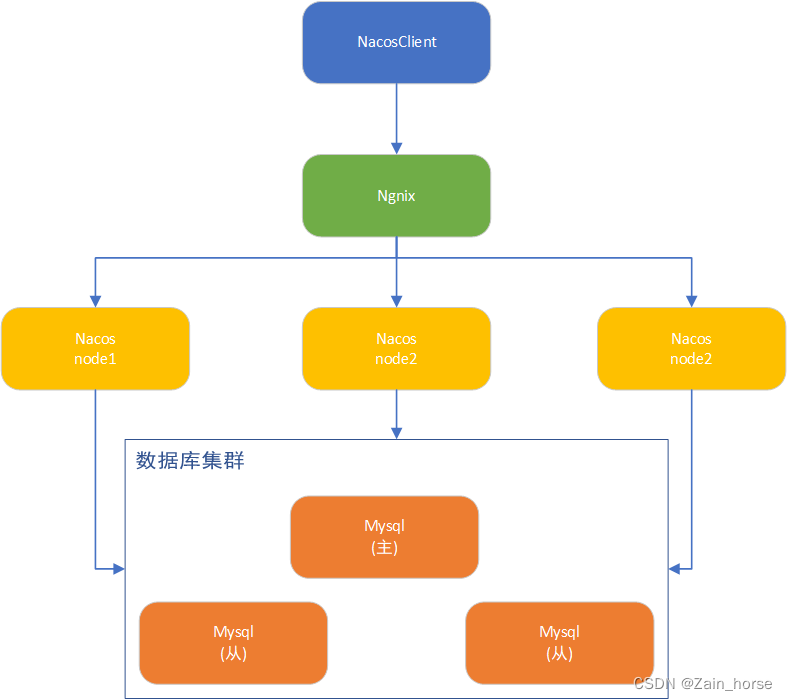
(一)Nacos集群结构图

三个Nacos结点地址
| 节点 | ip | port |
|---|---|---|
| nacos1 | xxx.xxx.xxx.xxx | 8845 |
| nacos2 | xxx.xxx.xxx.xxx | 8846 |
| nacos3 | xxx.xxx.xxx.xxx | 8847 |
(二)搭建集群
基本步骤
- 搭建数据库,初始化数据库表结构
- 下载nacos安装包
- 配置nacos
- conf/cluster.conf.template 重命名为 cluster.conf
- cluster.conf中添加三个Nacos节点
- 127.0.0.1:8845
- 127.0.0.1:8846
- 127.0.0.1:8847
- application.properties文件,添加数据库配置
#配置数据库源
spring.datasource.platform=mysql

#数据库源配置 db.xx.0 => 数据库0的配置信息
db.num=1
db.url.0=jdbc:mysql://127.0.0.1:3306/xxx?characterEncoding=utf8&connetTimeout=1000&socketTimeout=3000&autoReconnect=true&useUnicod=true&useSSL=false&serverTimezone=UTC
db_user.0=root
db_password.0=123456
- 启动nacos集群
- 复制修改nacos,使用bin/startup.cmd启动即可
- nginx反向代理
- conf/nginx.conf,配置负载均衡
#nacos的结点
upstream nacos-cluster {
	server 127.0.0.1:8845
	server 127.0.0.1:8846
	server 127.0.0.1:8847
}

#服务代理
#意思是,当访问localhost:80/nacos 就会均衡到上述的nacos结点中去
server {
	listen 80; #监听80端口,只需要访问80端口就可以
	server_name localhost; #服务名以localhost为域名

	localhost /nacos { #设置访问路径
		proxy_pass http://nacos-cluster #重定向路径
	}
}