一.MVVM的概念
MVVM是Model-View-ViewModel的简写,MVVM是一种设计模式,类似于比较流行的MVC。这种模式引入的主要的目的就是将前端UI视图(View)和后端逻辑数据(Model)进行分离,从而降低前后端的耦合,提高项目的开发效率和可维护性、可拓展性。
- Model:对现实事物简单的抽象与模型封装,不添加任何业务代码
- View:前端的可视化UI界面,比如Window/Page
- ViewModel:与前端绑定的视图模型,存放界面相关的交互逻辑、数据,类似于MVC中的Controller

二.MVVM项目架构
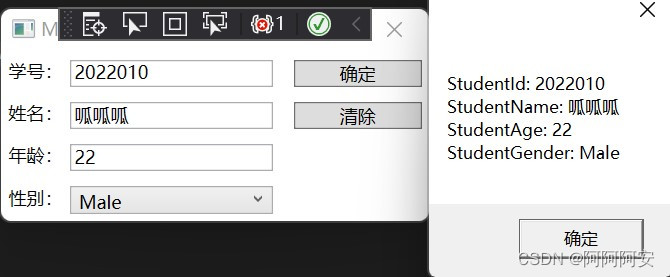
本节旨在以一个简单的案例来介绍MVVM的组织结构。案例背景是设计一个简单的学生信息编辑界面,具有“确定”和“清空”两个按钮,分别用以展示输入学生信息和清除编辑信息,整个案例的大致项目组织结构如下:
├── Commands :放置所有的基命令和其他封装的可复用命令类
├── Converters :放置所有的转换器
├── Model :放置模型/抽象实体类
├── Pages :放置所有的页面Page
├── Style :放置所有的自定义控件样式
├── Utils :放置所有的工具类
├── ViewModel :放置所有的页面绑定的ViewModel
└── Windows :放置所有的窗口类
1. Commands/RelayCommand 基命令类
自定义ICommand基命令类,通过委托Action来实现命令内部执行逻辑/行为,并通过泛型来进行命令拓展,实现逻辑处理的前后端分离。
namespace WPF_MVVM.Commands
{
    //2.默认object命令实现:RelayCommand<object>
    public class RelayCommand : RelayCommand<object>
    {
        public RelayCommand(Action<object> action) : base(action)
        {
        }
    }
    //1.自定义ICommand基类:整合泛型,用于在命令内部实现命令逻辑action
    public class RelayCommand<T> : ICommand
    {
        #region Private Members

        /// <summary>
        /// The _action to run
        /// </summary>
        private Action<T> _action;

        #endregion

        #region Constructor

        /// <summary>
        /// Default constructor
        /// </summary>
        public RelayCommand(Action<T> action)
        {
            _action = action;
        }

        #endregion

        #region Command Methods

        /// <summary>
        /// A relay command can always execute
        /// </summary>
        /// <param name="parameter"></param>
        /// <returns></returns>
        public bool CanExecute(object parameter)
        {
            return true;
        }

        /// <summary>
        /// Executes the commands Action
        /// </summary>
        /// <param name="parameter"></param>
        public void Execute(object parameter)
        {
            _action((T)parameter);
        }

        #endregion

        #region Public Events

        /// <summary>
        /// The event thats fired when the <see cref="CanExecute(object)"/> value has changed
        /// </summary>
        public event EventHandler CanExecuteChanged = (sender, e) => { };

        #endregion


    }
}
2.ViewModel
(1)ViewModelBase 实现
ViewModel 用于绑定View,为前端View提供逻辑/数据绑定支持,因此 ViewModel需要实现 INotifyPropertyChanged, INotifyCollectionChanged 等通知接口,具备通知UI数据变更的能力。我们将其公共部分封装起来作为一个基类 ViewModelBase。
namespace WPF_MVVM.ViewModel
{
    public class ViewModelBase : INotifyPropertyChanged, INotifyCollectionChanged
    {
        public event PropertyChangedEventHandler PropertyChanged;

        public void RaisePropertyChanged(string propertyName)
        {
            if (PropertyChanged != null)
            {
                PropertyChanged(this, new PropertyChangedEventArgs(propertyName));
            }
        }

        public event NotifyCollectionChangedEventHandler CollectionChanged;

        public void RaiseCollectionChanged(ICollection collection)
        {
            if (CollectionChanged != null)
            {
                CollectionChanged(collection, new NotifyCollectionChangedEventArgs(NotifyCollectionChangedAction.Reset));
            }
        }

        public void RaiseCollectionAdd(ICollection collection, object item)
        {
            if (CollectionChanged != null)
            {
                if (PropertyChanged != null)
                {
                    PropertyChanged(collection, new PropertyChangedEventArgs("Count"));
                    PropertyChanged(collection, new PropertyChangedEventArgs("Item[]"));
                }
                CollectionChanged(collection, new NotifyCollectionChangedEventArgs(NotifyCollectionChangedAction.Reset));
                //CollectionChanged(collection, new NotifyCollectionChangedEventArgs(NotifyCollectionChangedAction.Add, item));
            }
        }
    }
}
(2)MainWindowViewModel 实现
每个窗口Window/页面Page都应该具有一个与其绑定的ViewModel,在背后为View提供逻辑/数据绑定支持。因为本例只有MainWindow一个窗口页面,因此此处只有一个MainWindowViewModel 。
namespace WPF_MVVM.ViewModel
{
    public class MainWindowViewModel : ViewModelBase
    {

        //1.ViewModel 声明为单例模式
        private static MainWindowViewModel instance;

        public static MainWindowViewModel Instance
        {
            get
            {
                if (instance == null)
                {
                    instance = new MainWindowViewModel();

                }
                return instance;
            }
            private set { instance = value; }
        }
        //2.为前端View提供绑定的列表枚举数据(属性方式,字段不行必须声明为静态)
        public List<GenderEnum> Genders
        {
            get
            {
                return new List<GenderEnum>() { GenderEnum.Male, GenderEnum.Female };
            }
        }

        //3.持有Model对象提供数据绑定Model.xxx(需要先new出来,否则为null)
        public Student StudentModel { get; set; } = new Student();

        //4.自定义Command绑定的处理方式
        public ICommand ConfirmCommand
        {
            get
            {
                return new RelayCommand((parameter) =>
                {
                    MessageBox.Show("StudentId: " + StudentModel.StudentId + "\n" +
                    "StudentName: " + StudentModel.StudentName + "\n" +
                    "StudentAge: " + StudentModel.StudentAge + "\n" +
                    "StudentGender: " + StudentModel.StudentGender.ToString());
                });
            }
        }

        public ICommand ClearCommand
        {
            get
            {
                return new RelayCommand((parameter) =>
                {
                    StudentModel.StudentId = -1;
                    StudentModel.StudentAge = -1;
                    StudentModel.StudentName = "null";
                    StudentModel.StudentGender = GenderEnum.Male;
                });
            }
        }

    }
}
3.Model/Student 实体类
实体类封装实体的所有属性。此处实体类Student也实现了ViewModelBase的原因是,在View中我们需要绑定Student的属性, 并应该能在Student数据改变时通知前端View,因此我们需要实现通知接口:
- 方式一:在 MainWindowViewModel 中封装Student的属性,直接通过 MainWindowViewModel 来绑定数据。但这样的弊端就是ViewModel与Model之间的区别不清晰,Model变得可有可无。
- 方式二:在 Model 中单独封装Student的实体属性,然后在 MainWindowViewModel 中只需持有 Model 对象即可(需要 new 出来否则为null),这样就需要 Model 层也实现ViewModelBase,来通知前端UI属性变化。此处为第二种方式。
namespace WPF_MVVM.Model
{
    public class Student: ViewModelBase
    {
        private int studentId;
        public int StudentId
        {
            get
            {
                return this.studentId;
            }
            set
            {
                if (this.studentId != value)
                {
                    this.studentId = value;
                    RaisePropertyChanged("StudentId");
                }
            }
        }

        private string studentName;
        public string StudentName
        {
            get
            {
                return this.studentName;
            }
            set
            {
                if (this.studentName != value)
                {
                    this.studentName = value;
                    RaisePropertyChanged("StudentName");
                }
            }
        }

        private int studentAge;
        public int StudentAge
        {
            get
            {
                return this.studentAge;
            }
            set
            {
                if (this.studentAge != value)
                {
                    this.studentAge = value;
                    RaisePropertyChanged("StudentAge");
                }
            }
        }

        private GenderEnum studentGender;
        public GenderEnum StudentGender
        {
            get
            {
                return this.studentGender;
            }
            set
            {
                if (this.studentGender != value)
                {
                    this.studentGender = value;
                    RaisePropertyChanged("StudentGender");
                }
            }
        }
    }
}
4.Utils/GenderEnum 性别枚举类
namespace WPF_MVVM.Utils
{
    public enum GenderEnum
    {
        Male,
        Female
    }
}
5.MainWindow 界面
View 部分就很简单了,我们只需设计UI界面,然后使用绑定Binding的方式,来绑定数据(ViewModel)和行为(ICommand),前后端只通过简单的数据和命令来维持连接,极大的进行了解耦。
<Window
    x:Class="WPF_MVVM.MainWindow"
    xmlns="http://schemas.microsoft.com/winfx/2006/xaml/presentation"
    xmlns:x="http://schemas.microsoft.com/winfx/2006/xaml"
    xmlns:d="http://schemas.microsoft.com/expression/blend/2008"
    xmlns:enum="clr-namespace:WPF_MVVM.Utils"
    xmlns:local="clr-namespace:WPF_MVVM"
    xmlns:mc="http://schemas.openxmlformats.org/markup-compatibility/2006"
    xmlns:sys="clr-namespace:System;assembly=mscorlib"
    xmlns:vm="clr-namespace:WPF_MVVM.ViewModel"
    Title="MainWindow"
    Width="300"
    Height="150"
    DataContext="{x:Static vm:MainWindowViewModel.Instance}"
    mc:Ignorable="d">

    <Window.Resources>
        <ObjectDataProvider
            x:Key="Genders_XAML"
            MethodName="GetValues"
            ObjectType="{x:Type sys:Enum}">
            <ObjectDataProvider.MethodParameters>
                <x:Type TypeName="enum:GenderEnum" />
            </ObjectDataProvider.MethodParameters>
        </ObjectDataProvider>
        <Style x:Key="LocalTextBoxStyle" TargetType="TextBox">
            <Setter Property="Width" Value="135" />
            <Setter Property="Margin" Value="0,5,0,5"/>
            <Style.Triggers>
                <Trigger Property="Validation.HasError" Value="true">
                    <Setter Property="ToolTip" Value="{Binding RelativeSource={x:Static RelativeSource.Self}, Path=(Validation.Errors)/ErrorContent}" />
                    <Setter Property="BorderThickness" Value="0" />
                </Trigger>
            </Style.Triggers>
        </Style>
    </Window.Resources>


    <Grid>
        <Grid.ColumnDefinitions>
            <ColumnDefinition Width="*" />
            <ColumnDefinition Width="*" />
            <ColumnDefinition Width="*" />
        </Grid.ColumnDefinitions>
        <Grid.RowDefinitions>
            <RowDefinition Height="*" />
            <RowDefinition Height="*" />
            <RowDefinition Height="*" />
            <RowDefinition Height="*" />
        </Grid.RowDefinitions>
        <StackPanel Grid.ColumnSpan="2" Orientation="Horizontal">
            <TextBlock Margin="5" Text="学号:" />
            <TextBox Style="{StaticResource LocalTextBoxStyle}" Text="{Binding StudentModel.StudentId,UpdateSourceTrigger=PropertyChanged}"/>
        </StackPanel>
        <StackPanel
            Grid.Row="1"
            Grid.ColumnSpan="2"
            Orientation="Horizontal">
            <TextBlock Margin="5" Text="姓名:" />
            <TextBox Style="{StaticResource LocalTextBoxStyle}" Text="{Binding StudentModel.StudentName,UpdateSourceTrigger=PropertyChanged}"/>
        </StackPanel>
        <StackPanel
            Grid.Row="2"
            Grid.ColumnSpan="2"
            Orientation="Horizontal">
            <TextBlock Margin="5" Text="年龄:" />
            <TextBox Style="{StaticResource LocalTextBoxStyle}" Text="{Binding StudentModel.StudentAge,UpdateSourceTrigger=PropertyChanged}"/>
        </StackPanel>
        <StackPanel
            Grid.Row="3"
            Grid.ColumnSpan="2"
            Orientation="Horizontal">
            <TextBlock Margin="5" Text="性别:" />
            <ComboBox
                Width="135"
                Margin="0,5,0,5"
                ItemsSource="{Binding Genders}"
                SelectedItem="{Binding StudentModel.StudentGender,UpdateSourceTrigger=PropertyChanged}"/>
        </StackPanel>
        <Button
            Grid.Column="2"
            Margin="5"
            Content="确定">
            <Button.InputBindings>
                <MouseBinding Command="{Binding ConfirmCommand}" MouseAction="LeftClick"/>
            </Button.InputBindings>
        </Button>
        <Button
            Grid.Row="1"
            Grid.Column="2"
            Margin="5"
            Content="清除">
            <Button.InputBindings>
                <MouseBinding Command="{Binding ClearCommand}" MouseAction="LeftClick"/>
            </Button.InputBindings>
        </Button>
    </Grid>
</Window>
三.案例总结
在上述案例中,我们已经基本阐明了MVVM的组织思路。接下来,我们发现碰到了很多没见过的语法,因此我们这里进行一下简单的说明与总结。
1.Binding的限制
- 绑定源 Source:Source是个object类型,这也就意味着绑定源可以是任何可以提供数据的对象类型。
- 绑定路径 Path:Path用于设置绑定源[属性]的路径,也就是绑定Source的哪一个数据值。这里需要注意的是 Path 是个PropertyPath 类型,只能用于绑定属性,而不能绑定普通字段。实际上,通过C#代码的方式可以绑定字段,但是普通字段无法实现数据变更之后的通知功能。
2.ObjectDataProvider介绍
ObjectDataProvider 提供了一种在 XAML 中创建和使用对象作为绑定源对象的便捷方法。简单来说,ObjectDataProvider 可以在XAML中将方法的返回结果包装和创建为绑定数据源。由于没有直接方法可以将枚举用作数据绑定源,因此该方法常用于包装枚举类型本身提供的枚举值数组用作数据绑定源。其使用方式如下(参考 WPF ObjectDataProvider):
使用属性将 ConstructorParameters 参数传递给对象的构造函数,通过构造函数包装对象。
使用 MethodName 属性调用方法,并使用 MethodParameters 属性将参数传递给该方法。 然后可以将数据源绑定到方法的返回结果。
- ObjectDataProvider 属性:
    - ConstructorParameters:获取要传递给该构造函数的参数列表。
    - MethodName: 获取或设置要调用的方法的名称。
    - MethodParameters: 获取要传递给方法的参数列表。
    - ObjectInstance: 获取或设置用作绑定源的对象。
    - ObjectType: 获取或设置要创建其实例的对象的类型。

- 注意: ObjectInstance和ObjectType不可同时赋值。ObjectType的类型是Type,ObjectInstance的类型是Object。换句话说objecttype可以使用x:type进行赋值,也只有这种方式。objectinstance则是可以通过 staticresource的方式进行绑定,绑定的也是实例化后的元素。
在绑定枚举处理中,枚举基类Enum有一个静态方法Enum.GetValues(Type),该方法可以检索返回指定枚举类型中的常数值数组Array。 因此我们无需自行创建枚举数组,只需通过ObjectDataProvider处理即可。上述案例绑定枚举也可写为:
  <Window.Resources>
        <ObjectDataProvider
            x:Key="Genders_XAML"
            MethodName="GetValues"
            ObjectType="{x:Type sys:Enum}">
            <ObjectDataProvider.MethodParameters>
                <x:Type TypeName="enum:GenderEnum" />
            </ObjectDataProvider.MethodParameters>
        </ObjectDataProvider>
  </Window.Resources>

<StackPanel
    Grid.Row="3"
    Grid.ColumnSpan="2"
    Orientation="Horizontal">
    <TextBlock Margin="5" Text="性别:" />
    <ComboBox
        Width="135"
        Margin="0,5,0,5"
        ItemsSource="{Binding Source={StaticResource Genders_XAML}}"
        SelectedItem="{Binding StudentModel.StudentGender,UpdateSourceTrigger=PropertyChanged}"/>
</StackPanel>