1.先卸载sendmail和postfix
yum remove sendmail
yum remove postfix
2.安装所有软件,然后修改配置文件,包括postfix,dovecot,crontabs,cyrus-sasl*
yum install postfix
yum install dovecot
yum install crontabs (这个是如果初始安装了postfix的话,卸载时会顺带把它卸载掉,所以要重新安装)
yum install cyrus-sasl*
3.修改配置文件
修改main.cf文件:vim /etc/postfix/main.cf
75行 修改为:myhostname = mail.test.com
83行 修改为:mydomain = test.com
99行 修改为:myorigin = $mydomain
116行 修改为:inet_interfaces = all
119行 修改为:inet_protocols = ipv4 (或者inet_protocols = all)
164行 修改为:mydestination = $myhostname, localhost.$mydomain, localhost, $mydomain
264行 修改为:mynetworks = 0.0.0.0
419行 修改为:home_mailbox = Maildir/
569行 加参数:smtpd_banner = $myhostname ESMTP
文件末尾插入:
# limit an email size for 10M
message_size_limit = 10485760
# limit a mailbox for 1G
mailbox_size_limit = 1073741824
# for SMTP-Auth
smtpd_sasl_type = dovecot
smtpd_sasl_path = private/auth
smtpd_sasl_auth_enable = yes
smtpd_sasl_security_options = noanonymous
smtpd_sasl_local_domain = $myhostname
smtpd_recipient_restrictions = permit_mynetworks,permit_auth_destination,permit_sasl_authenticated,reject
修改dovecot.conf文件:vim /etc/dovecot/dovecot.conf
20行 修改为:protocols = imap pop3 lmtp
26行 修改为:listen = *
修改10-auth.conf文件:vim /etc/dovecot/conf.d/10-auth.conf
9行 修改为:disable_plaintext_auth = no
97行 修改为:auth_mechanisms = plain login
修改10-mail.conf文件:vim /etc/dovecot/conf.d/10-mail.conf
30行 修改为:mail_location = maildir:~/Maildir
修改10-master.conf文件:vim /etc/dovecot/conf.d/10-master.conf
88行-90行 修改为:
unix_listener /var/spool/postfix/private/auth {
mode = 0666
user = postfix
group = postfix
}
修改10-ssl.conf文件:vim /etc/dovecot/conf.d/10-ssl.conf
6行 修改为:ssl = no
修改/etc/hosts文件:vim /etc/hosts
在文件末尾插入:
192.168.1.235 mail.test.com mail (注意:IP是你自己虚拟机的IP,我这里是192.168.1.235)
修改hostname:
执行命令:hostname mail.test.com
4.重启服务:
service postfix restart
service dovecot restart
service saslauthd restart
5.添加用户(也是邮箱用户)
useradd user1
passwd user1 --> 输入密码
useradd user2
passwd user2 --> 输入密码
6.创建邮件存储目录:
su user1 -c "mkdir /home/user1/Maildir"
su user2 -c "mkdir /home/user2/Maildir"
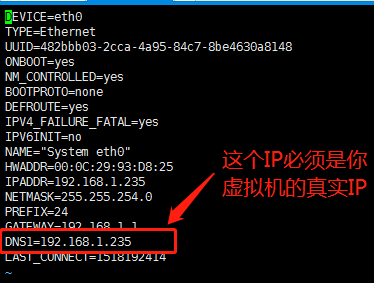
7.设置网卡的DNS:vim /etc/sysconfig/network-scripts/ifcfg-eth0
重启网卡:service network restart
8.关闭防火墙:service iptables stop
配置完成,开始收发邮件!
下面就本次配置过程中遇到的问题做一总结:
1.首先是DNS的配置(就是上边网卡设置中的DNS1),好多教程里边都没有提到DNS的配置,默认基本都是和网关一样的,但是这里的域名解析写在了本机的/etc/hosts文件中,所以必须改成本机IP才可以解析正确,注意DNS1的IP一定要和/etc/hosts文件匹配起来,否则解析不了
2.邮件存储目录的创建(就是上边创建的“/home/user1/Maildir”和“/home/user2/Maildir”目录),好多教程直接把这一步省略了,所以刚开始发送的邮件没地方存储,被退回了,所以这个目录一定先创建好,其次还要保证每个用户对存储目录具有读写权限,刚开始我是用root用户创建的这个目录,所以没权限读写,直接发送失败了,然后执行chown -R user1:user1 /home/user1/Maildir; chown -R user2:user2 /home/user2/Maildir,更改权限后就成功了!
3.如果邮箱客户端要使用Windows下的Foxmail,则需要修改Windows系统的hosts文件,文件目录:
“C:\Windows\System32\drivers\etc”
找到hosts文件,在文件末尾加入:
192.168.1.235 mail.test.com
然后在Foxmail客户端新建邮箱账号[email protected]和[email protected](就是刚才新建的user1和user2)

新建完成之后,两个账号之间就可以正常收发邮件了