前言
从本篇文章开始记录uniapp实战仿写网易云音乐项目的过程,主要会写一下关键步骤和难点,本专栏会保持持续更新,并在最后送上源码,感兴趣的可以订阅本专栏。本篇主要实现的是首页tab栏以及图片滚动区域。
首页导航栏
首先要在page.json中配置页面和导航栏:
pages页面,这里有五个页面
"pages": [ //pages数组中第一项表示应用启动页,参考:https://uniapp.dcloud.io/collocation/pages
	{


		"path": "pages/index/index",
		"style": {


			"navigationBarTitleText": "uni-app",
			"app-plus":{


				"titleNView": false
			}
		}
	},
	{


		"path": "pages/video/video",
		"style": {


			"navigationBarTitleText": "uni-app"
		}
	},
	{


		"path": "pages/mine/mine",
		"style": {


			"navigationBarTitleText": "uni-app"
		}
	}
    ,{


           "path" : "pages/account/account",
           "style" :
           {


               "navigationBarTitleText": "",
               "enablePullDownRefresh": false
           }

       }
       ,{


           "path" : "pages/cloud/cloud",
           "style" :
           {


               "navigationBarTitleText": "",
               "enablePullDownRefresh": false
           }

       }
   ],
tabBar配置导航栏,五个页面五个导航栏,注意这里每个导航栏都有未选中的图片和选中的图片:
"tabBar": {


		"color":"#888",
		"selectedColor":"#ff2419",
		"borderStyle":"white",
		"backgroundColor":"#f9f9f9",
		"list": [
			{


				"pagePath":"pages/index/index",
				"iconPath":"static/tab/t_1.png",
				"selectedIconPath":"static/tab/t_11.png",
				"text":"首页"
			},
			{


				"pagePath":"pages/video/video",
				"iconPath":"static/tab/t_2.png",
				"selectedIconPath":"static/tab/t_21.png",
				"text":"视频"
			},
			{


				"pagePath":"pages/mine/mine",
				"iconPath":"static/tab/t_3.png",
				"selectedIconPath":"static/tab/t_31.png",
				"text":"我的"
			},
			{


				"pagePath":"pages/cloud/cloud",
				"iconPath":"static/tab/t_4.png",
				"selectedIconPath":"static/tab/t_41.png",
				"text":"云村"
			},
			{


				"pagePath":"pages/account/account",
				"iconPath":"static/tab/t_5.png",
				"selectedIconPath":"static/tab/t_51.png",
				"text":"账号"
			}
		]
	}
公共样式的配置
一般在项目中都会配置一些公共样式,比如一些页面或者组件的样式,还有这里用到的iconfont样式
一般单独文件存放公共样式
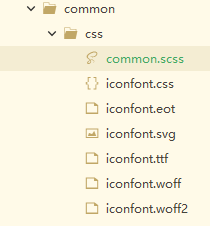
然后在App.vue页面进行引入:
<style lang="scss">
	/*每个页面公共css */
	@import url("./common/css/common.scss");
	@import url("./common/css/iconfont.css");
</style>
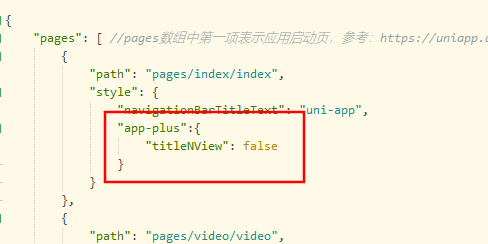
另外我们还需要去掉uniapp的头部内容:

我们只需要在page.json中加上这块代码就行 ,关闭标题显示
首页轮播图
轮播图我们使用uniapp自带的swiper组件,详细用法可以参考官方文档 链接
我们首先先把需要轮播的图片数据获取到:
methods: {


	getBanner() {


		uni.request({


			url: 'http://localhost:3000/banner',
			method: 'GET',
			success:(res)=>{


				this.swiper = res.data.banners;
			}
		})
	}
}
然后编写轮播图
<!-- 轮播 -->
<view class="banner">
	<swiper :indicator-dots="true"
	        :autoplay="true"
			indicator-color="rgba(255,255,255, .5)"
			indicator-active-color="#ff372b"
			:interval="3000"
			:duration="500">
		<swiper-item v-for="(item,index) in swiper" :key="index">
			<view class="item">
				<image :src="item.imageUrl" class="img"></image>
				<view class="tag">
					{

    {

    item.typeTitle}}
				</view>
			</view>
		</swiper-item>
	</swiper>
</view>
最后看实现的轮播图效果:

最后看看本文实现的最后效果:

最后
本文内容到这里就结束了,下期会带大家继续完成首页部分的功能和一些细节,并且完成api的封装。