题外话
本文这个标题其实让我想起了电影《蝙蝠侠大战超人:正义黎明》中的一句话,在该片中,从未来穿越回来的闪电侠对蝙蝠侠发出警告: It’s Lois! She’s the key!

【布鲁斯,是露易丝!露易丝是关键!】
【你是对的,你对他的看法一直都是对的……】
【我来得太早了吗?我来得太早了……】
【敬畏他!敬畏他!】
【你一定要找到我们!你必须要找到我们!……】
这是闪电侠借助神速力从未来的某个时间点穿越回来,他是来警告蝙蝠侠的。从前几句话可以推断出,在未来的时间线里,因为露易丝出事了,超人可能成为了某种可怕的存在,正义联盟根本没人能拦得住他,所以闪电侠只能回到过去告诉战友们提前做好准备,不能让超人堕落成这种样子。不料他穿越回来的时候发现蝙蝠侠还不认识他,所以他就知道自己来得太早了(因为这个时间点正义联盟还没有建立)。他知道只有正义联盟有能力保护好超人和他的家人,所以他最后恳求蝙蝠侠一定要找到他们并组建正义联盟。这段剧情应该是改编自漫画和游戏《不义联盟:人间之神》。

剧情回忆: 在电影《蝙蝠侠大战超人:正义黎明》中,正当蝙蝠侠暴揍大超之时,超人提到了玛莎,他让蝙蝠侠去救玛莎,愤怒的蝙蝠侠质问超人为什么要提起这个名字,这时一旁的超人女友及时赶到,她告诉蝙蝠侠那是他母亲的名字。因为蝙蝠侠的妈妈也叫玛莎,由于蝙蝠侠当年自己还是年幼的时候因为没能救下自己妈妈,而亲眼目睹了自己的母亲玛莎·韦恩在自己面前遭遇劫匪杀害,所以当超人叫蝙蝠侠救玛莎时,就想到了自己妈妈。而这时,蝙蝠侠也想起了之前闪电侠对他的警告,顿时恍然大悟,这才明白过来,自己差点犯下大错,假如他没能救出超人的母亲玛莎,那么之后超人将会黑化,世界就会变成蝙蝠侠之前梦境中的那般由黑化的超人所统治,世上再也无人能够阻止超人。
好了,下面开始进入本文正题。
为什么 key 非常重要
我们先看一个例子,现在有一个自定义的 FancyButton 组件,代码如下:
import 'dart:math';
import 'package:flutter/material.dart';
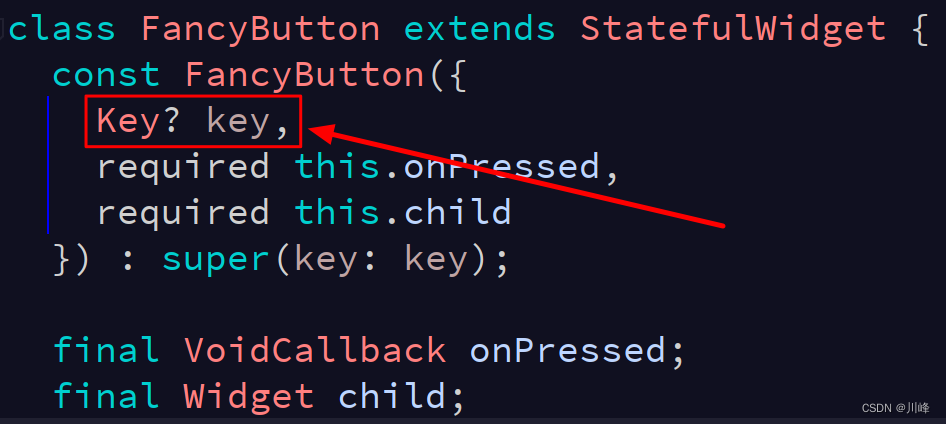
class FancyButton extends StatefulWidget {
const FancyButton({
Key? key, required this.onPressed, required this.child})
: super(key: key);
final VoidCallback onPressed;
final Widget child;
@override
State<FancyButton> createState() => _FancyButtonState();
}
class _FancyButtonState extends State<FancyButton> {
@override
Widget build(BuildContext context) {
return ElevatedButton(
style: ButtonStyle(
backgroundColor: MaterialStateProperty.all(_getColors()),
),
onPressed: widget.onPressed,
child: Padding(
padding: const EdgeInsets.all(30),
child: widget.child,
),
);
}
// 以下代码用于生成随机背景色,以确保每个Button的背景色不同
Color _getColors() {
return _buttonColors.putIfAbsent(this, () => _colors[next(0, 5)]); // map中不存在就放入map, 否则直接返回
}
final Map<_FancyButtonState, Color> _buttonColors =
{
}; // 注意,这里使用了一个Map保存当前State对应的Color
final Random _random = Random();
int next(int min, int max) => min + _random.nextInt(max - min);
final List<Color> _colors = [
Colors.blue,
Colors.green,
Colors.orange,
Colors.purple,
Colors.amber
];
}
FancyButton 很简单,只是包装了一下ElevatedButton组件,它在内部会自己管理背景色,为了使每个 FancyButton 的背景色不同,这里使用了随机数来获取一个随机的颜色,并且使用Map来缓存颜色,这样下次可直接从Map中获取而不用每次计算。
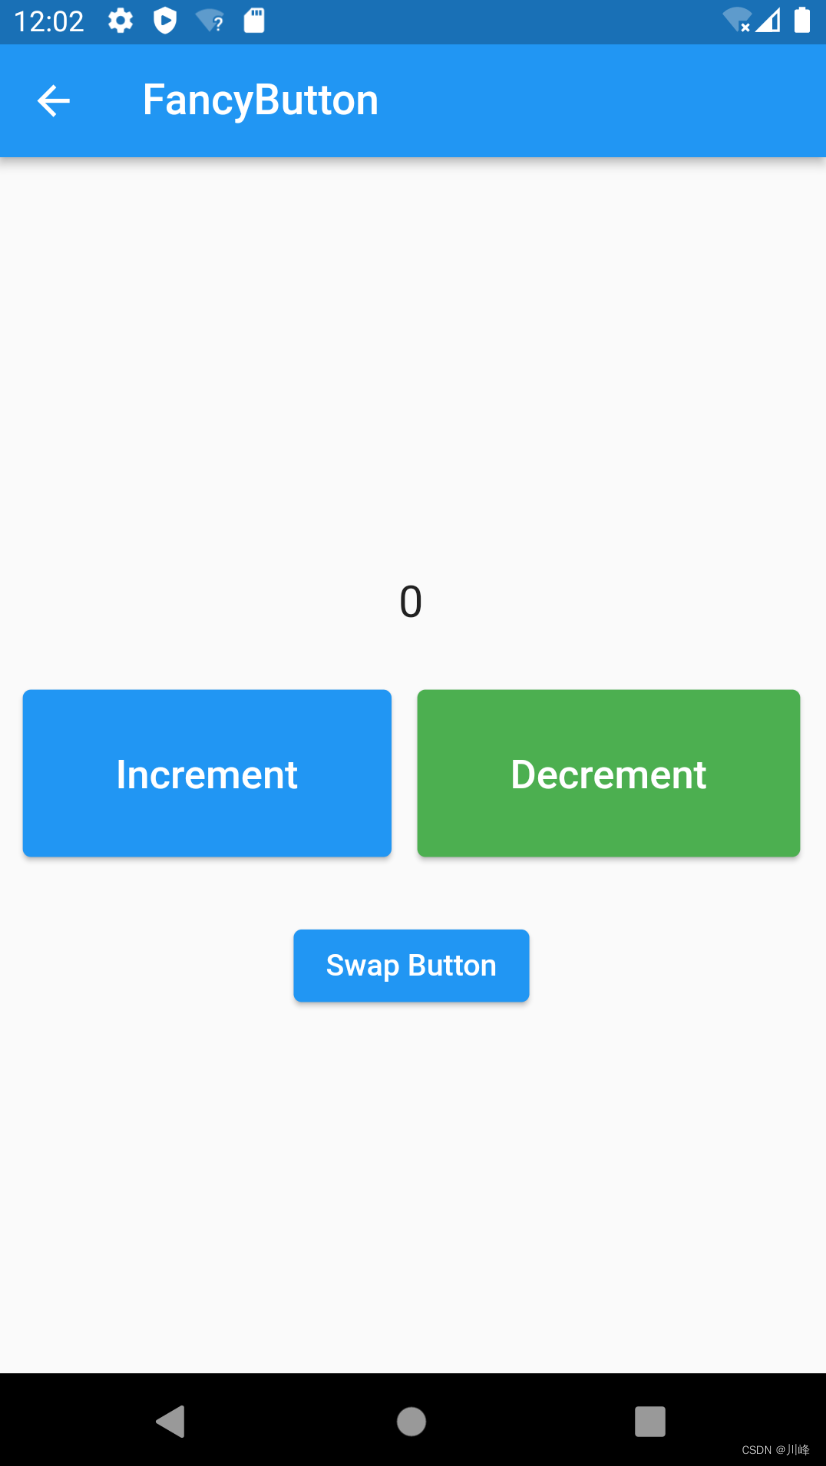
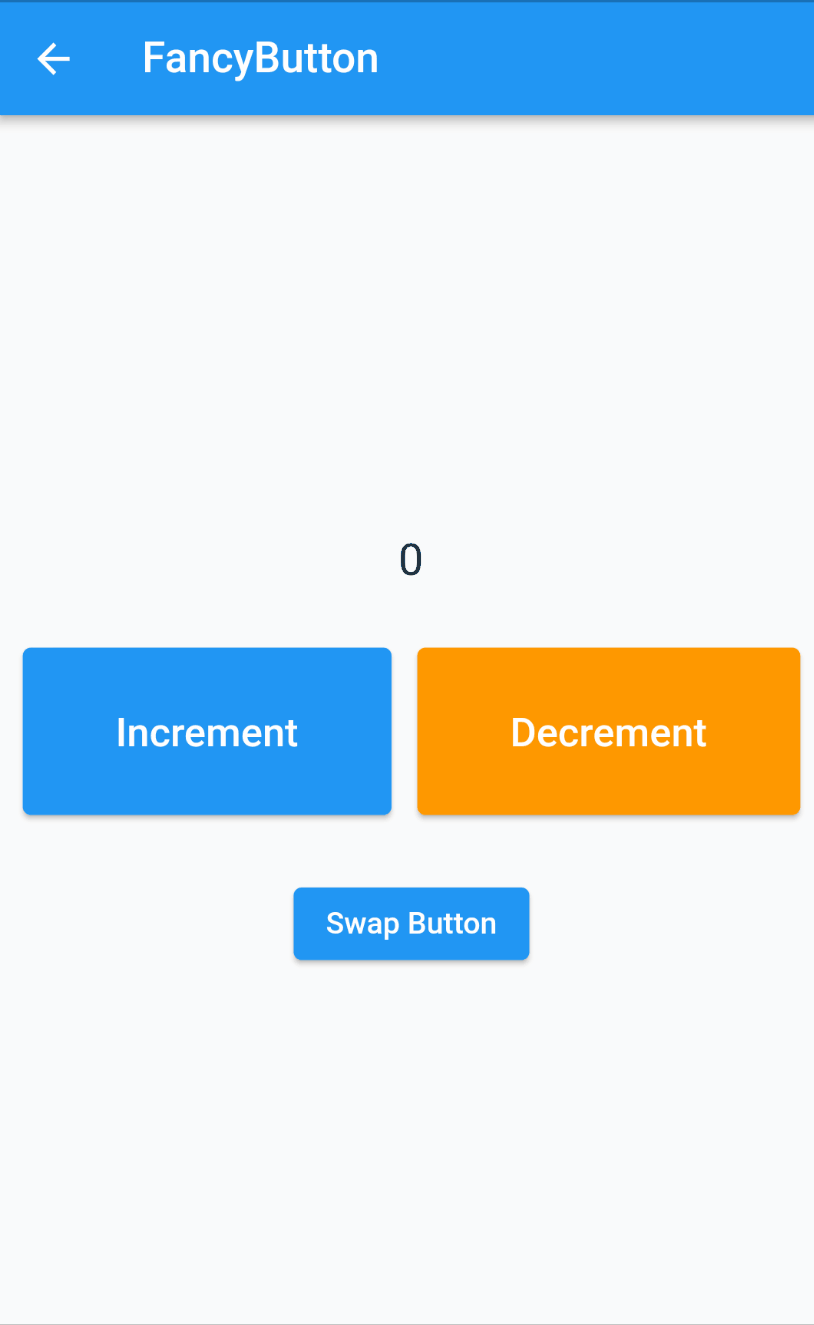
下面基于 Flutter 默认的计数器示例应用使用上面的 FancyButton 进行改造,我们在页面上添加两个 FancyButton 按钮,点击的时候分别用来加减counter值,另外我们添加一个“Swap”按钮,点击的时候可以交换页面上的两个 FancyButton,页面要实现的静态效果如下:
实现代码如下:
class FancyButtonPage extends StatefulWidget {


  const FancyButtonPage({

    Key? key}) : super(key: key);

  @override
  State<FancyButtonPage> createState() => _FancyButtonPageState();
}

class _FancyButtonPageState extends State<FancyButtonPage> {


  int counter = 0;
  bool _reversed = false;

  void resetCounter() {


    setState(() => counter = 0);
    swapButton();
  }

  void swapButton() {


    setState(() => _reversed = !_reversed);
  }

  @override
  Widget build(BuildContext context) {


    final incrementButton = FancyButton(
        onPressed: () => setState(() => counter++),
        child: const Text(
          "Increment",
          style: TextStyle(fontSize: 20),
        ));
    final decrementButton = FancyButton(
        onPressed: () => setState(() => counter--),
        child: const Text(
          "Decrement",
          style: TextStyle(fontSize: 20),
        ));
    List<Widget> buttons = [incrementButton, decrementButton];
    if (_reversed) {


      buttons = buttons.reversed.toList();
    }
    return Scaffold(
      appBar: AppBar(title: const Text("FancyButton")),
      body: Column(
        crossAxisAlignment: CrossAxisAlignment.center,
        mainAxisAlignment: MainAxisAlignment.center,
        children: [
          const SizedBox(height: 30),
          Text("$counter", style: const TextStyle(fontSize: 22)),
          const SizedBox(height: 30),
          Row(
            mainAxisAlignment: MainAxisAlignment.spaceEvenly,
            children: buttons,
          ),
          const SizedBox(height: 30),
          ElevatedButton(
              onPressed: resetCounter, child: const Text("Swap Button"))
        ],
      ),
    );
  }
}
运行后测试效果:
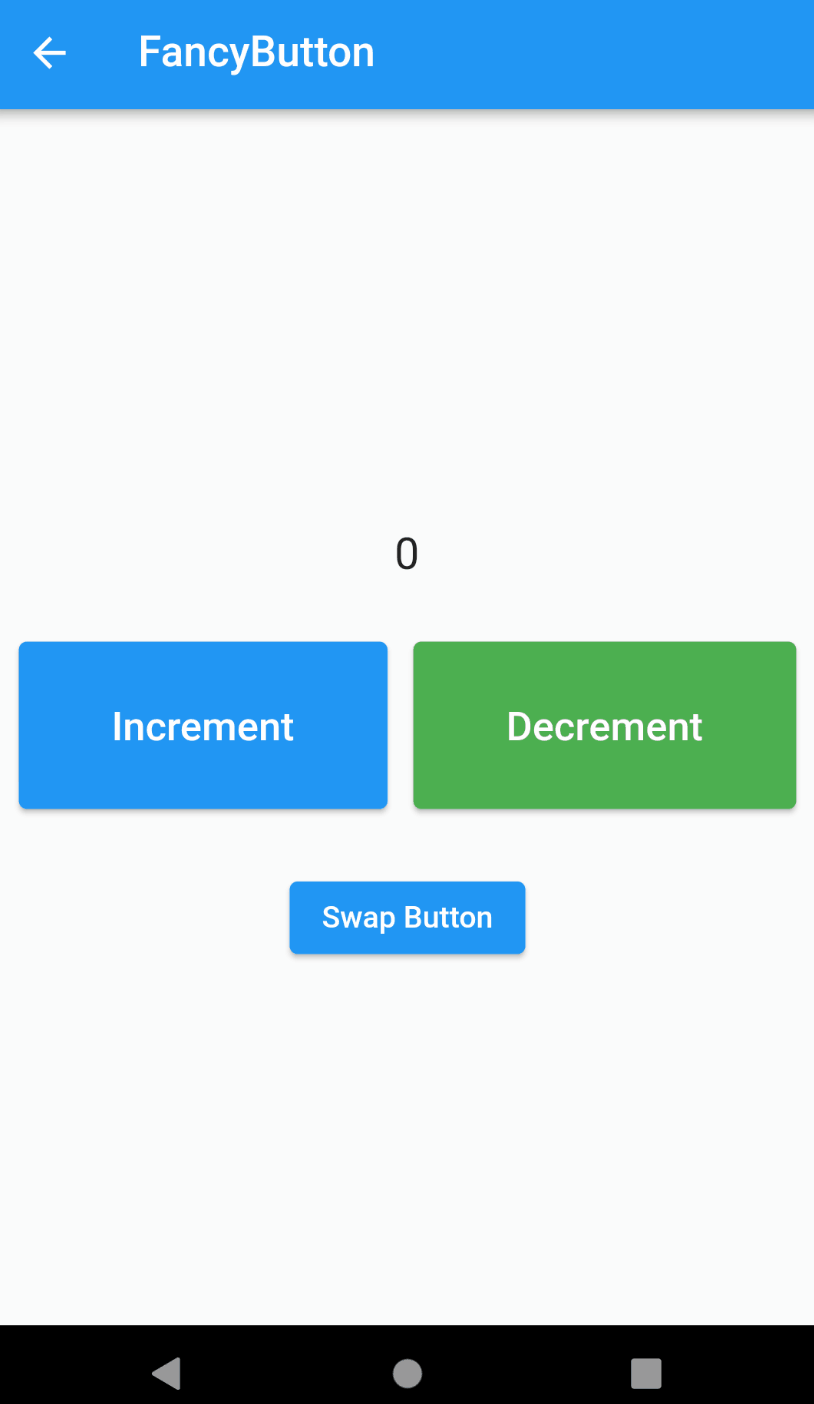
这时你会发现一个奇怪的现象:当按下交换按钮时,上面两个按钮确实会交换位置,但是只有按钮的文字被交换了,背景色却没有变,而点击按钮时对应的功能正常。也就是说,左边的按钮与交换前的背景颜色相同,即使按钮本身是不同的。这是为什么呢?这明显不是我们期望的,我们期望的是两个按钮可以“真正的”对调位置。但这只换了一半是几个意思?
Element Tree 和 State
在解释这个问题之前我们先来了解一下关于 Element Tree 和 State 的几个概念:
-
State对象实际上是由Element Tree管理的。(确切的说是由StatefulElement创建并持有) -
State对象是长期存在的。与Widget不同,每当Widget重新渲染时,它们都不会被销毁和重新构建。 -
State对象是可以被重用的。 -
Element引用了Widget。同时State对象也会保存对Widget的引用,但这种持有不是永久的。
Element很简单,因为它们只包含元信息和对Widget的引用,但它们也知道如果一旦Widget发生更改,自己该如何更新对不同Widget的引用。

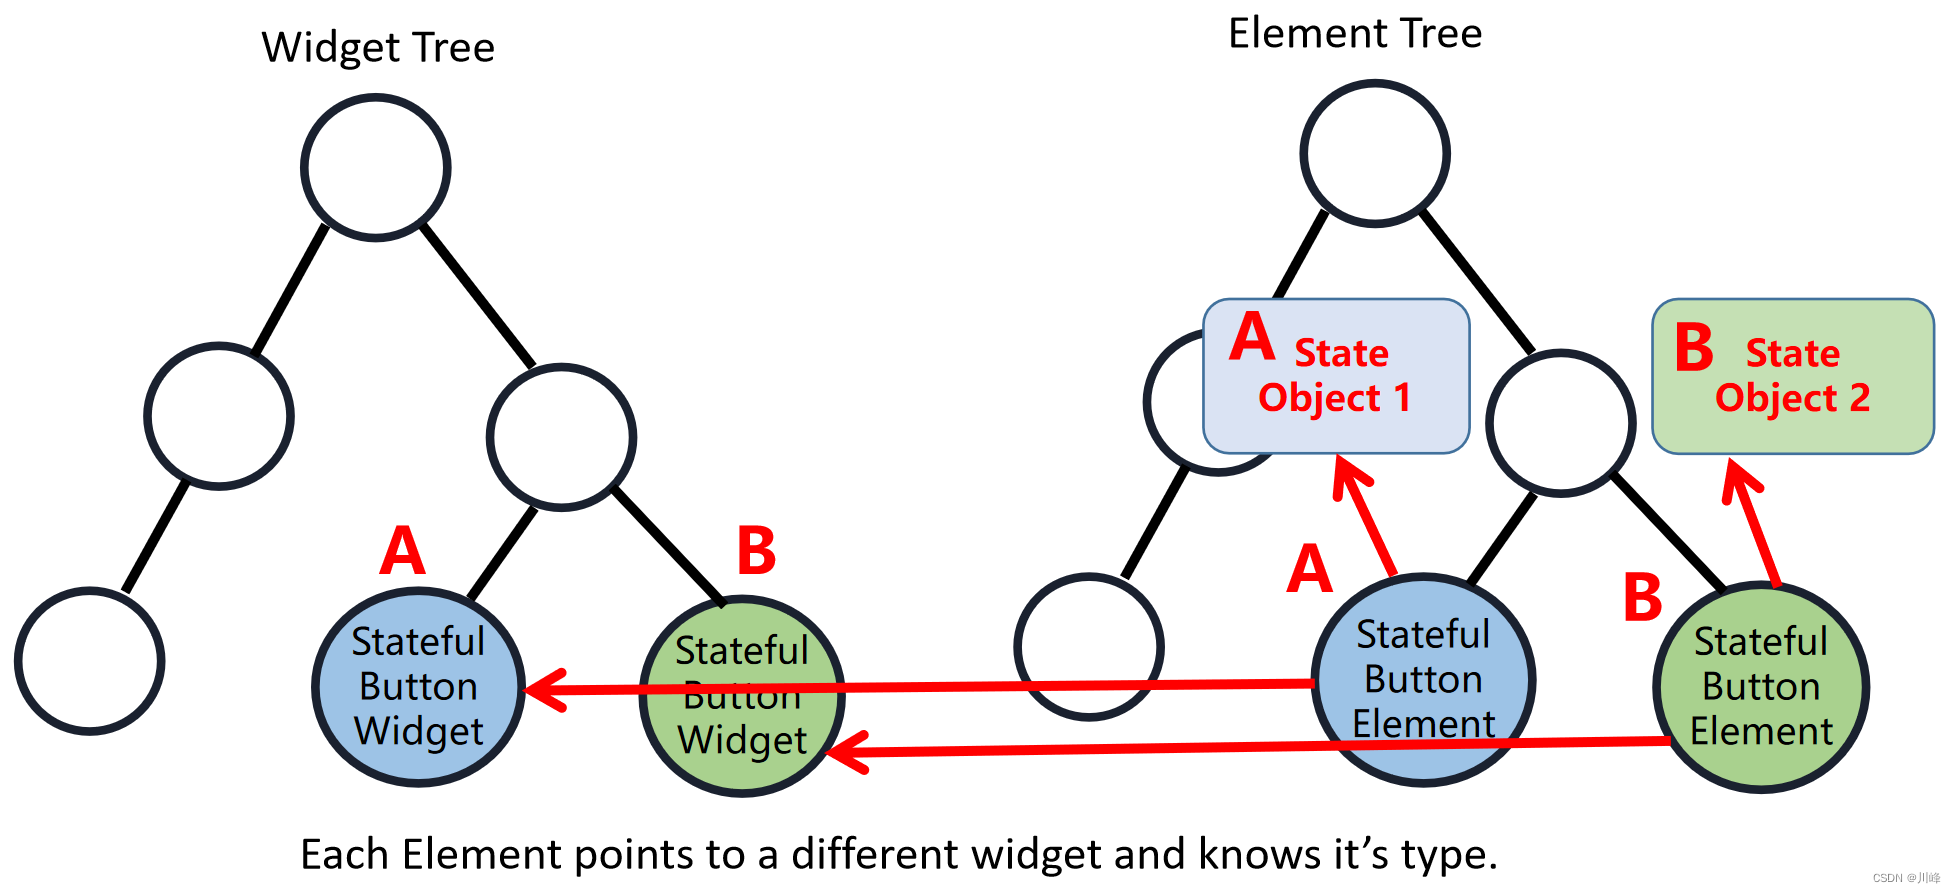
当Flutter决定在调用build方法进行重建和重新渲染时,一个element将会查找与它引用的前一个Widget完全相同的位置处的Widget。
然后,它将决定Widget是否相同(若相同,它不需要做任何事情),或者Widget是否发生了变化,或者它是一个完全不同的Widget(若完全不同,它需要重新被渲染)。
但问题是Element是根据什么来判断更新的内容,它们只查看Widget上的几个属性:
-
在运行时的确切类型(runtimeType)
-
一个
Widget的key(如果有的话)
其实也就是 Flutter 执行 Build 重建流程中Element源码中 updateChild() 方法的逻辑:
// flutter/lib/src/widgets/framework.dart
Element? updateChild(Element? child, Widget? newWidget, Object? newSlot) {

     // Element
    if (newWidget == null) {


      if (child != null) {


        deactivateChild(child);
      }
      return null;
    }
    final Element newChild;
    if (child != null) {


       ...
      if (hasSameSuperclass && child.widget == newWidget) {


        if (child.slot != newSlot) {


          updateSlotForChild(child, newSlot);
        }
        newChild = child;
      } else if (hasSameSuperclass && Widget.canUpdate(child.widget, newWidget)) {


        if (child.slot != newSlot) {


          updateSlotForChild(child, newSlot);
        }
        ...
        child.update(newWidget);
        ...
        newChild = child;
      } else {


        deactivateChild(child);
        newChild = inflateWidget(newWidget, newSlot);
      }
    } else {


      newChild = inflateWidget(newWidget, newSlot);
    }
    return newChild;
  }
该方法主要逻辑总结如下:

其中的Widget.canUpdate()方法的源码如下:
  static bool canUpdate(Widget oldWidget, Widget newWidget) {


    return oldWidget.runtimeType == newWidget.runtimeType
        && oldWidget.key == newWidget.key;
  }
本例中交换的两个FancyButton对象是内存地址完全不同的两个实例对象,因此肯定会直接执行上面updateChild() 方法逻辑的情况2,排除情况1。也就是会执行 canUpdate 方法的逻辑判断。
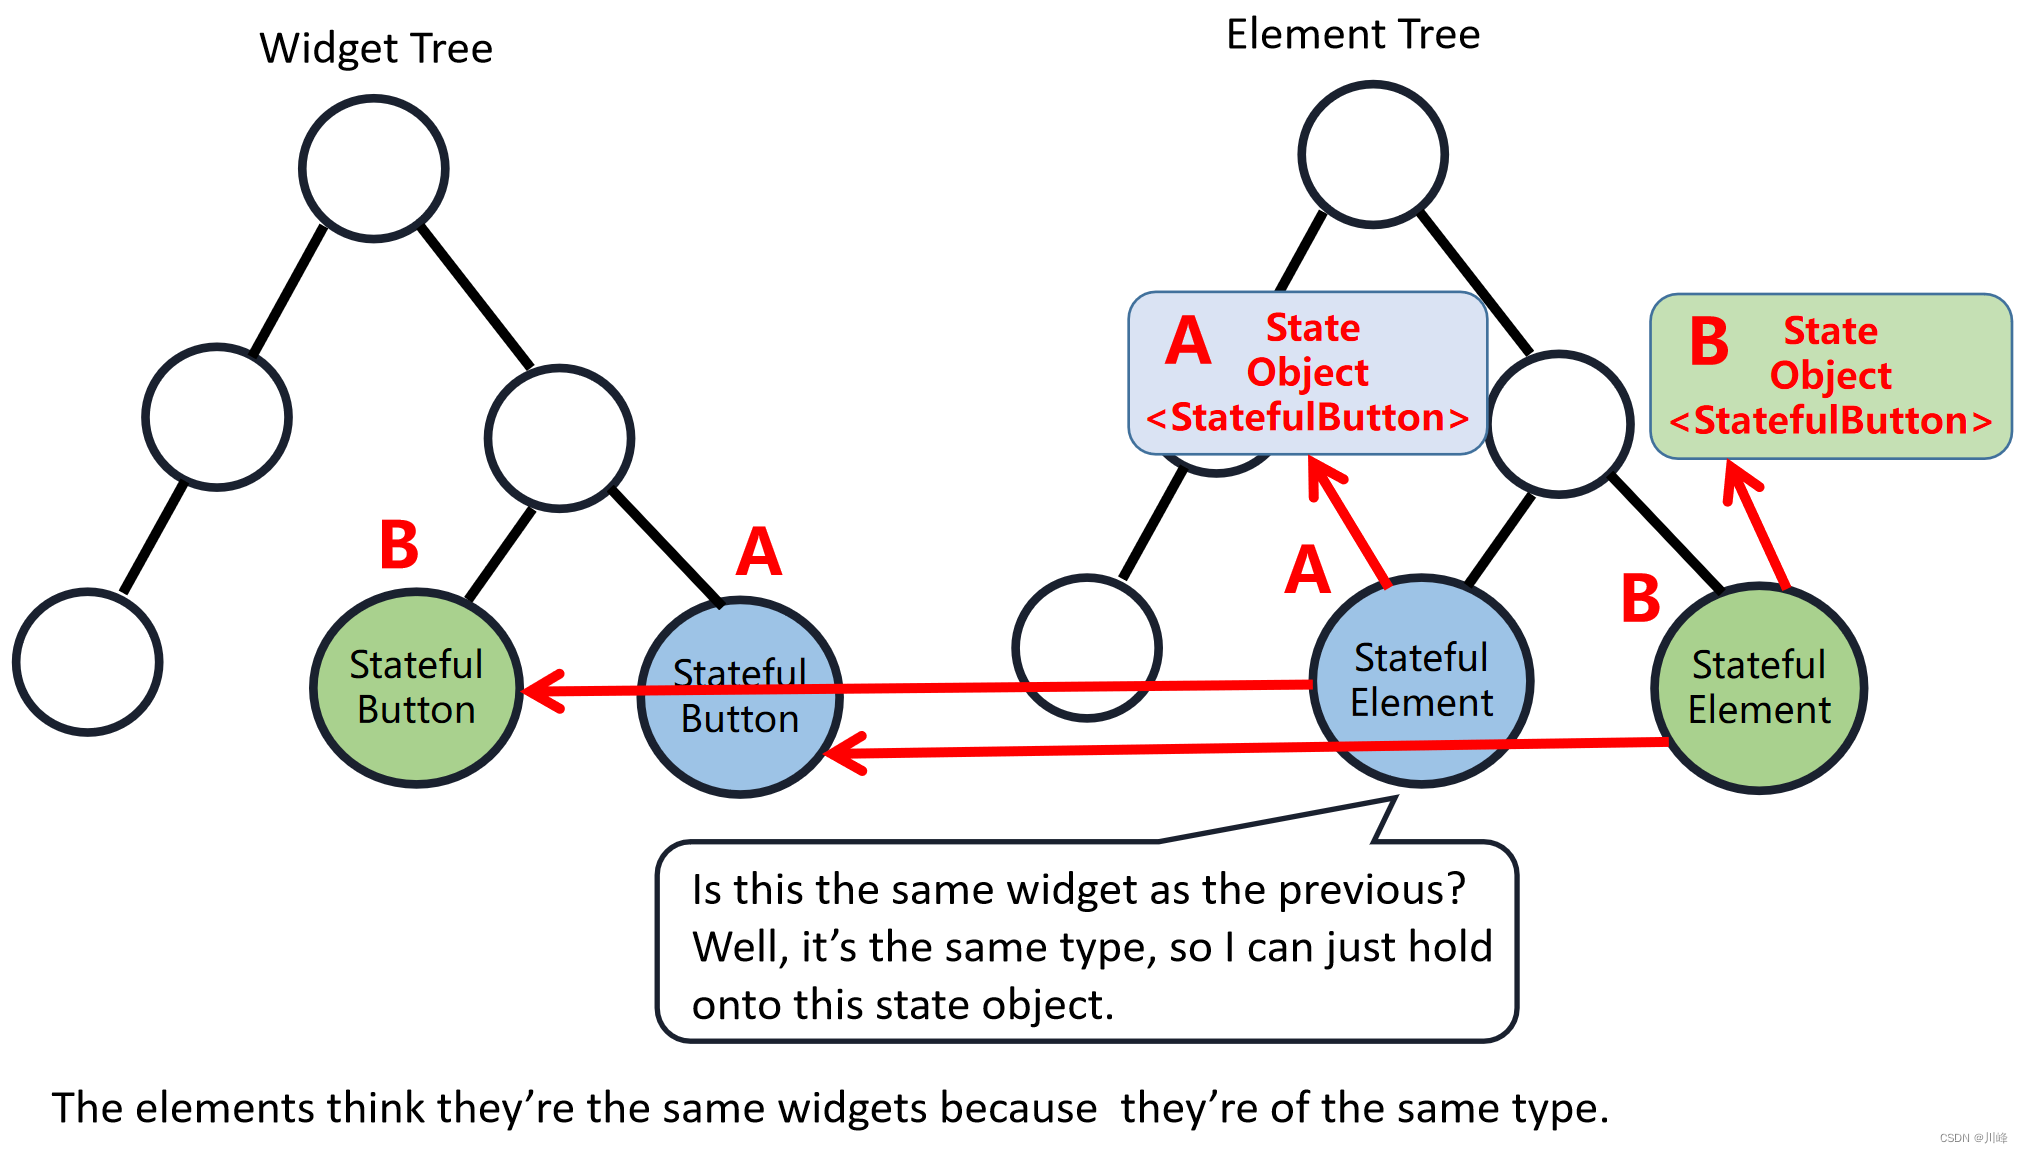
我们知道,Widget Tree 只是 Element Tree 的映射,它只提供描述UI树的配置信息,而在本例中,这些Widget的颜色不在Widget的配置中;它们保存在对应Widget的State对象中。Element指向更新的Widget并显示新的配置,但仍然保留原始State对象。因此,当Element看到了插入到UI树的这个地方的新Widget,然后它就想:“emm,没有key,运行时类型仍然是FancyButton,所以我不需要更新我的引用。这是匹配我的State对象的正确的Widget。”
Widget keys
问题分析清楚了,那么解决这个问题的最简单的方案就是: key。终于来到了本文的正题,在处理集合中的Widget时,为它们提供key可以帮助Flutter了解相同类型的两个Widget何时实际上不同。这对于多子组件的Widget特别有用。通常,就像在我们上面的示例中一样,当一行或列中的所有子节点都是同一类型时,最好给Flutter一个额外的信息来区分这些子节点。
下面我们用UniqueKey来解决这个问题:
class FancyButtonPage extends StatefulWidget {
const FancyButtonPage({
Key? key}) : super(key: key);
State<FancyButtonPage> createState() => _FancyButtonPageState();
}
class _FancyButtonPageState extends State<FancyButtonPage> {
int counter = 0;
bool _reversed = false;
final List _buttonKeys = [UniqueKey(), UniqueKey()]; // add key
void resetCounter() {
setState(() => counter = 0);
swapButton();
}
void swapButton() {
setState(() => _reversed = !_reversed);
}
Widget build(BuildContext context) {
final incrementButton = FancyButton(
key: _buttonKeys.first, // add key
onPressed: () => setState(() => counter++),
child: const Text(
"Increment",
style: TextStyle(fontSize: 20),
));
final decrementButton = FancyButton(
key: _buttonKeys.last, // add key
onPressed: () => setState(() => counter--),
child: const Text(
"Decrement",
style: TextStyle(fontSize: 20),
));
List<Widget> buttons = [incrementButton, decrementButton];
if (_reversed) {
buttons = buttons.reversed.toList();
}
return Scaffold(
appBar: AppBar(title: const Text("FancyButton")),
body: Column(
crossAxisAlignment: CrossAxisAlignment.center,
mainAxisAlignment: MainAxisAlignment.center,
children: [
const SizedBox(height: 30),
Text("$counter", style: const TextStyle(fontSize: 22)),
const SizedBox(height: 30),
Row(
mainAxisAlignment: MainAxisAlignment.spaceEvenly,
children: buttons,
),
const SizedBox(height: 30),
ElevatedButton(
onPressed: resetCounter, child: const Text("Swap Button"))
],
),
);
}
}
重新运行后效果如下:
可以看到现在符合我们的预期了,按钮的背景和文字都会交换,功能也正常。
这下,我们终于知道在Flutter中创建Widget类时,编写构造函数的时候,为啥编译器总是提醒我们要添加一个名为key的参数了:
如果你不加,它会不厌其烦的给出提示和警告来提醒你。另外,我们发现这个key推荐的规范写法是定义为可空类型的,这意味着我们创建Widget组件时,并不总是需要传入一个key。
在Flutter中,Key一般用来做唯一标识,所以Key是不能重复使用的。前面提到,Element在更新的时候,决定要不要复用主要是通过判断组件的类型 && key值是否一致。因此,当各组件的类型不同的时候,类型已经足够用来区分不同的组件了,此时我们可以不必使用key。但是如果同时存在多个同一类型的控件的时候,此时类型已经无法作为区分的条件了,我们就需要使用到key。
LocalKey 和 GlobalKey
Flutter 中的 key 主要分为两大类: LocalKey 和 GlobalKey 。
- 局部 Key(LocalKey):ValueKey、ObjectKey、UniqueKey
- 全局 Key(GlobalKey): GlobalKey、GlobalObjectKey
1. Global Keys
-
GlobalKey用于管理状态和在 Widget 树中移动 Widget。例如,您可以在一个Widget中使用一个GlobalKey,它将显示一个复选框,并在多个页面上使用该Widget。这个key告诉框架使用该Widget的相同实例。因此,当您导航到不同的页面以查看该复选框时,它的选中状态将保持不变。如果你在A页选中了它,它会在B页也被选中。 -
GlobalObjectKey:全局 Object key,可以根据对象生成全局key,和ObjectKey有点类似。
使用 GlobalKey 必须保证全局唯一不重复,需要留意的一点的是使用它也有缺点,那就是性能损耗,因为它需要总是保持全局可用状态占有资源。
2. Local Keys
-
ValueKey<T>:当要添加key的对象具有某种不变的唯一属性时,ValueKey是最好的选择。例如,在一个 todo 列表应用程序中,每个显示 todo 的 Widget 可能都有一个常量和唯一的 todo 文本。或者说后端接口返回给我们的业务类中有某种唯一的业务id属性,就可以拿来使用其创建ValueKey<T>。 -
ObjectKey:使用对象创建key,当对象具有相同的类型,但其属性值不同时,适合使用ObjectKey。例如在一个电子商务应用程序中考虑一个名为“产品”的对象:两个产品可以有相同的标题(两个不同的卖家可以出售球芽甘蓝)。一个卖家可以有多种产品。产品的独特之处在于产品名称和卖方名称的组合。所以,key是一个传递到ObjectKey中的文字对象。例如:

-
UniqueKey: 如果要向集合的子项添加key,而子项直到创建后才知道它们的值,则可以使用UniqueKey。或者说当我们不知道如何指定ValueKey或ObjectKey的时候就可以直接使用UniqueKey。 -
PageStorageKey: 这是一个用于存储页面信息的专门键,如滚动位置。
使用 GlobalKey 解决状态丢失问题
LocalKey 和 GlobalKey 另一个比较明显的区别就是使用 LocalKey 在屏幕旋转之后页面的状态会丢失,例如以下代码:
import 'package:flutter/material.dart';
class LocalKeyPage extends StatefulWidget {
const LocalKeyPage({
Key? key}) : super(key: key);
State<LocalKeyPage> createState() => _LocalKeyPageState();
}
class _LocalKeyPageState extends State<LocalKeyPage> {
List<Widget> list = [
const Box(
key: ValueKey('1'),
color: Colors.red,
),
Box(
key: UniqueKey(), //唯一值 每次运行的时候会随机生成
color: Colors.yellow,
),
const Box(key: ObjectKey(Box(color: Colors.blue)), color: Colors.blue)
];
Widget build(BuildContext context) {
return Scaffold(
floatingActionButton: FloatingActionButton(
child: const Icon(Icons.refresh),
onPressed: () =>setState(() => list.shuffle()), //shuffle:打乱list元素的顺序
),
appBar: AppBar(title: const Text('LocalKey')),
body: Center(
child: MediaQuery.of(context).orientation==Orientation.portrait?Column(
mainAxisAlignment: MainAxisAlignment.center,
children: list,
):Row(
mainAxisAlignment: MainAxisAlignment.center,
children: list,
),
),
);
}
}
class Box extends StatefulWidget {
final Color color;
const Box({
Key? key, required this.color}) : super(key: key);
State<Box> createState() => _BoxState();
}
class _BoxState extends State<Box> {
int _count = 0;
Widget build(BuildContext context) {
return SizedBox(
height: 100,
width: 100,
child: ElevatedButton(
style: ButtonStyle(
backgroundColor: MaterialStateProperty.all(widget.color)),
onPressed: () {
setState(() {
_count++;
});
},
child: Text(
"$_count",
style: Theme.of(context).textTheme.headline2,
),
),
);
}
}
上面代码中在设备竖屏时使用一个Column组件来展示列表,而在设备横屏时使用一个 Row组件来展示列表。运行效果如下:

使用 GlobalKey 则可以避免这个问题,修改代码如下:
class GlobalKeyPage extends StatefulWidget {
const GlobalKeyPage({
Key? key}) : super(key: key);
State<GlobalKeyPage> createState() => _GlobalKeyPagePageState();
}
final GlobalKey _globalKey1 = GlobalKey();
final GlobalKey _globalKey2 = GlobalKey();
final GlobalKey _globalKey3 = GlobalKey();
class _GlobalKeyPagePageState extends State<GlobalKeyPage> {
List<Widget> list = [];
void initState() {
super.initState();
list = [
Box(
key: _globalKey1,
color: Colors.red,
),
Box(
key: _globalKey2,
color: Colors.yellow,
),
Box(key: _globalKey3, color: Colors.blue)
];
}
Widget build(BuildContext context) {
return Scaffold(
floatingActionButton: FloatingActionButton(
child: const Icon(Icons.refresh),
onPressed: () => setState(() => list.shuffle()), // shuffle:打乱list元素的顺序
),
appBar: AppBar(title: const Text('LocalKey')),
body: Center(
child: MediaQuery.of(context).orientation == Orientation.portrait
? Column(
mainAxisAlignment: MainAxisAlignment.center,
children: list,
)
: Row(
mainAxisAlignment: MainAxisAlignment.center,
children: list,
),
),
);
}
}
class Box extends StatefulWidget {
final Color color;
const Box({
Key? key, required this.color}) : super(key: key);
State<Box> createState() => _BoxState();
}
class _BoxState extends State<Box> {
int _count = 0;
Widget build(BuildContext context) {
return SizedBox(
height: 100,
width: 100,
child: ElevatedButton(
style: ButtonStyle(
backgroundColor: MaterialStateProperty.all(widget.color)),
onPressed: () {
setState(() {
_count++;
});
},
child: Text(
"$_count",
style: Theme.of(context).textTheme.headline2,
),
),
);
}
}
运行效果:
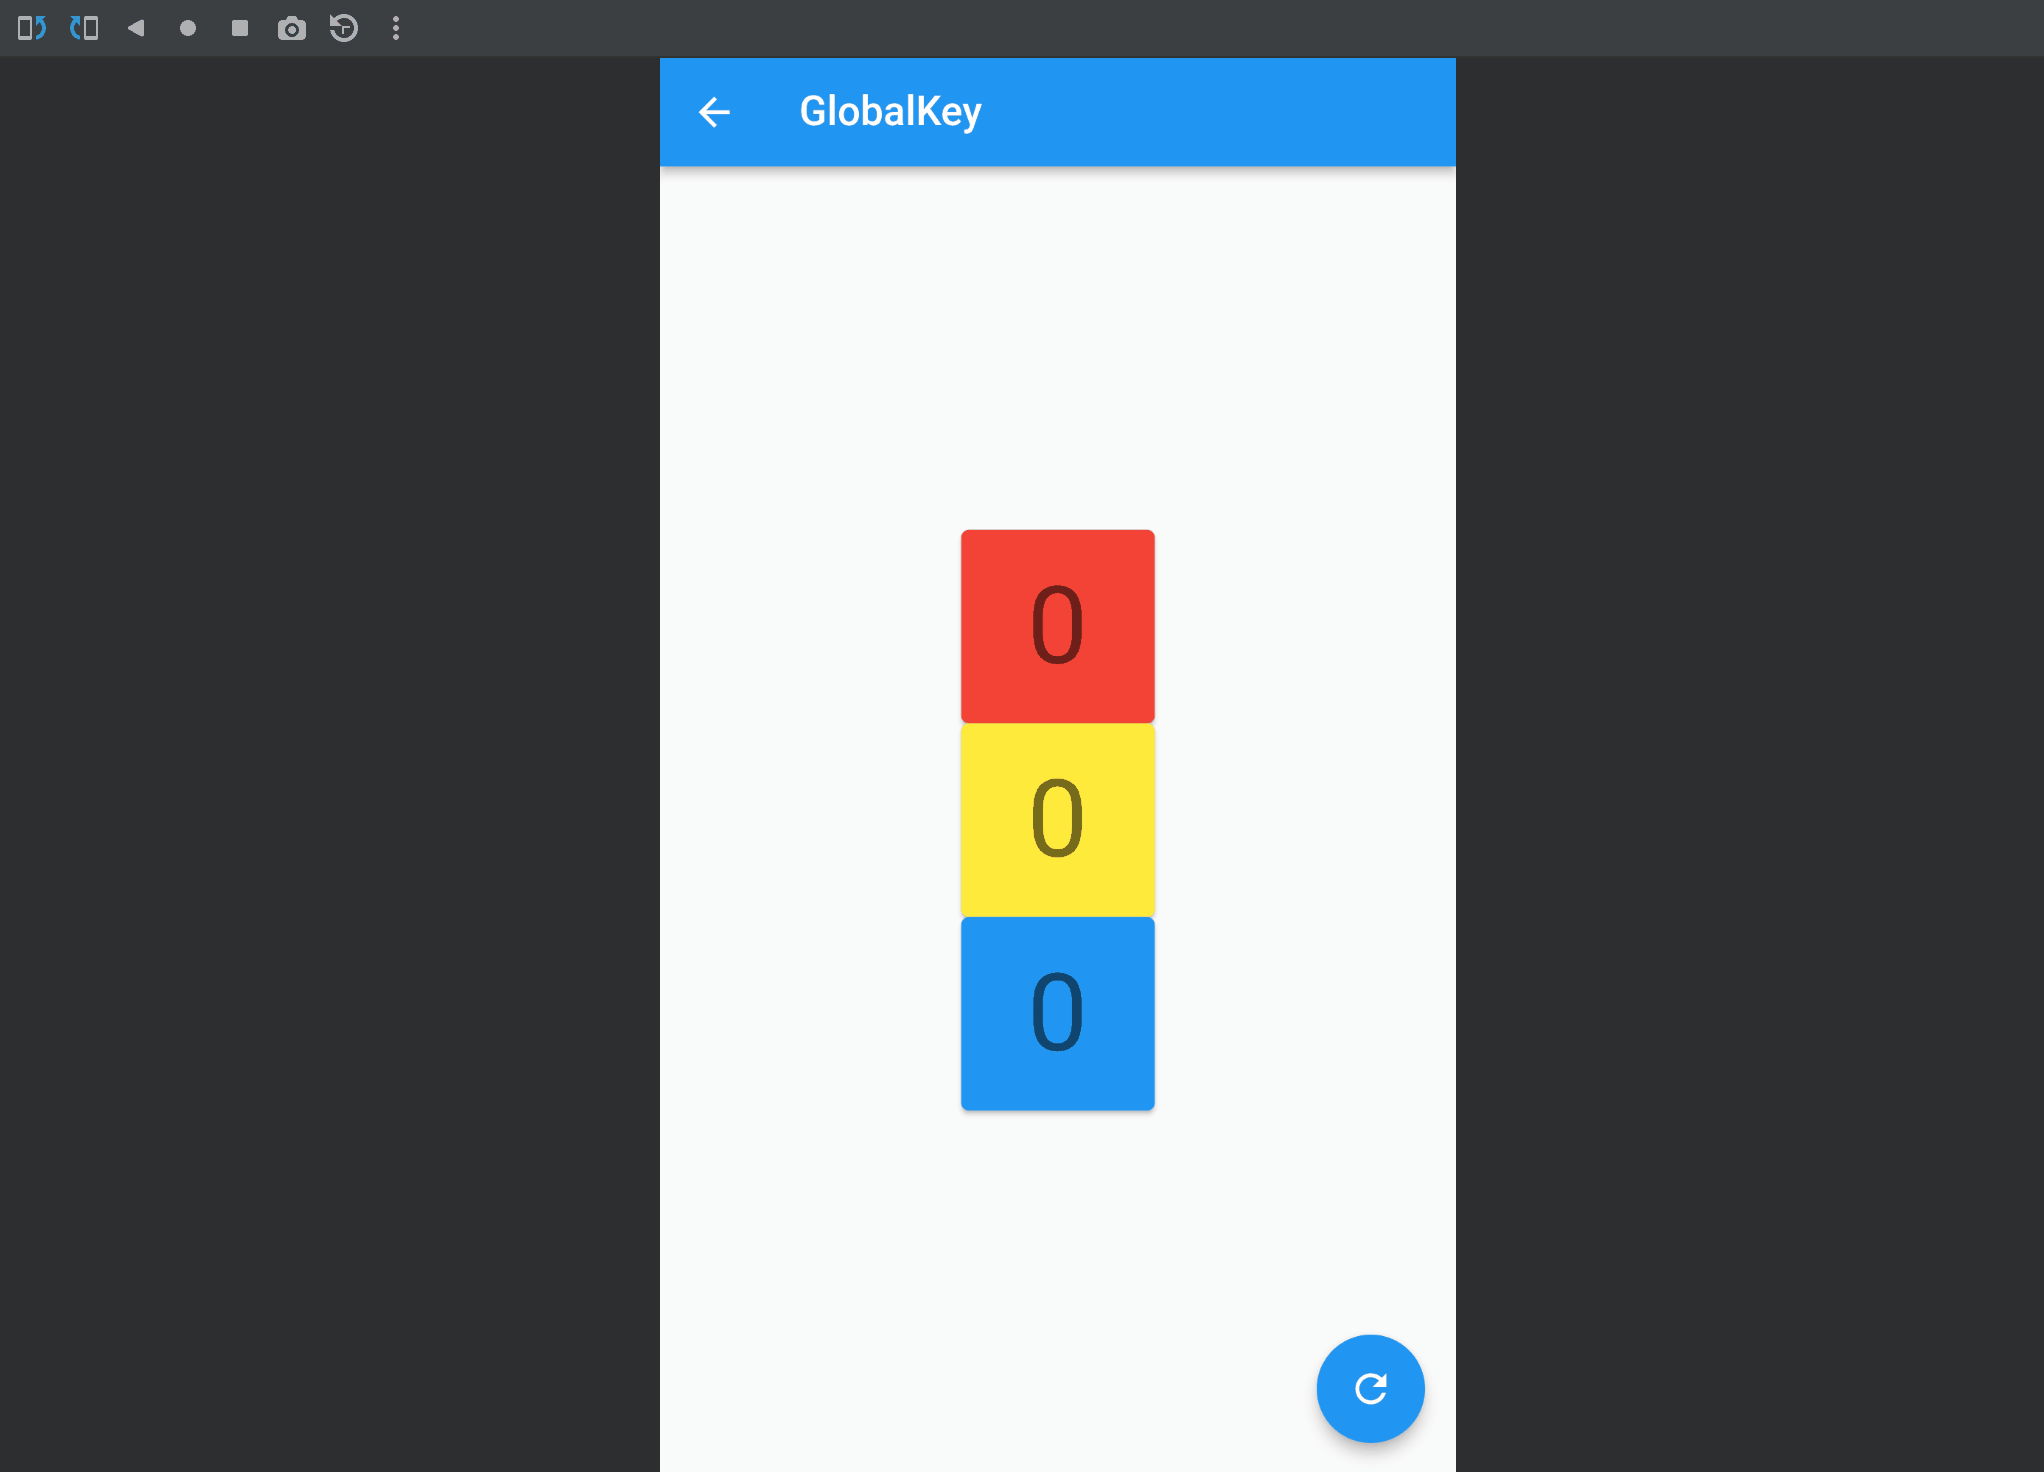
之所以 GlobalKey 在屏幕旋转后依然能够保持状态,是因为 Flutter 对使用 GlobalKey 创建的Widget所对应的Element节点重新挂载到 Element Tree 时进行了复用逻辑(后文会分析)。
使用 GlobalKey 来获取 State 对象
在 Flutter 中要获取 StatefulWidget 组件的 State 对象,一种方法是使用 context.findAncestorStateOfType<T>() 方法,该方法可以从当前节点沿着 widget 树向上查找指定类型的 StatefulWidget 对应的 State 对象。例如,下面是实现打开 SnackBar 的示例:
class GetStateObjectRoute extends StatefulWidget {
const GetStateObjectRoute({
Key? key}) : super(key: key);
State<GetStateObjectRoute> createState() => _GetStateObjectRouteState();
}
class _GetStateObjectRouteState extends State<GetStateObjectRoute> {
Widget build(BuildContext context) {
return Scaffold(
appBar: AppBar(
title: Text("子树中获取State对象"),
),
body: Center(
child: Column(
children: [
Builder(builder: (context) {
return ElevatedButton(
onPressed: () {
// 查找父级最近的Scaffold对应的ScaffoldState对象
ScaffoldState _state = context.findAncestorStateOfType<ScaffoldState>()!;
// 打开抽屉菜单
_state.openDrawer();
},
child: Text('打开抽屉菜单1'),
);
}),
],
),
),
drawer: Drawer(),
);
}
}
注意:
-
一般来说,如果
StatefulWidget的状态是私有的(不应该向外部暴露),那么我们代码中就不应该去直接获取其State对象;如果StatefulWidget的状态是希望暴露出的(通常还有一些组件的操作方法),我们则可以去直接获取其State对象。 -
但是通过
context.findAncestorStateOfType获取StatefulWidget的状态的方法是通用的,我们并不能在语法层面指定StatefulWidget的状态是否私有,所以在 Flutter 开发中便有了一个默认的约定:如果StatefulWidget的状态是希望暴露出的,应当在StatefulWidget中提供一个of静态方法 来获取其State对象,开发者便可直接通过该方法来获取;如果State不希望暴露,则不提供of方法。这个约定在 Flutter SDK 里随处可见。
所以,上面示例中的获取方式 Flutter SDK 也提供了一个Scaffold.of方法,我们可以直接使用它:
Builder(builder: (context) {


  return ElevatedButton(
    onPressed: () {


      // 直接通过of静态方法来获取ScaffoldState
      ScaffoldState _state = Scaffold.of(context);
      // 打开抽屉菜单
      _state.openDrawer();
    },
    child: Text('打开抽屉菜单2'),
  );
}),
又比如我们想显示 snackbar 的话可以通过下面代码调用:
Builder(builder: (context) {


  return ElevatedButton(
    onPressed: () {


      ScaffoldMessenger.of(context).showSnackBar(
        SnackBar(content: Text("我是SnackBar")),
      );
    },
    child: Text('显示SnackBar'),
  );
}),
在 Flutter 中另一种获取 StatefulWidget 组件的 State 对象的方法就是使用 GlobalKey 了,我们可以通过 globalKey.currentState 来获取子组件的状态,执行子组件的方法,同样的,globalKey.currentWidget可以获取子组件的Widget对象,而 globalKey.currentContext可以获取子组件的context对象。下面是一个使用示例:
class GlobalKeyExample extends StatefulWidget {
const GlobalKeyExample({
Key? key}) : super(key: key);
State createState() => _GlobalKeyExampleState();
}
final GlobalKey<GlobalKeyTestState> _globalKey =
GlobalKey<GlobalKeyTestState>();
class _GlobalKeyExampleState extends State<GlobalKeyExample> {
Widget build(BuildContext context) {
return Column(
crossAxisAlignment: CrossAxisAlignment.center,
mainAxisAlignment: MainAxisAlignment.center,
children: <Widget>[
GlobalKeyTest(key: _globalKey), // 子组件指定 key 使用 globalKey
ElevatedButton(
child: const Text("Add"),
onPressed: () {
// 获取子组件 widget 的 state 对象,并执行其方法
_globalKey.currentState?.addCount(20);
// GlobalKeyTest wg = _globalKey.currentWidget as GlobalKeyTest;
// _globalKey.currentContext!.findRenderObject();
// 系统暴露state对象的范例
// ScaffoldMessenger.of(context).showSnackBar(
// const SnackBar(content: Text("这是SnackBar")),
// );
},
),
],
);
}
}
// 子组件
class GlobalKeyTest extends StatefulWidget {
const GlobalKeyTest({
Key? key}) : super(key: key);
GlobalKeyTestState createState() => GlobalKeyTestState();
}
class GlobalKeyTestState extends State<GlobalKeyTest> {
int count = 0;
addCount(int x) {
setState(() {
count = count + x;
});
}
Widget build(BuildContext context) {
return Column(
children: <Widget>[
Text(count.toString()),
],
);
}
}
运行效果:

Key 源码分析
Key在Flutter的源码中几乎无处不在,但在日常开发中鲜有涉及。用官方的话来说,Key的使用场景是:你需要将一系列类型相同并持有不同状态(State)的Widget进行增加、移除和排序。
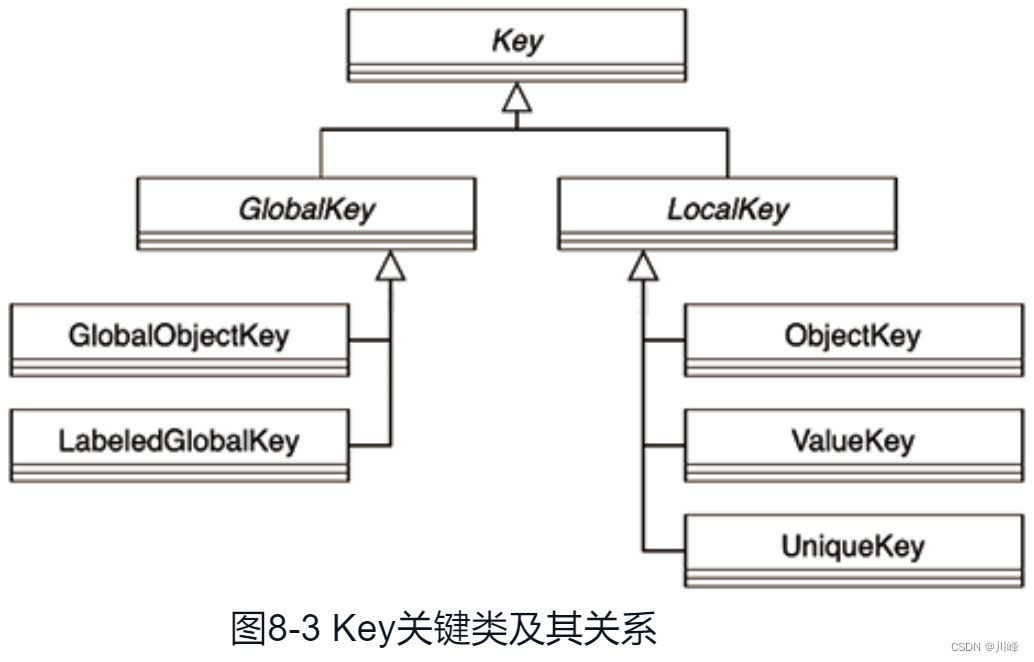
Key主要分为GlobalKey和LocalKey,关键类及其关系如图8-3所示。
接下来将从源码的角度一窥Key的作用及原理。
GlobalKey 源码分析
GlobalKey 的注册代码如下:
// 代码清单5-3 flutter/packages/flutter/lib/src/widgets/framework.dart
// Element
void mount(Element? parent, dynamic newSlot) {
_parent = parent; // 对根节点而言,parent为null
_slot = newSlot;
_lifecycleState = _ElementLifecycle.active; // 更新状态
_depth = _parent != null ? _parent!.depth + 1 : 1; // 树的深度
if (parent != null) _owner = parent.owner; // 绑定BuildOwner
final Key? key = widget.key; // Global Key 注册
if (key is GlobalKey) {
key._register(this); } // 见代码清单8-15
_updateInheritance();
}
_register的逻辑如代码清单8-15所示,即当前Element会被加入一个全局字段_registry中。
// 代码清单8-15 flutter/packages/flutter/lib/src/widgets/framework.dart
static final Map<GlobalKey, Element> _registry = <GlobalKey, Element>{

    }; // 全局注册表
Element? get _currentElement => _registry[this];
void _register(Element element) {


  _registry[this] = element; // this即GlobalKey子类的实例
}
void _unregister(Element element) {


  if (_registry[this] == element) _registry.remove(this); // 移除注册
}
那么,GlobalKey又是如何被使用的?在代码清单5-8中,当解析一个新的Widget并创建Element时会触发GlobalKey的逻辑,完整逻辑如代码清单8-16所示。
// 代码清单5-8 flutter/packages/flutter/lib/src/widgets/framework.dart
Element inflateWidget(Widget newWidget, dynamic newSlot) {


  final Key? key = newWidget.key;
  if (key is GlobalKey) {

     ...... } // 见代码清单8-16
  final Element newChild = newWidget.createElement(); // 创建对应的Element
  newChild.mount(this, newSlot); // 由对应的Element实例继续子节点的挂载
  return newChild;
}
// 代码清单8-16 flutter/packages/flutter/lib/src/widgets/framework.dart
Element inflateWidget(Widget newWidget, dynamic newSlot) {

     // 见代码清单5-8
  assert(newWidget != null);
  final Key? key = newWidget.key;
  if (key is GlobalKey) {

     // 当前Widget含有配置Key信息
    final Element? newChild = _retakeInactiveElement(key, newWidget); // 见代码清单8-17
    if (newChild != null) {

     // 若能找到Key对应的Element,则复用
      newChild._activateWithParent(this, newSlot); // 见代码清单8-19
      // 得到目标Element,基于它进行更新
      final Element? updatedChild = updateChild(newChild, newWidget, newSlot);
      assert(newChild == updatedChild); // 检查确实是同一个Element对象
      return updatedChild!;
    } // 如果找不到,仍会进入下面的逻辑,新建一个Element节点并挂载
  } // if
  final Element newChild = newWidget.createElement();
  newChild.mount(this, newSlot);
  return newChild;
}
由以上逻辑可知,当新的Widget存在GlobalKey时,会尝试通过_retakeInactiveElement获取其对应的Element对象并复用;否则会创建一个新的Element实例并挂载到Element Tree中。
首先分析Element对象的取出逻辑,如代码清单8-17所示。
// 代码清单8-17 flutter/packages/flutter/lib/src/widgets/framework.dart
Element? _retakeInactiveElement(GlobalKey key, Widget newWidget) {
final Element? element = key._currentElement; // 即key._registry[this]
if (element == null) return null;
if (!Widget.canUpdate(element.widget, newWidget)) // 见代码清单5-48
return null; // 正常情况下,Key相同的Widget,其类型应该相同
final Element? parent = element._parent;
if (parent != null) {
// 从原来的位置卸载此Element,即从Element Tree中移除
parent.forgetChild(element); // 登记到_forgottenChildren字段
parent.deactivateChild(element);
}
assert(element._parent == null);
owner!._inactiveElements.remove(element); // 移除,避免被finalizeTree方法清理
return element;
}
// MultiChildRenderObjectElement
void forgetChild(Element child) {
_forgottenChildren.add(child); // 用于代码清单8-21的相关逻辑
super.forgetChild(child);
}
以上逻辑首先取出当前Key对应的Element对象,然后将其从原来的节点卸载,一般是同一轮 Build 流程中被复用的节点尚未被遍历到,但GlobalKey的复用已经触发的结果,最后将其从_inactiveElements列表中移除,避免在清理阶段被回收。
每当一个节点从Element Tree中移除时,其就会被加入_inactiveElements列表,如代码清单8-18所示。
// 代码清单8-18 flutter/packages/flutter/lib/src/widgets/framework.dart
void deactivateChild(Element child) {
child._parent = null;
child.detachRenderObject(); // 从Render Tree中移除对应节点
owner!._inactiveElements.add(child); // 登记该节点,如果在清理阶段该节点仍在本列表中,则清理释放
}
在代码清单8-16的inflateWidget方法中,当取出可复用的Element对象后,需要将其重新挂载到Element Tree,该逻辑通过_activateWithParent方法实现,如代码清单8-19所示。
// 代码清单8-19 flutter/packages/flutter/lib/src/widgets/framework.dart
void _activateWithParent(Element parent, dynamic newSlot) {


  assert(_lifecycleState == _ElementLifecycle.inactive); // 状态检查,只有inactive节点才会触发
  _parent = parent; // 更新相关成员字段
  _updateDepth(_parent!.depth);
  _activateRecursively(this); // 递归调用每个Element子节点的activate方法
  attachRenderObject(newSlot); // 更新Render Tree
  assert(_lifecycleState == _ElementLifecycle.active); // 状态检查
}
static void _activateRecursively(Element element) {


  assert(element._lifecycleState == _ElementLifecycle.inactive);
  element.activate(); // 见代码清单8-20,此时会触发_lifecycleState的更新
  assert(element._lifecycleState == _ElementLifecycle.active);
  element.visitChildren(_activateRecursively);
}
以上逻辑主要是初始化当前Element节点的相关字段,让其对应Element Tree中的新位置。最后递归调用每个子节点的activate方法,如代码清单8-20所示。
// 代码清单8-20 flutter/packages/flutter/lib/src/widgets/framework.dart
void activate() {
final bool hadDependencies = // 是否存在依赖,详见8.2节
(_dependencies != null && _dependencies!.isNotEmpty) || _hadUnsatisfied
Dependencies;
_lifecycleState = _ElementLifecycle.active; // 更新状态
_dependencies?.clear(); // 清理原来的依赖
_hadUnsatisfiedDependencies = false;
_updateInheritance(); // 更新可用依赖集合,见代码清单8-14
if (_dirty) owner!.scheduleBuildFor(this); // 如有必要,请求刷新
if (hadDependencies) didChangeDependencies(); // 通知依赖发生变化,见代码清单8-13
}
_hadUnsatisfiedDependencies字段表示当前依赖未被处理,因为找不到对应类型的InheritedElement。当Element被重新挂载到Element Tree时,如果存在依赖的变化,则最终会调用didChangeDependencies,对StatefulElement来说,会触发State的对应生命周期回调。
当Element节点被彻底卸载时,如代码清单8-8所示,会完成GlobalKey的清理工作。
// 代码清单8-8 flutter/packages/flutter/lib/src/widgets/framework.dart
// StatefulElement
void unmount() {
super.unmount();
state.dispose(); // 触发dispose回调
state._element = null;
}
void unmount() {
// Element
final Key? key = _widget.key;
if (key is GlobalKey) {
key._unregister(this); // 取消key的注册
}
_lifecycleState = _ElementLifecycle.defunct;
}
LocalKey 源码分析
相较于GlobalKey,LocalKey的生效范围只在同一个Element节点的子节点之间,因而其逻辑也更加隐晦。不会像GlobalKey那样“明目张胆”地存在于Build流程中。由于LocalKey作用的范围是节点下面的各个子节点,所以其逻辑必然和MultiChildRenderObjectElement这个Element的子类有关系,MultiChildRenderObjectElement的子节点更新逻辑如代码清单8-21所示。
// 代码清单8-21 flutter/packages/flutter/lib/src/widgets/framework.dart
// MultiChildRenderObjectElement
void update(MultiChildRenderObjectWidget newWidget) {
super.update(newWidget); // 见代码清单5-49
assert(widget == newWidget);
_children = updateChildren(_children, widget.children, forgottenChildren:
_forgottenChildren);
_forgottenChildren.clear(); // 本次更新结束,重置
}
以上逻辑主要调用RenderObjectElement的updateChildren方法,如代码清单8-22所示。其中,_forgottenChildren字段表示的是因为被GlobalKey使用而排除在LocalKey的复用之外的节点,而_forgottenChildren列表的注册逻辑在代码清单8-17的forgetChild方法中,由MultiChildRenderObjectElement实现。
updateChildren方法将开始真正的子节点更新逻辑,如代码清单8-22所示。
// 代码清单8-22 flutter/packages/flutter/lib/src/widgets/framework.dart
List<Element> updateChildren(List<Element> oldChildren,
    List<Widget> newWidgets, {

     Set<Element>? forgottenChildren }) {


  Element? replaceWithNullIfForgotten(Element child) {

     // 被GlobalKey索引的节点返回null
    return forgottenChildren != null && forgottenChildren.contains(child) ? null : child;
  } // GlobalKey的优先级高于LocalKey,所以这里返回null,避免在两处复用
  int newChildrenTop = 0; // 新Element列表的头部索引
  int oldChildrenTop = 0; // 旧Element列表的头部索引
  int newChildrenBottom = newWidgets.length - 1;  // 新Element列表的尾部索引
  int oldChildrenBottom = oldChildren.length - 1;  // 旧Element列表的尾部索引
  final List<Element> newChildren = oldChildren.length == newWidgets.length ?
      oldChildren : List<Element>.filled(newWidgets.length, _NullElement.instance,
      growable: false);
  Element? previousChild; // 见代码清单 8-23 ~ 代码清单8-27
  return newChildren;
}
updateChildren的主要职责是根据旧的Element子节点列表oldChildren和新的Widget子节点列表newWidgets来更新当前Element节点的子树,即newChildren。当新旧子节点的结束数目相同时会直接基于原来的列表更新,否则会新建一个列表。这里之所以只在长度相等时才复用原来的列表,主要是因为更新算法的机制不适合处理长度不等的情况,与其增加逻辑的复杂度,不如直接新建一个列表。下面以图8-4的过程为例详细分析,这里为了方便演示,虽然新旧列表长度相同,仍然分开表示。
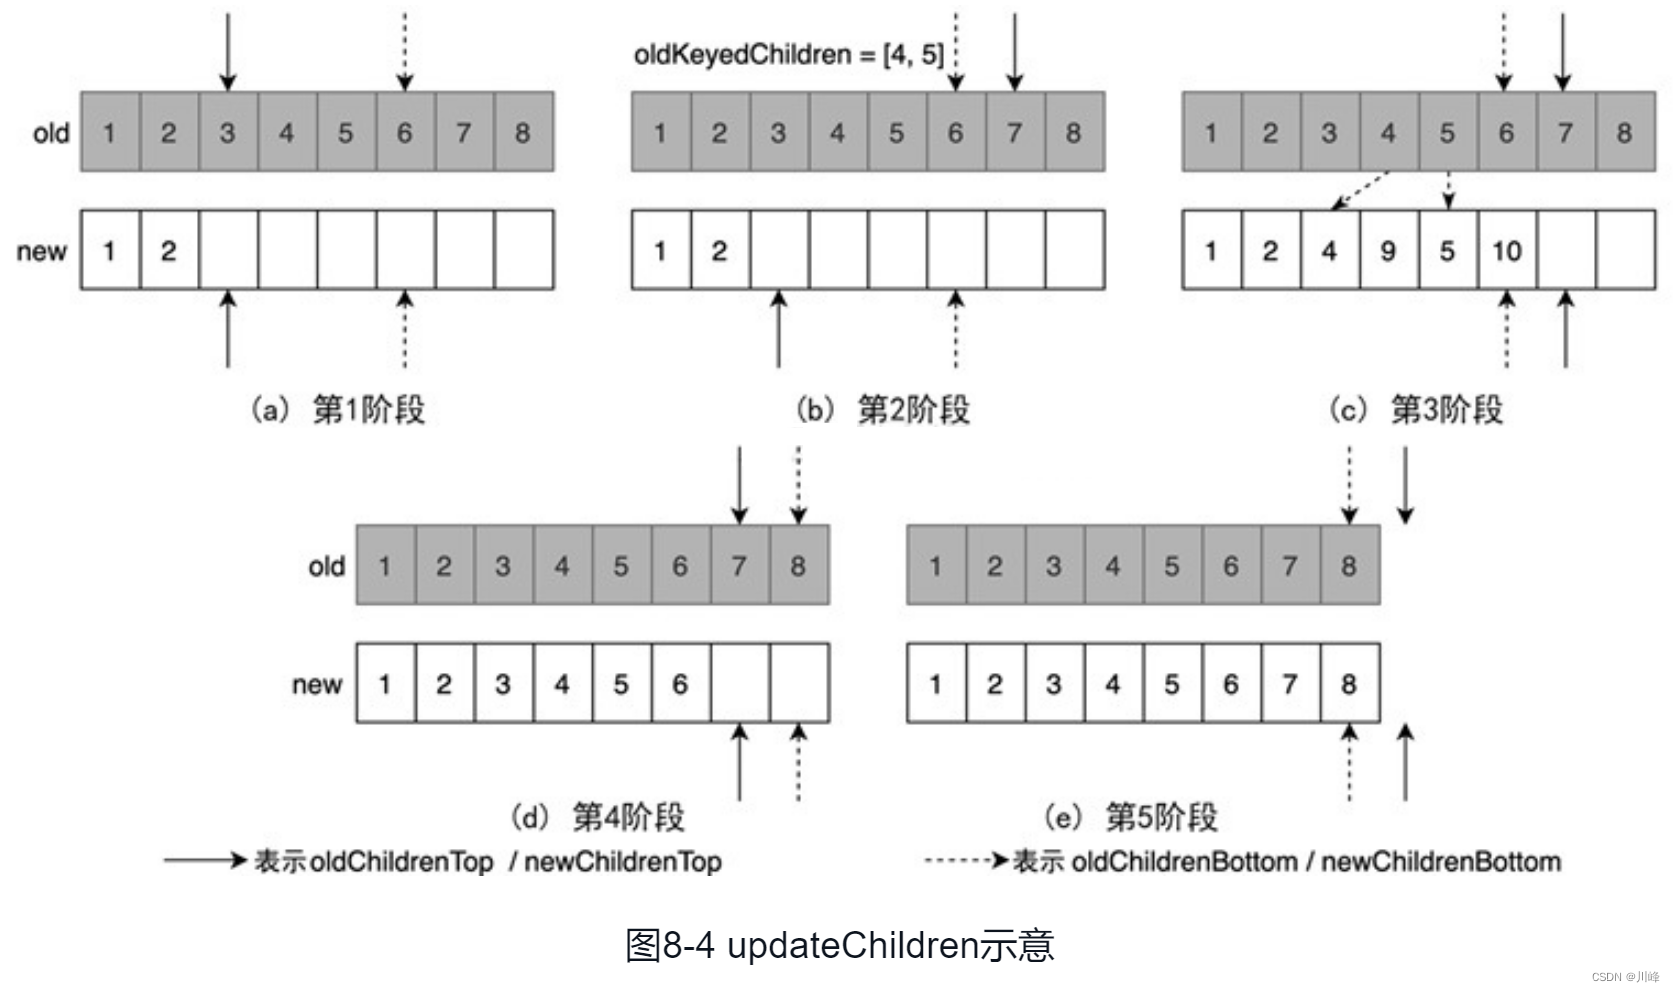
下面正式分析updateChildren方法的更新逻辑,图8-4中第1阶段如代码清单8-23所示。
// 代码清单8-23 flutter/packages/flutter/lib/src/widgets/framework.dart
// 更新两个列表的头部索引和尾部索引,分别定位到第1个不可复用的Element节点
while ((oldChildrenTop <= oldChildrenBottom) && (newChildrenTop <=
    newChildrenBottom)) {


  final Element? oldChild = replaceWithNullIfForgotten(oldChildren[oldChildrenTop]);
  final Widget newWidget = newWidgets[newChildrenTop];
  assert(oldChild == null || oldChild._lifecycleState == _ElementLifecycle.active);
  if (oldChild == null || !Widget.canUpdate(oldChild.widget, newWidget)) break;
  final Element newChild = // 完成Element节点的更新
    updateChild(oldChild, newWidget, IndexedSlot<Element?>(newChildrenTop,
    previousChild))!;
  assert(newChild._lifecycleState == _ElementLifecycle.active);
  newChildren[newChildrenTop] = newChild; // 加入newChildren列表
  previousChild = newChild;
  newChildrenTop += 1;
  oldChildrenTop += 1; // 处理下一个
}
// 更新尾部索引,但是不加入newChildren列表,逻辑大致同上
while ((oldChildrenTop <= oldChildrenBottom) && (newChildrenTop <=
    newChildrenBottom)) {


  final Element? oldChild = replaceWithNullIfForgotten(oldChildren
     [oldChildrenBottom]);
  final Widget newWidget = newWidgets[newChildrenBottom];
  assert(oldChild == null || oldChild._lifecycleState == _ElementLifecycle.active);
  if (oldChild == null || !Widget.canUpdate(oldChild.widget, newWidget)) break;
  oldChildrenBottom -= 1;
  newChildrenBottom -= 1; // 只更新索引
}
第 1 阶段,新旧列表的头部指针会同步扫描,可以直接基于Widget更新的节点完成更新;尾部索引同理进行扫描,但不会直接更新,而只是记录位置。这里之所以不直接更新是为了保证执行的顺序,否则在输出日志等场景下会变得非常不可控。
经过第 1 阶段之后,剩下未扫描的节点在顺序上已经无法对应。在图8-4所示的第 2 阶段中将扫描这些节点,并记录有LocalKey的节点,如代码清单8-24所示。
// 代码清单8-24 flutter/packages/flutter/lib/src/widgets/framework.dart
// Scan the old children in the middle of the list.
final bool haveOldChildren = oldChildrenTop <= oldChildrenBottom;
Map<Key, Element>? oldKeyedChildren;
if (haveOldChildren) {


  oldKeyedChildren = <Key, Element>{

    };
  while (oldChildrenTop <= oldChildrenBottom) {

     // 开始扫描oldChildren的剩余节点
    final Element? oldChild = replaceWithNullIfForgotten(oldChildren[oldChildrenTop]);
    assert(oldChild == null || oldChild._lifecycleState == _ElementLifecycle.active);
    if (oldChild != null) {

     // 没有被GlobalKey使用
      if (oldChild.widget.key != null) // 存在Key
        oldKeyedChildren[oldChild.widget.key!] = oldChild; // 记录,以备复用
      else
        deactivateChild(oldChild); // 直接移出Element Tree
    }
    oldChildrenTop += 1;
  } // while
}
以上逻辑遍历oldChildren剩下的节点,如果replaceWithNullIfForgotten返回不为null,说明没有被GlobalKey使用,那么LocalKey可以将其加入自己的临时索引oldKeyedChildren。
在图8-4所示的第 3 阶段更新newChildren的剩余元素,如果自身的Key可以在oldKeyedChildren中找到对应的索引,则直接复用,如代码清单8-25所示。
// 代码清单8-25 flutter/packages/flutter/lib/src/widgets/framework.dart
while (newChildrenTop <= newChildrenBottom) {

     // 还有Widget节点未处理
  Element? oldChild;
  final Widget newWidget = newWidgets[newChildrenTop];
  if (haveOldChildren) {

     // 存在可复用的Element节点
    final Key? key = newWidget.key;
    if (key != null) {


      oldChild = oldKeyedChildren![key];
      if (oldChild != null) {


        if (Widget.canUpdate(oldChild.widget, newWidget)) {


          oldKeyedChildren.remove(key);
        } else {

     // 无法基于新的Widget进行更新,放弃复用
          oldChild = null;
        }
      }
    } // if
  } // if
  assert(oldChild == null || Widget.canUpdate(oldChild.widget, newWidget));
  final Element newChild = // 计算新的Element节点,见代码清单5-7和代码清单5-47
    updateChild(oldChild, newWidget, IndexedSlot<Element?>(newChildrenTop,
        previousChild))!;
  newChildren[newChildrenTop] = newChild;
  previousChild = newChild;
  newChildrenTop += 1;
} // while
以上逻辑主要是newChildren中间部分Element节点的更新,这些节点会优先通过LocalKey 复用。
在图8-4所示的第 4 阶段和第 5 阶段重置尾部索引的位置,并完成剩余节点的更新,如代码清单8-26所示。
// 代码清单8-26 flutter/packages/flutter/lib/src/widgets/framework.dart
assert(oldChildrenTop == oldChildrenBottom + 1); // 检查索引位置
assert(newChildrenTop == newChildrenBottom + 1);
assert(newWidgets.length - newChildrenTop == oldChildren.length - oldChildrenTop);
newChildrenBottom = newWidgets.length - 1; // 重置尾部索引,以便更新
oldChildrenBottom = oldChildren.length - 1;
// 开始更新newChildren的尾部,代码清单8-23中已经确认过可复用
while ((oldChildrenTop <= oldChildrenBottom) && (newChildrenTop <=
    newChildrenBottom)) {


  final Element oldChild = oldChildren[oldChildrenTop];
  final Widget newWidget = newWidgets[newChildrenTop];
  final Element newChild = // 更新Element节点
    updateChild(oldChild, newWidget, IndexedSlot<Element?>(newChildrenTop,
        previousChild))!;
  newChildren[newChildrenTop] = newChild;
  previousChild = newChild;
  newChildrenTop += 1;
  oldChildrenTop += 1;
}
至此,新的Element子树已经生成,但是oldKeyedChildren中可能还存有未命中Key的元素,需要释放,如代码清单8-27所示。
// 代码清单8-27 flutter/packages/flutter/lib/src/widgets/framework.dart
if (haveOldChildren && oldKeyedChildren!.isNotEmpty) {

     // oldKeyedChildren有未被
                                                       // 复用的节点
  for (final Element oldChild in oldKeyedChildren.values) {


    if (forgottenChildren == null || !forgottenChildren.contains(oldChild))
      deactivateChild(oldChild); // 彻底移除Element Tree
  }
}
以上就是LocalKey的作用过程,它不像GlobalKey那样在代码中有明显的痕迹,却在无形中提高了Element Tree更新的效率。