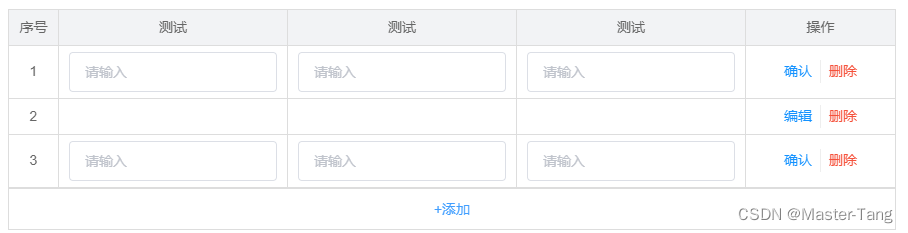
实现效果图
table主体代码,通过switchChange字段作为数据框的开关
   <div>
      <el-table :data="list" border style="width: 100%">
        <el-table-column type="index" label="序号" align="center" width="50"></el-table-column>
        <el-table-column label="测试" align="center">
          <template slot-scope="scope">
            <el-input v-model="list[scope.$index].value1" placeholder="请输入"
                      v-if="scope.row.switchChange"></el-input>
            <span v-else>{

   { scope.row.value1 }}</span>
          </template>
        </el-table-column>
        <el-table-column label="测试" align="center">
          <template slot-scope="scope">
            <el-input v-model="list[scope.$index].value2" placeholder="请输入"
                      v-if="scope.row.switchChange"></el-input>
            <span v-else>{

   { scope.row.value2 }}</span>
          </template>
        </el-table-column>
        <el-table-column label="测试" align="center">
          <template slot-scope="scope">
            <el-input v-model="list[scope.$index].value6" placeholder="请输入"
                      v-if="scope.row.switchChange"></el-input>
            <span v-else>{

   { scope.row.value6 }}</span>
          </template>
        </el-table-column>
        <el-table-column align="center" label="操作" width="150">
          <template slot-scope="scope">
            <div class="deal_box">
              <span
                  v-if="!scope.row.switchChange"
                  @click="scope.row.switchChange=true"
              >编辑</span>
              <span
                  v-if="scope.row.switchChange"
                  @click="scope.row.switchChange=false"
              >确认</span>
              <span
                  @click="deletePlan(scope.$index,list)"
              >删除</span>
            </div>
          </template>
        </el-table-column>
      </el-table>
      <div class="button_under">
        <el-button type="text" @click="insertPlan(list.length)">+添加</el-button>
      </div>
    </div>
按钮样式代码:
.button_under {
  text-align: center;
  border: 1px solid #DDDDDD;
}
添加事件insertPlan
   insertPlan(index) {
      this.outboundList.splice(index + 1, 0,
          {
            id: null,
            item1: "",
            item2: "",
            item3: "",
            item4: "",
            item5: "",
            item6: "",
            switchChange: false,
          }
      )
    },
删除事件deletePlan
   deletePlan(index, rows) {
      rows.splice(index, 1);
},数据的传输,直接将整个list提交给后端就行,我之前博客中有写,前后端List对象的传递