哈哈镜
输入图像f(x,y),宽高分别为Width和Height,设置图像中心坐标 Center(cx,xy)为缩放中心点,图像上任意一点到中心点的相对坐标 tx=x-cx,ty=y-cy。哈哈镜效果分为图像拉伸放大和图像缩小。
对于图像拉伸放大,设置图像变换的半径为radius,哈哈镜变换 后的图像为p(x,y)。
x=(tx/2)×(sqrt(tx×tx+ty×ty)/radius)+cx
y=(ty/2)×(sqrt(tx×tx+ty×ty)/radius)+cy
对于图像缩小,设置图像变换的半径为radius,哈哈镜变换后的 图像为p(x,y)。
x=cos(atan2(ty,tx))×12×(sqrt(tx×tx+ty×ty)+cx
y=sin(atan2(ty,tx))×12×(sqrt(tx×tx+ty×ty)+cy
# -*- coding: UTF-8 -*-
import cv2
import numpy as np
import math

def MaxFrame(frame):
    height, width, n = frame.shape
    center_X = width / 2
    center_Y = height / 2
    radius = 200
    real_radius =int(radius / 2.0)
    new_data = frame.copy()

    for i in range(width):
        for j in range(height):
            tX = i - center_X
            tY = j - center_Y

            distance = tX * tX + tY * tY
            if distance < radius * radius:

                newX = int(tX/ 2.0)
                newY = int(tY/ 2.0)

                newX = int(newX * (math.sqrt(distance) / real_radius))
                newX = int(newX * (math.sqrt(distance)/ real_radius))

                newX = int(newX + center_X)
                newY = int(newY + center_Y)
                if newX<width and newY<height:
                    new_data[j, i] = frame[newY, newX]
                    new_data[j, i] = frame[newY, newX]
                    new_data[j, i] = frame[newY, newX]

            else:
                new_data[j, i] = frame[j, i]
                new_data[j, i] = frame[j, i]
                new_data[j, i] = frame[j, i]

    return new_data

def MinFrame(frame):
    height, width, n = frame.shape
    center_X = width / 2
    center_Y = height / 2
    new_data = frame.copy()

    for i in range(width):
        for j in range(height):
            tX = i - center_X
            tY = j - center_Y
            theta = math.atan2(tY, tX)
            radius = math.sqrt((tX * tX) + (tY * tY))

            newR = math.sqrt(radius) *12
            newX = int(center_X + (newR * math.cos(theta)))
            newY = int(center_Y + (newR * math.sin(theta)))

            if newX < 0 and  newX >width:
                newX = 0

            if newY <0 and newY >height:
                newY = 0

            if newX<width and newY<height:
                new_data[j, i][0] = frame[newY, newX][0]
                new_data[j, i][1] = frame[newY, newX][1]
                new_data[j, i][2] = frame[newY, newX][2]

            else:
                new_data[j, i][0] = frame[j, i][0]
                new_data[j, i][1] = frame[j, i][1]
                new_data[j, i][2] = frame[j, i][2]

    return new_data

def main():
    img = cv2.imread("8.jpg")

    cv2.imshow("original", img)
    img2=MaxFrame(img)
    cv2.imshow("enlarge", img2)
    img3 = MinFrame(img)
    cv2.imshow("ensmall", img3)
    cv2.waitKey(0)

if __name__ == '__main__':
    main()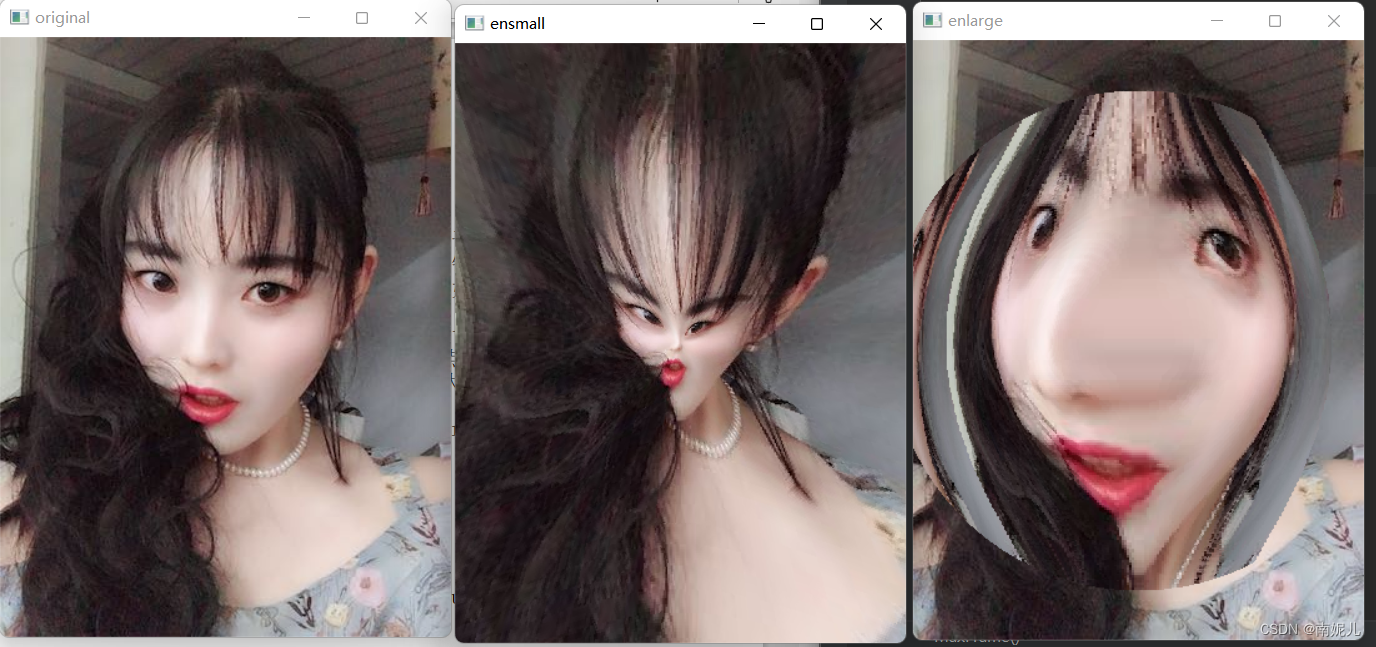
这种图像变 形的原理很简单,就是求解变换后坐标和变换前坐标的坐标方程。接 下来可以按照上面的例子直接赋值,也可以采取插值的方法得到输出 图像。
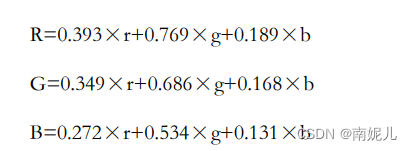
怀旧风格
怀旧风格的设计主要是在图像的颜色空间进行处理,以GRB空间为 例,对R、G、B这3个通道的颜色数值进行处理,让图像有一种泛黄的 老照片效果。设计的转换公式如下:
import cv2
import numpy as np

def retro_style(img):
    b,g,r=cv2.split(img)
    B=(0.272*r + 0.534*g + 0.131*b)
    G=(0.349*r + 0.686*g + 0.168*b)
    R = (0.393 * r + 0.769 * g + 0.189 * b)
    img2=cv2.merge([B,G,R])
    img2=np.clip(img2,0,255)
    img2=img2.astype(np.uint8)
    return img2

def main():
    img = cv2.imread('8.jpg')
    img2=retro_style(img)
    cv2.imshow("img", np.hstack([img,img2]))
    cv2.waitKey(0)

if __name__ == '__main__':
    main()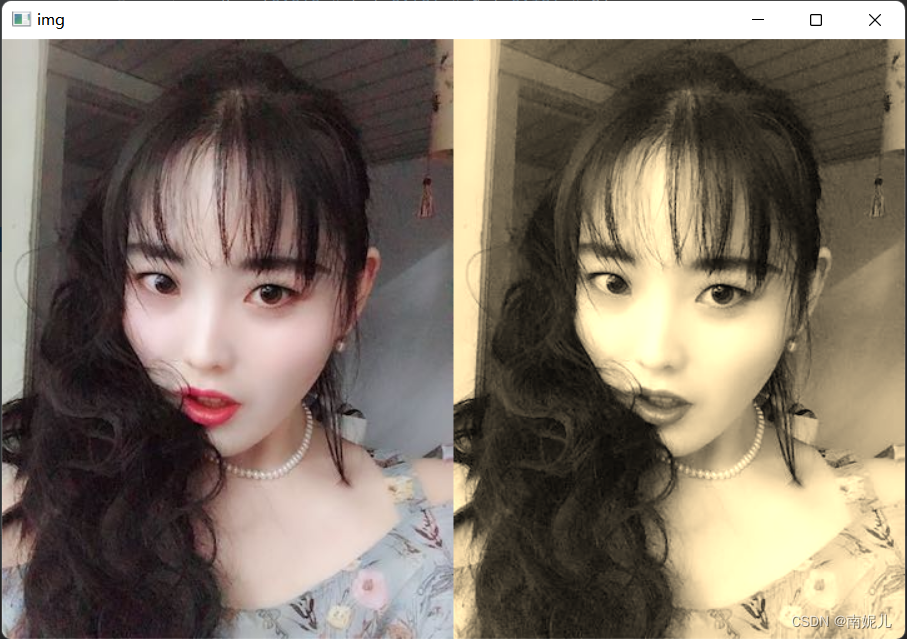
马赛克算法原理
马赛克效果其实就是将图像分成大小一致的图像块,每一个图像 块都是一个正方形,并且在这个正方形中所有像素值都相等。
其实现的思路是,将这个马赛克中一个个小正方形看成模板窗 口。马赛克的编码方式有很多种,常见的如下:
- ·模板中对应的所有图像的像素值都等于该模板的左上角第一个 像素的像素值。
- ·对于方块里的像素进行随机打乱。
- ·随机用某一点代替领域类的所有像素。
from skimage import img_as_float
import matplotlib.pyplot as plt
from skimage import io
import random
import numpy as np
file_name='4.jpg'
img=io.imread(file_name)
img = img_as_float(img)
img_out = img.copy()
row, col, channel = img.shape
half_patch =40
for i in range(half_patch, row-1-half_patch, half_patch):
  for j in range (half_patch, col-1-half_patch, half_patch):
    k1 = random.random() - 0.5
    k2 = random.random() - 0.5
    m=np.floor(k1*(half_patch*2 + 1))
    n=np.floor(k2*(half_patch*2 + 1))
    h=int((i+m) % row)
    w=int((j+n) % col)
    img_out[i-half_patch:i+half_patch, j-half_patch:j+half_patch, :] =\
            img[h, w, :]
# plt.figure(1)
# plt.imshow(img)
# plt.axis('off')
plt.figure(2)
plt.imshow(img_out)
plt.axis('off')
plt.show()
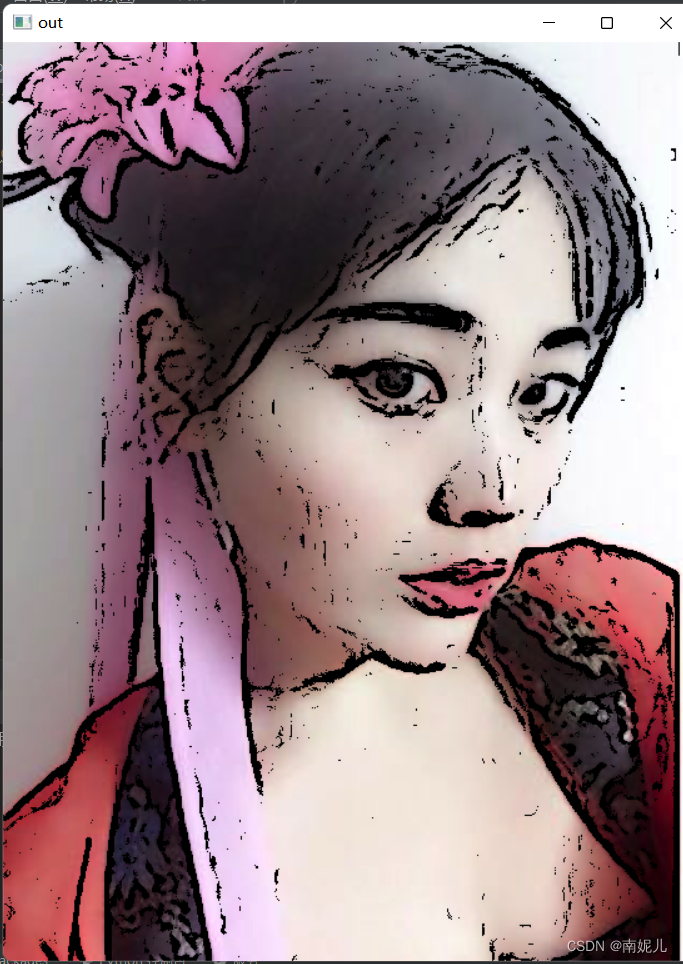
漫画风格算法原理
算法的设计思路如下:
(1)将彩色图像转换成灰度图像。
(2)边缘检测提取灰度图像的边缘。
(3)对于检测的边缘进行增强并二值化产生粗线条的特征图像。
(4)将处理完的图像与原图进行叠加,得到最终效果
边缘提取和二值化可以采用OpenCV自带的自适应阈值二值化函数
adaptiveThreshold()来解决。函数声明如下:
dst = cv2.adaptiveThreshold(src, maxval, thresh_type, type, Block Size,
C)
参数说明:
·src:输入图,只能输入单通道图像,通常来说为灰度图。
·dst:输出图。
·maxval:当像素值超过了阈值(或者小于阈值,根据type来决定
所赋予的值。)
·thresh_type:阈值的计算方法包含两种类型,即
cv2.ADAPTIVE_THRESH_MEAN_C和
cv2.ADAPTIVE_THRESH_GAUSSIAN_C。
·type:二值化操作的类型与固定阈值函数相同,包含5种类型,
即cv2.THRESH_BINARY、cv2.THRESH_BINARY_INV、
cv2.THRESH_TRUNC、cv2.THRESH_TOZERO和
cv2.THRESH_TOZERO_INV。
·Block Size:图片中分块的大小。
·C:阈值计算方法中的常数项。图像阈值化的目的是从灰度图像中分离目标区域和背景区域。因 为在灰度图像中,灰度值变化明显的区域往往是物体的轮廓,所以将 图像分成一小块一小块地去计算阈值会得出图像的轮廓。
import cv2

def main():

 img_rgb = cv2.imread("4.jpg")  #读取图片
 img_color = img_rgb
 img_gray = cv2.cvtColor(img_rgb, cv2.COLOR_RGB2GRAY)
 img_blur = cv2.medianBlur(img_gray, 7)
 #检测到边缘并且增强其效果
 img_edge = cv2.adaptiveThreshold(img_blur,255,
          cv2.ADAPTIVE_THRESH_MEAN_C,
          cv2.THRESH_BINARY,
          blockSize=9,
          C=2)
 #转换回彩色图像
 img_edge = cv2.cvtColor(img_edge, cv2.COLOR_GRAY2RGB)
 img_cartoon = cv2.bitwise_and(img_color, img_edge)
 # 保存转换后的图片
 cv2.imshow("out", img_cartoon)
 cv2.waitKey(0)


if __name__ == '__main__':
     main()