文章目录
一、汽车控制器类型
一辆汽车上存在着上百个控制器,从发动机,变速箱,电动机,ESP,到中控大屏,车机系统,车道辅助等。
汽车电子控制:
- 通过直接向执行机构(如电子阀门、继电器开关、执行马达 等)发送指令,以控制发动机、变速箱、动力电池等协同工作的系统。这类系统对实时性的要求非常高,而且一般都会有功能安全等级的需求
车载电子设备:
- 如仪表、中控、抬头显示(HUD)、流媒体后视镜等。这类系统常与用户体验相关,不直接参与汽车行驶的控制决策,对车辆行驶性能和安全影响较小
由于两者对实时性要求的差异,操作系统逐步演化出了两种类型,Real Time Operating System,简称RTOS,与Time-sharing Operating System的分时操作系统。
实时操作系统是指当外界事件或数据产生时,能够接受并以足够快的速度予以处理,其处理的结果又能在规定的时间之内来控制生产过程或对处理系 统作出快速响应,并控制所有实时任务协调一致运行的操作系统。常见的RTOS如:Ucos,Free Rtos等。
分时操作系统是一种联机的多用户交互式的操作系统。一般采用时间片轮转的方式使一台计算机为多个终端服务。对每个用户能保证足够快的响应时间,并提供交互会话能力,我们现在使用的PC操作系统就是基于这种方式。
拿安全气囊控制器来说,由于这是与安全相关的关键功能,极小的时间误差(太早或太迟)都会产生灾难性后果,甚至导致人员伤亡,所以必须使用实时操作系统;对于车载终端来说,我们可能需要一边打电话,一边进行实时导航,所以使用分时操作系统。
二、Hypervisor
Hypervisor(硬件虚拟化技术,提供虚 拟平台支持多操作系统)的出现,让实时操作系统和分时操作系统出现了“融合”)
通俗来讲,Hypervisor是一种将操作系统与硬件抽象分离的方法,以达到host machine的硬件能同时运行一个至多个虚拟机作为guest machine的目的,这样能够使得这些虚拟机高效地分享主机硬件资源。

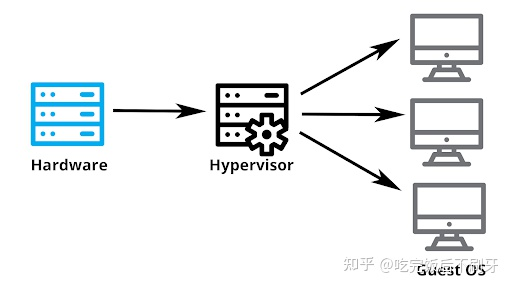
Hypervisor的出现使得“多系统”的概念成为了可能,只要资源足够,我们就可以在控制器上安装多种不同类型,不同种类,不同供应商的操作系统来满足上层功能的需求。比如我们可以在智能座舱域控制器中,装上ASIL QM的信息娱乐系统,也可以添加满足ASIL B/C的ADAS实时操作系统。
三、QNX、Linux、Andorid
目前汽车底层操作系统,格局较为稳定,主要玩家为 QNX(Blackberry)、Linux(开源基金会)、 Andorid(Google)。对于座舱域这类对功能安全和信息安全要求较低的控制器,国内多基于安卓/AliOS 开发, 国外多基于 Linux 开发;而有着高实时,安全性的自动驾驶控制器目前仍多以 Linux/QNX 开发为主。
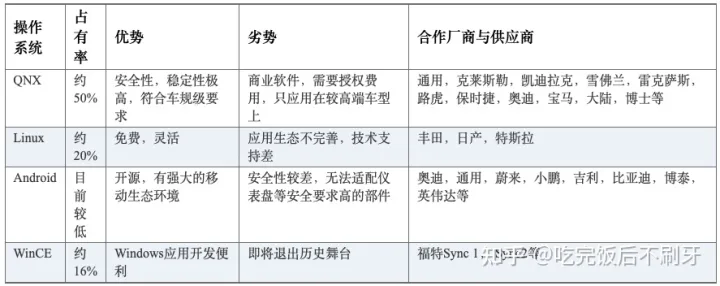
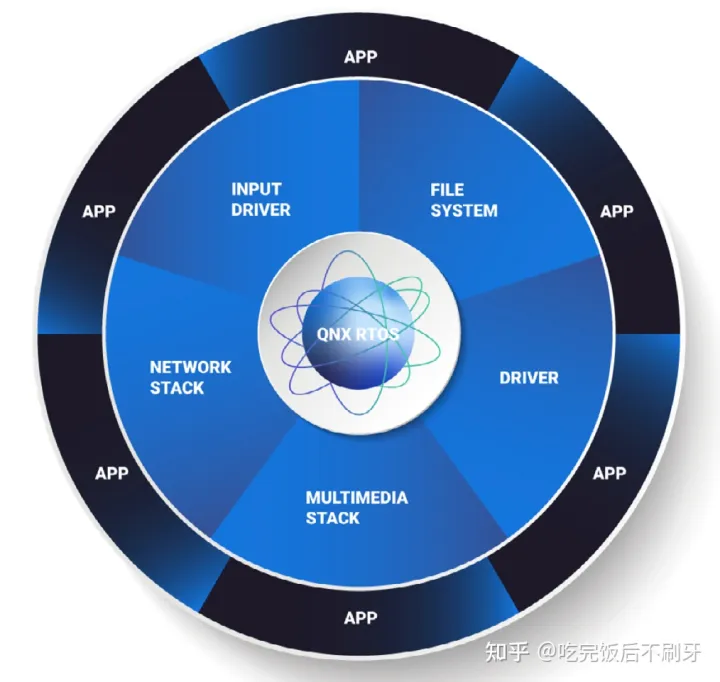
QNX 是一款微内核、嵌入式、非开源、安全实时的操作系统。因其内核小巧,运行速度极快,具有独特的微内核架构,安全和稳定性高,是全球首款通过 ISO26262 ASIL-D 安全认证的实时操作系统,常用于安全稳定性要求较高的数字仪表中。凭借其安全、稳定等优势占据市场较高份额,超过1.75亿辆汽车使用了QNX 系统。
Linux 是一款开源、功能更强大的操作系统。Linux 具有内核紧凑高效等特点,可以充分发挥硬件的性能。它与 QNX 相比最大优势在于开源,具有很强的定制开发灵活度。我们通常提的基于 Linux 开发新的操作系统是指基于 Linux Kernel 进一步集成中间件、桌面环境和部分应用软件。Linux 功能较 QNX 更强大,组件也更为复杂,因此 Linux 常用于支持更多应用和接口的信息娱乐系统中。
AGL(Automotive Grade Linux)是一个协作性开源项目,它将汽车制造商,供应商和技术公司召集在一起,以加速开发和采用针对互联汽车的完全开放的软件堆栈。AGL以Linux为核心,正在从头开始开发一个开放平台,该平台可以用作事实上的行业标准,以实现新功能和新技术的快速开发。AGL 早期主要为丰田、本田、日产等日系厂商,随着 2019 年大众、现代汽车的加入,AGL 势力规模逐渐壮大。截至 2020 年 3 月,国内已有 中国移动、上汽集团、德赛西威、中科创达等公司加入了 AGL,成员总数超过 150 个。
Android 是由 Google 公司和开放手机联盟基于 Linux 开发的操作系统,被称为基于 Linux 开发的最成功的产品之一,应用生态最为丰富,主要应用于移动设备。Android 手机上的 APP 不需要经过大的修改就可以应用在车机上,有利于国内互联网厂商切入汽车领域,快速建立起车载软件生态。尤其是各大互联网巨头、自主品牌、造车新势力 纷纷基于 Android 进行定制化改造,推出了自己的汽车操作系统,如阿里 AliOS、百度 小度车载 OS、比亚迪 DiLink、蔚来 NIO OS、小鹏 Xmart OS 等。
四、Automotive Grade Linux 系统(AGL)
1.介绍
Automotive Grade Linux是一套开源的车载系统平台。
Automotive Grade Linux (简称AGL)是一个由Linux基金会主导的一个开源项目。这是一个由汽车制造商,供应商,技术公司共同组建的开发团体开发的项目。
AGL是一个为车载环境开发的操作系统,我们通常称这种系统叫做车载信息娱乐系统(In-Vehicle Infotainment,简称IVI)。 进一步:Android与汽车
大家熟悉的Android Auto和Apple CarPlay也都属于IVI系统。
2.IVI市场现状
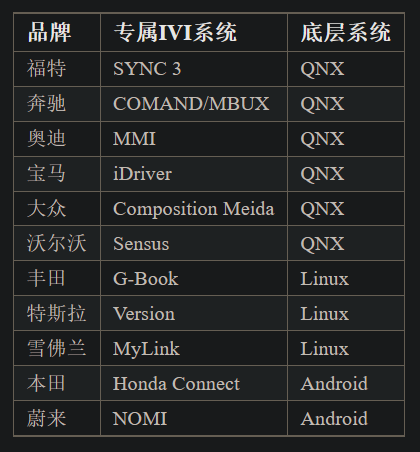
下表整理了几大汽车厂商的IVI系统以及底层系统的信息:
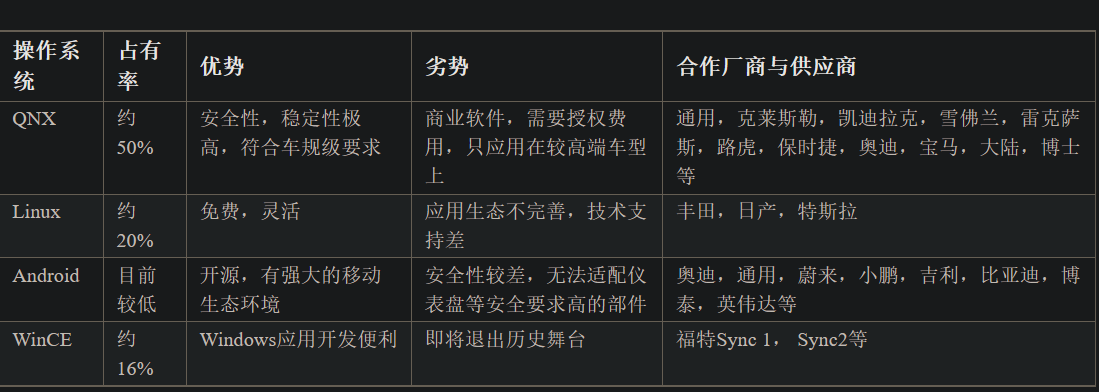
到目前为止,黑莓的QNX在市场占有率上有绝对的优势。下面是几个主流系统的对比:
3.系统构建
AGL系统的构建流程如下:
- 准备开发的宿主系统
- 下载AGL编译环境
- 初始化编译环境
- 编译系统镜像
下面我们就按这个流程来进行构建。
(1)准备开发的宿主系统
AGL的开发环境需要使用Yocto Project编译系统,所以需要以此为基础来准备开发环境。
目前,Yocto项目支持的Linux版本包括下面这些:
Ubuntu 14.10
Ubuntu 15.04
Ubuntu 15.10
Ubuntu 16.04 (LTS)
Fedora release 22
Fedora release 23
Fedora release 24
CentOS release 7.x
Debian GNU/Linux 8.x (Jessie)
Debian GNU/Linux 9.x (Stretch)
openSUSE 13.2
openSUSE 42.1
考虑到Ubuntu Linux的使用的人群最多,因此笔者建议大家以这个系统来进行准备。
在安装好Ubuntu系统之后,还需要安装如下的开发软件包以便编译AGL系统:
sudo apt-get install gawk wget git-core diffstat unzip texinfo gcc-multilib \
     build-essential chrpath socat cpio python python3 python3-pip python3-pexpect \
     xz-utils debianutils iputils-ping libsdl1.2-dev xterm
(2)下载AGL编译环境
AGL项目中包含了很多子项目,因此建议大家创建一个新的文件夹来存放相关文件。
这里以workspace_agl文件夹为例来构建编译环境。
export AGL_TOP=$HOME/workspace_agl
mkdir -p $AGL_TOP
AGL使用repo工具来管理源码,所以需要先下载这个工具:
mkdir -p ~/bin
export PATH=~/bin:$PATH
curl https://storage.googleapis.com/git-repo-downloads/repo > ~/bin/repo
chmod a+x ~/bin/repo
获取工具之后就可以根据需求来下载不同版本的环境。
如果是希望获取稳定版源码,可以通过下面这个命令:
cd $AGL_TOP
repo init -b flounder -u https://gerrit.automotivelinux.org/gerrit/AGL/AGL-repo
repo sync
如果是希望获取最新的版本,可以使用下面这个命令:
cd $AGL_TOP
repo init -u https://gerrit.automotivelinux.org/gerrit/AGL/AGL-repo
repo sync
(3)初始化编译环境
下载完成之后,需要通过一个脚本来初始化编译环境,脚本位于下面这个路径:
$AGL_TOP/meta-agl/scripts/aglsetup.sh
通过这个脚本可以设置编译的参数,例如:目标硬件,编译产出的目录等等。
可以通过下面这个命令来查看帮助:
source meta-agl/scripts/aglsetup.sh -h
在执行aglsetup.sh脚本之前,需要先确定想要编译出AGL系统的哪些特性。
特性的选择可以通过指定分层来确定,目前主要使用的分层有下面三个:
meta-agl:包含AGL发行版的最小集合。
meta-agl-demo:包含了参考UI实现以及演示平台和应用。
meta-agl-devel:包含了开发中的模块。这个也会包含OEM需要的但不在AGL中的软件包。
这里我们只要编译出模拟器中可以运行的演示系统即可,因此执行下面这条命令:
source meta-agl/scripts/aglsetup.sh -f -m qemux86-64 agl-demo agl-devel
执行完这条命令之后,脚本便会生成编译需要的配置文件。
(4)编译系统镜像
接下来输入下面这条命令:
bitbake agl-demo-platform
这个步骤会比较耗时,可能需要若干个小时,因为其中包含了下载和编译的过程。具体时间长度取决于你的网络环境和开发机器的硬件配置。
编译完成之后会自动生成系统镜像。
(5)启动编译产物
编译出的镜像位于 build/tmp/deploy/images/ 目录下。根据编译时的设置会存在于不同的子文件夹中。镜像的文件名以 vmdk 为后缀。
例如,根据上面的配置,本次编译出的镜像是:
build/tmp/deploy/images/qemux86-64/agl-demo-platform-qemux86-64-20190529011851.rootfs.wic.vmdk
这个文件可以通过QEMU启动,也可以通过VirtualBox启动。
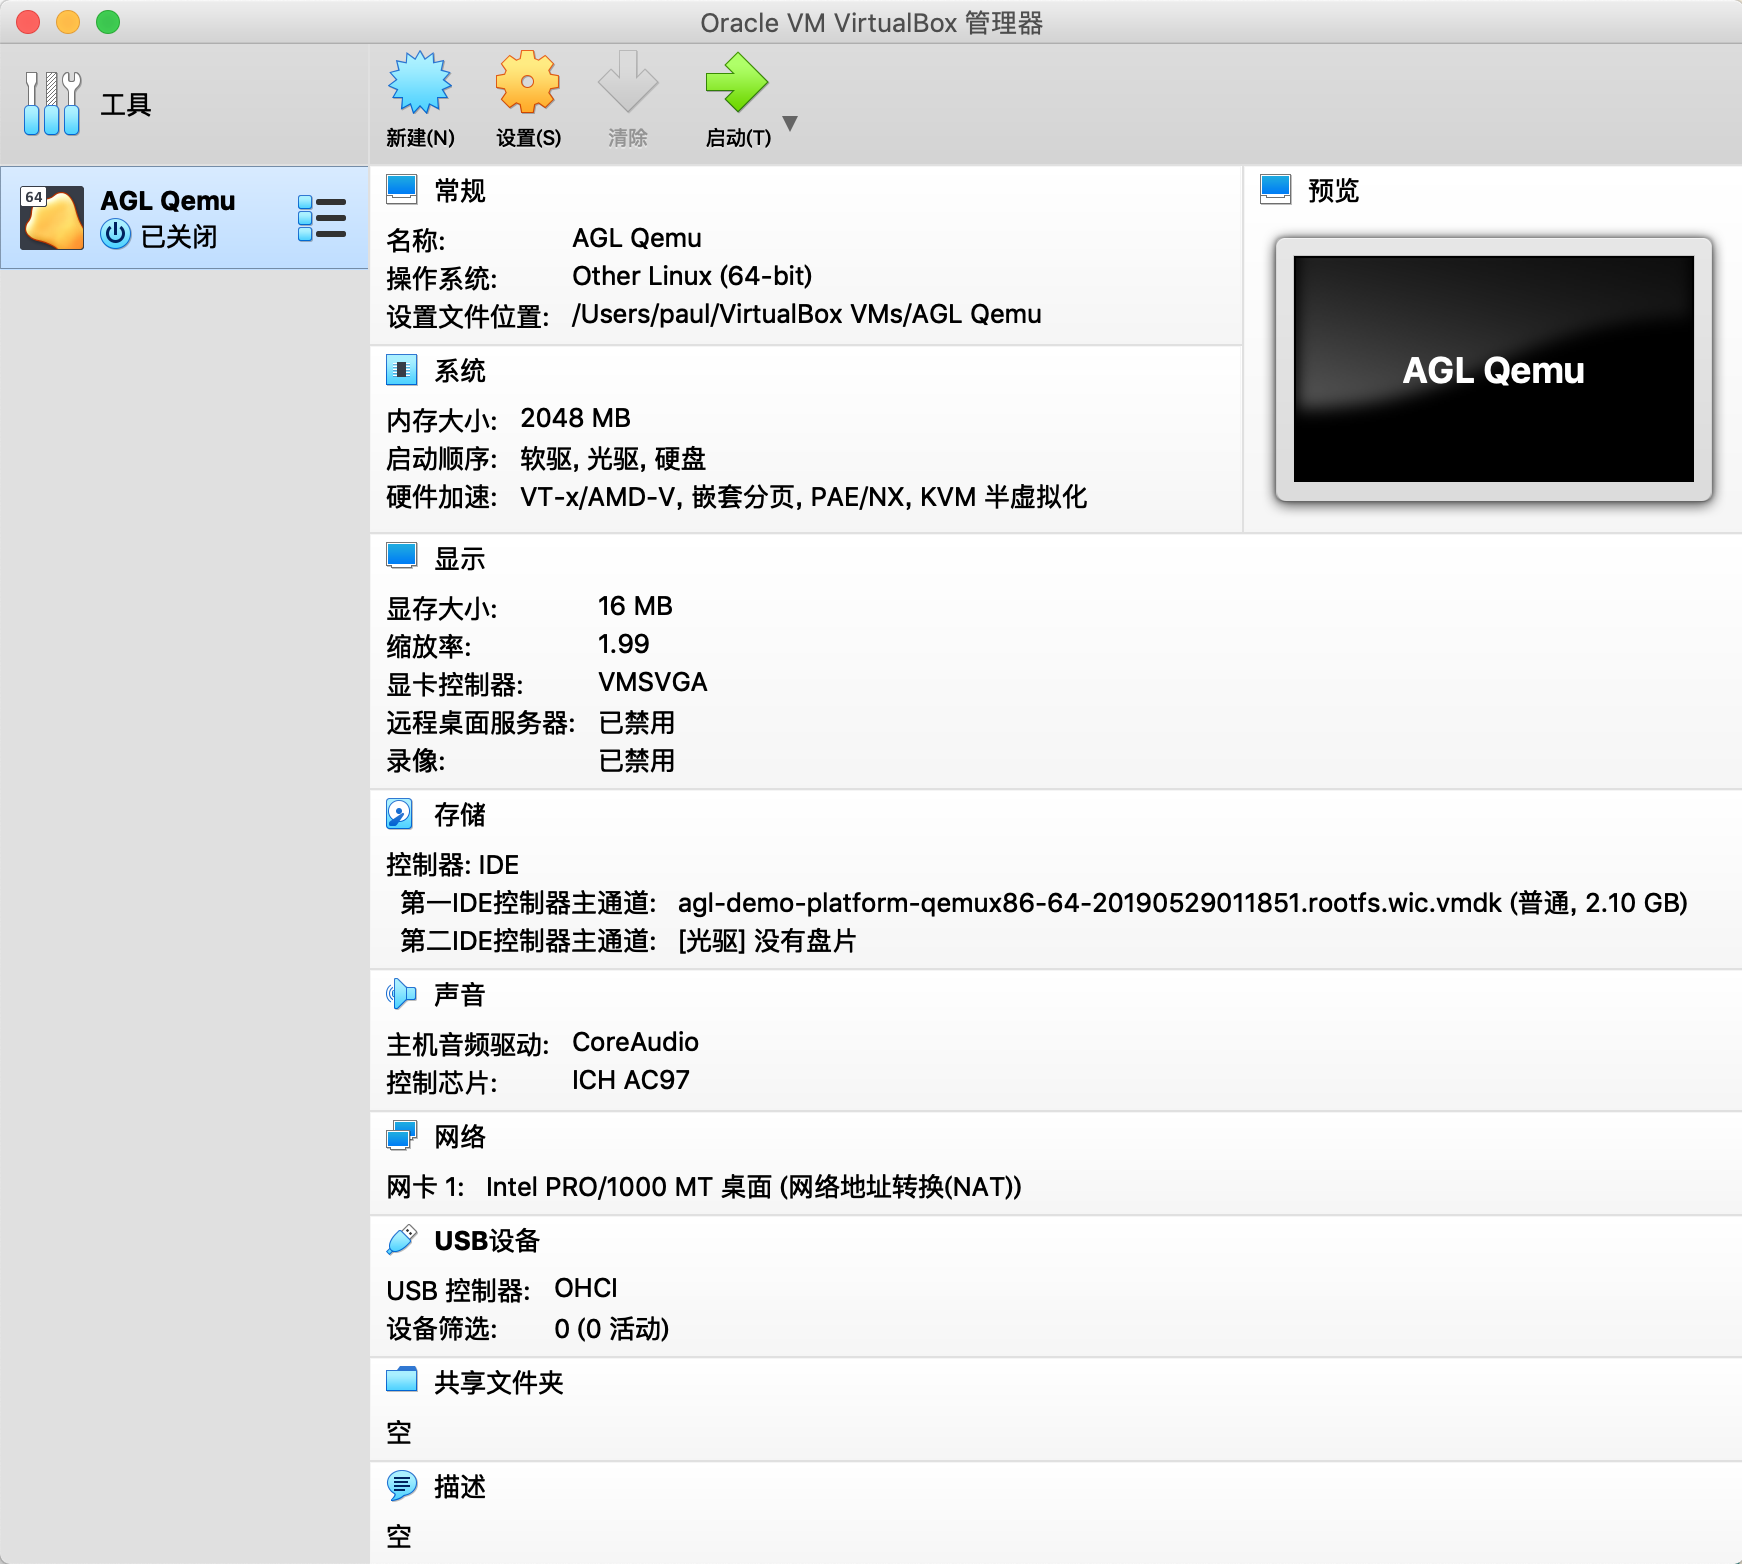
笔者将上面这个vmdk文件拷贝的MacBook Pro上之后,通过VirtualBox新建了虚拟机,配置如下:
(6)系统架构
AGL系统的完整功能说明见这里:《Automotive Grade Linux Requirements Specification》。
这份文档中描述了AGL的整体系统架构,并对每一个模块都做了说明。
系统架构图如下所示:
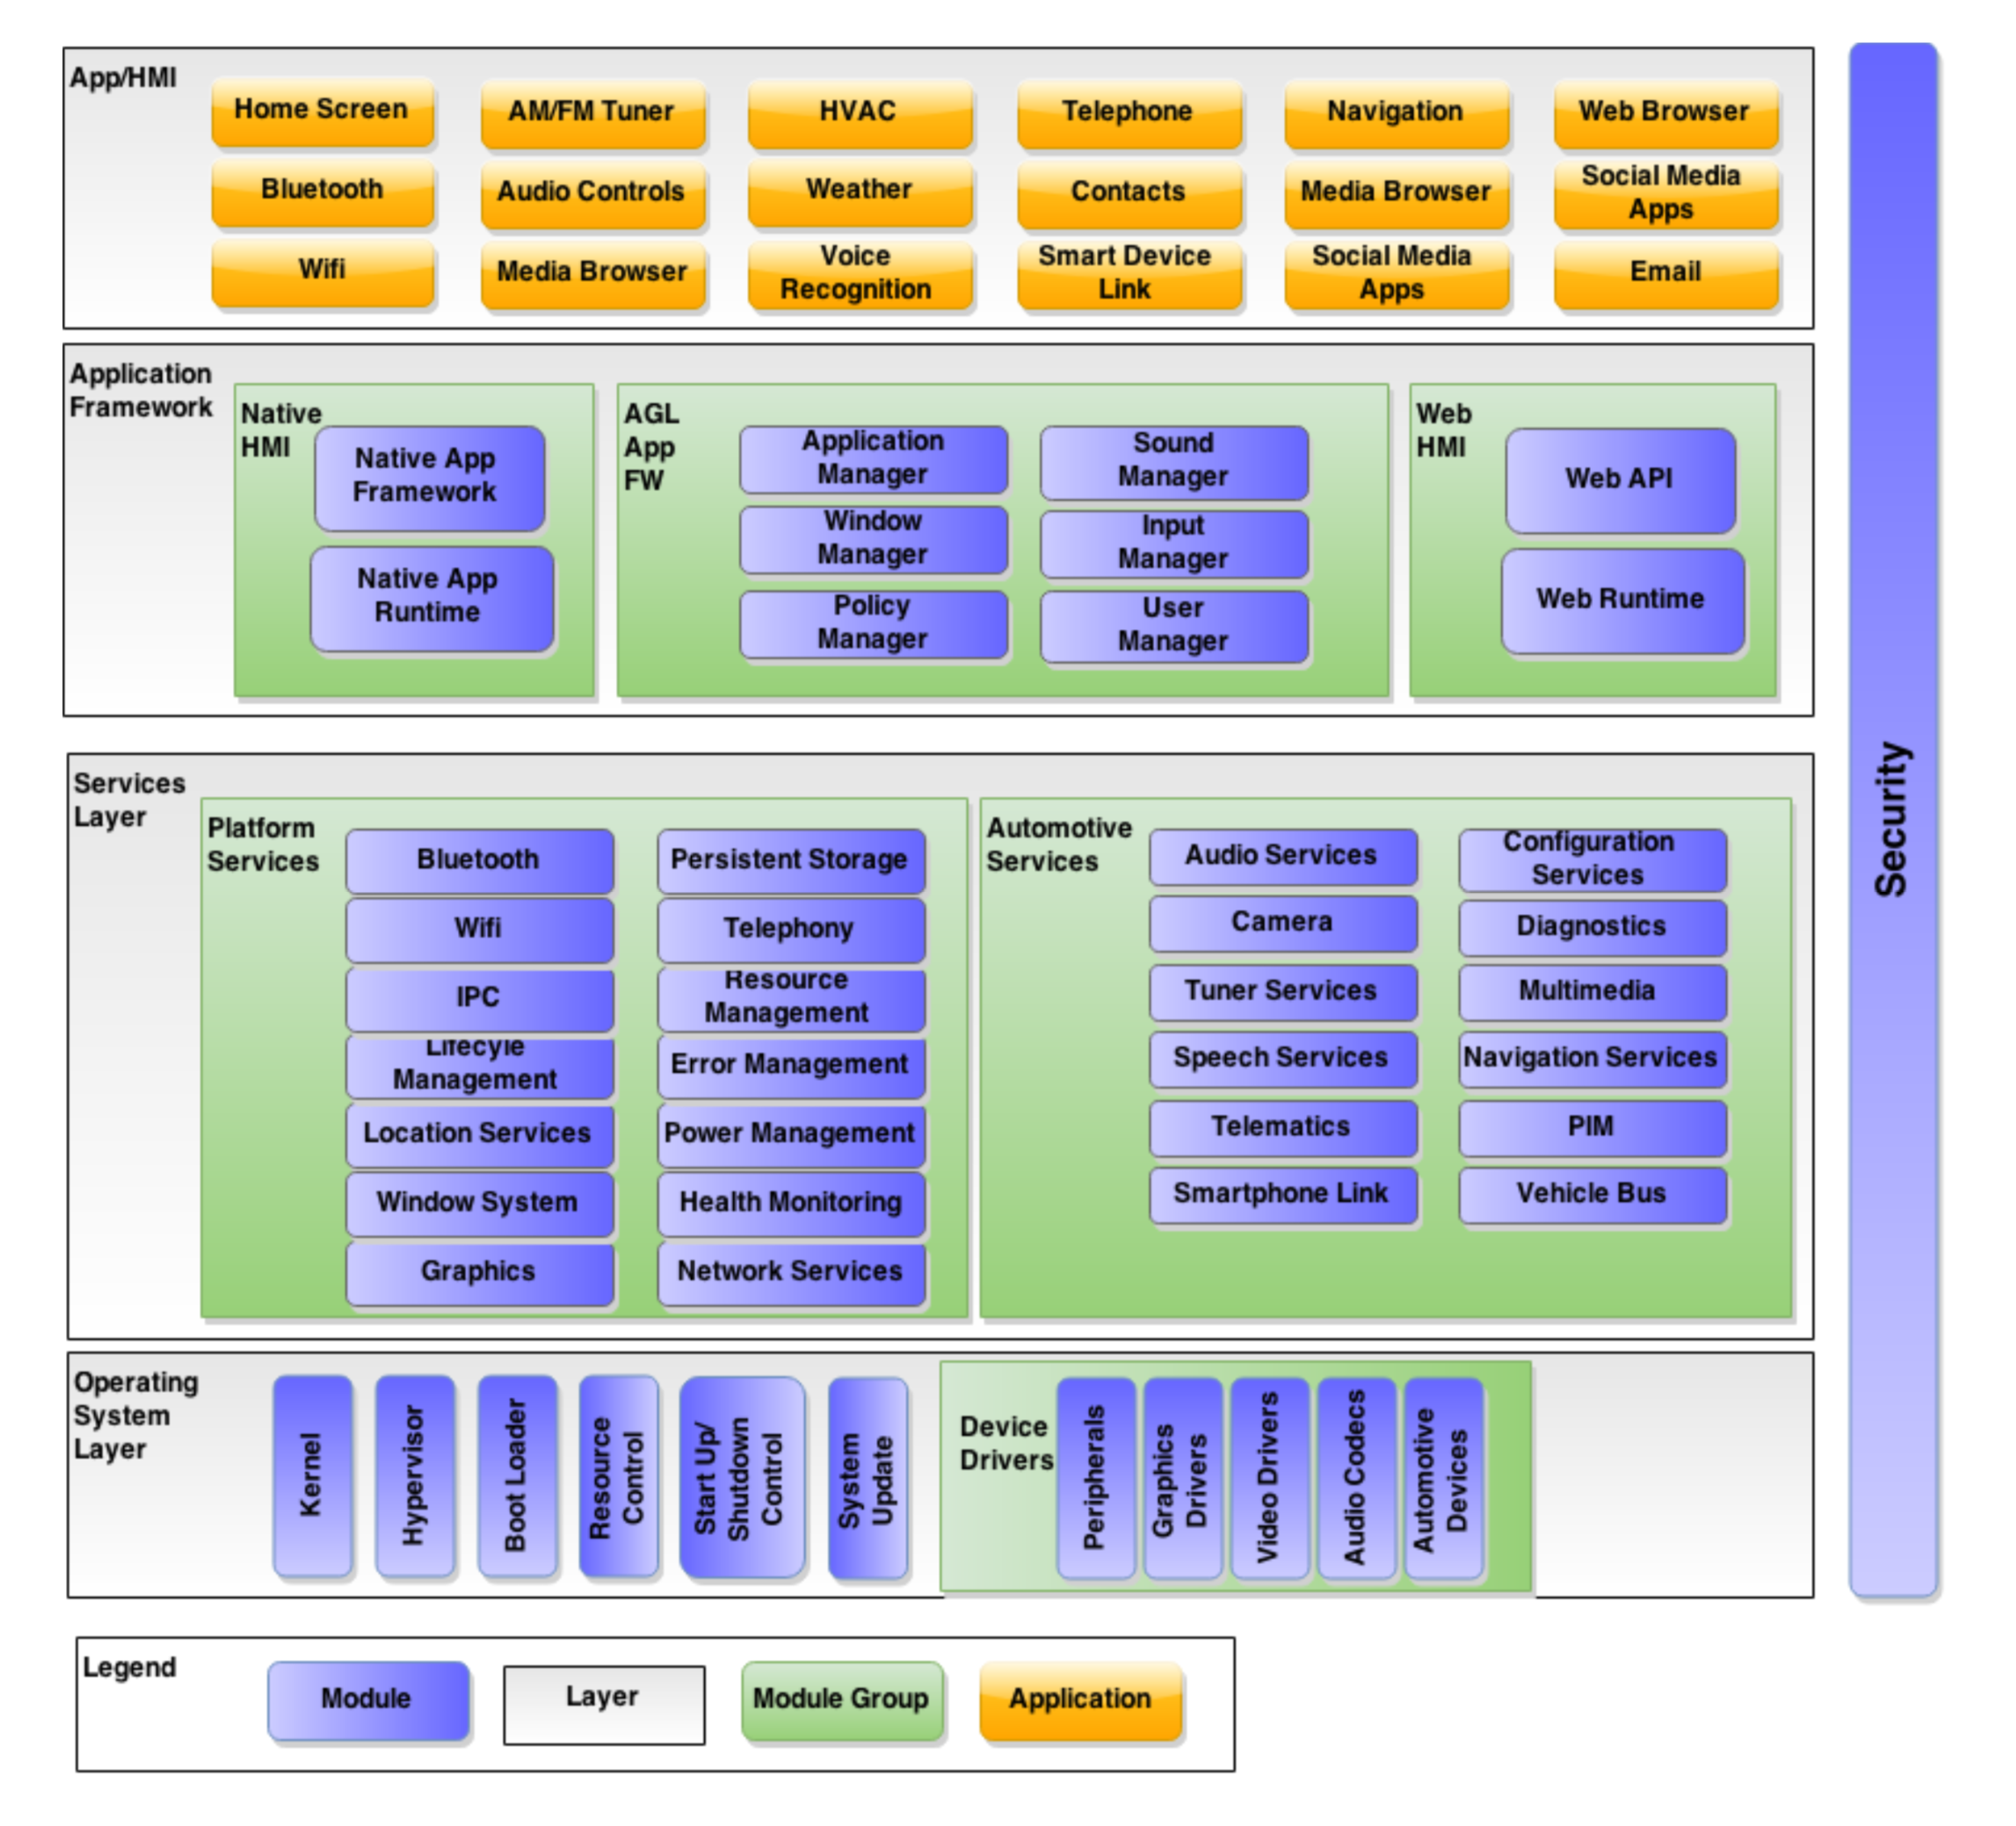
从这幅图中我们可以看出,整个AGL系统可以分为四层。从上至下以此是:
- 应用和界面层:包含各种类型的应用程序,以及用户接触到的操作界面。
- 应用程序框架层:提供接口来管理运行中的应用程序。这一层又分为:本地应用,AGL应用框架,Web应用三个部分。
- 服务层:包含了位于用户空间的所有应用程序可以访问的服务,这些服务分为平台服务和汽车服务两大类。
- 操作系统层:包含了系统内核以及驱动设备。
(7)浏览源码
事实上,通过repo工具获取的并非是系统的源码,仅仅是项目的元数据。真正的源码在编译的过程中才会拉取。拉取后,源码便位于build/tmp/work/目录下。
通过浏览源码会发现,AGL项目使用CMake做为编译的配置工具,因此可以通过查看每个工程的CMakeLists.txt来了解工程的目标产物。
由于篇幅所限,下文选取系统中最核心应用程序框架和人机界面框架做一些介绍。
(8)应用程序框架
应用程序框架(Application Framework)负责管理所有的应用程序。管理主要分为两类
- 静态的:包括应用程序的安装和卸载。
- 动态的:应用程序的运行时管理,例如:应用启动和退出,应用间的切换等。
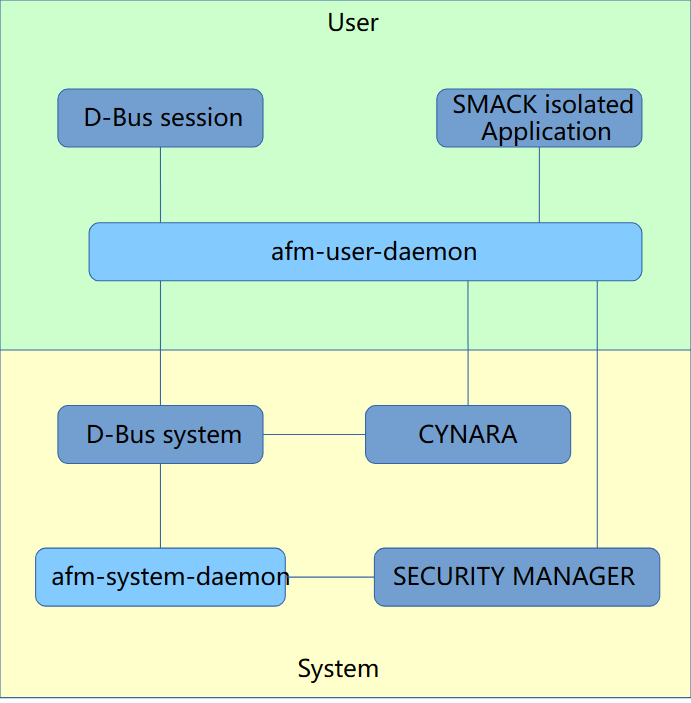
应用程序框架最核心的就是afm-system-daemon 和 afm-user-daemon两个模块。这是两个独立的进程,它们通过D-Bus进行通信。如下图所示:
D-Bus是一种高级的进程间通信机制,它由freedesktop.org项目提供,使用GPL许可证发行。D-Bus最主要的用途是在 Linux桌面环境为进程提供通信,同时能将Linux桌面环境和Linux内核事件作为消息传递到进程。D-Bus的主要概率为总线,注册后的进程可通 过总线接收或传递消息,进程也可注册后等待内核事件响应,例如等待网络状态的转变或者计算机发出关机指令。目前,D-Bus已被大多数Linux发行版所 采用,开发者可使用D-Bus实现各种复杂的进程间通信任务。
ref:DBUS基础知识(非常全面)
其中,
afm-system-daemon负责应用的安装和卸载afm-user-daemon负责应用程序生命周期的管理,包括:启动,退出,暂停和恢复等。
应用程序框架的项目地址见这里:src/app-framework-main。
可以通过下面这条命令直接获取其源码:
git clone "https://gerrit.automotivelinux.org/gerrit/src/app-framework-main"
AGL使用systemd来管理系统进程的启动。
afm-system-daemon和afm-user-daemon的启动配置分别如下:
[Unit]
Description=Application Framework Master, system side
Requires=afm-system-setup.service

[Service]
#User=afm
#Group=afm
SyslogIdentifier=afm-system-daemon
ExecStart=/usr/bin/afb-daemon --name=afm-system-daemon --no-httpd --no-ldpaths --binding=@afm_libexecdir@/afm-binding.so --ws-server=sd:afm-main
Restart=on-failure
RestartSec=5
CapabilityBoundingSet=CAP_DAC_OVERRIDE CAP_MAC_OVERRIDE

[Install]
WantedBy=multi-user.target
[Unit]
Description=Application Framework Master, User side

[Service]
Type=dbus
BusName=org.AGL.afm.user
ExecStart=/usr/bin/afm-user-daemon --user-dbus=unix:path=%t/bus unix:@afm_platform_rundir@/apis/ws/afm-main
Environment=AFM_APP_INSTALL_DIR=%%r
EnvironmentFile=-@afm_confdir@/unit.env.d/*
Restart=on-failure
RestartSec=5


[Install]
WantedBy=default.target
从上面这个配置可以看出:
afm-system-daemon由/usr/bin/afb-daemon可执行文件启动。afm-user-daemon由/usr/bin/afm-user-daemon可执行文件启动。
afb-daemon 是Application Framework Binder Daemon的简写。
AGL系统进程通过D-Bus 暴露接口。关于这两个服务暴露的接口说明见这里:The afm daemons: The D-Bus interface。
afm-system-daemon 暴露的接口包括下面这些
install
uninstall
afm-user-daemon 暴露的接口包括下面这些
runnables
detail
start
once
terminate
pause
resume
runners
state
install
uninstall
其中,afm-user-daemon的install和uninstall接口最终还是会请求afm-system-daemon。
(9)afm-user-daemon
afm-user-daemon的main函数位于afm-user-daemon.c文件中。
这是一个守护进程,守护进程在启动之后通常都会一直在loop上循环等待消息的处理。
/* start servicing */
if (jbus_start_serving(user_bus) < 0) {


  ERROR("can't start server");
  return 1;
}

/* run until error */
for(;;)
  sd_event_run(evloop, (uint64_t)-1);
return 0;
对外接口名称和内部实现的绑定在 afm-binding.c 文件中完成:
static const afb_verb_t verbs[] =
{


	{

    .verb=_runnables_, .callback=runnables, .auth=&auth_detail,    .info="Get list of runnable applications",          .session=AFB_SESSION_CHECK },
	{

    .verb=_detail_   , .callback=detail,    .auth=&auth_detail,    .info="Get the details for one application",        .session=AFB_SESSION_CHECK },
	{

    .verb=_start_    , .callback=start,     .auth=&auth_start,     .info="Start an application",                       .session=AFB_SESSION_CHECK },
	{

    .verb=_once_     , .callback=once,      .auth=&auth_start,     .info="Start once an application",                  .session=AFB_SESSION_CHECK },
	{

    .verb=_terminate_, .callback=terminate, .auth=&auth_kill,      .info="Terminate a running application",            .session=AFB_SESSION_CHECK },
	{

    .verb=_pause_    , .callback=pause,     .auth=&auth_kill,      .info="Pause a running application",                .session=AFB_SESSION_CHECK },
	{

    .verb=_resume_   , .callback=resume,    .auth=&auth_kill,      .info="Resume a paused application",                .session=AFB_SESSION_CHECK },
	{

    .verb=_runners_  , .callback=runners,   .auth=&auth_state,     .info="Get the list of running applications",       .session=AFB_SESSION_CHECK },
	{

    .verb=_state_    , .callback=state,     .auth=&auth_state,     .info="Get the state of a running application",     .session=AFB_SESSION_CHECK },
	{

    .verb=_install_  , .callback=install,   .auth=&auth_install,   .info="Install an application using a widget file", .session=AFB_SESSION_CHECK },
	{

    .verb=_uninstall_, .callback=uninstall, .auth=&auth_uninstall, .info="Uninstall an application",                   .session=AFB_SESSION_CHECK },
	{

    .verb=NULL }
};
这是一个数组,每一项对应了一个接口的绑定。.callback指定的是逻辑实现的回调函数。
afm-user-daemon中对应用程序生命周期的管理实现在以下这些函数中:
extern int afm_urun_start(struct json_object *appli, int uid);
extern int afm_urun_once(struct json_object *appli, int uid);
extern int afm_urun_terminate(int runid, int uid);
extern int afm_urun_pause(int runid, int uid);
extern int afm_urun_resume(int runid, int uid);
extern struct json_object *afm_urun_list(struct afm_udb *db, int all, int uid);
extern struct json_object *afm_urun_state(struct afm_udb *db, int runid, int uid);
extern int afm_urun_search_runid(struct afm_udb *db, const char *id, int uid);
afm_urun_once
int afm_urun_once(struct json_object *appli, int uid)
{


	const char *udpath, *state, *uscope, *uname;
	int rc, isuser;

	/* retrieve basis */
	rc = get_basis(appli, &isuser, &udpath, uid);
	if (rc < 0)
		goto error;

	/* start the unit */
	rc = systemd_unit_start_dpath(isuser, udpath);
	if (rc < 0) {


		j_read_string_at(appli, "unit-scope", &uscope);
		j_read_string_at(appli, "unit-name", &uname);
		ERROR("can't start %s unit %s for uid %d", uscope, uname, uid);
		goto error;
	}

	state = wait_state_stable(isuser, udpath);
	if (state == NULL) {


		j_read_string_at(appli, "unit-scope", &uscope);
		j_read_string_at(appli, "unit-name", &uname);
		ERROR("can't wait %s unit %s for uid %d: %m", uscope, uname, uid);
		goto error;
	}
	if (state != SysD_State_Active) {


		j_read_string_at(appli, "unit-scope", &uscope);
		j_read_string_at(appli, "unit-name", &uname);
		ERROR("start error %s unit %s for uid %d: %s", uscope, uname, uid, state);
		goto error;
	}

	rc = systemd_unit_pid_of_dpath(isuser, udpath);
	if (rc <= 0) {


		j_read_string_at(appli, "unit-scope", &uscope);
		j_read_string_at(appli, "unit-name", &uname);
		ERROR("can't getpid of %s unit %s for uid %d: %m", uscope, uname, uid);
		goto error;
	}

	return rc;

error:
	return -1;
}
如果你浏览这些源码就会发现,这里面还有些逻辑没有实现完全:
int afm_urun_pause(int runid, int uid)
{


	return not_yet_implemented("pause");
}

int afm_urun_resume(int runid, int uid)
{


	return not_yet_implemented("resume");
}
(10)afb-daemon
afb-daemon可执行文件的源码位于另外一个工程中:src/app-framework-binder
可以通过下面这条命令获取其源码:
git clone "https://gerrit.automotivelinux.org/gerrit/src/app-framework-binder"
binder提供了将应用程序连接到所需服务的方法。利用binder,可以安全地为各种语言编写并几乎可在任何地方运行的应用程序提供服务。
这里的binder和Android中的binder不是一回事。
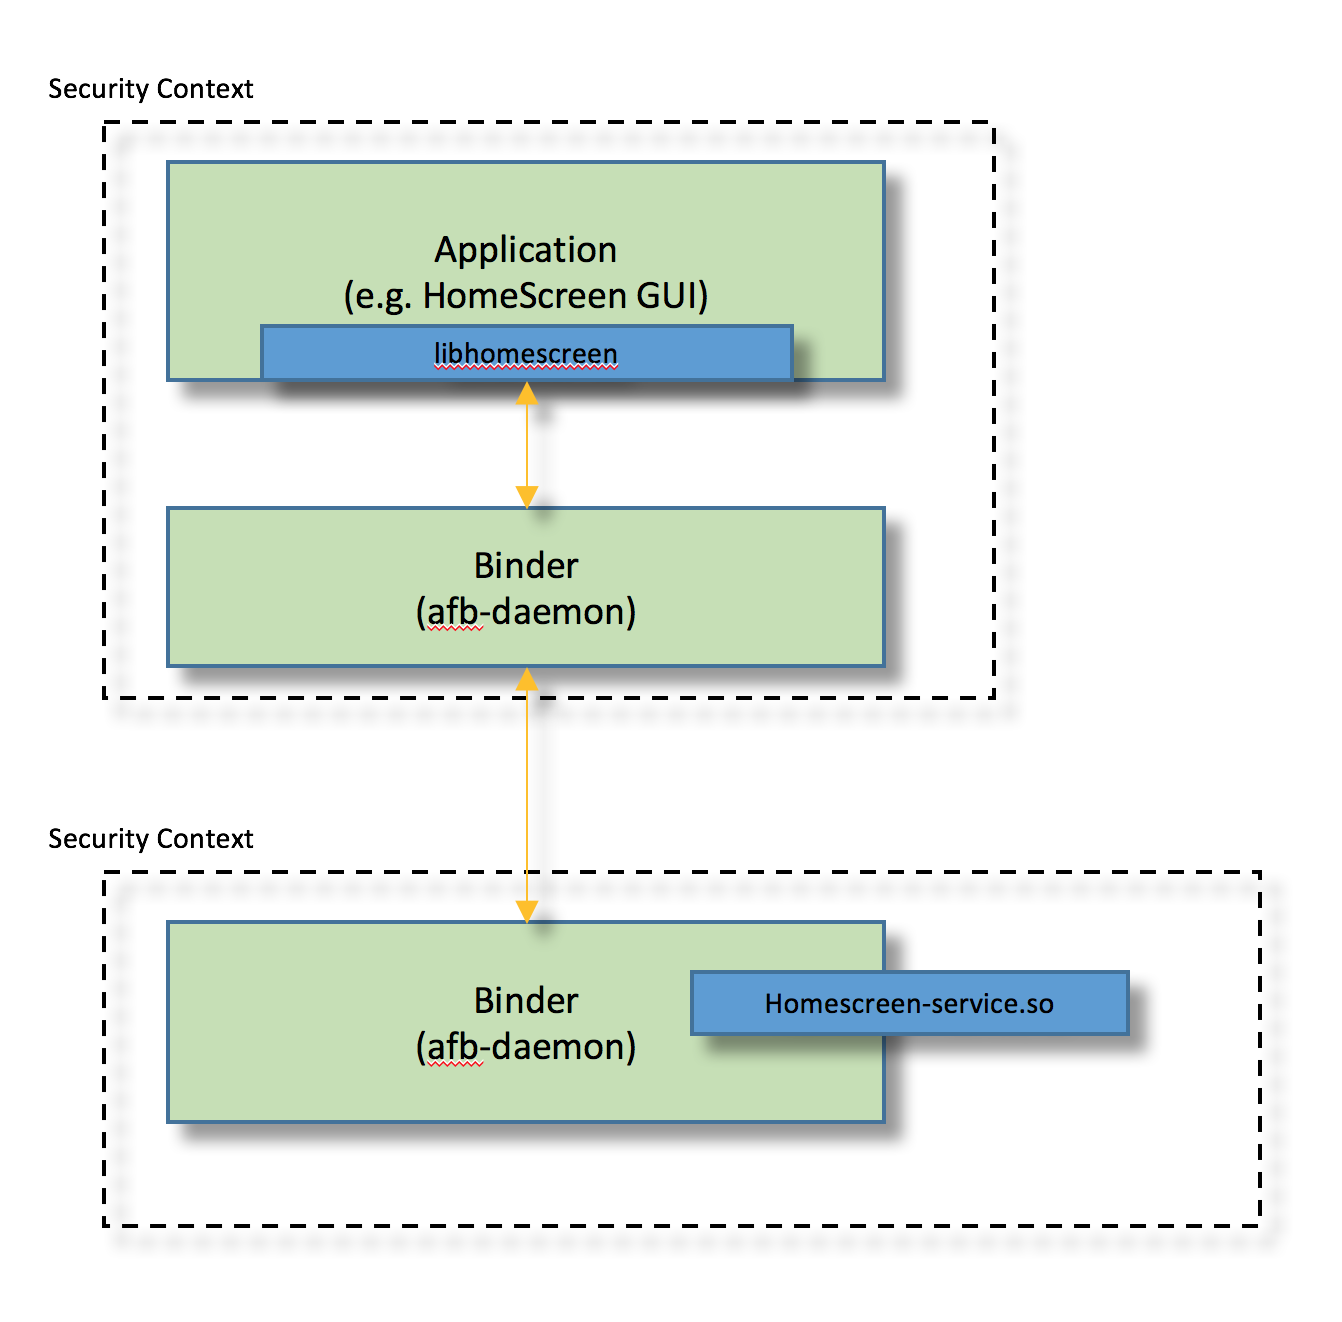
afb-daemon与应用程序的关系如下图所示:
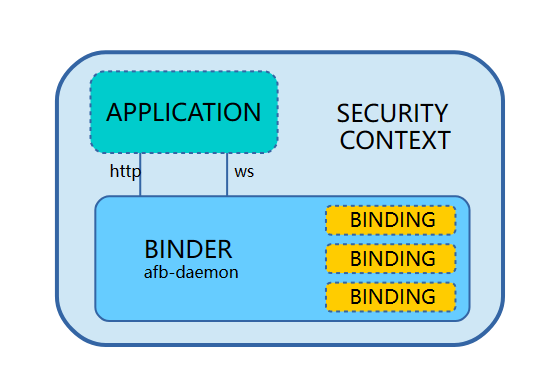
afb-daemon 提供了同时提供了http接口和WebSocket接口。
afb-daemon的main函数位于main-afb-daemon.c文件中。其main函数中主体逻辑做了四件事情:
解析传入的参数。
根据name参数设置进程名称。回顾一下上文,启动afm-system-daemon的时候就是通过systemd的配置文件指定了name参数:--name=afm-system-daemon。
设置为守护进程。
开始服务。
考虑到守护进程在同一时刻可能被多个客户端并发请求,所以afb-daemon以多线程的方式工作。具体是通过下面这个接口实现的:
int jobs_start(int allowed_count, int start_count,
int waiter_count, void (*start)(int signum, void* arg), void *arg)
这里的几个参数说明如下:
allowed_count 最大支持的线程数量
start_count 初始启动的线程数量
waiter_count 最多等待的请求
start 处理请求的函数指针
main函数中对于这几个参数设定的值如下:
jobs_start(3, 0, 50, start, NULL);
(11)afm-util
应用程序框架提供了一个命令行工具来方便开发和测试,这个工具的名称叫做afm-util。
提供的功能包含下面这些:
list
runnables      list the runnable widgets installed

add wgt
install wgt    install the wgt file

remove id
uninstall id   remove the installed widget of id

info id
detail id      print detail about the installed widget of id

ps
runners        list the running instance

run id
start id       start an instance of the widget of id

kill rid
terminate rid  terminate the running instance rid

status rid
state rid      get status of the running instance rid
(12)人机界面框架
人机界面(Human-Machine Interface,简称HMI)框架主要包含下面几个模块:
WindowManager
HomeScreen
SoundManager
InputManager
WindowManager
- WindowManager正如其名称所示,该模块负责系统的窗口管理。通过下面的命令可以获取其源码:
git clone https://gerrit.automotivelinux.org/gerrit/apps/agl-service-windowmanager
WindowManager需要管理的硬件包括:显示设备,GPU,输入设备和显存。它的主要职责包括:
绘制窗口
管理好窗口的层级
处理可视化效果动画
显示帧率管理
有效利用各种硬件,并减少硬件依赖
多窗口,多屏幕管理
兼容性管理
下面仅对该模块的做一个简单介绍。
WindowManager的整体架构如下图所示:
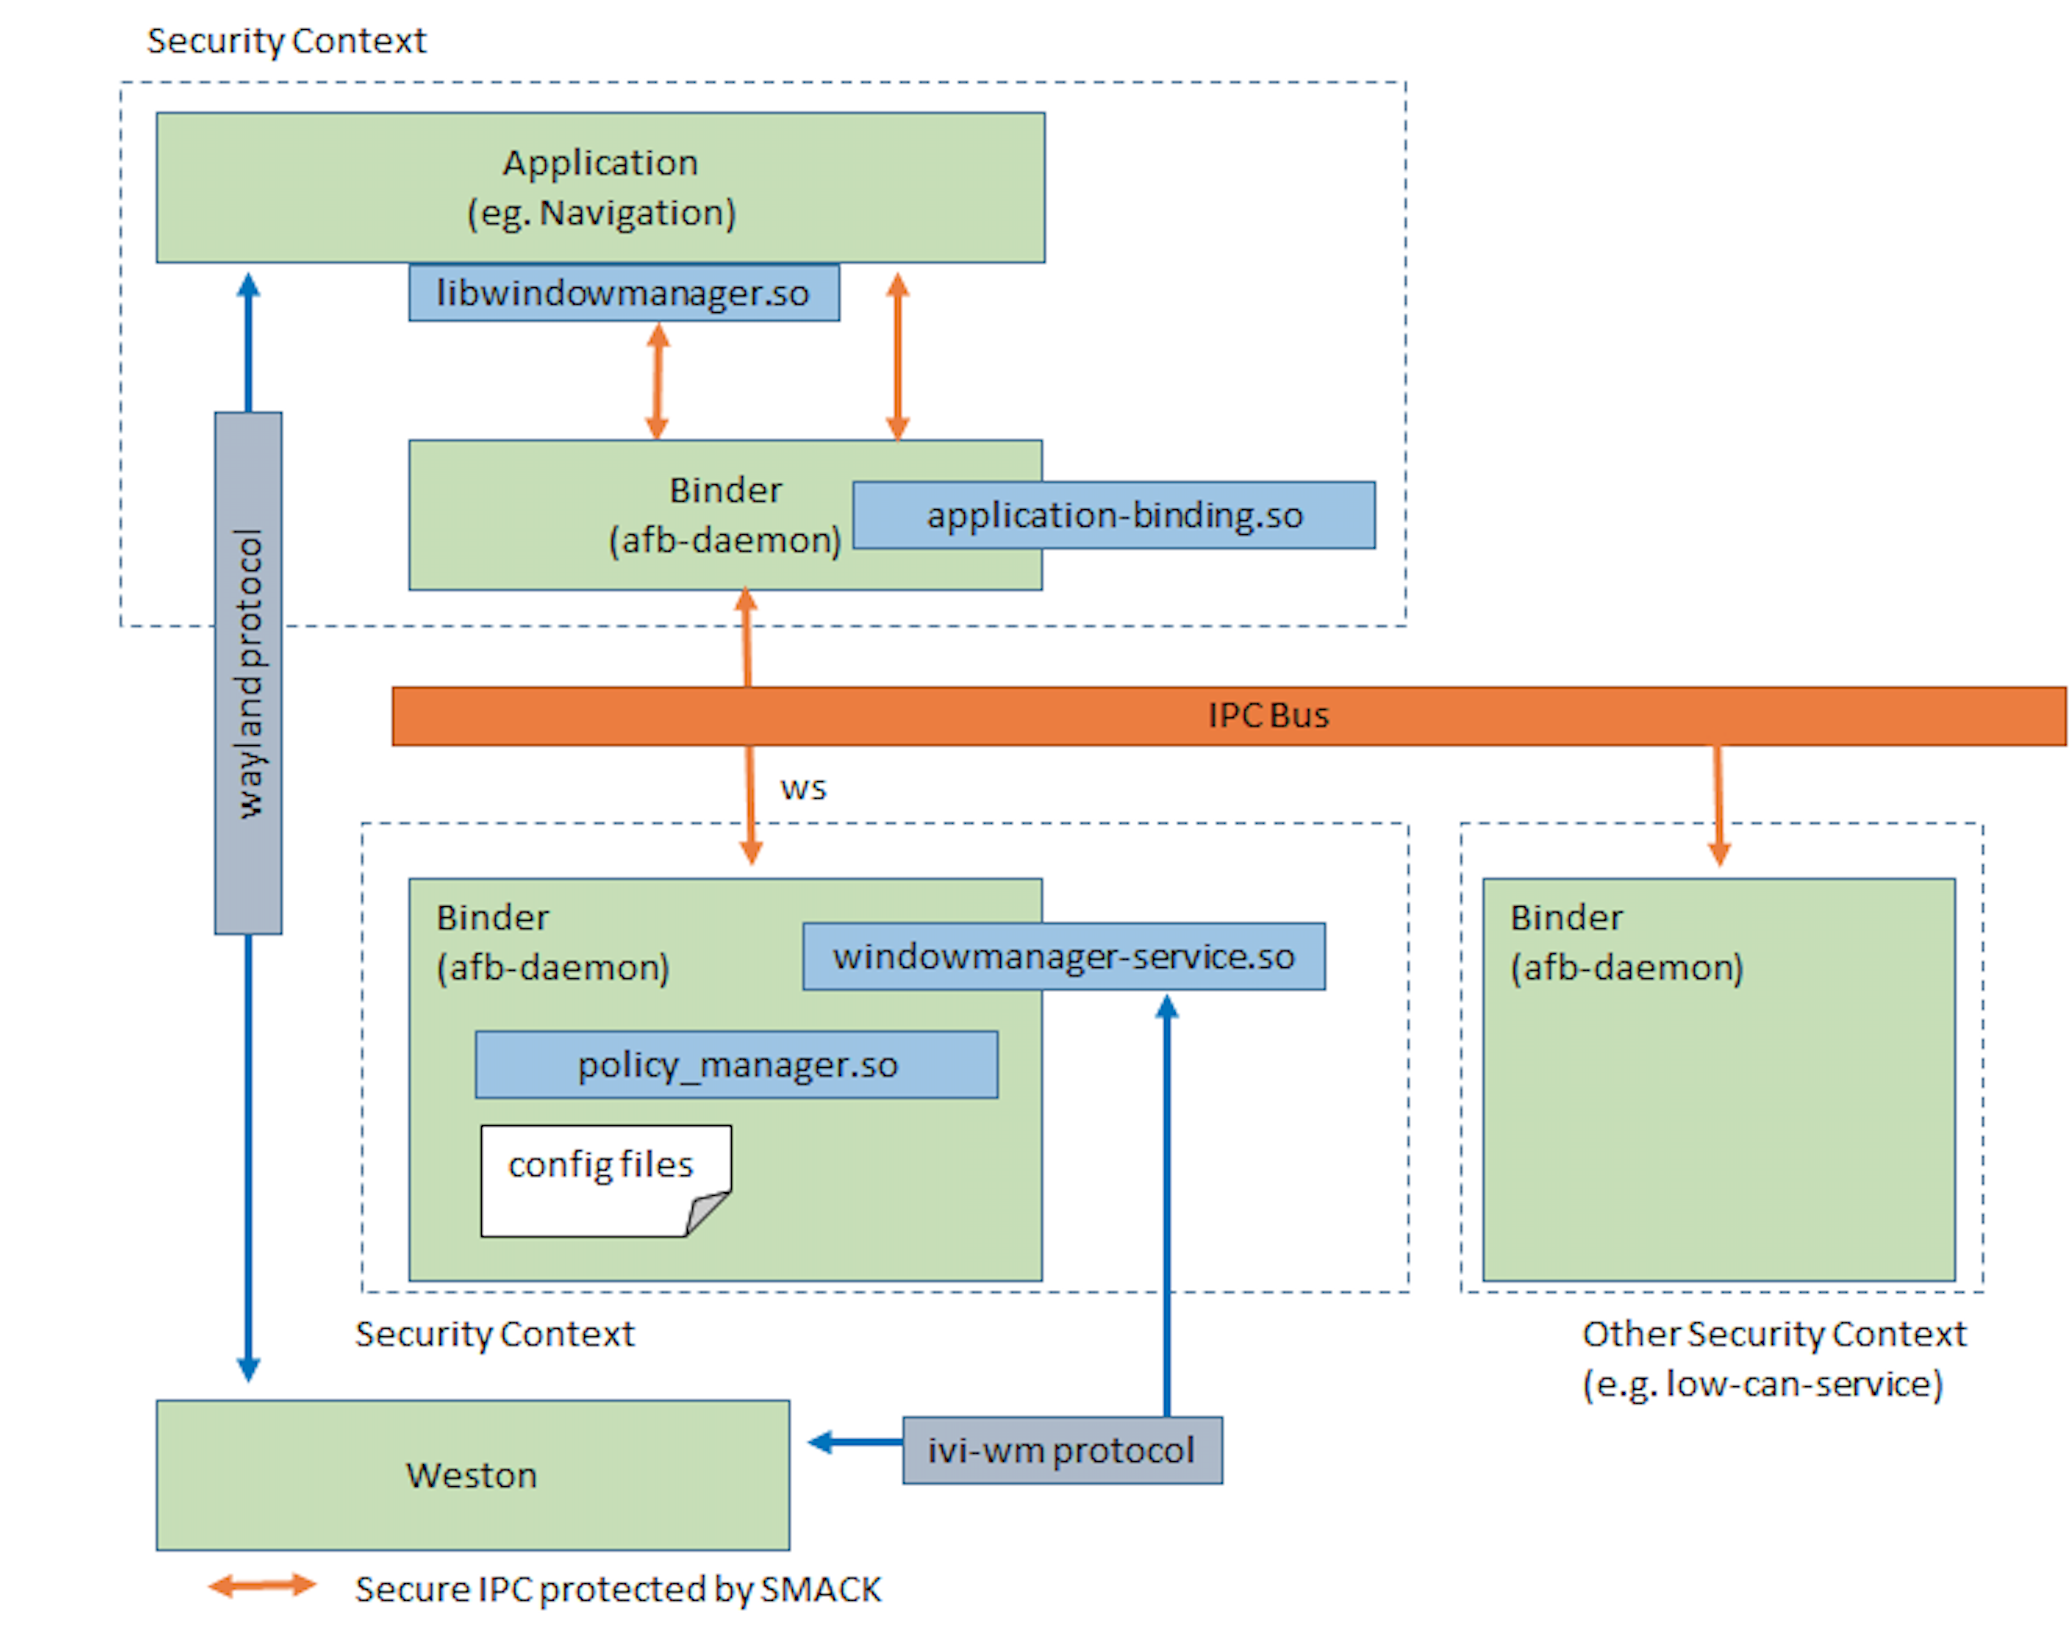
WindowManager模块包含四个部分:
afb-binder
服务绑定库
用于策略管理的共享库
配置文件
应用程序可以利用 libwindowmanager.so 来使用WindowManager的接口。接口包括下面这些:
int requestSurface(const char* role);
int requestSurfaceXDG(const char* role, unsigned ivi_id);
int activateWindow(const char* role, const char* area);
int activateWindow(const char* role);
int deactivateWindow(const char* role);
int endDraw(const char* role);
struct Screen getScreenInfo();
int getAreaInfo(const char* role, Rect *out_rect);
void setEventHandler(const WMHandler& wmh);
HomeScreen
桌面模块的实现包含在下面几个项目中:
homescreen:HomeScreenGUI,这是一个Qt的应用程序
launcher:LauncherGUI,这是一个Qt的应用程序
gl-service-homescreen:HomeScreenBinder的绑定库
libhomescreen:提供来给应用程序与HomeScreenBinder通讯的库
libqthomescreen:提供给Qt应用程序与HomeScreenBinder通讯的库,基于libhomescreen
libhomescreen中提供了一组接口用来管理桌面:这些接口的说明请参见 libhomescreen.cpp 文件。
int init(const int port, const std::string& token);

	int tapShortcut(const char* application_id);
	int onScreenMessage(const char* display_message);
	int onScreenReply(const char* reply_message);

	void set_event_handler(enum EventType et, handler_func f);

	void registerCallback(
		void (*event_cb)(const std::string& event, struct json_object* event_contents),
		void (*reply_cb)(struct json_object* reply_contents),
		void (*hangup_cb)(void) = nullptr);

	int call(const std::string& verb, struct json_object* arg);
	int call(const char* verb, struct json_object* arg);
	int subscribe(const std::string& event_name);
	int unsubscribe(const std::string& event_name);

	int showWindow(const char* application_id, json_object* json);
	int hideWindow(const char* application_id);
	int replyShowWindow(const char* application_id, json_object* json);
	int showNotification(json_object* json);
	int showInformation(json_object* json);
	int getRunnables(void);
例如,当有应用被点击的时候,被会调用showWindow接口显示影响的应用:
void HomescreenHandler::tapShortcut(QString application_id)
{


    HMI_DEBUG("Launcher","tapShortcut %s", application_id.toStdString().c_str());
    struct json_object* j_json = json_object_new_object();
    struct json_object* value;
    value = json_object_new_string("normal.full");
    json_object_object_add(j_json, "area", value);

    mp_hs->showWindow(application_id.toStdString().c_str(), j_json);
}
(13)在非WSL安装virtual-box启动已有的AGL
第一步在windows下安装vm:vm 6.0.24 windows以及扩展包(安装教程)
第二步:参考2. Virtual Box (Emulation)在VM中安装AGL
问题:
Call to WHvSetupPartition failed: ERROR_SUCCESS (Last=0xc000000d/87) (VERR_NEM_VM_CREATE_FAILED).
解决:
WSL和virtual,vm虚拟机存在冲突,所以开启WSL开关如下:
bcdedit /set hypervisorlaunchtype off
重启电脑
关闭虚拟机支持:参考
打开:
bcdedit /set hypervisorlaunchtype auto
重启电脑
Motes:
不要执行AGL中操作说明的下面这行代码:否则只显示终端了,不显示GUI了
VBoxManage setextradata agl-demo VBoxInternal2/EfiGraphicsResolution 1920x1080
===================================================================================================
1)在非WSL2中安装virtual box:6.0.24
- 注意wsl不支持virtualbox可以参考下
方法1:(不建议)
 sudo dpkg -i virtualbox-6.0_6.0.24-139119_Ubuntu_eoan_amd64.deb


方法2:
echo "deb [arch=amd64] http://download.virtualbox.org/virtualbox/debian $(lsb_release -cs) contrib" | \
     sudo tee -a /etc/apt/sources.list.d/virtualbox.list
 sudo apt update
 apt-cache search virtualbox
 apt-cache search virtualbox-ext-pack
sudo apt install virtualbox
sudo apt install  virtualbox-ext-pack
ref:如何在 Ubuntu 20.04 上安装 VirtualBox,Ubuntu:NO_PUBKEY(找不到公钥)问题的解决办法
方法2出现的问题:
wangji@script-wang:/mnt/d/ubunt_tmp$ sudo apt update
Get:3 http://download.virtualbox.org/virtualbox/debian focal InRelease [4431 B]
Err:3 http://download.virtualbox.org/virtualbox/debian focal InRelease
  The following signatures couldn't be verified because the public key is not available: NO_PUBKEY A2F683C52980AECF
Hit:4 https://download.docker.com/linux/ubuntu focal InRelease
Hit:5 https://mirrors.tuna.tsinghua.edu.cn/ubuntu focal InRelease
Hit:6 https://mirrors.tuna.tsinghua.edu.cn/ubuntu focal-updates InRelease
Hit:7 https://mirrors.tuna.tsinghua.edu.cn/ubuntu focal-backports InRelease
Hit:8 https://mirrors.tuna.tsinghua.edu.cn/ubuntu focal-security InRelease
Hit:1 https://scala.jfrog.io/artifactory/debian all InRelease
Ign:2 https://scala.jfrog.io/artifactory/debian  InRelease
Hit:9 https://scala.jfrog.io/artifactory/debian  Release
Reading package lists... Done
W: GPG error: http://download.virtualbox.org/virtualbox/debian focal InRelease: The following signatures couldn't be verified because the public key is not available: NO_PUBKEY A2F683C52980AECF
E: The repository 'http://download.virtualbox.org/virtualbox/debian focal InRelease' is not signed.
N: Updating from such a repository can't be done securely, and is therefore disabled by default.
N: See apt-secure(8) manpage for repository creation and user configuration details.
解决:添加下这个O_PUBKEY A2F683C52980AECF
1)gpg --keyserver keyserver.ubuntu.com --recv A2F683C52980AECF
    #  后面的字符串是NO_PUBKEY后的提供字符

2)gpg --export --armor A2F683C52980AECF| sudo apt-key add -
    #  注意命令最后面还有一个“-”,千万不要忘记了它!
2)使用virtualbox,按照2. Virtual Box (Emulation)教程启动vmdk文件即可
启动virtualbox:
方法2出现的问题:
wangji@script-wang:/mnt/d/ubunt_tmp$ sudo virtualbox
WARNING: The vboxdrv kernel module is not loaded. Either there is no module
         available for the current kernel (5.10.102.1-microsoft-standard-WSL2) or it failed to
         load. Please recompile the kernel module and install it by

           sudo /sbin/vboxconfig

         You will not be able to start VMs until this problem is fixed.


Qt WARNING: could not connect to display 172.19.128.1:0
Qt FATAL: This application failed to start because no Qt platform plugin could be initialized. Reinstalling the application may fix this problem.

Available platform plugins are: eglfs, linuxfb, minimal, minimalegl, offscreen, vnc, xcb.
解决:
 export QT_DEBUG_PLUGINS=1
 wangji@script-wang:/mnt/d/ubunt_tmp$ virtualbox
方法2出现的问题:
Unpacking virtualbox-dkms (6.1.38-dfsg-3~ubuntu1.20.04.1) over (6.1.38-dfsg-3~ubuntu1.20.04.1) ...
Setting up virtualbox-dkms (6.1.38-dfsg-3~ubuntu1.20.04.1) ...
Loading new virtualbox-6.1.38 DKMS files...
It is likely that 5.10.102.1-microsoft-standard-WSL2 belongs to a chroot's host
Building for 5.4.0-1013-iot and 5.4.0-146-generic
Module build for kernel 5.4.0-1013-iot was skipped since the
kernel headers for this kernel does not seem to be installed.
Building initial module for 5.4.0-146-generic
Done.
解决:
wangji@script-wang:~$ apt-cache search  5.4.0-1013-iot
wangji@script-wang:~$ supd apt-get install -y linux-headers-5.4.0-1013-iot
方法2出现的问题:
wangji@script-wang:~$ sudo dpkg --configure -a
Setting up grub-pc (2.04-1ubuntu26.16) ...
dpkg: error processing package grub-pc (--configure):
 installed grub-pc package post-installation script subprocess returned error exit status 10
dpkg: dependency problems prevent configuration of grub-gfxpayload-lists:
 grub-gfxpayload-lists depends on grub-pc (>= 1.99~20101210-1ubuntu2); however:
  Package grub-pc is not configured yet.
解决:
wangji@script-wang:~$ sudo dpkg --configure -a
Setting up grub-pc (2.04-1ubuntu26.16) ...
dpkg: error processing package grub-pc (--configure):
 installed grub-pc package post-installation script subprocess returned error exit status 10
dpkg: dependency problems prevent configuration of grub-gfxpayload-lists:
 grub-gfxpayload-lists depends on grub-pc (>= 1.99~20101210-1ubuntu2); however:
  Package grub-pc is not configured yet.
方法2出现的问题:
wangji@script-wang:~$ virtualbox
WARNING: The character device /dev/vboxdrv does not exist.
         Please install the virtualbox-dkms package and the appropriate
         headers, most likely linux-headers-standard.
解决:
wangji@script-wang:~$ sudo apt-get install --reinstall virtualbox-dkms -y
4.AGL应用开发
AGL系统既支持Web应用,也支持Native应用。系统框架会处理好不同类型应用的管理。
很显然,在进行AGL应用开发之前必须先获取相应的系统镜像。如果没有自己的编译环境,可以从官网上下载编译好的镜像。
AGL应用开发有两种模式:
- 使用Software Development Kit(简称SDK)
- 使用Cross Development System(简称XDS)
XDS是官方推荐的方式,XDS支持通过XDS dashboard 或XDS命令行在目标系统上构建,部署和运行个人项目。
关于如何开发AGL的应用程序请参见这里:Developer Guides。
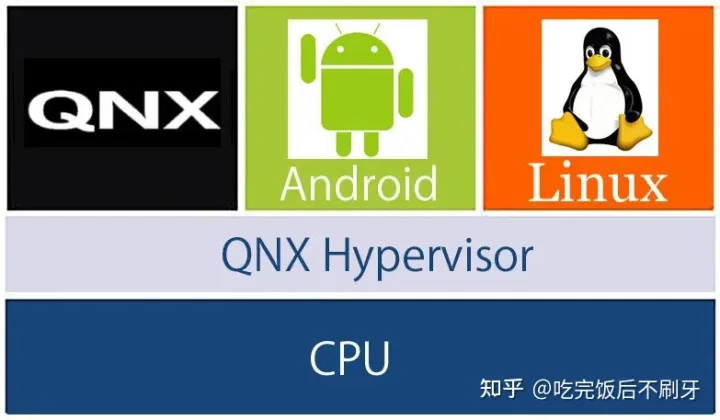
5.QNX Hypervisor
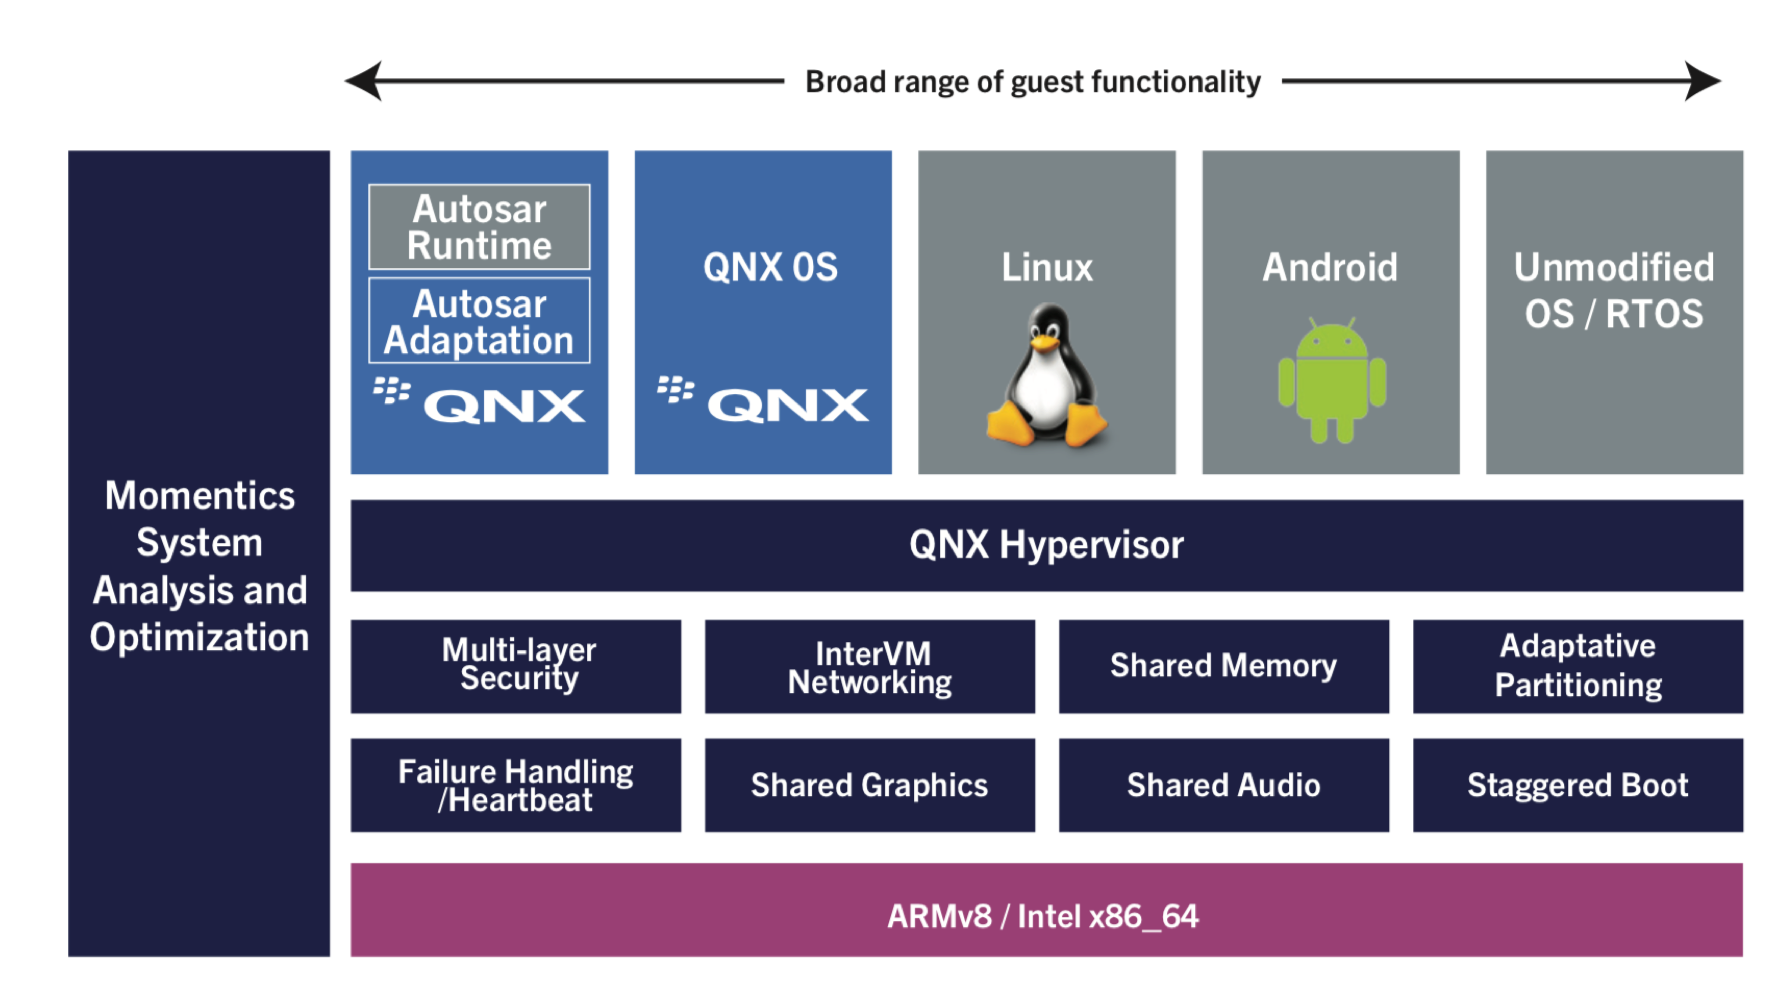
前面已经提到,目前IVI市场上占有率最高是黑莓的QNX系统。这主要是因为其安全稳定的特性。
不过,QNX本身是收费的商业软件,并不开源,因此对其深度化定制就比较难了。
好在QNX系统了Hypervisor功能,这个功能类似于电脑上的虚拟机功能:在QNX的基础上运行其他的操作系统,例如Linux或者Android系统。如下图所示:
ref: