一、TaskScheduler
TaskScheduler类是任务调度的基础抽象类,live555将任务分为三种类型,分别是延迟任务、事件任务和后台IO任务,在这个类中定义了三种任务的调度函数。
TaskScheduler类跟UsageEnvironment定义在相同的文件中UsageEnvironment/include/UsageEnvironment.h:
class TaskScheduler {


public:
  virtual ~TaskScheduler();

  virtual TaskToken scheduleDelayedTask(int64_t microseconds, TaskFunc* proc,
					void* clientData) = 0;
	// Schedules a task to occur (after a delay) when we next
	// reach a scheduling point.
	// (Does not delay if "microseconds" <= 0)
	// Returns a token that can be used in a subsequent call to
	// unscheduleDelayedTask() or rescheduleDelayedTask()
        // (but only if the task has not yet occurred).

  virtual void unscheduleDelayedTask(TaskToken& prevTask) = 0;
	// (Has no effect if "prevTask" == NULL)
        // Sets "prevTask" to NULL afterwards.
        // Note: This MUST NOT be called if the scheduled task has already occurred.

  virtual void rescheduleDelayedTask(TaskToken& task,
				     int64_t microseconds, TaskFunc* proc,
				     void* clientData);
        // Combines "unscheduleDelayedTask()" with "scheduleDelayedTask()"
        // (setting "task" to the new task token).
        // Note: This MUST NOT be called if the scheduled task has already occurred.

  // For handling socket operations in the background (from the event loop):
  typedef void BackgroundHandlerProc(void* clientData, int mask);
    // Possible bits to set in "mask".  (These are deliberately defined
    // the same as those in Tcl, to make a Tcl-based subclass easy.)
    #define SOCKET_READABLE    (1<<1)
    #define SOCKET_WRITABLE    (1<<2)
    #define SOCKET_EXCEPTION   (1<<3)
  virtual void setBackgroundHandling(int socketNum, int conditionSet, BackgroundHandlerProc* handlerProc, void* clientData) = 0;
  void disableBackgroundHandling(int socketNum) {

     setBackgroundHandling(socketNum, 0, NULL, NULL); }
  virtual void moveSocketHandling(int oldSocketNum, int newSocketNum) = 0;
        // Changes any socket handling for "oldSocketNum" so that occurs with "newSocketNum" instead.

  virtual void doEventLoop(char volatile* watchVariable = NULL) = 0;
      // Causes further execution to take place within the event loop.
      // Delayed tasks, background I/O handling, and other events are handled, sequentially (as a single thread of control).
      // (If "watchVariable" is not NULL, then we return from this routine when *watchVariable != 0)

  virtual EventTriggerId createEventTrigger(TaskFunc* eventHandlerProc) = 0;
      // Creates a 'trigger' for an event, which - if it occurs - will be handled (from the event loop) using "eventHandlerProc".
      // (Returns 0 iff no such trigger can be created (e.g., because of implementation limits on the number of triggers).)
  virtual void deleteEventTrigger(EventTriggerId eventTriggerId) = 0;

  virtual void triggerEvent(EventTriggerId eventTriggerId, void* clientData = NULL) = 0;
      // Causes the (previously-registered) handler function for the specified event to be handled (from the event loop).
      // The handler function is called with "clientData" as parameter.
      // Note: This function (unlike other library functions) may be called from an external thread
      // - to signal an external event.  (However, "triggerEvent()" should not be called with the
      // same 'event trigger id' from different threads.)

  // The following two functions are deprecated, and are provided for backwards-compatibility only:
  void turnOnBackgroundReadHandling(int socketNum, BackgroundHandlerProc* handlerProc, void* clientData) {


    setBackgroundHandling(socketNum, SOCKET_READABLE, handlerProc, clientData);
  }
  void turnOffBackgroundReadHandling(int socketNum) {

     disableBackgroundHandling(socketNum); }

  virtual void internalError(); // used to 'handle' a 'should not occur'-type error condition within the library.

protected:
  TaskScheduler(); // abstract base class
};
二、BasicTaskScheduler0
BasicTaskScheduler0类继承自TaskScheduler,是对TaskScheduler的初步实现,但是也是个抽象类,里面对三种任务对应的成员变量做了定义。
protected:
  // To implement delayed operations:
  DelayQueue fDelayQueue;

  // To implement background reads:
  HandlerSet* fHandlers;
  int fLastHandledSocketNum;

  // To implement event triggers:
  EventTriggerId volatile fTriggersAwaitingHandling; // implemented as a 32-bit bitmap
  EventTriggerId fLastUsedTriggerMask; // implemented as a 32-bit bitmap
  TaskFunc* fTriggeredEventHandlers[MAX_NUM_EVENT_TRIGGERS];
  void* fTriggeredEventClientDatas[MAX_NUM_EVENT_TRIGGERS];
  unsigned fLastUsedTriggerNum; // in the range [0,MAX_NUM_EVENT_TRIGGERS)
fDelayQueue用来管理延迟任务
fHandlers和fLastHandledSocketNum用来管理后台IO任务
其他几个成员变量用来管理事件任务。
1. SingleStep
SingleStep函数是个纯虚函数,在doEventLoop时调用。
void BasicTaskScheduler0::doEventLoop(char volatile* watchVariable) {


  // Repeatedly loop, handling readble sockets and timed events:
  while (1) {


    if (watchVariable != NULL && *watchVariable != 0) break;
    SingleStep();
  }
}
doEventLoop就是循环执行任务。
watchVariable时执行任务时的一个标志,当这个变量为NULL或它指向的内容为0时就停止任务。
所以SingleStep就是单步执行任务,具体实现在BasicTaskScheduler中。
2. 事件任务调度
本段先分析事件任务如何调度,延迟任务调度在DelayQueue介绍时再分析,后台IO任务要在BasicTaskScheduler介绍时再做分析。
先看这几个成员变量的定义
fTriggersAwaitingHandling 这是一个32位位图,这个变量的每位代表一个事件槽,如果该位为1,则代表对应的时间槽已经就绪,可以执行。
fLastUsedTriggerMask 这也一个32位位图,记录的是上次执行的事件任务,fLastUsedTriggerMask只有1位是1,该位就是上次执行事件的槽位。
fTriggeredEventHandlers是一个数组,用来存放具体的事件,其实就是函数指针。最多可以存放32个事件。
fTriggeredEventClientDatas也是一个数组,用来存放fTriggeredEventHandlers对应每个元素的用户数据。其实就是对应函数执行时候所需要的参数。
fLastUsedTriggerNum保存上次执行的事件槽。
1)创建事件任务
EventTriggerId BasicTaskScheduler0::createEventTrigger(TaskFunc* eventHandlerProc) {


  unsigned i = fLastUsedTriggerNum;
  EventTriggerId mask = fLastUsedTriggerMask;

  do {


    i = (i+1)%MAX_NUM_EVENT_TRIGGERS;
    mask >>= 1;
    if (mask == 0) mask = 0x80000000;

    if (fTriggeredEventHandlers[i] == NULL) {


      // This trigger number is free; use it:
      fTriggeredEventHandlers[i] = eventHandlerProc;
      fTriggeredEventClientDatas[i] = NULL; // sanity

      fLastUsedTriggerMask = mask;
      fLastUsedTriggerNum = i;

      return mask;
    }
  } while (i != fLastUsedTriggerNum);

  // All available event triggers are allocated; return 0 instead:
  return 0;
}
fLastUsedTriggerNum初始化时为31,fLastUsedTriggerMask初始化为1。这样在创建第一个任务时变保证了第一个任务对应的TriggerNum为(31+1)%32=0,且第一个任务对应的mask第一位为1。
可能稍微不太好理解,我们可以假设MAX_NUM_EVENT_TRIGGERS为4来理解,理解以后带入32位就可以了。
如果MAX_NUM_EVENT_TRIGGERS=4,那么fLastUsedTriggerNum初始化时为3,fLastUsedTriggerMask初始化为1。
那么当创建第一个任务时,i=0,mask右移一位为0,但是若mask=0,就把第一位置为1,即1000。
第二个任务时,i=1,mask右移一位0100。
第三个任务时,i=2,mask右移一位0010。
第四个任务时,i=3,mask右移一位0001。
第五个任务时,就又跟第一个任务对应的标志位一样了。所以其实就是第几个任务对应的mask的第几位就是1。带入到MAX_NUM_EVENT_TRIGGERS=32也很好理解,就不再赘述了。
值得注意的是,创建时只保存了对应的fTriggeredEventHandlers,fTriggeredEventClientDatas对应的槽位还是NULL。
2)触发事件任务
void BasicTaskScheduler0::triggerEvent(EventTriggerId eventTriggerId, void* clientData) {


  // First, record the "clientData".  (Note that we allow "eventTriggerId" to be a combination of bits for multiple events.)
  EventTriggerId mask = 0x80000000;
  for (unsigned i = 0; i < MAX_NUM_EVENT_TRIGGERS; ++i) {


    if ((eventTriggerId&mask) != 0) {


      fTriggeredEventClientDatas[i] = clientData;
    }
    mask >>= 1;
  }

  // Then, note this event as being ready to be handled.
  // (Note that because this function (unlike others in the library) can be called from an external thread, we do this last, to
  //  reduce the risk of a race condition.)
  fTriggersAwaitingHandling |= eventTriggerId;
}
触发任务就是根据eventTriggerId,也就是创建任务时任务对应的mask,来找到对应的槽位,并把槽位所对应的用户数据填充。
值得注意的是,triggerEvent并不是真正的执行事件,而是把fTriggersAwaitingHandling对应的位置1,表明该槽位对应的事件可以被执行了,等待调度到的时候再执行。
3)删除事件任务
void BasicTaskScheduler0::deleteEventTrigger(EventTriggerId eventTriggerId) {


  fTriggersAwaitingHandling &=~ eventTriggerId;

  if (eventTriggerId == fLastUsedTriggerMask) {

     // common-case optimization:
    fTriggeredEventHandlers[fLastUsedTriggerNum] = NULL;
    fTriggeredEventClientDatas[fLastUsedTriggerNum] = NULL;
  } else {


    // "eventTriggerId" should have just one bit set.
    // However, we do the reasonable thing if the user happened to 'or' together two or more "EventTriggerId"s:
    EventTriggerId mask = 0x80000000;
    for (unsigned i = 0; i < MAX_NUM_EVENT_TRIGGERS; ++i) {


      if ((eventTriggerId&mask) != 0) {


        fTriggeredEventHandlers[i] = NULL;
        fTriggeredEventClientDatas[i] = NULL;
      }
      mask >>= 1;
    }
  }
}
删除事件跟触发事件一样,都是通过eventTriggerId找到对应事件的槽位。删除时先把fTriggersAwaitingHandling对应的位置0。这里就体现出使用位图的优势了,直接用位运算就可以完成对应事件的标记。
找到对应的槽位后就把fTriggeredEventHandlers和fTriggeredEventClientDatas的对应槽位数据置为NULL。
代码中先判断eventTriggerId 是否就是fLastUsedTriggerMask,其实就是为了减省搜索过程,因为一般情况下都是执行一个任务后就把它删掉了。这种设计就是依据人们处理任务的习惯做的设计,可以提高检索效率。
三、DelayQueue
DelayQueue类定义了延迟任务的队列,包含了对延迟任务的增删减除等功能。
DelayQueue继承自DelayQueueEntry,DelayQueueEntry是DelayQueue的元素。
1、DelayQueueEntry
DelayQueueEntry是一个双向链表的元素,并且记录了需要延迟的时间。注意这个延迟的时间不是任务真正需要延迟的时间,而是deta延迟时间。什么意思呢,就是相对时间。
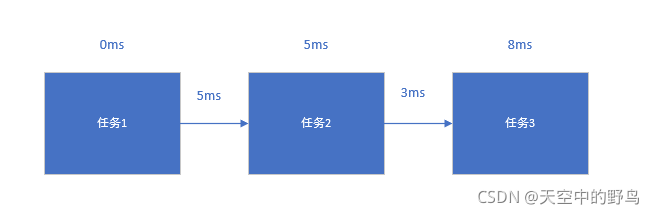
以上图为例,假设第一个任务已经到时可以执行了,也就是说当前第一个任务的延迟为0ms;第二个任务在第一个任务执行结束后还需要等待5ms(假设执行不耗时),则第二个任务的fDeltaTimeRemaining就是5ms。而第三个任务实际上还要等8ms才可以执行,那么他的fDeltaTimeRemaining就是8-5=3ms。
为什么要存储deta延迟,而不是按照先来后到存储实际延迟呢。可以设想一下,如果第二个任务的延迟时间是50ms,而第三个任务的延迟时间是3ms,按照FIFO的顺序,则第三个任务必须等待第二个任务执行完才可以执行,那么第三个任务就要等待53ms才能执行到了。所以live555是按照延迟的时间来形成延迟任务执行链表的。而使用deta延迟更方便计算。
2、添加延迟任务
void DelayQueue::addEntry(DelayQueueEntry* newEntry) {


  synchronize();

  DelayQueueEntry* cur = head();
  while (newEntry->fDeltaTimeRemaining >= cur->fDeltaTimeRemaining) {


    newEntry->fDeltaTimeRemaining -= cur->fDeltaTimeRemaining;
    cur = cur->fNext;
  }

  cur->fDeltaTimeRemaining -= newEntry->fDeltaTimeRemaining;

  // Add "newEntry" to the queue, just before "cur":
  newEntry->fNext = cur;
  newEntry->fPrev = cur->fPrev;
  cur->fPrev = newEntry->fPrev->fNext = newEntry;
}
因为新添加的元素的延迟时间都是基于当前的,所以每次添加元素前先进行同步,所谓同步就是根据当前时间更新deta延迟。
同步后找到新添加元素应该插入到队列的哪个位置,并且计算新元素相对于前一个任务的deta延迟后插入进DelayQueue中。
下面来看一下如何同步
void DelayQueue::synchronize() {


  // First, figure out how much time has elapsed since the last sync:
  _EventTime timeNow = TimeNow();
  if (timeNow < fLastSyncTime) {


    // The system clock has apparently gone back in time; reset our sync time and return:
    fLastSyncTime  = timeNow;
    return;
  }
  DelayInterval timeSinceLastSync = timeNow - fLastSyncTime;
  fLastSyncTime = timeNow;

  // Then, adjust the delay queue for any entries whose time is up:
  DelayQueueEntry* curEntry = head();
  while (timeSinceLastSync >= curEntry->fDeltaTimeRemaining) {


    timeSinceLastSync -= curEntry->fDeltaTimeRemaining;
    curEntry->fDeltaTimeRemaining = DELAY_ZERO;
    curEntry = curEntry->fNext;
  }
  curEntry->fDeltaTimeRemaining -= timeSinceLastSync;
}
首先获取当前时间,并且跟上次同步的时间对比,如果当前时间比上次同步的时间还早,说明时钟已经转了一圈了,重设上次同步时间并返回。
否则,计算出上次同步到这次同步过了多长时间了,然后根据过了的时间来更新DelayQueue中的deta时间。值得注意的是,这次同步时可能很多任务都超时了,所以要把那些任务的deta延迟都置位0。然后找到没超时的第一个任务,把这个任务的deta延迟减去过了的时间可以了(这也是使用deta任务的好处,就是每次只更新到未超时的第一个任务就可以了,因为是相对延迟时间,所以后面都不需要更新)。
3、更新延迟任务
有些延迟任务可能会更新自己的延迟时间,更新延迟任务的功能就是这个。
有两种更新方式,基于token和基于延迟任务指针的方式更新。
void DelayQueue::updateEntry(DelayQueueEntry* entry, DelayInterval newDelay) {


  if (entry == NULL) return;

  removeEntry(entry);
  entry->fDeltaTimeRemaining = newDelay;
  addEntry(entry);
}

void DelayQueue::updateEntry(intptr_t tokenToFind, DelayInterval newDelay) {


  DelayQueueEntry* entry = findEntryByToken(tokenToFind);
  updateEntry(entry, newDelay);
}
基于token的方式就是根据token找到对应的延迟任务指针后,根据基于延迟任务指针的方式更新。
更新比较简单粗暴,先把任务删掉再重新添加就行了。
4、删除延迟任务
void DelayQueue::removeEntry(DelayQueueEntry* entry) {


  if (entry == NULL || entry->fNext == NULL) return;

  entry->fNext->fDeltaTimeRemaining += entry->fDeltaTimeRemaining;
  entry->fPrev->fNext = entry->fNext;
  entry->fNext->fPrev = entry->fPrev;
  entry->fNext = entry->fPrev = NULL;
  // in case we should try to remove it again
}

DelayQueueEntry* DelayQueue::removeEntry(intptr_t tokenToFind) {


  DelayQueueEntry* entry = findEntryByToken(tokenToFind);
  removeEntry(entry);
  return entry;
}
删除延迟任务与更新延迟任务一样都是两种方式去删除。删除后要更新next的那个的deta延迟。(再次证明使用相对延迟的好处)
5、调度延迟任务
DelayInterval const& DelayQueue::timeToNextAlarm() {


  if (head()->fDeltaTimeRemaining == DELAY_ZERO) return DELAY_ZERO; // a common case

  synchronize();
  return head()->fDeltaTimeRemaining;
}
这个函数返回下个任务需要等待的时间,为任务调度时使用。
处理延迟任务在函数handleAlarm中
void DelayQueue::handleAlarm() {


  if (head()->fDeltaTimeRemaining != DELAY_ZERO) synchronize();

  if (head()->fDeltaTimeRemaining == DELAY_ZERO) {


    // This event is due to be handled:
    DelayQueueEntry* toRemove = head();
    removeEntry(toRemove); // do this first, in case handler accesses queue

    toRemove->handleTimeout();
  }
}
这个是延迟任务的调度函数。首先判断链表头部的任务是不是到时可以执行了,如果没到时就做一次同步,然后等待下次调度。
如果到时了,就把改任务从队列中移除。并处理任务,执行handleTimeout。
因为实际上BasicTaskScheduler0中使用的延迟任务对象是AlarmHandler类型的。
AlarmHandler继承自DelayQueueEntry,并重载了handleTimeout函数
  virtual void handleTimeout() {


    (*fProc)(fClientData);
    DelayQueueEntry::handleTimeout();
  }
也就是说,实际上处理延迟任务就是执行注册的延迟任务的函数,执行完后删除掉这个延迟任务的资源。
四、BasicTaskScheduler
BasicTaskScheduler是真正的任务调度类,继承于BasicTaskScheduler0,并且实现了具体了后台IO任务的调度。
1、生成BasicTaskScheduler对象
BasicTaskScheduler的构造函数是protected的,这意味着不能再类外直接new一个对象出来,所以想要创建任务调度对象,必须通过createNew的方式创建。
BasicTaskScheduler* BasicTaskScheduler::createNew(unsigned maxSchedulerGranularity) {


	return new BasicTaskScheduler(maxSchedulerGranularity);
}
maxSchedulerGranularity是最大调度间隔,表示在规定时间内至少完成一次调度。
createNew返回一个BasicTaskScheduler对象。
BasicTaskScheduler::BasicTaskScheduler(unsigned maxSchedulerGranularity)
  : fMaxSchedulerGranularity(maxSchedulerGranularity), fMaxNumSockets(0)
#if defined(__WIN32__) || defined(_WIN32)
  , fDummySocketNum(-1)
#endif
{


  FD_ZERO(&fReadSet);
  FD_ZERO(&fWriteSet);
  FD_ZERO(&fExceptionSet);

  if (maxSchedulerGranularity > 0) schedulerTickTask(); // ensures that we handle events frequently
}
在构造的时候初始化了fReadSet、fWriteSet和fExceptionSet。同时产生了schedulerTickTask延迟任务。
我们来看一下schedulerTickTask实现了什么功能:
void BasicTaskScheduler::schedulerTickTask(void* clientData) {


  ((BasicTaskScheduler*)clientData)->schedulerTickTask();
}

void BasicTaskScheduler::schedulerTickTask() {


  scheduleDelayedTask(fMaxSchedulerGranularity, schedulerTickTask, this);
}
其实就是把schedulerTickTask作为延迟任务放进延迟队列,当延迟任务调度到schedulerTickTask后,再把自己作为延迟任务放进延迟队列。简言之,就是以一定的时间周期执行schedulerTickTask。
看起来没啥意义啊,就定时执行一个没什么意义的函数而已,这个函数没做任何实际工作。什么作用呢?只看这里是看不出来的,要在SingleStep函数时才能知道。
2、后台IO任务调度
live555的BasicTaskScheduler是用select的方式实现IO多路复用。
1)设置后台IO任务
void BasicTaskScheduler
  ::setBackgroundHandling(int socketNum, int conditionSet, BackgroundHandlerProc* handlerProc, void* clientData) {


  if (socketNum < 0) return;
#if !defined(__WIN32__) && !defined(_WIN32) && defined(FD_SETSIZE)
  if (socketNum >= (int)(FD_SETSIZE)) return;
#endif
  FD_CLR((unsigned)socketNum, &fReadSet);
  FD_CLR((unsigned)socketNum, &fWriteSet);
  FD_CLR((unsigned)socketNum, &fExceptionSet);
  if (conditionSet == 0) {


    fHandlers->clearHandler(socketNum);
    if (socketNum+1 == fMaxNumSockets) {


      --fMaxNumSockets;
    }
  } else {


    fHandlers->assignHandler(socketNum, conditionSet, handlerProc, clientData);
    if (socketNum+1 > fMaxNumSockets) {


      fMaxNumSockets = socketNum+1;
    }
    if (conditionSet&SOCKET_READABLE) FD_SET((unsigned)socketNum, &fReadSet);
    if (conditionSet&SOCKET_WRITABLE) FD_SET((unsigned)socketNum, &fWriteSet);
    if (conditionSet&SOCKET_EXCEPTION) FD_SET((unsigned)socketNum, &fExceptionSet);
  }
}
这个设置后台任务包含了新建后台任务和删除后台任务两个功能。
当conditionSet为0时即是删除后台任务,通过HandlerSet类的clearHandler函数删除掉后台IO任务。
当conditionSet不为0时,通过HandlerSet类的assignHandler函数生成后台IO任务。
HandlerSet类后台IO任务的集合,实现对后台IO任务的增加、删除和移动。类的内容比较简单,就不做过多分析了。
2)移动Socket对应的任务
void BasicTaskScheduler::moveSocketHandling(int oldSocketNum, int newSocketNum) {


  if (oldSocketNum < 0 || newSocketNum < 0) return; // sanity check
#if !defined(__WIN32__) && !defined(_WIN32) && defined(FD_SETSIZE)
  if (oldSocketNum >= (int)(FD_SETSIZE) || newSocketNum >= (int)(FD_SETSIZE)) return; // sanity check
#endif
  if (FD_ISSET(oldSocketNum, &fReadSet)) {

    FD_CLR((unsigned)oldSocketNum, &fReadSet); FD_SET((unsigned)newSocketNum, &fReadSet);}
  if (FD_ISSET(oldSocketNum, &fWriteSet)) {

    FD_CLR((unsigned)oldSocketNum, &fWriteSet); FD_SET((unsigned)newSocketNum, &fWriteSet);}
  if (FD_ISSET(oldSocketNum, &fExceptionSet)) {

    FD_CLR((unsigned)oldSocketNum, &fExceptionSet); FD_SET((unsigned)newSocketNum, &fExceptionSet);}
  fHandlers->moveHandler(oldSocketNum, newSocketNum);

  if (oldSocketNum+1 == fMaxNumSockets) {


    --fMaxNumSockets;
  }
  if (newSocketNum+1 > fMaxNumSockets) {


    fMaxNumSockets = newSocketNum+1;
  }
}
这个函数实现了改变任务对应的socket,以及所在意的标志(读、写、异常)。
3)后台IO任务调度
BasicTaskScheduler的任务调度函数在SingleStep函数中。这个函数在父类的doEventLoop函数中被循环调用。也就是真正的调度函数。
  DelayInterval const& timeToDelay = fDelayQueue.timeToNextAlarm();
  struct timeval tv_timeToDelay;
  tv_timeToDelay.tv_sec = timeToDelay.seconds();
  tv_timeToDelay.tv_usec = timeToDelay.useconds();
  // Very large "tv_sec" values cause select() to fail.
  // Don't make it any larger than 1 million seconds (11.5 days)
  const long MAX_TV_SEC = MILLION;
  if (tv_timeToDelay.tv_sec > MAX_TV_SEC) {


    tv_timeToDelay.tv_sec = MAX_TV_SEC;
  }
  // Also check our "maxDelayTime" parameter (if it's > 0):
  if (maxDelayTime > 0 &&
      (tv_timeToDelay.tv_sec > (long)maxDelayTime/MILLION ||
       (tv_timeToDelay.tv_sec == (long)maxDelayTime/MILLION &&
	tv_timeToDelay.tv_usec > (long)maxDelayTime%MILLION))) {


    tv_timeToDelay.tv_sec = maxDelayTime/MILLION;
    tv_timeToDelay.tv_usec = maxDelayTime%MILLION;
  }
先是获取到下个延迟任务的延迟时间,判断这个延迟时间是不是超过了最大限制延迟时间,如果超了,就设置本次调度的超时时间为最大限制延迟时间,否则超时时间就是下个延迟任务的超时时间。
这里就知道schedulerTickTask函数的作用了。试下如果没有设置schedulerTickTask函数,且没有其他的延迟任务,那么延迟任务队列里就没有任何任务,那么从timeToNextAlarm()获取到的延迟时间就只能是默认值,这里的调度超时时间就不好控制了。
继续往下看后台IO任务的调度
  int selectResult = select(fMaxNumSockets, &readSet, &writeSet, &exceptionSet, &tv_timeToDelay);
  if (selectResult < 0) {


#if defined(__WIN32__) || defined(_WIN32)
    int err = WSAGetLastError();
    // For some unknown reason, select() in Windoze sometimes fails with WSAEINVAL if
    // it was called with no entries set in "readSet".  If this happens, ignore it:
    if (err == WSAEINVAL && readSet.fd_count == 0) {


      err = EINTR;
      // To stop this from happening again, create a dummy socket:
      if (fDummySocketNum >= 0) closeSocket(fDummySocketNum);
      fDummySocketNum = socket(AF_INET, SOCK_DGRAM, 0);
      FD_SET((unsigned)fDummySocketNum, &fReadSet);
    }
    if (err != EINTR) {


#else
    if (errno != EINTR && errno != EAGAIN) {


#endif
	// Unexpected error - treat this as fatal:
#if !defined(_WIN32_WCE)
	perror("BasicTaskScheduler::SingleStep(): select() fails");
	// Because this failure is often "Bad file descriptor" - which is caused by an invalid socket number (i.e., a socket number
	// that had already been closed) being used in "select()" - we print out the sockets that were being used in "select()",
	// to assist in debugging:
	fprintf(stderr, "socket numbers used in the select() call:");
	for (int i = 0; i < 10000; ++i) {


	  if (FD_ISSET(i, &fReadSet) || FD_ISSET(i, &fWriteSet) || FD_ISSET(i, &fExceptionSet)) {


	    fprintf(stderr, " %d(", i);
	    if (FD_ISSET(i, &fReadSet)) fprintf(stderr, "r");
	    if (FD_ISSET(i, &fWriteSet)) fprintf(stderr, "w");
	    if (FD_ISSET(i, &fExceptionSet)) fprintf(stderr, "e");
	    fprintf(stderr, ")");
	  }
	}
	fprintf(stderr, "\n");
#endif
	internalError();
      }
  }

  // Call the handler function for one readable socket:
  HandlerIterator iter(*fHandlers);
  HandlerDescriptor* handler;
  // To ensure forward progress through the handlers, begin past the last
  // socket number that we handled:
  if (fLastHandledSocketNum >= 0) {


    while ((handler = iter.next()) != NULL) {


      if (handler->socketNum == fLastHandledSocketNum) break;
    }
    if (handler == NULL) {


      fLastHandledSocketNum = -1;
      iter.reset(); // start from the beginning instead
    }
  }
  while ((handler = iter.next()) != NULL) {


    int sock = handler->socketNum; // alias
    int resultConditionSet = 0;
    if (FD_ISSET(sock, &readSet) && FD_ISSET(sock, &fReadSet)/*sanity check*/) resultConditionSet |= SOCKET_READABLE;
    if (FD_ISSET(sock, &writeSet) && FD_ISSET(sock, &fWriteSet)/*sanity check*/) resultConditionSet |= SOCKET_WRITABLE;
    if (FD_ISSET(sock, &exceptionSet) && FD_ISSET(sock, &fExceptionSet)/*sanity check*/) resultConditionSet |= SOCKET_EXCEPTION;
    if ((resultConditionSet&handler->conditionSet) != 0 && handler->handlerProc != NULL) {


      fLastHandledSocketNum = sock;
          // Note: we set "fLastHandledSocketNum" before calling the handler,
          // in case the handler calls "doEventLoop()" reentrantly.
      (*handler->handlerProc)(handler->clientData, resultConditionSet);
      break;
    }
  }
  if (handler == NULL && fLastHandledSocketNum >= 0) {


    // We didn't call a handler, but we didn't get to check all of them,
    // so try again from the beginning:
    iter.reset();
    while ((handler = iter.next()) != NULL) {


      int sock = handler->socketNum; // alias
      int resultConditionSet = 0;
      if (FD_ISSET(sock, &readSet) && FD_ISSET(sock, &fReadSet)/*sanity check*/) resultConditionSet |= SOCKET_READABLE;
      if (FD_ISSET(sock, &writeSet) && FD_ISSET(sock, &fWriteSet)/*sanity check*/) resultConditionSet |= SOCKET_WRITABLE;
      if (FD_ISSET(sock, &exceptionSet) && FD_ISSET(sock, &fExceptionSet)/*sanity check*/) resultConditionSet |= SOCKET_EXCEPTION;
      if ((resultConditionSet&handler->conditionSet) != 0 && handler->handlerProc != NULL) {


	fLastHandledSocketNum = sock;
	    // Note: we set "fLastHandledSocketNum" before calling the handler,
            // in case the handler calls "doEventLoop()" reentrantly.
	(*handler->handlerProc)(handler->clientData, resultConditionSet);
	break;
      }
    }
    if (handler == NULL) fLastHandledSocketNum = -1;//because we didn't call a handler
  }
先是进入select阻塞,超时时间就是上一步计算出来的本次调度超时时间。
如果selectResult<0表明有错误,就打印错误信息。
然后开始遍历fHandlers中的任务,如果有任务达到执行条件,就执行该任务(每次调度最多只执行一个后台IO任务、一个事件任务和一个延迟任务)。
值得注意的是,为保证每个后台IO任务都有机会被运行,所以先从上次运行的那个任务开始去遍历,如果找不到符合条件的任务,才从头去找。试想如果每次只是简单的从头开始遍历,那么假如队头的那个任务在每次调度的时候都达到了执行的条件,那么后面的任务不就都没机会执行了。
执行完后台IO任务,开始执行事件任务:
  // Also handle any newly-triggered event (Note that we do this *after* calling a socket handler,
  // in case the triggered event handler modifies The set of readable sockets.)
  if (fTriggersAwaitingHandling != 0) {


    if (fTriggersAwaitingHandling == fLastUsedTriggerMask) {


      // Common-case optimization for a single event trigger:
      fTriggersAwaitingHandling &=~ fLastUsedTriggerMask;
      if (fTriggeredEventHandlers[fLastUsedTriggerNum] != NULL) {


	(*fTriggeredEventHandlers[fLastUsedTriggerNum])(fTriggeredEventClientDatas[fLastUsedTriggerNum]);
      }
    } else {


      // Look for an event trigger that needs handling (making sure that we make forward progress through all possible triggers):
      unsigned i = fLastUsedTriggerNum;
      EventTriggerId mask = fLastUsedTriggerMask;

      do {


	i = (i+1)%MAX_NUM_EVENT_TRIGGERS;
	mask >>= 1;
	if (mask == 0) mask = 0x80000000;

	if ((fTriggersAwaitingHandling&mask) != 0) {


	  fTriggersAwaitingHandling &=~ mask;
	  if (fTriggeredEventHandlers[i] != NULL) {


	    (*fTriggeredEventHandlers[i])(fTriggeredEventClientDatas[i]);
	  }

	  fLastUsedTriggerMask = mask;
	  fLastUsedTriggerNum = i;
	  break;
	}
      } while (i != fLastUsedTriggerNum);
    }
  }
可以看到注释,防止事件任务在运行时会改变后台IO任务的状态,所以事件任务要在后台IO任务后面调度。
跟后台IO任务一样,都是确保每个任务都有机会运行,所以都是从上次执行的位置开始遍历运行。
最后调度延迟任务。
  // Also handle any delayed event that may have come due.
  fDelayQueue.handleAlarm();
五、基础调度总结
live555将任务分成三大类,分别是延迟任务、事件任务和后台IO任务。延迟任务通过DelayQueue进行管理调度,事件任务通过位图的结构进行管理调度,后台IO任务通过HandlerSet进行调度。
DelayQueue将延迟任务按照延迟时间存储在一个链表中,每个元素记录自己的任务函数和用户数据,以及相对于上个任务的相对延迟时间。
事件任务通过32位的位图来进行保存,为保证每个事件任务都有机会被执行,事件任务会记录上次执行的任务,并且每次调度从上次执行的任务开始遍历。
后台IO任务利用select机制实现IO的多路复用,并且为保证每个IO任务都有机会执行,也记录了上次执行的事件,并且每次调度从上次执行的任务开始遍历。