一、介绍
前面几篇文章已介绍了很多data binding的用法,今天我将会介绍一个新的方法绑定BindingMethod的用法。
BindingMethod,从名字可以看出是绑定方法的,绑定的一般都是和布局有关,通过绑定来提高布局可扩展性。
二、使用
BindingMethod是一个注解机制,单独的BindingMethod无法单一使用,需要搭配BindingMethods来使用,BindingMethod是BindingMethods的一个子项。
用法如下:
java
@BindingMethods({@BindingMethod(type = TextView.class, attribute = "text", method = "myText"), @BindingMethod(type = TextView.class, attribute = "android:text", method = "sysText")})Kotlin:
@BindingMethods(
    BindingMethod(type = TextView::class, attribute = "text", method = "myText"),
    BindingMethod(type = TextView::class, attribute = "android:text", method = "sysText")
)
1、BindingMethod源码分析
@Target(ElementType.ANNOTATION_TYPE)
public @interface BindingMethod {

    /**
     * @return the View Class that the attribute is associated with.
     */
    Class type();

    /**
     * @return The attribute to rename. Use android: namespace for all android attributes or
     * no namespace for application attributes.
     */
    String attribute();

    /**
     * @return The method to call to set the attribute value.
     */
    String method();
}
三个参数:
type:类型,如果你绑定的是textview,那么直接设置textview.class
attribute:属性,要拦截xml布局中哪个属性
1.系统:android:text
2.用户自定义:bind:text
method:对应type类中的方法名,一般都是单个参数,且是public,否则找不到
2、如何注册BindingMethods
BindingMethods的注册地方很随意,你可以用一个空类单独管理,也可以注册在指需要绑定的view头部,这样方便查看和管理
2.1、管理类
@BindingMethods(
    BindingMethod(type = TextView::class, attribute = "text", method = "myText"),
    BindingMethod(type = TextView::class, attribute = "android:text", method = "sysText")
)
class BindMethodControll {

}
方法类:
class TestTextView : TextView {
    constructor(context: Context?) : super(context) {}
    constructor(context: Context?, attrs: AttributeSet?) : super(context, attrs) {}

    fun myText(msg: String?) {
        mtoast(msg)
    }

    fun sysText(msg: String?) {
        mtoast(msg)
    }


    private fun mtoast(msg: String?) {
        Toast.makeText(context,msg,Toast.LENGTH_SHORT).show()
//        text=msg
    }
}
2.2、 关联类
@BindingMethods(
BindingMethod(type = TextView::class, attribute = "text", method = "myText"),
BindingMethod(type = TextView::class, attribute = "android:text", method = "sysText")
)
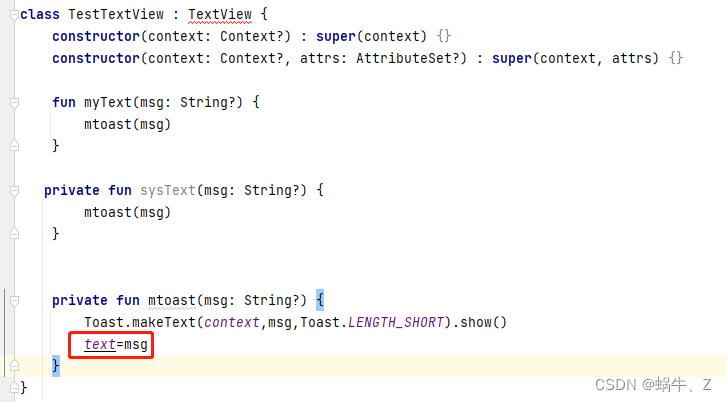
class TestTextView : TextView {
constructor(context: Context?) : super(context) {}
constructor(context: Context?, attrs: AttributeSet?) : super(context, attrs) {}
fun myText(msg: String?) {
mtoast(msg)
}
//不会被执行
private fun sysText(msg: String?) {
mtoast(msg)
}
private fun mtoast(msg: String?) {
Toast.makeText(context,msg,Toast.LENGTH_SHORT).show()
text=msg
}
}这样我们就对指定类的属性进行了拦截。
布局XML如下:
<?xml version="1.0" encoding="utf-8"?>
<layout xmlns:android="http://schemas.android.com/apk/res/android"
xmlns:bind="http://schemas.android.com/apk/res-auto">
<data class="MyBindMethod">
<import type="androidx.databinding.ObservableField" />
<variable
name="my"
type="ObservableField<String>" />
<variable
name="sys"
type="ObservableField<String>" />
</data>
<LinearLayout
android:layout_width="match_parent"
android:layout_height="match_parent"
android:orientation="vertical">
<EditText
android:layout_width="match_parent"
android:layout_height="wrap_content"
android:text="@={sys}" />
<com.example.wiik.testdemo.databinding.view.TestTextView
android:layout_width="match_parent"
android:layout_height="wrap_content"
android:text="@{sys}" />
<View
android:layout_width="match_parent"
android:layout_height="1dp"
android:layout_marginTop="5dp"
android:layout_marginBottom="5dp"
android:background="@color/black" />
<EditText
android:layout_width="match_parent"
android:layout_height="wrap_content"
android:text="@={my}" />
<com.example.wiik.testdemo.databinding.view.TestTextView
android:layout_width="match_parent"
android:layout_height="wrap_content"
bind:text="@{my}" />
</LinearLayout>
</layout>测试数据:
    lateinit var bind: MyBindMethod

    override fun onCreate(savedInstanceState: Bundle?) {
        super.onCreate(savedInstanceState)
        MyUtil.context=this;
        bind = DataBindingUtil.setContentView(this, R.layout.layout_bind_method)
        var my = ObservableField<String>("my")
        var sys = ObservableField<String>("sys")
        bind.my = my
        bind.sys = sys

    }
三、总结
拦截可能会导致内容被拦截了,如果出现不显示内容,需要单独处理。
如果方法是private,也不会被管理,看截图是灰色的,默认没有被生成的代码关联上,因为是private
如果三个参数对应的只要有一个不对,都会不起作用。所以设置的时候,需要格外注意。
关于BindingMethods添加在哪里?我建议是在需要处理的类上方,而且不同的类最好用不同的方法,这样可以避免对其他的布局产生影响。
这种写法也可以解决ImageView的图片加载问题和统一处理脏数据。