使用go语言开发部署链码
需要提前部署好测试网络,以下安装操作是基于测试网络的安装,fabric版本为2.4.1
注ps:链码在go版本1.13环境下会出问题,本文是在1.18环境下执行的,可以自行升级版本
第一步编写go链码
package main

import (
	"encoding/json"
	"fmt"
)
import "github.com/hyperledger/fabric-contract-api-go/contractapi"

//定义合约对象
type StudentContract struct {


	contractapi.Contract
}
//定义实体
type Student struct {


	Id      string `json:"id"`
	Name    string `json:"name"`
	Age     string `json:"age"`
	Address string `json:"address"`
}

//方便后期返回值接收
type QueryResult struct {


	Key    string `json:"key"`
	Record *Student
}

func init() {


}

//初始化链码
func (s *StudentContract) InitLedger(ctx contractapi.TransactionContextInterface) error {


	students := []Student{


		{


			Id:      "1",
			Name:    "zs",
			Age:     "23",
			Address: "北京",
		},
		{


			Id:      "2",
			Name:    "ls",
			Age:     "24",
			Address: "河南",
		},
		{


			Id:      "3",
			Name:    "ww",
			Age:     "25",
			Address: "hn",
		},
	}
	for _, student := range students {


		studentAsBytes, _ := json.Marshal(student)
		err := ctx.GetStub().PutState(student.Id, studentAsBytes)
		if err != nil {


			return fmt.Errorf("添加失败 %s", err.Error())
		}
	}
	return nil
}

//创建一个学生
func (s *StudentContract) CreateStudent(ctx contractapi.TransactionContextInterface, Id string, Name string, Age string, Address string) error {


	student := Student{


		Id:      Id,
		Name:    Name,
		Age:     Age,
		Address: Address,
	}
	studentAsBytes, _ := json.Marshal(student)
	return ctx.GetStub().PutState(student.Id, studentAsBytes)
}

//查询一个学生
func (s *StudentContract) QueryStudent(ctx contractapi.TransactionContextInterface, studentId string) (*Student, error) {


	studentAsBytes, err := ctx.GetStub().GetState(studentId)
	if err != nil {


		return nil, fmt.Errorf("查询失败 %s", err.Error())
	}
	if studentAsBytes == nil {


		return nil, fmt.Errorf("%s 不存在", studentId)
	}
	student := new(Student)
	_ = json.Unmarshal(studentAsBytes, student)
	return student, nil
}

//查询全部学生
func (s *StudentContract) QueryAllStudents(ctx contractapi.TransactionContextInterface) ([]QueryResult, error) {


	startKey := ""
	endKey := ""
	resultsIterator, err := ctx.GetStub().GetStateByRange(startKey, endKey)
	if err != nil {


		return nil, err
	}
	defer resultsIterator.Close()
	results := []QueryResult{

    }
	for resultsIterator.HasNext() {


		queryResponse, err := resultsIterator.Next()
		if err != nil {


			return nil, err
		}
		student := new(Student)
		_ = json.Unmarshal(queryResponse.Value, student)
		queryResult := QueryResult{

    Key: queryResponse.Key, Record: student}
		results = append(results, queryResult)
	}
	return results, nil
}

//更新学生姓名
func (s *StudentContract) UpdateStudentName(ctx contractapi.TransactionContextInterface, studentId string, studentName string) error {


	student, err := s.QueryStudent(ctx, studentName)
	if err != nil {


		return err
	}
	student.Name = studentName
	studentAsByte, _ := json.Marshal(student)
	return ctx.GetStub().PutState(studentId,studentAsByte)
}
func main() {


	chaincode, err := contractapi.NewChaincode(new(StudentContract))
	if err!=nil {


		fmt.Errorf("Error create fabcar chaincode: %s", err.Error())
	}
	if err := chaincode.Start(); err != nil {


		fmt.Printf("Error starting fabcar chaincode: %s", err.Error())
	}
}
这个是根据fabcar修改的go链码,把这个代码文件放到想要安装的目录即可
我把这个文件放到了/fabric/fabric-samples/test-network/mychaincode/studentcontract目录,命名为了main.go文件

第二步编译go的链码
在该目录下执行命令进行编译
可选操作,检查自己go的代理是否有配置,可以配置下代理
export GOPROXY="https://goproxy.cn"
go mod init 项目名 # 示例 go mod init studentcontract
go mod tidy
go mod vendor
执行完成以后在该目录下生成的目录结构,

第三步部署go链码
切换到test-network目录下,执行命令
./network.sh deployCC -ccn studentcontract -ccp /fabric/fabric-samples/test-network/mychaincode/studentcontract -ccl go
解释该命令:根据自己的情况进行部署
| 参数 | 值 | 含义 |
|---|---|---|
| -ccn | studentcontract | 指定合约名字 |
| -ccp | /fabric/fabric-samples/test-network/mychaincode/studentcontract | 合约所在目录 |
| ccl | go | 合约所使用的语言 |
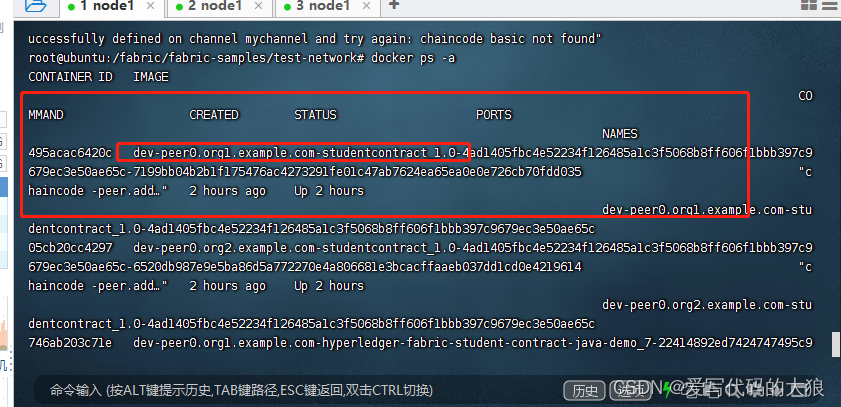
链码部署成功

可以使用docker ps -a 命令查看链码
docker ps -a
即可完成调用,go写的链码也是可以通过java来进行调用的