一、DLL文件的导出
1.新建win32项目,选择DLL empty Project
2.头文件
// 下列 ifdef 块是创建使从 DLL 导出更简单的
// 宏的标准方法。此 DLL 中的所有文件都是用命令行上定义的 UNITYCALL_EXPORTS
// 符号编译的。在使用此 DLL 的
// 任何其他项目上不应定义此符号。这样,源文件中包含此文件的任何其他项目都会将
// UNITYCALL_API 函数视为是从 DLL 导入的,而此 DLL 则将用此宏定义的
// 符号视为是被导出的。
#ifdef UNITYCALL_EXPORTS
#define UNITYCALL_API __declspec(dllexport)//宏定义方便书写
#else
#define UNITYCALL_API __declspec(dllimport)
#endif

// 此类是从 UnityCall.dll 导出的
class UNITYCALL_API CUnityCall {
public:
	CUnityCall(void);
	// TODO:  在此添加您的方法。
};

extern UNITYCALL_API int nUnityCall;

extern"C" UNITYCALL_API int fnUnityCall(void);
extern"C" UNITYCALL_API void Fun(int* a);
此处定义了宏定义UNITYCALL_API,为了方便书写(因为__declspec(dllexport)容易打错字)。
特别注意:方法要加上extern"C",不然导出后的dll被调用时会找不到指定的方法报错。
3.源文件给出相应方法的实现
// UnityCall.cpp : 定义 DLL 应用程序的导出函数。
//

#include "stdafx.h"
#include "UnityCall.h"


// 这是导出变量的一个示例
UNITYCALL_API int nUnityCall=42;

// 这是导出函数的一个示例。
UNITYCALL_API int fnUnityCall(void)
{
    return nUnityCall;
}

UNITYCALL_API void Fun(int* a) {
	*a = 60;
}

// 这是已导出类的构造函数。
// 有关类定义的信息,请参阅 UnityCall.h
CUnityCall::CUnityCall()
{
    return;
}
4.导出DLL,选择release,根据项目需要导出X86还是X64,然后将导出的dll文件放到unity的plugins文件夹下,点击dll文件可以看到dll import settings面板如下:

需要注意:如果unity编辑器是64位的,而导入的dll是32位的,在编辑器中是无法识别dll的会报错,需要重新导出64的dll,如果项目是X86的,在buildsetting面板可以看到:
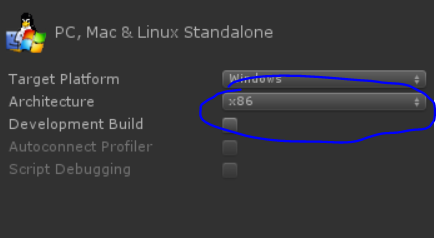
则需要对dll设置,在dll import settings面板中将32位的dll的build选项勾选x86,将64位的dll的build选项取消勾选即可。
5.unity创建代码来调用dll方法:
using UnityEngine;
using System.Collections;
using System.Runtime.InteropServices;

public class DLLTest : MonoBehaviour
{
    private int a = 0;


    [DllImport("UnityCall")]
    public static extern void Fun(ref int a);
    [DllImport("UnityCall")]
    public static extern int fnUnityCall();
    // Use this for initialization
    void Start()
    {
        //Fun(ref a);
        a = fnUnityCall();
        print(a);
    }

}
需要注意定义的方法名称要和dll中的相同。
运行以上代码即可输出相应的结果。