这里介绍一种web服务部署方式,提供接口服务。基于flask+uwsgi+nginx实现web应用部署,实现逻辑如下图所示:

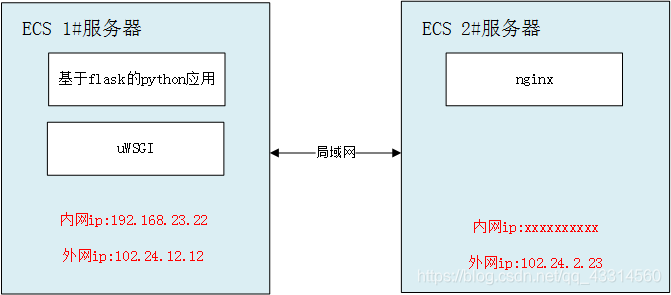
项目基于两台阿里云ECS服务器进行部署,物理拓扑图如下:
接下来分三方面介绍项目实现过程。
1、基于flask的python应用
这里包含两个脚本run.py 和 main.py
run.py:
#!usr/bin/env python
# _*_ coding:utf-8 _*_
"""python
Created on 2020/8/19
@author:
@theme:接口开发
"""
from main import app
if __name__ == "__main__":
    app.run()
    # app.run(host="0.0.0.0", port=8080, debug=True, threaded=True)
main.py
#!usr/bin/env python
# _*_ coding:utf-8 _*_
# pylint: disable=no-member
"""python
Created on 2019/2/10
@author:
@theme:接口开发
"""
import datetime
import time
import pandas as pd
from flask import Flask, jsonify, request
from flask_limiter import Limiter
from flask_limiter.util import get_remote_address
#from flask_redis import FlaskRedis
from utilities import log
from utilities.mysql_conn import get_conn
import config
import get_data_funs
import AES_funs

app = Flask(__name__)
#redis_client = FlaskRedis(app)
limiter = Limiter(
    app,
    key_func=get_remote_address,   # 根据访问者的IP记录访问次数
    default_limits=["10000 per day", "1000 per hour"], # 默认限制,一天最多访问1000次,一小时最多访问100次
    #storage_uri="redis://localhost:6379/0"  #需开启redis服务器
)

# 查询接口apikey账号所拥有的权限列表
@app.route('/queryStationID', methods=['POST'])
def get_station_id():
    sub_log = log.logger.getChild("get_station_id")
    # 获取用户的ip、访问客户端类型、访问url
    user_ip = request.remote_addr
    # user_agent = request.headers.get("User-Agent")
    visit_url = request.url
    proc_time = datetime.datetime.now().strftime('%Y-%m-%d %H:%M:%S')  # 获取当前系统时间
    # 默认返回内容
    return_dict = {

    'return_code': 200, 'return_msg': 'success', 'proc_time': proc_time, 'station_id_list': ''}

    # 获取入参并判断入参是否填写
    params = request.get_json(force=True)  # 获取请求体body为raw的参数
    apikey = params['apikey']

    if (apikey): # 参数全部填写
        # 判断apikey的状态是否正常且是否过期失效
        sql_valid_apikey = "SELECT * from table WHERE status = 1 and DATEDIFF(invalid_time,NOW())>=0 " \
                           "and apikey='{}';".format(apikey)
        apikey_record = pd.read_sql(sql_valid_apikey, con=get_conn(config.username, config.password, config.hostname,
                                                                   config.port, config.database))

        if (apikey_record.empty is False):  # apikey 有效
            # 查询该apikey对应的station_id
            sql_valid_authority = "select * from table1 where status =1 and apikey='{}' " .format(apikey)
            authority_record = pd.read_sql(sql_valid_authority,
                                           con=get_conn(config.username, config.password, config.hostname,
                                                        config.port, config.database))
            if (authority_record.empty is False): #station_id  有效
                station_id = authority_record['station_id'].tolist()
                return_dict['station_id_list'] = station_id
                return jsonify(return_dict)
main.py脚本里删除了部分内容,涉及项目隐私,仅示例说明一下flask实现接口开发
2、uwsgi
基于uwsgi.ini这样的配置文件,在ECS 1#服务器上运行服务。
在上述python脚本所在目录下新建文本 uwsgi.ini ,文本内容:
[uwsgi]

module = run:app    #要注意服务器默认python解释器能否执行run.py中的app  可指定python解释器

master = true

processes = 3

chdir = /home/restful

socket = %(chdir)/myproject.sock

socket = 192.168.23.22:5000     # 这里的ip必须是ECS1#服务器的内网地址

daemonize = %(chdir)/myapp_uwsgi.log

chmod-socket = 660

vacuum = true

stats = %(chdir)/uwsgi.status

pidfile = %(chdir)/uwsgi.pid
uwsgi的相关命令总结如下:
# 启动uwsgi服务命令
uwsgi --ini uwsgin.ini

# 查看一下uwsgi的进程
ps aux | grep uwsgi

# 重启uwsgi服务命令
uwsgi --reload uwsgi.pid

# 显示进程和worker的状态
uwsgi --connect-and-read uwsgi/uwsgi.status

# 停止uwsgi服务命令
uwsgi --stop uwsgi.pid
3、nginx
通过nginx.conf配置文件启动nginx服务,配置文件内容如下:
worker_processes 6;
events{

    worker_connections 6144;}
http{


    include /etc/nginx/mime.types;
    default_type application/octet_stream;
    server{


        listen 1543;
        access_log /home/project_nginx/logs/access.log combined;
        error_log /home/project_nginx/logs/error.log error;
        location / {


            include /etc/nginx/uwsgi_params;
            uwsgi_pass 102.24.12.12:5000;   //ECS1#服务器的外网ip
        }
    }
}
nginx使用相关命令如下:
#nginx启动
nginx -c /home/project_nginx/nginx.conf

# nginx重载
nginx -s reload -c /home/project_nginx/nginx.conf

# nginx 停止
nginx -s stop

# 日志切割
0 0 * * * sh /home/project_nginx/nginx_log.sh
日志切割脚本nginx_log.sh内容如下:
#!/bin/bash
#设置日志文件存放目录

LOG_HOME="/home/project_nginx/logs/"
#备分文件名称
LOG_PATH_BAK="$(date -d yesterday +%Y%m%d%H%M)".access.log
#重命名日志文件
mv ${

    LOG_HOME}/access.log ${

    LOG_HOME}/${

    LOG_PATH_BAK}.log
#向nginx主进程发信号重新打开日志
kill -USR1 `cat /run/nginx.pid`
小结
这个项目启动uwsgi和nginx服务后,正常就可以通过ECS 2#服务器的外网ip及监听端口号1543及请求route地址,就能够调用接口。
这里头涉及的配置文件中的参数都是可以进行调整的。阿里云ECS服务器有内外网地址区分,配置文件涉及ip地址部分需格外注意。