1、下载网络yum源
[root@centos7_4 ~]# wget http://mirrors.aliyun.com/repo/Centos-7.repo -P /etc/yum.repos.d/ #这里安装的是阿里的网络源,epel扩展源,也可以安装阿里的,但是阿里的epel源有些包不全,所以下面就直接用yum安装网络epel源
[root@centos7_4 ~]# yum -y install epel-release
[root@centos7_4 ~]# ls /etc/yum.repos.d/
back Centos-7.repo CentOS-Media.repo epel.repo epel-testing.repo
[root@centos7_4 ~]# yum clean all;yum makecache
2 源码编译安装nginx
2.1 安装依赖包:
[root@centos7_4 ~]# yum -y install gcc gcc-c++ autoconf automake zlib zlib-devel openssl openssl-devel pcre*
2.2 创建nginx运行用户
[root@centos7_4 ~]# useradd -M -s /sbin/nologin nginx
下载pcre包
[root@centos7_4 ~]# wget https://jaist.dl.sourceforge.net/project/pcre/pcre/8.42/pcre-8.42.zip
[root@centos7_4 ~]# unzip pcre-8.42.zip -d /usr/local/src/
2.3 下载nginx源码包并解压
[root@centos7_4 ~]# wget http://nginx.org/download/nginx-1.14.0.tar.gz
[root@centos7_4 ~]# tar zxf nginx-1.14.0.tar.gz -C /usr/local/src/
[root@centos7_4 ~]# cd /usr/local/src/nginx-1.14.0/
[root@centos7_4 nginx-1.14.0]# ./configure --prefix=/usr/local/nginx \
--with-http_dav_module \
--with-http_stub_status_module \
--with-http_addition_module \
--with-http_sub_module \
--with-http_flv_module \
--with-http_mp4_module \
--with-http_ssl_module \
--user=nginx \
--group=nginx \
--with-pcre=/usr/local/src/pcre-8.42 \ #这个是可选项,如果yum安装了依赖包这里也可以不用
2.4 编译并安装
[root@centos7_4 nginx-1.14.0]# echo $?
0
[root@centos7_4 nginx-1.14.0]# make
[root@centos7_4 nginx-1.14.0]# echo $?
0
[root@centos7_4 nginx-1.14.0]# make install
[root@centos7_4 nginx-1.14.0]# echo $?
0
2.5 修改配置文件
[root@centos7_4 nginx-1.14.0]# vim /usr/local/nginx/conf/nginx.conf
user nginx nginx; #修改用户和组
location ~ \.php$ {
root html;
fastcgi_pass 127.0.0.1:9000;
fastcgi_index index.php;
fastcgi_param SCRIPT_FILENAME /usr/local/nginx/html$fastcgi_script_name; #修改路径
include fastcgi_params;
}
2.6 添加环境变量,优化nginx服务
[root@centos7_4 ~]# nginx -t #检查nginx语法是否正确
nginx: the configuration file /usr/local/nginx/conf/nginx.conf syntax is ok
nginx: configuration file /usr/local/nginx/conf/nginx.conf test is successful
[root@centos7_4 ~]# /usr/local/nginx/sbin/nginx #安装好的启动路径
[root@centos7_4 ~]# vim /etc/profile #添加环境变量
export PATH=$PATH:/usr/local/nginx/sbin
[root@centos7_4 ~]# source /etc/profile
[root@centos7_4 ~]# nginx
[root@centos7_4 ~]# netstat -antup|grep nginx
tcp 0 0 0.0.0.0:80 0.0.0.0:* LISTEN 7417/nginx: master
[root@centos7_4 ~]# vim /etc/init.d/nginx #配置启动脚本
#!/bin/bash
# chkconfig: 2345 99 20
#description: nginx-server
nginx=/usr/local/nginx/sbin/nginx
case $1 in
start)
netstat -anptu | grep nginx
if [ $? -eq 0 ]
then
echo "nginx service is already running"
else
echo "nginx Service started successfully "
$nginx
fi
;;
stop)
$nginx -s stop
if [ $? -eq 0 ]
then
echo "nginx service closed successfully"
else
echo "nginx server stop fail,try again"
fi
;;
status)
netstat -anlpt | grep nginx
if [ $? -eq 0 ]
then
echo "nginx server is running"
else
echo "nginx service not started "
fi
;;
restart)
$nginx -s reload
if [ $? -eq 0 ]
then
echo "nginx service restart successfully "
else
echo "nginx server restart failed"
fi
;;
*)
echo "please enter {start restart status stop}"
;;
esac
[root@centos7_4 ~]# chmod +x /etc/init.d/nginx
[root@centos7_4 ~]# chkconfig --add nginx
[root@centos7_4 ~]# chkconfig nginx on
3 源码安装MySQL
3.1 卸载系统自带的mariadb*
[root@centos7_4 ~]# yum -y remove mariadb* boost-*
3.2 安装依赖包
[root@centos7_4 ~]# yum install -y cmake make gcc gcc-c++ bison ncurses ncurses-devel
3.3 下载源码包
[root@centos7_4 ~]# wget https://cdn.mysql.com/archives/mysql-5.7/mysql-boost-5.7.20.tar.gz
3.4 解压源码包
[root@centos7_4 ~]# tar zxf mysql-boost-5.7.20.tar.gz -C /usr/local/src/
3.5 配置编译并安装
[root@centos7_4 ~]# cd /usr/local/src/mysql-5.7.20/
[root@centos7_4 mysql-5.7.20]# cmake -DCMAKE_INSTALL_PREFIX=/usr/local/mysql \
-DMYSQL_DATADIR=/usr/local/mysql/data \
-DDOWNLOAD_BOOST=1 \
-DWITH_BOOST=/usr/local/src/mysql-5.7.20/boost/boost_1_59_0 \
-DSYSCONFDIR=/etc \
-DWITH_MYISAM_STORAGE_ENGINE=1 \
-DWITH_INNOBASE_STORAGE_ENGINE=1 \
-DWITH_MEMORY_STORAGE_ENGINE=1 \
-DWITH_ARCHIVE_STORAGE_ENGINE=1 \
-DWITH_FEDERATED_STORAGE_ENGINE=1 \
-DWITH_BLACKHOLE_STORAGE_ENGINE=1 \
-DWITH_PARTITION_STORAGE_ENGINE=1 \
-DWITH_READLINE=1 \
-DMYSQL_UNIX_ADDR=/usr/local/mysql/mysql.sock \
-DMYSQL_TCP_PORT=3306 \
-DENABLED_LOCAL_INFILE=1 \
-DENABLE_DTRACE=0 \
-DEXTRA_CHARSETS=all \
-DDEFAULT_CHARSET=utf8 \
-DDEFAULT_COLLATION=utf8_general_ci \
-DMYSQL_USER=mysql \
编译并安装
[root@centos7_4 mysql-5.7.20]# make
[root@centos7_4 mysql-5.7.20]# make install
3.6 创建数据库用户和数据目录
[root@centos7_4 ~]# useradd -M -s /sbin/nologin -r mysql
[root@centos7_4 ~]# mkdir -p /usr/local/mysql/data #创建数据存储目录
[root@centos7_4 ~]# chown -R mysql.mysql /usr/local/mysql/ #更改属主数组为MySQL
3.7 配置my.cnf文件
[root@centos7_4 ~]# vim /etc/my.cnf #以下是简单配置
[mysqld]
basedir=/usr/local/mysql
datadir=/usr/local/mysql/data
port=3306
socket=/usr/local/mysql/mysql.sock
symbolic-links=0
character-set-server=utf8
pid-file=/usr/local/mysql/mysqld.pid
log-error=/var/log/mysqld.log
3.8 配置MySQL启动脚本
[root@centos7_4 mysql]# cp /usr/local/mysql/support-files/mysql.server /etc/init.d/mysqld #复制启动脚本到/etc/init.d
[root@centos24 mysql-5.7.20]# ll /etc/init.d/mysqld #默认拥有执行权限
-rwxr-xr-x 1 root root 10576 Jun 7 19:27 /etc/init.d/mysqld
[root@centos7_4 mysql]# chkconfig --add mysqld #添加到开机启动项
[root@centos7_4 mysql]# chkconfig mysqld on #添加开机自启动
[root@centos7_4 mysql]# vim /etc/init.d/mysqld #修改路径
basedir=/usr/local/mysql
datadir=/usr/local/mysql/data
[root@centos7_4 mysql]# vim /etc/profile #配置环境变量
export PATH=$PATH:/usr/local/mysql/bin
[root@centos7_4 mysql]# source /etc/profile #加载变量立即生效
配置MySQL启动脚本,这个和上面的二选一都可以
[root@centos7_4 system]# vim mysqld.service
[Unit]
Description=MySQL DBMS
[Service]
LimitNOFILE=10000
Type=simple
User=mysql
Group=mysql
PIDFile=/usr/local/mysql/mysqld.pid
ExecStart=/usr/local/mysql/bin/mysqld_safe --datadir=/usr/local/mysql/data
ExecStop=/bin/kill -9 $MAINPID
[Install]
WantedBy=multi-user.target
[root@centos7_4 system]# chmod +x mysqld.service #添加执行权限
[root@centos7_4 system]# systemctl enable mysqld.service #设置开机启动
3.9 安全初始化数据库
[root@centos7_4 ~]# /usr/local/mysql/bin/mysqld --initialize-insecure --user=mysql --basedir=/usr/local/mysql --datadir=/usr/local/mysql/data #这样初始化之后,数据库是没有密码的
如果要想初始化之后分配临时密码,可以将--initialize-insecure 红色部分去掉,初始化之后,可以分配到一个临时密码。
[root@centos7_4 ~]# /etc/init.d/mysqld start #启动数据库
Starting MySQL. SUCCESS!
[root@centos7_4 ~]# mysql -uroot #登录数据库修改root用户密码
mysql> alter user 'root'@'localhost' identified by '123456';
Query OK, 0 rows affected (0.00 sec)
mysql> flush privileges;
Query OK, 0 rows affected (0.00 sec)
4 源码编译安装PHP
4.1 安装依赖包
[root@centos7_4 ~]# yum -y install php-mcrypt libmcrypt libmcrypt-devel autoconf freetype gd libmcrypt libpng libpng-devel libjpeg libxml2 libxml2-devel zlib curl curl-devel re2c net-snmp-devel libjpeg-devel php-ldap openldap-devel openldap-servers openldap-clients freetype-devel gmp-devel
4.2 下载PHP源码包
[root@centos7_4 ~]# wget http://cn2.php.net/distributions/php-7.2.6.tar.gz
4.3 解压压缩包
[root@centos7_4 ~]# tar zxf php-7.2.6.tar.gz -C /usr/local/src/
[root@centos7_4 ~]# cd /usr/local/src/php-7.2.6/
4.4 生成配置文件
[root@centos7_4 php-7.2.6]# ./configure --prefix=/usr/local/php \
--with-config-file-path=/usr/local/php/etc \
--with-mysqli \
--with-pdo-mysql \
--with-mysql-sock=/usr/local/mysql/mysql.sock \
--with-iconv-dir \
--with-freetype-dir \
--with-jpeg-dir \
--with-png-dir \
--with-curl \
--with-gd \
--with-gmp \
--with-zlib \
--with-xmlrpc \
--with-openssl \
--without-pear \
--with-snmp \
--with-gettext \
--with-mhash \
--with-libxml-dir=/usr \
--with-ldap \
--with-ldap-sasl \ #如果不添加这两项,要是安装zabbix监控时候,会有提示还得需要再次编译,如果不安装zabbix,也可以忽略
--with-fpm-user=nginx \
--with-fpm-group=nginx \
--enable-xml \
--enable-fpm \
--enable-ftp \
--enable-bcmath \
--enable-soap \
--enable-shmop \
--enable-sysvsem \
--enable-sockets \
--enable-inline-optimization \
--enable-maintainer-zts \
--enable-mbregex \
--enable-mbstring \
--enable-pcntl \
--enable-zip \
--disable-fileinfo \
--disable-rpath \
--enable-libxml \
--enable-opcache \
--enable-mysqlnd \
configure: error: Cannot find ldap libraries in /usr/lib. #解决方法
[root@centos7_4 php-7.2.6]# cp -frp /usr/lib64/libldap* /usr/lib/ #在重新配置
4.5 编译并安装
[root@centos7_4 php-7.2.6]# make
/usr/bin/ld: ext/ldap/.libs/ldap.o: undefined reference to symbol 'ber_strdup'
/usr/lib64/liblber-2.4.so.2: error adding symbols: DSO missing from command line
collect2: error: ld returned 1 exit status
make: *** [sapi/cli/php] Error 1
[root@centos7_4 php-7.2.6]# vim Makefile #在以EXTRA_LIBS开头的一行结尾添加‘-llber’
EXTRA_LIBS = -lcrypt -lz -lresolv -lcrypt -lrt -lldap -lgmp -lpng -lz -ljpeg -lz -lrt -lm -ldl -lnsl -lpthread -lxml2 -lz -lm -ldl -lssl -lcrypto -lcurl -lxml2 -lz -lm -ldl -lssl -lcrypto -lfreetype -lxml2 -lz -lm -ldl -lnetsnmp -lssl -lssl -lcrypto -lm -lxml2 -lz -lm -ldl -lcrypt -lxml2 -lz -lm -ldl -lxml2 -lz -lm -ldl -lxml2 -lz -lm -ldl -lxml2 -lz -lm -ldl -lssl -lcrypto -lcrypt -llber

[root@centos7_4 php-7.2.6]# make
[root@centos7_4 php-7.2.6]# echo $?
0
[root@centos7_4 php-7.2.6]# make install
[root@centos7_4 php-7.2.6]# echo $?
0
4.6 配置php配置文件
移动php配置文件的位置,并修改名称
[root@centos7_4 php-7.2.6]# cp /usr/local/php/etc/php-fpm.d/www.conf.default /usr/local/php/etc/php-fpm.conf
复制php.ini文件
[root@centos7_4 php-7.2.6]# cp /usr/local/src/php-7.2.6/php.ini-production /usr/local/php/etc/php.ini
4.7 复制php启动脚本到/etc/init.d/
[root@centos7_4 php-7.2.6]# cp /usr/local/src/php-7.2.6/sapi/fpm/init.d.php-fpm /etc/init.d/php-fpm
添加执行权限,添加到启动项并设置卡机启动
[root@centos7_4 php-7.2.6]# chmod +x /etc/init.d/php-fpm
[root@centos7_4 php-7.2.6]# chkconfig --add php-fpm
[root@centos7_4 php-7.2.6]# chkconfig php-fpm on
启动php-fpm
[root@centos7_4 ~]# /etc/init.d/php-fpm start
Starting php-fpm done
[root@centos7_4 ~]# vim /usr/local/nginx/conf/nginx.conf
43 location / {
44 root html;
45 index index.php index.html index.htm;
46 }
[root@centos7_4 ~]# service nginx restart #重启nginx服务
编写php探测文件
[root@centos7_4 ~]# vim /usr/local/nginx/html/index.php
<?php
phpinfo();
?>
[root@centos7_4 ~]# netstat -antup|grep php-fpm
tcp 0 0 127.0.0.1:9000 0.0.0.0:* LISTEN 128974/php-fpm: mas
通过浏览器测试
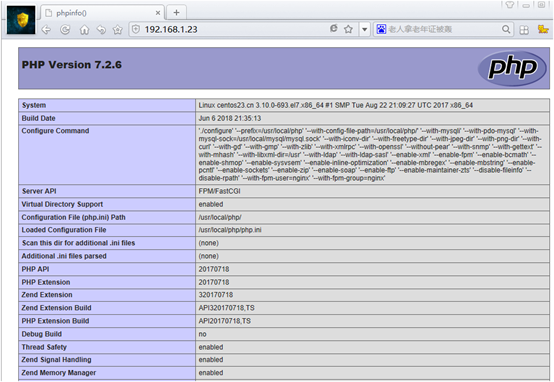
到这里整个实验已经完成了,新手上路,有什么写的不完善,还请各位大神多提宝贵意见