目录
章节介绍
主要介绍图像的基本表示方式等等,同时Numpy.array库为pytho处理图像的基础,需熟练了解awa。
一、图像基本表示法
常见的表示方法一般有三种:二值化,灰度图以及彩色图像。
1.二值图像
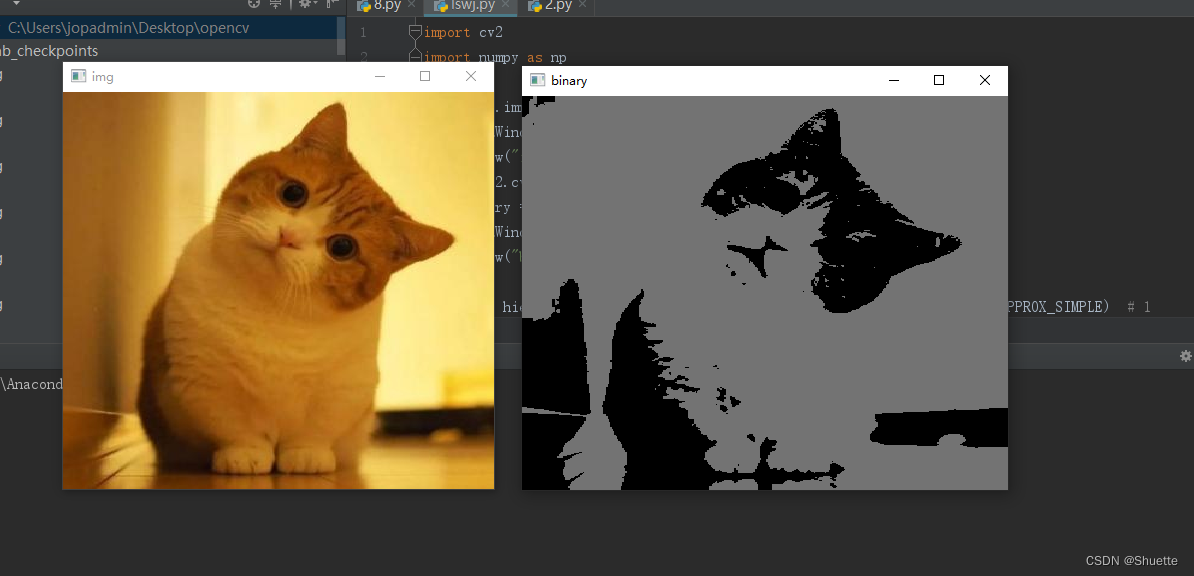
含义:二值图像指仅包含黑白色二种颜色的图像。在图像的像素点中,一般将白色像素点处理为“1”,而黑色像素点处理标记为“0”。
#二值化图像的具体例子
import cv2
import numpy as np

img = cv2.imread("28.jpg")
cv2.namedWindow("img", cv2.WINDOW_NORMAL)
cv2.imshow("img", img)
gray = cv2.cvtColor(img, cv2.COLOR_BGR2GRAY)
ret, binary = cv2.threshold(gray, 95, 115, cv2.THRESH_BINARY)
cv2.namedWindow("binary", cv2.WINDOW_NORMAL)
cv2.imshow("binary", binary)

contours, hierarchy = cv2.findContours(binary, cv2.RETR_TREE, cv2.CHAIN_APPROX_SIMPLE)  # 1
cv2.drawContours(img, contours, -1, (0, 0, 50), -1)  # 2
cv2.namedWindow("result", cv2.WINDOW_NORMAL)
cv2.imshow("result", img)
cv2.waitKey()
cv2.destroyAllWindows()
以下是图片二值化的结果:图一为原图,图二为二值化后所得到的部分猫的形态。
2.灰度图像
意义:让图像表现出更多的细节,从而采用更多的数值以体现不同的颜色,使得图像的细节更丰富。
#相应代码
import cv2
import numpy as np

img = cv2.imread("28.jpg")
gray = cv2.cvtColor(img,cv2.COLOR_BGR2GRAY,0)

cv2.imshow("img",gray)
cv2.waitKey()
cv2.destroyAllWindows()
运行结果如下: 
3.彩色图像
说明:比起二值图和灰度图像。彩色图像为常见的一类图像之一。同时在RGB色彩空间中,每个色彩通道值的范围都在0到255之间。一般我们使用这三个色彩通道的组合表示颜色。同时还需注意一点的是,在opencv中,通道的顺序往往为BGR。
#代码一
#导包
import cv2
#读取图像
img = cv2.imread("28.jpg")
#分离颜色通道
b,g,r = cv2.split(img)
#显示图像
cv2.imshow("b", b)
cv2.imshow("g", g)
cv2.imshow("r", r)
cv2.imshow("img",img)
cv2.waitKey(0)
cv2.destroyAllWindows()


#代码二
#导包
import cv2
import numpy as np
#读取图像
img = cv2.imread("28.jpg")
#提取图像通道
b = img[:,:,0]
g = img[:,:,1]
r = img[:,:,2]
#显示不同层的通道
cv2.imshow("b", b)
cv2.imshow("g", g)
cv2.imshow("r", r)
#改变img图像的通道设置值
img[:,:,0] = 0
cv2.imshow("img1",img)
img[:,:,1] = 0
cv2.imshow("img2",img)
img[:,:,2] = 0
cv2.imshow("img3",img)

cv2.waitKey()
cv2.destroyAllWindows()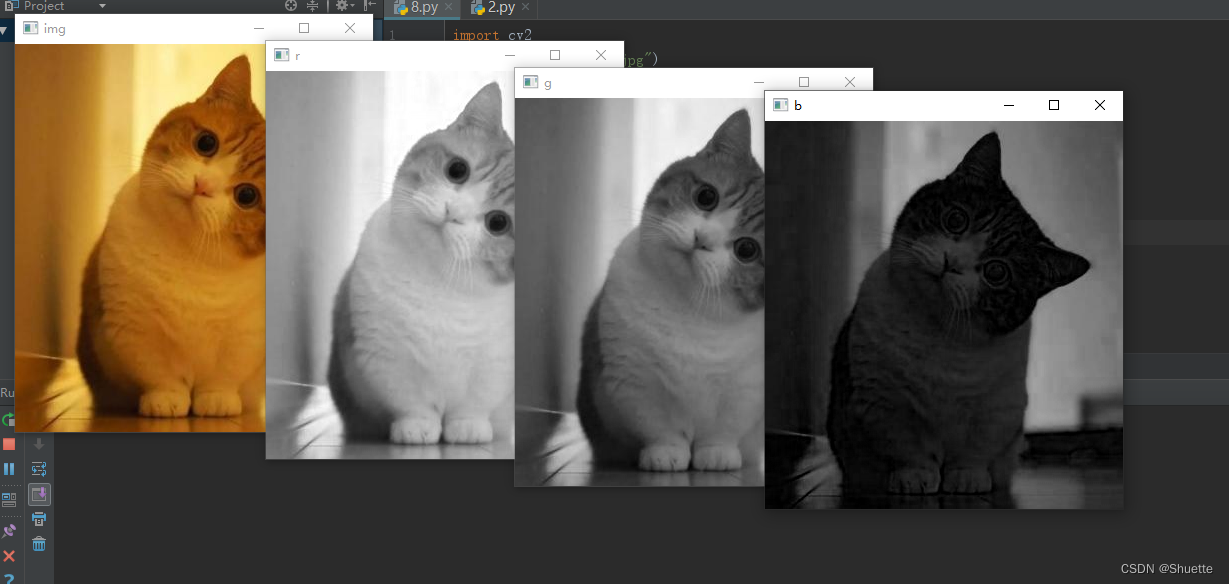

二、像素处理
1.二值图像与灰度图像
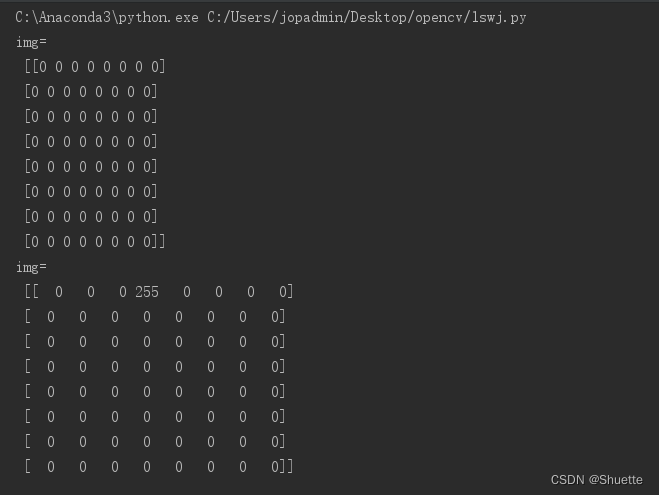
说明:二值化在一定可以理解为是一种特殊的灰度图,因为经过处理得到的二值化一般只有0(黑色)和255(白色)这二种数值。
#代码一
import cv2
import numpy as np
img = np.zeros((8,8),dtype = np.uint8)
print("img=\n",img)
cv2.imshow("img",img)
print("img[0,3]=",img[0,3])   #读取像素点
img[0,3] = 255
print("img=\n",img)      #修改后
print("img[0,3]=",img[0,3])   #读取修改后像素点
cv2.waitKey()
cv2.destroyAllWindows()
#在第一段代码的基础上修改后的代码二
import cv2
import numpy as np
img = np.zeros((8,8),dtype = np.uint8)
print("img=\n",img)
cv2.imshow("img",img)
for i in range(0,1):
for j in range(3,4):
img[i,j]=255
print("img=\n",img)
cv2.imshow("img1",img)
cv2.waitKey()
cv2.destroyAllWindows()运行结果:
实际应用案例
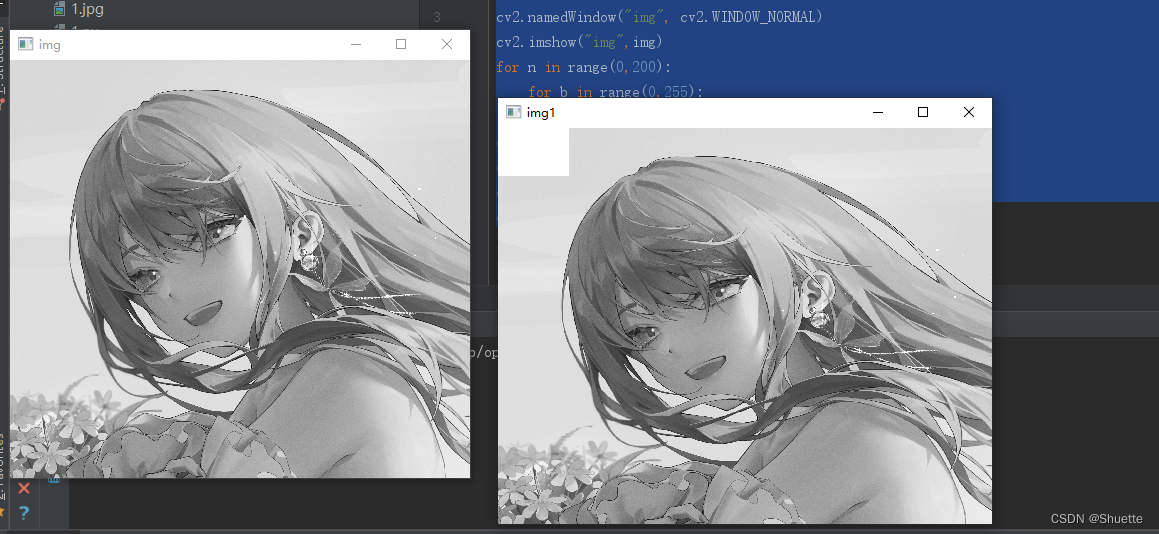
#读取灰度图像,并对像素进行访问获取,修改等。
import cv2
img = cv2.imread("beautiful.jpg",0)
cv2.namedWindow("img", cv2.WINDOW_NORMAL)
cv2.imshow("img",img)
for n in range(0,200):
    for b in range(0,255):
        img[n,b]=255
cv2.namedWindow("img1", cv2.WINDOW_NORMAL)
cv2.imshow("img1",img)
cv2.waitKey()
cv2.destroyAllWindows()
实际运行结果:
2.彩色图像
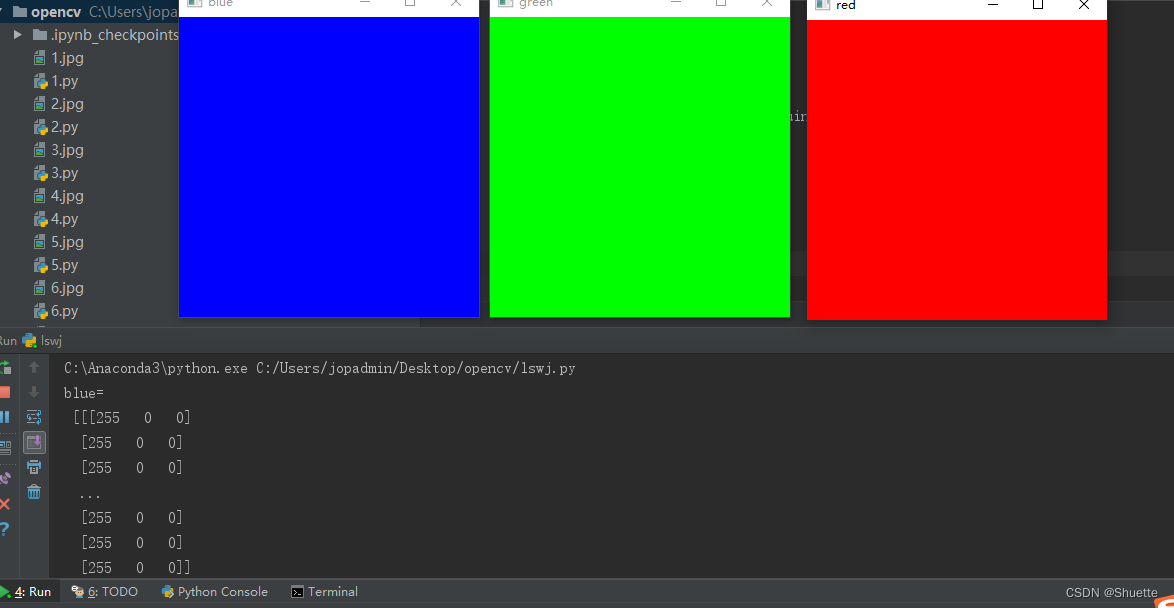
说明:一般在opencv当中RGB模式的彩色图像,在读取时会按照行方向依次读取RGB图像,即BGR通道的像素点awa。
#代码1
import cv2
import numpy as np

blue = np.zeros((300,300,3),dtype=np.uint8)
blue[:,:,0]=255
print("blue=\n",blue)
cv2.imshow("blue",blue)

green = np.zeros((300,300,3),dtype=np.uint8)
green[:,:,1]=255
print("green=\n",green)
cv2.imshow("green",green)

red = np.zeros((300,300,3),dtype=np.uint8)
red[:,:,2]=255
print("red=\n",red)
cv2.imshow("red",red)

cv2.waitKey()
cv2.destroyAllWindows()
三个通道值得变化(运行结果如下):
#代码2
import cv2
import numpy as np

img = np.zeros((300,300,3),dtype=np.uint8)
img[:,0:100,0]=255
img[:,100:200,1]=255
img[:,200:300,2]=255
print("img=\n",img)

cv2.namedWindow("img", cv2.WINDOW_NORMAL)
cv2.imshow("img",img)
cv2.waitKey()
cv2.destroyAllWindows()
代码2的运行结果: 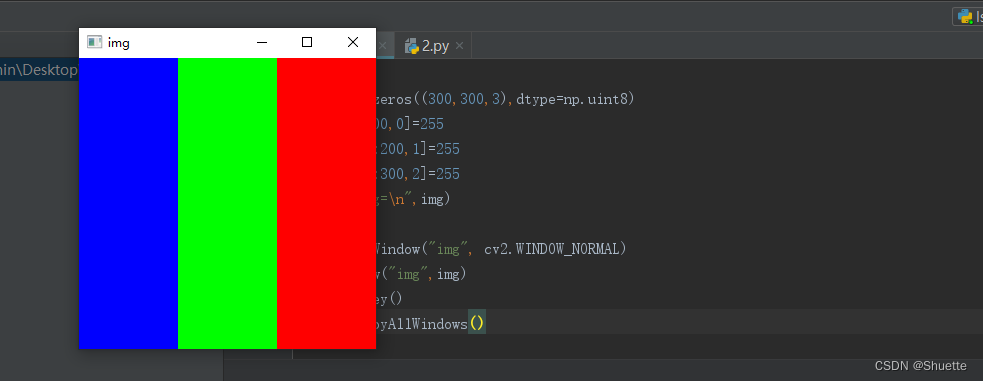
具体就是利用numpy生成一个三维的数组,以此来查看三个通道的不同色彩。
#代码4
#利用zeros()函数生成一个数组,直接使用数组索引对其进行访问,和修改。
import numpy as np
img = np.zeros((2,4,3),dtype = np.uint8)

print("img=\n",img)
print("img[0,3]=",img[0,3])
print("img[1,2,2]=",img[1,2,2])

img[0,3]=255
img[0,0]=[66,77,88]
img[1,1,1]=3
img[1,2,2]=4
img[0,2,0]=5
print("img\n",img)
print("img[1,2,2]=",img[1,2,2])
#代码5
#读取一幅彩色图像 并对其像素进行访问
import cv2
img = cv2.imread("28.jpg")
cv2.namedWindow("img", cv2.WINDOW_NORMAL)
cv2.imshow("img",img)
print("img[0,0]",img[0,0]) #访问读取
print("img[0,0,0]",img[0,0,0])
print("img[0,0,1]",img[0,0,1])
print("img[0,0,2]",img[0,0,2])
print("img[50,0]",img[50,0])
print("img[100,0]",img[100,0])
#区域1
for i in range(0,50):
for j in range(0,100):
for k in range(0,3):
img[i,j,k] = 255 #白色
#区域2
for i in range(50,100):
for j in range(0,100):
img[i,j]=[128,128,128] #灰色
#区域3
for i in range(100,150):
for j in range(0,100):
img[i,j]=0 #黑色
cv2.imshow("img",img)
print("img[0,0]=",img[0,0]) #修改后
print("img[0,0,0]=",img[0,0,0])
print("img[0,0,1]=",img[0,0,1])
print("img[0,0,2]=",img[0,0,2])
print("img[50,0]=",img[50,0])
print("img[100,0]=",img[100,0])
cv2.waitKey()
cv2.destroyAllWindows()三、用numpy.array访问像素
1.二值图像与灰度图像
相关函数说明:1.函数item()可以更加有效的访问图像的像素点,相应的表达式为:item(行,列)。
2.函数itemset()可以用来修改像素值,相应的表达式为:
itemset(索引值,新值)。
#
import numpy as np
img = np.random.randint(10,99,size=[5,5],dtype=np.uint8)
print("img=\n",img)
print("img.item(3,2)=",img.item(3,2))    #读取像素点
img.itemset((3,2),255)
print("img=\n",img)   #修改后
print("img.item(3,2)=",img.item(3,2))   #修改后像素点
运行结果(及思路):

思路:首先先导入运行库等。然后利用random.randint去生成一个随机数组,然后再使用item等函数对像素值等进行修改。
#生成一个灰度图。以及随机的像素值
import cv2
import numpy as np
img = np.random.randint(0,256,size=[256,256],dtype=np.uint8)
cv2.imshow("img",img)
cv2.waitKey()
cv2.destroyAllWindows()
如下为一个实际运用的案例:读取灰度图并对像素值进行访问和修改...
#
import cv2
img = cv2.imread("28.jpg",0)

print("读取像素值img.item(3,2)=",img.item(3,2))
img.itemset((3,2),255)
print("修改后像素值img.item(3,2)=",img.item(3,2))

cv2.imshow("img",img)
for i in range(10,100):
    for j in range(80,100):
        img.itemset((i,j),255)
cv2.imshow("img1",img)
cv2.waitKey()
cv2.destroyAllWindows() 
2.彩色图像
说明:彩色图像中使用item等函数来访问和修改彩色图像像素值的步骤与灰度图基本相类似,但不同的地方在于补充通道信息,例如:
1.item(行,列,通道)
2.itemset(三元组索引值,新值)
#使用item()等函数来修改随机数组构成的彩色图像

import numpy as np
img = np.random.randint(10,99,size=[2,4,3],dtype=np.uint8)

print("img=\n",img)
print("读取像素值img[1,2,0]=",img.item(1,2,0))
print("读取像素值img[0,2,1]=",img.item(0,2,1))
print("读取像素值img[1,0,2]=",img.item(1,0,2))

img.itemset((1,2,0),255)
img.itemset((0,2,1),255)
img.itemset((1,0,2),255)
print("修改后img=\n",img)
print("修改后像素点img[1,2,0]=",img.item(1,2,0))
print("修改后像素点img[0,2,1]=",img.item(0,2,1))
print("修改后像素点img[1,0,2]=",img.item(1,0,2))
具体运行结果: 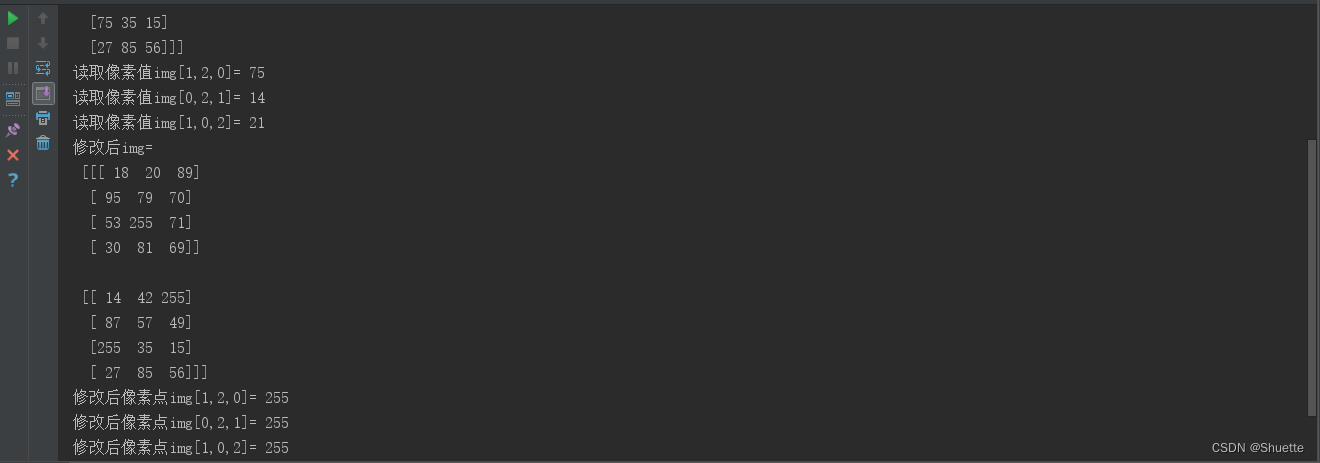
小建议:在实际运行中可以利用随机函数生成更大尺寸的随即数组,且使用函数cv2.imshow()观察随机数组对应的彩色图像。
#生成彩色图像,但像素值为随机数
import cv2
import numpy as np
img = np.random.randint(0,256,size=[256,256,3],dtype=np.uint8)
cv2.imshow("img",img)
cv2.waitKey()
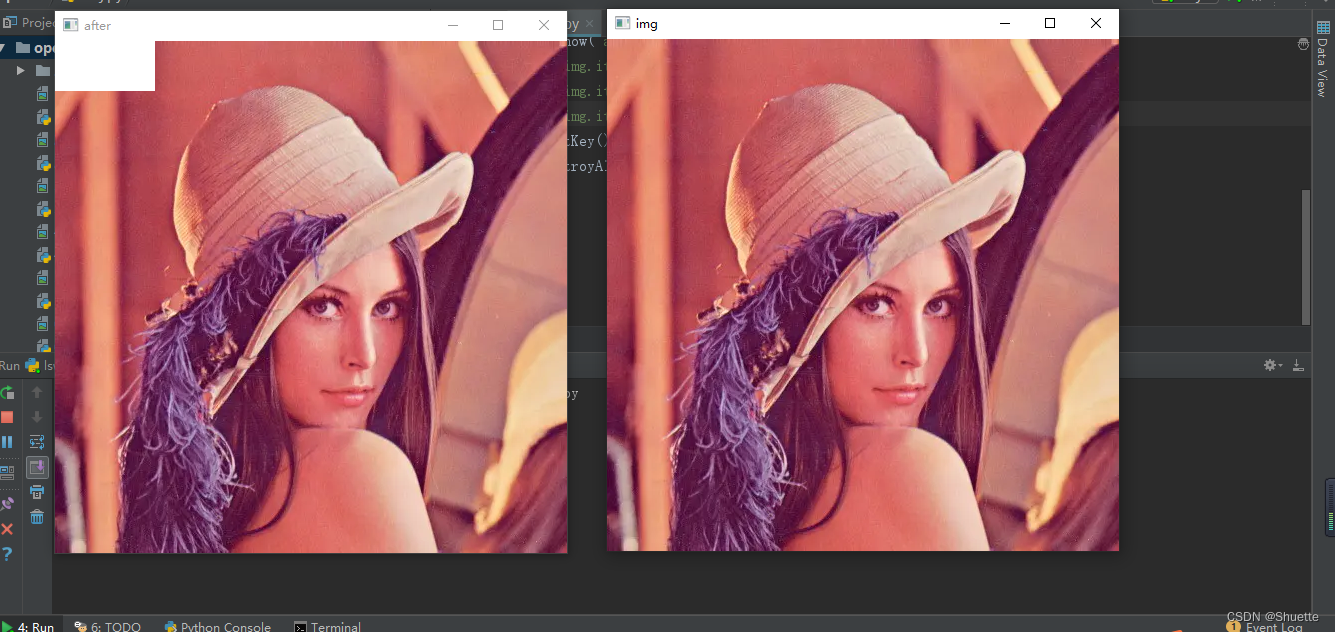
cv2.destroyAllWindows()实践操作:读取彩色图像并且对像素进行访问和修改。
#参考代码
import cv2
import numpy as np
img = cv2.imread("28.jpg")
cv2.imshow("img",img)
print("访问img.item(0,0,0)=",img.item(0,0,0))
print("访问img.item(0,0,1)=",img.item(0,0,1))
print("访问img.item(0,0,2)=",img.item(0,0,2))
for i in range(0,50):
    for j in range(0,100):
        for k in range(0,3):
            img.itemset((i,j,k),255)  #白色
cv2.imshow("after",img)
print("img.item(0,0,0)=",img.item(0,0,0))   #修改后
print("img.item(0,0,1)=",img.item(0,0,1))
print("img.item(0,0,2)=",img.item(0,0,2))
四、感兴趣区域(ROI)
概述:处理图像过程中,对于图像某一部特定区域感兴趣,那么该区域被称为感兴趣区域。一般来说在设定感兴趣区域ROI之后,就可以对该区域进行整体操作。
#
import cv2
img = cv2.imread("beautiful.jpg",cv2.IMREAD_UNCHANGED)
face = img[600:1000,500:900]   #通过face = img[600:1000,500:900]获取一个ROI,且使用函数
                                                   cv2.imshow("face",face)将其表现出来cv2.namedWindow("img", cv2.WINDOW_NORMAL)
cv2.namedWindow("face", cv2.WINDOW_NORMAL)
cv2.imshow("img",img)
cv2.imshow("face",face)
cv2.waitKey()
cv2.destroyAllWindows()
运行结果:
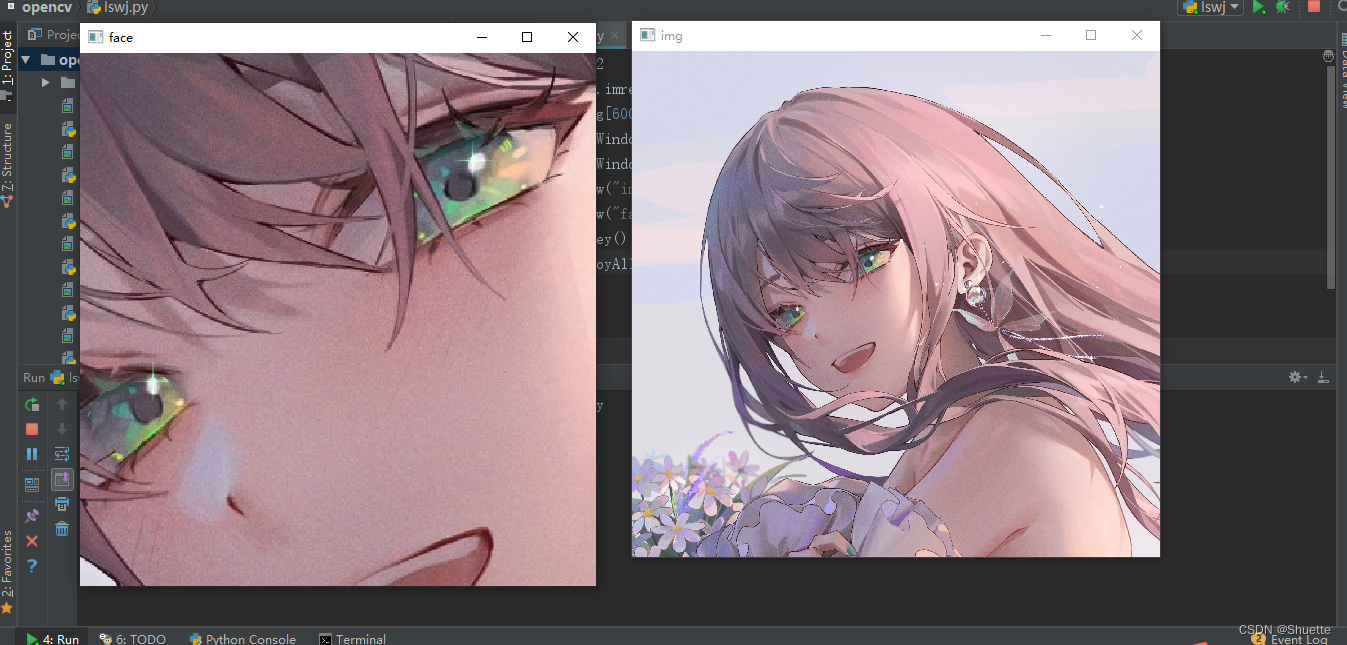
注:其中右图的img是原图,左边的face是从右图的img窗口图像中获取的脸部图像的一部分。
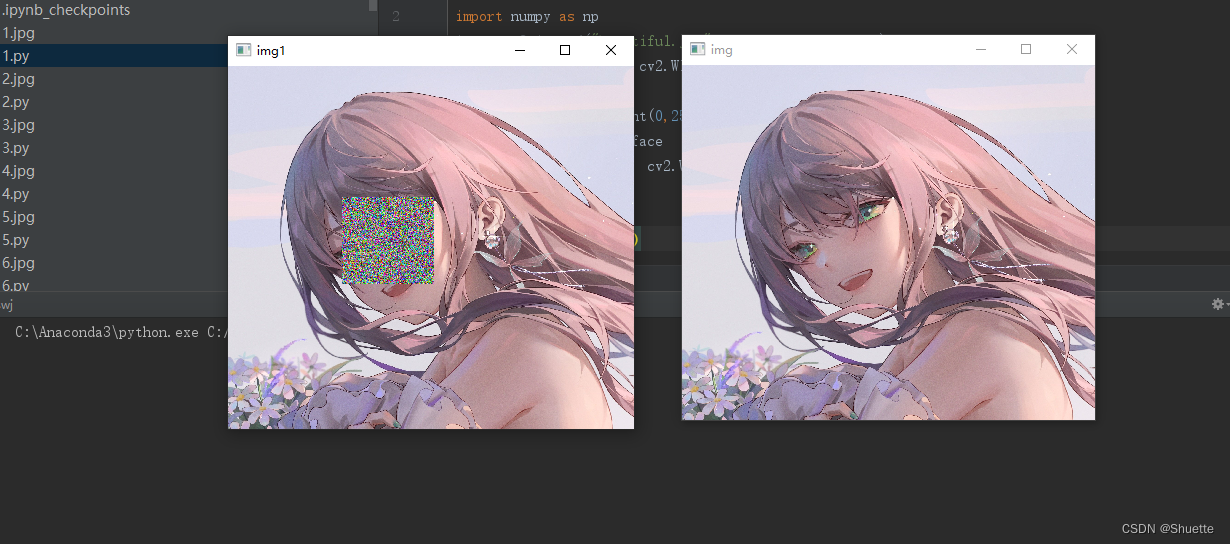
实践任务:在读取了上边原图里相关的ROI感兴趣区域后,现在我们对那一块的感兴趣区域进行一次打码的处理(具体参考代码如下)。
#
import cv2
import numpy as np
img = cv2.imread("beautiful.jpg",cv2.IMREAD_UNCHANGED)
cv2.namedWindow("img", cv2.WINDOW_NORMAL)
cv2.imshow("img",img)
face = np.random.randint(0,256,(400,400,3))
img[600:1000,500:900]=face
cv2.namedWindow("img1", cv2.WINDOW_NORMAL)
cv2.imshow("img1",img)
cv2.waitKey()
cv2.destroyAllWindows()
运行结果:
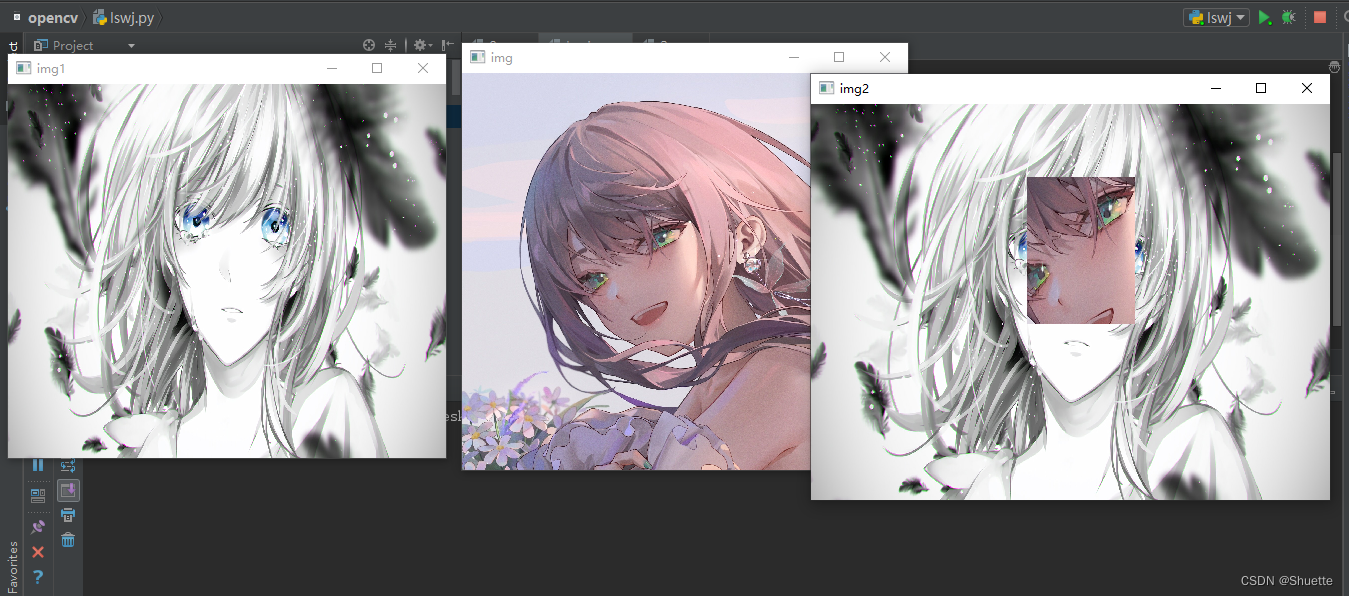
扩展:结合上边二个实践任务,我们在将其原图中打码位置的图像ROI复制到另一幅图像内。(具体代码如下)
#
import cv2
img = cv2.imread("beautiful.jpg",cv2.IMREAD_UNCHANGED)
img1 = cv2.imread("back.jpg",cv2.IMREAD_UNCHANGED)
cv2.namedWindow("img", cv2.WINDOW_NORMAL)
cv2.namedWindow("img1", cv2.WINDOW_NORMAL)
cv2.imshow("img",img)
cv2.imshow("img1",img1)
face = img[600:1000,500:900]
img1[200:600:,800:1200]=face
cv2.namedWindow("img2", cv2.WINDOW_NORMAL)
cv2.imshow("img2",img1)
cv2.waitKey()
cv2.destroyAllWindows()
运行结果:
五、通道操作
RGB图像一般来说由三个图像通道RGB构成,但一般在opencv中,它是按照字幕相反的顺序进行存储的。
1.通道索引拆分
#索引方式
import cv2

img = cv2.imread("beautiful.jpg")
cv2.namedWindow("img", cv2.WINDOW_NORMAL)
cv2.imshow("img",img)

b = img[:,:,0]
g = img[:,:,1]
r = img[:,:,2]
cv2.namedWindow("b", cv2.WINDOW_NORMAL)
cv2.namedWindow("g", cv2.WINDOW_NORMAL)
cv2.namedWindow("r", cv2.WINDOW_NORMAL)
cv2.imshow("b",b)
cv2.imshow("g",g)
cv2.imshow("r",r)

img[:,:,0] = 0
cv2.namedWindow("img1",cv2.WINDOW_NORMAL)
cv2.imshow("img1",img)
img[:,:,1] = 0
cv2.namedWindow("img2",cv2.WINDOW_NORMAL)
cv2.imshow("img2",img)
cv2.waitKey()
cv2.destroyAllWindows()
注:第一段代码所采用的的索引方式,即分别拆分出RGB的通道,然后在对图层进行一一的实现。
2.函数拆分
#函数拆分
import cv2
img = cv2.imread("fxj.jpg")
b,g,r=cv2.split(img)
cv2.imshow("b",b)
cv2.imshow("g",g)
cv2.imshow("r",r)
cv2.waitKey()
cv2.destroyAllWindows()
注:函数拆分中语句b,g,r=cv2.split(img)与拆分开的b=cv2.split(img)[0]有相同的效应。。。
#使用cv2.merge()合并通道
import cv2
img = cv2.imread("25.jpg")
b,g,r=cv2.split(img)
bgr = cv2.merge([b,g,r])
rgb = cv2.merge([r,g,b])
cv2.imshow("img",img)
cv2.imshow("bgr",bgr)
cv2.imshow("rgb",rgb)
cv2.waitKey()
cv2.destroyAllWindows()
说明:通道合并是通道拆分的逆过程,一般来说它可以将三个通道的灰度图像等构成一幅彩色图像。以上述代码框中的代码为例子,首先先将img中所读取的图像进行一个详细的通道拆分,然后在对b,g,r通道进行合并,得到bgr图像,以此类推。在下一行rgb = cv2.merge([r,g,b])代码中我们重复上边bgr图像的操作,得到rgb图像。最后在运行总程序得到全部的图像结果。
六、获取图像属性等
说明:在获取图像属性等过程中,属性常包括图像大小等。这里介绍下边代码中所用到的几个常用属性值:
1.首先是shape,一般我们用该属性时,它可以帮助我们通过该属性的返回值是否包含通道数等,来判断图像是否为二值图还是彩色图等等。
2.size一般为返回图像的像素数目。
3.dtype为返回图像的数据类型。
#
import cv2

gray = cv2.imread("4.jpg",0)
color = cv2.imread("9.jpg")

print("gray:")   #指图像gray的属性
print("gray.shape=",gray.shape)
print("gray.size=",gray.size)
print("gray.dtype=",gray.dtype)

print("color:")
print("color.shape=",color.shape)
print("color.size=",color.size)
print("color.dtype=",color.dtype)
总结
这里是对文章内容的一个大体总结叭:
主要介绍了图像的基本表达方式,感兴趣区域处理等知识点。对于文中所提到的numpy.array库,它是python处理的基础...