在上一篇博客中介绍了数据处理的整体结构:Faster RCNN代码详解(三):数据处理的整体结构。这一篇博客介绍数据处理的细节——关于anchor的前世今生,代码在脚本的:~/mx-rcnn/rcnn/io/rpn.py的assign_anchor函数中。
这一部分也是你想要深入了解Faster RCNN算法细节的重要部分,因为anchor是Faster RCNN算法的核心之一。具体而言,在这篇博客中我将为你介绍:anchor是什么?怎么生成的?anchor的标签是怎么定义的?bbox(bounding box)的回归目标是怎么定义的?bbox和anchor是什么区别?
def assign_anchor(feat_shape, gt_boxes, im_info, feat_stride=16,
                  scales=(8, 16, 32), ratios=(0.5, 1, 2), allowed_border=0):
    """
    assign ground truth boxes to anchor positions
    :param feat_shape: infer output shape
    :param gt_boxes: assign ground truth
    :param im_info: filter out anchors overlapped with edges
    :param feat_stride: anchor position step
    :param scales: used to generate anchors, affects num_anchors (per location)
    :param ratios: aspect ratios of generated anchors
    :param allowed_border: filter out anchors with edge overlap > allowed_border
    :return: dict of label
    'label': of shape (batch_size, 1) <- (batch_size, num_anchors, feat_height, feat_width)
    'bbox_target': of shape (batch_size, num_anchors * 4, feat_height, feat_width)
    'bbox_inside_weight': *todo* mark the assigned anchors
    'bbox_outside_weight': used to normalize the bbox_loss, all weights sums to RPN_POSITIVE_WEIGHT
    """
    def _unmap(data, count, inds, fill=0):
        """" unmap a subset inds of data into original data of size count """
        if len(data.shape) == 1:
            ret = np.empty((count,), dtype=np.float32)
            ret.fill(fill)
            ret[inds] = data
        else:
            ret = np.empty((count,) + data.shape[1:], dtype=np.float32)
            ret.fill(fill)
            ret[inds, :] = data
        return ret

    im_info = im_info[0]
    scales = np.array(scales, dtype=np.float32)
# base_anchors是anchor的初始化结果,输入中base_size=16,表示输入图像到该层
# feature map的尺寸缩小倍数,对于resnet网络的conv4_x而言缩小倍数是16;ratios默认是[0.5,1,2];
# scales默认是[8,16,32]。base_anchors默认是9*4的numpy array,表示9个anchor的4个坐标值,
# 4个坐标值用框的左上角坐标和右下角坐标。这9个anchor有一个共同点是中心坐标点一样,
# 这正是和RPN网络的滑窗操作对应(第一个3*3的卷积层),滑窗每滑到一个3*3区域,
# 则以该区域中心点为坐标就会生成9个anchor。
    base_anchors = generate_anchors(base_size=feat_stride, ratios=list(ratios), scales=scales)
    num_anchors = base_anchors.shape[0]
# feat_height和feat_width表示该层feature map的size,比如对于resnet的res4而言,
# 缩放系数是16,所以如果输入图像是600*900,则feat_height=600/16,feat_width=900/16
    feat_height, feat_width = feat_shape[-2:]

    logger.debug('anchors: %s' % base_anchors)
    logger.debug('anchor shapes: %s' % np.hstack((base_anchors[:, 2::4] - base_anchors[:, 0::4],
                                                 base_anchors[:, 3::4] - base_anchors[:, 1::4])))
    logger.debug('im_info %s' % im_info)
    logger.debug('height %d width %d' % (feat_height, feat_width))
    logger.debug('gt_boxes shape %s' % np.array(gt_boxes.shape))
    logger.debug('gt_boxes %s' % gt_boxes)

    # 1. generate proposals from bbox deltas and shifted anchors
# 前面说到base_anchors是滑窗每滑到一个区域时生成的9个anchor,因为滑窗所作用的对象
# 是38*50的feature map,当stride=1时,一共要滑动38*50次,也就是一共会得到
# 38*50*9=17100个anchor,接下来这部分代码就是要完成这样的操作。
# shift_x和shift_y是根据feat_stride生成的偏移量,
# 根据这两个偏移量就可以将前面计算的base_anchors推广到38*50中的每个点。
    shift_x = np.arange(0, feat_width) * feat_stride
    shift_y = np.arange(0, feat_height) * feat_stride
    shift_x, shift_y = np.meshgrid(shift_x, shift_y)
    shifts = np.vstack((shift_x.ravel(), shift_y.ravel(), shift_x.ravel(), shift_y.ravel())).transpose()
    # add A anchors (1, A, 4) to
    # cell K shifts (K, 1, 4) to get
    # shift anchors (K, A, 4)
    # reshape to (K*A, 4) shifted anchors
# A默认是9
    A = num_anchors
# K其实就是该层feature map的宽*高,比如高是38,宽是50,那么K就是1900。
# 注意all_anchors最后一个维度是4,表示4个坐标相关的信息。
    K = shifts.shape[0]
    all_anchors = base_anchors.reshape((1, A, 4)) + shifts.reshape((1, K, 4)).transpose((1, 0, 2))
    all_anchors = all_anchors.reshape((K * A, 4))
# 以前面的K是1900为例,总共会产生9*1900=17100个anchor。
    total_anchors = int(K * A)

    # only keep anchors inside the image
# inds_inside表示anchor的4个点坐标都在图像内部的anchor的index。
    inds_inside = np.where((all_anchors[:, 0] >= -allowed_border) &
                           (all_anchors[:, 1] >= -allowed_border) &
                           (all_anchors[:, 2] < im_info[1] + allowed_border) &
                           (all_anchors[:, 3] < im_info[0] + allowed_border))[0]
    logger.debug('total_anchors %d' % total_anchors)
    logger.debug('inds_inside %d' % len(inds_inside))

    # keep only inside anchors
# 将不完全在图像内部(初始化的anchor的4个坐标点超出图像边界)的anchor都过滤掉,
# 一般过滤后只会有原来1/3左右的anchor。如果不将这部分anchor过滤,则会使训练过程难以收敛。
    anchors = all_anchors[inds_inside, :]
    logger.debug('anchors shape %s' % np.array(anchors.shape))

    # label: 1 is positive, 0 is negative, -1 is dont care
# 前面得到的只是anchor的4个坐标信息,接下来就要为每个anchor分配标签了,
# 初始化的时候标签都用-1来填充,-1表示无效,这类标签的数据不会对梯度更新起到帮助。
    labels = np.empty((len(inds_inside),), dtype=np.float32)
    labels.fill(-1)


# 这个条件语句是判断输入图像中是否包含object,标签分配只针对ground truth中有object的图像。
# bbox_overlaps函数计算的是两个框之间的IOU,这里是计算每个anchor和每个object的IOU,
# 生成的overlaps(二维的numpy array,假设为n*m,n表示anchor数量,m表示object数量)的
# 每一行表示anchor,每一列表示object。 argmax_overlaps是计算每个anchor和哪个object的IOU最大,
# 维度是n*1,值是object的index。max_overlaps是具体的IOU值。
# gt_argmax_overlaps = overlaps.argmax(axis=0)则是计算每个object和哪个anchor的IOU最大,
# 维度是m*1,值是anchor的index,另外因为如果有多个anchor和某个object的IOU值都是最大且一样,
# 那么gt_argmax_overlaps只会得到index最小的那个,
# 所以需要gt_argmax_overlaps = np.where(overlaps == gt_max_overlaps)[0]将IOU最大的那些anchor都捞出来。
# gt_max_overlaps是具体的IOU值。
    if gt_boxes.size > 0:
        # overlap between the anchors and the gt boxes
        # overlaps (ex, gt)
        overlaps = bbox_overlaps(anchors.astype(np.float), gt_boxes.astype(np.float))
        argmax_overlaps = overlaps.argmax(axis=1)
        max_overlaps = overlaps[np.arange(len(inds_inside)), argmax_overlaps]
        gt_argmax_overlaps = overlaps.argmax(axis=0)
        gt_max_overlaps = overlaps[gt_argmax_overlaps, np.arange(overlaps.shape[1])]
        gt_argmax_overlaps = np.where(overlaps == gt_max_overlaps)[0]

# 这个条件语句默认是执行的,目的是将IOU小于某个阈值的anchor的标签都标为0,也就是背景类。
# 阈值config.TRAIN.RPN_NEGATIVE_OVERLAP默认是0.3。
# 如果某个anchor和所有object的IOU的最大值比这个阈值小,那么就是背景。
        if not config.TRAIN.RPN_CLOBBER_POSITIVES:
            # assign bg labels first so that positive labels can clobber them
            labels[max_overlaps < config.TRAIN.RPN_NEGATIVE_OVERLAP] = 0

        # fg label: for each gt, anchor with highest overlap
# 有两种类型的anhor其标签是1,标签1表示foreground,也就是包含object。
# 第一种是和任意一个object有最大IOU的anchor,也就是前面得到的gt_argmax_overlaps。
        labels[gt_argmax_overlaps] = 1

        # fg label: above threshold IoU
# 第二种是和所有object的IOU的最大值超过某个阈值的anchor,
# 其中阈值config.TRAIN.RPN_POSITIVE_OVERLAP默认是0.7。
        labels[max_overlaps >= config.TRAIN.RPN_POSITIVE_OVERLAP] = 1


# 这一部分是和前面if not config.TRAIN.RPN_CLOBBER_POSITIVES条件语句互斥的,
# 区别在于背景类anchor的标签定义先后顺序不同,这主要涉及到标签1和标签0之间的覆盖。
        if config.TRAIN.RPN_CLOBBER_POSITIVES:
            # assign bg labels last so that negative labels can clobber positives
            labels[max_overlaps < config.TRAIN.RPN_NEGATIVE_OVERLAP] = 0
    else:
# 如果ground truth中没有object,则所有标签都是背景。
        labels[:] = 0

    # subsample positive labels if we have too many
# 在RPN网络中,对回传损失的正负样本数量做了限定,如果不做限定的话,负样本的数量会非常多。
# 论文中默认正负样本的总数量是256(config.TRAIN.RPN_BATCH_SIZE),
# 因此接下来会分别针对正负样本的数量做欠采样,采样通过将不需要的样本标签设置为-1来实现。
# 首先是对正样本(标签是1)的欠采样操作(一般而言正样本都很少,所以很少会执行欠采样操作这个条件语句)。
# config.TRAIN.RPN_FG_FRACTION表示RPN网络最终生成的正样本占所有样本的最大比例,默认是0.5,
# 表示RPN网络最终输出的正负样本比例一样。num_fg是期望得到的1标签数量,
# fg_inds是实际的1标签数量,因此如果你实际的1标签数量大于期望得到的1标签数量,那么就要做欠采样。
    num_fg = int(config.TRAIN.RPN_FG_FRACTION * config.TRAIN.RPN_BATCH_SIZE)
    fg_inds = np.where(labels == 1)[0]
    if len(fg_inds) > num_fg:
        disable_inds = npr.choice(fg_inds, size=(len(fg_inds) - num_fg), replace=False)
        if logger.level == logging.INFO:
            disable_inds = fg_inds[:(len(fg_inds) - num_fg)]
        labels[disable_inds] = -1

    # subsample negative labels if we have too many
# 接下来这一段代码是对负样本(标签是0)的欠采样操作(一般而言负样本都很多,所以一般都会执行欠采样操作)。
# num_bg就是RPN网络中batch size减去前面得到的正样本数量。npr.choice是调用python中的random库的choice函数,
# 用来从指定序列(bg_inds)中随机选择指定数量(size)的值。
# 默认 if logger.level == logging.INFO条件语句是执行的,这样的话disable的样本
# 就是从bg_inds开头到指定数量位置,而不是随机disable。不要的样本标签也是置为-1,表示无效。
    num_bg = config.TRAIN.RPN_BATCH_SIZE - np.sum(labels == 1)
    bg_inds = np.where(labels == 0)[0]
    if len(bg_inds) > num_bg:
        disable_inds = npr.choice(bg_inds, size=(len(bg_inds) - num_bg), replace=False)
        if logger.level == logging.INFO:
            disable_inds = bg_inds[:(len(bg_inds) - num_bg)]
        labels[disable_inds] = -1

# bbox_target是每个bbox回归的ground truth,初始化为len(inds_inside)*4大小的numpy array,
# 所以包含了标签为1,0和-1三种类型的bbox。bbox_transform函数用来生成bbox_targets,
# 输入中gt_boxes原本是k*5的numpy array,k表示有几个object,
# 这里通过gt_boxes[argmax_overlaps, :4]扩增并取前4列值,
# 因为argmax_overlaps是和anchor的IOU最大的object的index,所以这种写法相当于复制
# 指定index的object的gt_boxes信息,因此某个anchor的坐标回归目标利用的就是和
# 该anchor的IOU最大的object的坐标通过一定公式转换后的信息,
# 这里的公式就是bbox_transform函数实现的,或者看最后附录截图的后两行公式。
    bbox_targets = np.zeros((len(inds_inside), 4), dtype=np.float32)
    if gt_boxes.size > 0:
        bbox_targets[:] = bbox_transform(anchors, gt_boxes[argmax_overlaps, :4])

# bbox_weights
# bbox_weights变量是后续用来指定哪些anchor用于梯度更新的0,1矩阵,相当于一个mask,
# 只有标签是1的bbox的weight才有值,值是config.TRAIN.RPN_BBOX_WEIGHTS,
# 该变量默认4个值都是1。因此标签是0或-1的weight都是0。
    bbox_weights = np.zeros((len(inds_inside), 4), dtype=np.float32)
    bbox_weights[labels == 1, :] = np.array(config.TRAIN.RPN_BBOX_WEIGHTS)

    if logger.level == logging.DEBUG:
        _sums = bbox_targets[labels == 1, :].sum(axis=0)
        _squared_sums = (bbox_targets[labels == 1, :] ** 2).sum(axis=0)
        _counts = np.sum(labels == 1)
        means = _sums / (_counts + 1e-14)
        stds = np.sqrt(_squared_sums / _counts - means ** 2)
        logger.debug('means %s' % means)
        logger.debug('stdevs %s' % stds)

    # map up to original set of anchors
# 前面介绍的是labels、bbox_targets和bbox_weights这3个重要变量的构建,
# 其构建的基础都是基于indx_inside这个重要的变量,也就是将初始anchor中坐标值在图像尺寸以外的bbox都过滤掉。
# 而接下来的3行代码则是将labels、bbox_targets和bbox_weights这3个变量重新映射回过滤之前的bbox。
# 所以假设RPN网络的输入feature map大小是38*50,那么最终这3个变量的第一个维度就是9*38*50=17100,
# 也就是最原始的anchor数量。当然,被过滤掉的bbox的label都是-1,bbox_targets都是0,
# bbox_weights都是0,因此对于RPN网络的训练而言没有帮助。
    labels = _unmap(labels, total_anchors, inds_inside, fill=-1)
    bbox_targets = _unmap(bbox_targets, total_anchors, inds_inside, fill=0)
    bbox_weights = _unmap(bbox_weights, total_anchors, inds_inside, fill=0)

    if logger.level == logging.DEBUG:
        if gt_boxes.size > 0:
            logger.debug('rpn: max max_overlaps %f' % np.max(max_overlaps))
        logger.debug('rpn: num_positives %f' % np.sum(labels == 1))
        logger.debug('rpn: num_negatives %f' % np.sum(labels == 0))
        _fg_sum = np.sum(labels == 1)
        _bg_sum = np.sum(labels == 0)
        _count = 1
        logger.debug('rpn: num_positive avg %f' % (_fg_sum / _count))
        logger.debug('rpn: num_negative avg %f' % (_bg_sum / _count))


# 最后就是一些reshape操作和字典的构造并返回。最后几个输出的情况:labels的维度是1*17100,
# bbox_targets的维度是1*36*38*50,bbox_targets的维度是1*36*38*50。
    labels = labels.reshape((1, feat_height, feat_width, A)).transpose(0, 3, 1, 2)
    labels = labels.reshape((1, A * feat_height * feat_width))
    bbox_targets = bbox_targets.reshape((1, feat_height, feat_width, A * 4)).transpose(0, 3, 1, 2)
    bbox_weights = bbox_weights.reshape((1, feat_height, feat_width, A * 4)).transpose((0, 3, 1, 2))

    label = {'label': labels,
             'bbox_target': bbox_targets,
             'bbox_weight': bbox_weights}
return label介绍完了anchor的定义、生成、标签分配,相信你对anchor的了解会更近一步。anchor是从初始化开始就固定了,所以anchor这个名字真的非常形象(翻译过来是锚)。
在Faster RCNN算法中你肯定还会经常听到另一个名词:region proposal(或者简称proposal,或者简称ROI),可以说RPN网络的目的就是为了得到proposal,这些proposal是对ground truth更好的刻画(和anchor相比,坐标更贴近ground truth,毕竟anchor的坐标都是批量地按照scale和aspect ratio复制的)。如果你还记得在系列二中关于网络结构的介绍,那么你就应该了解到RPN网络的回归支路输出的值(offset)作为smooth l1损失函数的输入之一时,其含义就是使得proposal和anchor之间的offset(RPN网络的回归支路输出)尽可能与ground truth和anchor之间的offset(RPN网络的回归支路的回归目标,也就是这篇博客代码中的’bbox_target’)接近。
至此,关于RPN网络中anchor的内容就都介绍完了。我们知道在Faster RCNN算法中,RPN网络只是其中的一部分,在RPN网络得到proposal后还会经过一系列的过滤操作才会得到送入检测网络的proposal,这个在系列二中关于网络结构的构造中已经介绍得很清楚了。但是在系列二中有一个自定一个网络层用来将2000个proposal过滤成128个,且为这128个proposal分配标签、回归目标、定义正负样本的1:3比例等,这部分算是RPN网络和检测网络(Fast RCNN)的衔接,因此下一篇博客就来介绍该自定义层的内容:Faster RCNN代码详解(五):关于检测网络(Fast RCNN)的proposal。
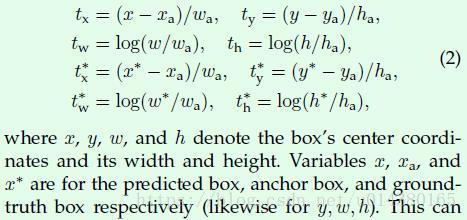
附:
Faster RCNN论文中的公式。bbox_transform函数中的第一个输入anchors相当于这里的xa,第二个输入gt_boxes[argmax_overlaps, :4]相当于这里的x*(y,w,h同理),而bbox_transform函数实现的就是截图中下面两行的4个式子,得到的tx*,ty*,tw*,th*就对应bbox_transform函数的输出bbox_targets。而前面两行式子计算的是在你得到预测的bbox信息(x,y,w,h)后与anchor box信息计算得到的tx,ty,tw,th。模型的回归部分损失函数计算是基于tx,ty,tw,th和tx*,ty*,tw*,th*。