目的
将视频接入进来以后,使用算法对图像进行处理并且输出
1 各种接入
2 解码
3 解码后图像算法 如矫正算法
4 共享输出
方式
使用动态库的方式进行扫描底层,每个动态库为一个插件,每个插件包含特定的函数,通过扫描的方式加载所有插件
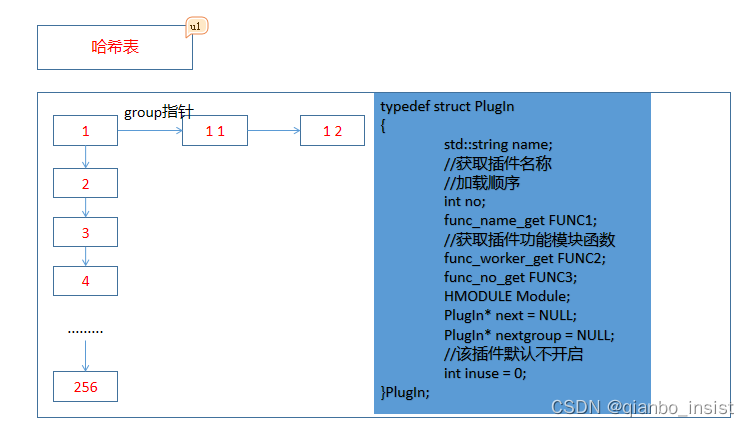
数据结构
typedef struct PlugIn
{


	std::string name;
	//获取插件名称
	//加载顺序
	int no;
	func_name_get FUNC1;
	//获取插件功能模块函数
	func_worker_get FUNC2;
	func_no_get FUNC3;
	HMODULE Module;
	PlugIn* next = NULL;
	PlugIn* nextgroup = NULL;
	//该插件默认不开启
	int inuse = 0;
}PlugIn;
其中,基本的数据结构包含PlugIn 数据结构,两个hash表,一个hash表为容器,存储所有对象,也方便立刻查找到某一个插件,另外一个hash表为指针数据,每个对象由next指针和nextgroup指针, nextgroup表示都为同一个no号码的动态库,比如no为0 的动态库优先级为最高,但是有三个,表示为同一优先级,并且可以并行执行,只有一个表示必须单独执行。最大插件为256,不能超过这个数目。超过这个数目不加载。
动态库示例
#include <stdint.h>
#include <opencv2/opencv.hpp>
#include <string>
extern "C"
{


	_declspec(dllexport) std::string WINAPI func_name();
	_declspec(dllexport) cv::Mat WINAPI _fastcall func_worker(cv::Mat& data, int w, int h);
	_declspec(dllexport) int WINAPI func_no();
}
3 插件框架
3.1 插件基础函数定义
typedef  std::string (WINAPI *func_name_get)();
typedef cv::Mat (WINAPI *func_worker_get)(cv::Mat& data, int w, int h);
typedef int (WINAPI *func_no_get)();
三个函数分别表示为名称获取,功能,no号码获取,每个插件必须包含这三个函数
3.2 扫描文件系统
	int scandll(const std::string &path, std::vector<std::string> &dirs,
		std::vector<std::string> &files)
	{


		struct _finddata_t filedata;
		memset(&filedata, 0x0, sizeof(filedata));
		std::string _path = path;

		//windows is dll
		_path += "\\*.dll";

		intptr_t handle = _findfirst(_path.c_str(), &filedata);
		if (handle == -1)
		{


			std::cout<<"扫描目录失败.\n"<<std::endl;
			return -1;

		}

		do
		{


			if (filedata.name[0] != '.')
			{


				//cout<<file.name<<endl;

				if (filedata.attrib & _A_SUBDIR)
					dirs.push_back(filedata.name);
				else
					files.push_back(path+"\\"+filedata.name);

				if (filedata.attrib & _A_SUBDIR)
				{


					//文件为目录(文件夹)


					std::string tmp_path = path;
					tmp_path += "\\";
					tmp_path += filedata.name;

					//递归遍历
					scandll(tmp_path, dirs, files);
				}
			}

		} while (!_findnext(handle, &filedata));

		_findclose(handle);
		return 0;
	}
该函数为扫描文件夹下plugin 下面文件夹所有的动态库,window下扫描所有dll, 而linux下则扫描所有 so 文件
	int loadall(std::vector<std::string> dlls)
	{


		memset(&v_cache[0], 0, sizeof(v_cache));
		int ret = 0;
		auto iter = dlls.begin();
		while (iter != dlls.end())
		{


			if (load(*iter) == 0)
				ret++;
			iter++;
		}
		PlugIn* a = NULL;
		PlugIn* b = NULL;
		//将指针数据里的数据链接起来
		for (int i = v_minno; i <= v_maxno; ++i)
		{


			if (v_cache[i] != NULL)
			{


				if (a == NULL)
				{


					a = v_cache[i];
					//记录第一个编号,最小的编号
					v_firstno = i;
				}
				else
				{


					a->nextgroup = v_cache[i];
					a = v_cache[i];
				}
			}
		}

		return ret;
	}
以上为装载过程,单个load函数如下所示:
	//改进算法使用链表和
	int load(std::string& name)
	{


		std::cout << "load name " << name << std::endl;
		PlugIn plugin;
		plugin.no = -1;
		//func_name_get FUNC1 = NULL;
		//func_worker_get FUNC2 = NULL;
		plugin.Module = LoadLibraryA(name.c_str());
		if (plugin.Module == NULL)
			return -1;
		plugin.FUNC1 = (func_name_get)GetProcAddress(plugin.Module, "func_name");
		plugin.FUNC2 = (func_worker_get)GetProcAddress(plugin.Module, "func_worker");
		plugin.FUNC3 = (func_no_get)GetProcAddress(plugin.Module, "func_no");
		if (plugin.FUNC3 != NULL)
		{


			plugin.no = plugin.FUNC3();
		}
		else
		{


			FreeLibrary(plugin.Module);
			return -1;
		}
		if (plugin.no > (PLUGIN_MAX - 1))//编号过大直接卸载
		{


			FreeLibrary(plugin.Module);
			return -1;
		}
		if (plugin.no < 0)
			plugin.no = 0;

		if (plugin.FUNC1 != NULL && plugin.FUNC2!=NULL)
		{


			plugin.name = plugin.FUNC1();
			//hash表准备
			v_mapplugin[plugin.no] = plugin;

			PlugIn* pobj = &v_mapplugin[plugin.no];

			int no = plugin.no;
			if (no > v_maxno)
				v_maxno = no;//记录最大插件编号
			if (no < v_minno)
				v_minno = no;//记录最小插件编号
			//cache表只是按顺序放的指针
			PlugIn* tmp = v_cache[no];
			if (tmp == NULL)
				v_cache[no] = pobj;
			else
			{


				while (tmp != NULL && tmp->next != NULL)
				{


					tmp = tmp->next;
				}
				tmp->next = pobj;
			}

		}
		return 0;
	}
单个插件装载的时候要注意是否有同一插件编号,有则挂到最末端的指针,如果要在组里面继续使用优先级,可以改变上面代码,增加一个组内编号。
单元测试
将以上函数封装成类后,使用单例挂载对象,指定扫描目录为plugin,开始加载,执行函数,下面测试只简单测试是否挂载正常,打印所有链接的插件名称。
#include "../client/plug.h"
#include <iostream>
#ifdef _DEBUG
#pragma comment(lib,"opencv_world450d.lib")
#else
#pragma comment(lib,"opencv_world450.lib")
#endif
using namespace std;
int main()
{


	//PlugIn* v_cache[256] = { 0 };

	//PlugIn in1;
	//in1.no = 2;
	//in1.name = "test";
	//v_cache[in1.no] = &in1;

	//std::cout << v_cache[2]->name << std::endl;


	string path = "plugin";
	vector<string> sub_dir,sub_file;

	c_plugins::instance()->scandll(path, sub_dir, sub_file);

	c_plugins::instance()->loadall(sub_file);

	c_plugins::instance()->printoutname();
 这里可以执行图像函数,输入opencv Mat
	c_plugins::instance()->unload_all();
	return 0;
}
测试结果

继续改进
将使用热插拔的方式继续改进,以上代码暂时是在windows上执行,下一版将增加linux代码。