简介
ET框架是类ECS的一个Unity前后端框架
论坛地址为:https://et-framework.cn
Git地址为:https://github.com/egametang/ET
预备知识
Unity程序集的使用
接入流程
本文将会以7.2版本进行分析。所以直接clone github上的仓库,将工程导入到本地,之后将分支切换到最新的release分支,"release7.2"
菜单栏相关
ENABLE_CODE选项
ET->ChangeDefine->ADD_ENABLE_CODE/REMOVE_ENABLE_CODE
一般在开发阶段使用Editor时需要启用ENABLE_CODE选项。该选项启用时,修改脚本之后,会直接重新编译所有的代码,Editor在运行时会直接使用最新的程序集。如果ENABLE_CODE选项是关闭的,框架启动后会加载之前生成的程序集文件(这个文件需要在ET->BuildTool界面生成),导致每次需要应用修改,都要重新生成程序集文件。
框架解析
框架入口解析
启动流程如下
- 入口文件为Init,之后调用CodeLoader对代码进行加载
- 如果是EnableCodes模式则直接加载程序集。否则通过AB加载文件,之后调用LoadHotfix函数
- LoadHotfix会加载程序集,并且调用EventSystem,根据特性注册对应事件的监听。
- 之后调用ET.Entry的Start方法。
- ET.Entry.Start 进行初始化之后,推送对应的EntryEvent事件
- 推送EntryEvent3,EntryEvent3_InitClient接收后推送AppStartInitFinish
- AppStartInitFinish_CreateLoginUI接收该事件后,创建UI场景
UI系统
UI界面的生成流程
ET是通过异步方式创建UI,如下方例子,调用UIHelper.Create方法,指定创建UI的场景,UI类型和对应的层级
| C#
protected override async ETTask Run(Scene scene, EventType.AppStartInitFinish args)
{
await UIHelper.Create(scene, UIType.UILogin, UILayer.Mid);
}
扫描二维码关注公众号,回复:
15512899 查看本文章

|
调用scene挂载的UIComponent组件,处理Create事件
| C#
public static async ETTask<UI> Create(Scene scene, string uiType, UILayer uiLayer)
{
return await scene.GetComponent<UIComponent>().Create(uiType, uiLayer);
} |
之后会标记有对应UIEvent特性的类,处理该事件,开始加载资源并生成对应的GameObject
| C#
[UIEvent(UIType.UILogin)]
public class UILoginEvent: AUIEvent
{
public override async ETTask<UI> OnCreate(UIComponent uiComponent, UILayer uiLayer)
{
await uiComponent.DomainScene().GetComponent<ResourcesLoaderComponent>().LoadAsync(UIType.UILogin.StringToAB());
GameObject bundleGameObject = (GameObject) ResourcesComponent.Instance.GetAsset(UIType.UILogin.StringToAB(), UIType.UILogin);
GameObject gameObject = UnityEngine.Object.Instantiate(bundleGameObject, UIEventComponent.Instance.GetLayer((int)uiLayer));
UI ui = uiComponent.AddChild<UI, string, GameObject>(UIType.UILogin, gameObject);
ui.AddComponent<UILoginComponent>();
return ui;
}
public override void OnRemove(UIComponent uiComponent)
{
ResourcesComponent.Instance.UnloadBundle(UIType.UILogin.StringToAB());
}
} |
UI组件解析
以UILogin为例子,对应的Prefab实际上只挂载了ReferenceCollector,ReferenceCollector负责将结点进行绑定

生成该GameObject之后,调用AddComponent
| C#
GameObject gameObject = UnityEngine.Object.Instantiate(bundleGameObject, UIEventComponent.Instance.GetLayer((int)uiLayer));
UI ui = uiComponent.AddChild<UI, string, GameObject>(UIType.UILogin, gameObject);
ui.AddComponent<UILoginComponent>(); |
其中UILoginComponent负责显示对应成员
| C#
[ComponentOf(typeof(UI))]
public class UILoginComponent: Entity, IAwake
{
public GameObject account;
public GameObject password;
public GameObject loginBtn;
} |
AddComponent之后,会调用对应的System,这里UILoginComponentSystem就是对应的System,在Awake阶段通过ReferenceCollector对UILoginComponent进行了绑定,以及实现了对应的UI逻辑
| C#
[ObjectSystem]
public class UILoginComponentAwakeSystem : AwakeSystem<UILoginComponent>
{
protected override void Awake(UILoginComponent self)
{
ReferenceCollector rc = self.GetParent<UI>().GameObject.GetComponent<ReferenceCollector>();
self.loginBtn = rc.Get<GameObject>("LoginBtn");
self.loginBtn.GetComponent<Button>().onClick.AddListener(()=> { self.OnLogin(); });
self.account = rc.Get<GameObject>("Account");
self.password = rc.Get<GameObject>("Password");
}
} |
场景切换
关于ET的场景切换相关逻辑可以查看
UILobbyComponentSystem处理进入Map的操作,先是调用EnterMap异步函数,等待EnterMapHelper异步返回后删除界面
| C#
//UILobbyComponentSystem
public static async ETTask EnterMap(this UILobbyComponent self)
{
await EnterMapHelper.EnterMapAsync(self.ClientScene());
await UIHelper.Remove(self.ClientScene(), UIType.UILobby);
} |
之后EnterMapHelper会向服务器发起进入Map的请求
| C#
//EnterMapHelper
public static async ETTask EnterMapAsync(Scene clientScene)
{
try
{
G2C_EnterMap g2CEnterMap = await clientScene.GetComponent<SessionComponent>().Session.Call(new C2G_EnterMap()) as G2C_EnterMap;
clientScene.GetComponent<PlayerComponent>().MyId = g2CEnterMap.MyId;
// 等待场景切换完成
await clientScene.GetComponent<ObjectWait>().Wait<Wait_SceneChangeFinish>();
EventSystem.Instance.Publish(clientScene, new EventType.EnterMapFinish());
}
catch (Exception e)
{
Log.Error(e);
}
} |
网络模块
获取路由地址示例
下面以获取路由地址为例,分析ET框架完成一次HTTP请求的过程。
主要包含的类有RouterAddressComponentSystem,RouterAddressComponent
其中RouterAddressComponent为数据的载体,负责填写请求参数,以及保存返回的数据
| C#
using System.Collections.Generic;
using System.Net;
using System.Net.Sockets;
namespace ET.Client
{
[ComponentOf(typeof(Scene))]
public class RouterAddressComponent: Entity, IAwake<string, int>
{
public IPAddress RouterManagerIPAddress { get; set; }
public string RouterManagerHost;
public int RouterManagerPort;
public HttpGetRouterResponse Info;
public int RouterIndex;
}
} |
RouterAddressComponentSystem则是处理获取路由的逻辑
| C#
using System;
using System.IO;
using System.Net;
using System.Net.Sockets;
namespace ET.Client
{
[FriendOf(typeof(RouterAddressComponent))]
public static class RouterAddressComponentSystem
{
public class RouterAddressComponentAwakeSystem: AwakeSystem<RouterAddressComponent, string, int>
{
protected override void Awake(RouterAddressComponent self, string address, int port)
{
self.RouterManagerHost = address;
self.RouterManagerPort = port;
}
}
public static async ETTask Init(this RouterAddressComponent self)
{
self.RouterManagerIPAddress = NetworkHelper.GetHostAddress(self.RouterManagerHost);
await self.GetAllRouter();
}
private static async ETTask GetAllRouter(this RouterAddressComponent self)
{
string url = $"http://{self.RouterManagerHost}:{self.RouterManagerPort}/get_router?v={RandomGenerator.RandUInt32()}";
Log.Debug($"start get router info: {url}");
string routerInfo = await HttpClientHelper.Get(url);
Log.Debug($"recv router info: {routerInfo}");
HttpGetRouterResponse httpGetRouterResponse = JsonHelper.FromJson<HttpGetRouterResponse>(routerInfo);
self.Info = httpGetRouterResponse;
Log.Debug($"start get router info finish: {JsonHelper.ToJson(httpGetRouterResponse)}");
// 打乱顺序
RandomGenerator.BreakRank(self.Info.Routers);
self.WaitTenMinGetAllRouter().Coroutine();
}
// 等10分钟再获取一次
public static async ETTask WaitTenMinGetAllRouter(this RouterAddressComponent self)
{
await TimerComponent.Instance.WaitAsync(10 * 60 * 1000);
if (self.IsDisposed)
{
return;
}
await self.GetAllRouter();
}
public static IPEndPoint GetAddress(this RouterAddressComponent self)
{
if (self.Info.Routers.Count == 0)
{
return null;
}
string address = self.Info.Routers[self.RouterIndex++ % self.Info.Routers.Count];
string[] ss = address.Split(':');
IPAddress ipAddress = IPAddress.Parse(ss[0]);
if (self.RouterManagerIPAddress.AddressFamily == AddressFamily.InterNetworkV6)
{
ipAddress = ipAddress.MapToIPv6();
}
return new IPEndPoint(ipAddress, int.Parse(ss[1]));
}
public static IPEndPoint GetRealmAddress(this RouterAddressComponent self, string account)
{
int v = account.Mode(self.Info.Realms.Count);
string address = self.Info.Realms[v];
string[] ss = address.Split(':');
IPAddress ipAddress = IPAddress.Parse(ss[0]);
//if (self.IPAddress.AddressFamily == AddressFamily.InterNetworkV6)
//{
// ipAddress = ipAddress.MapToIPv6();
//}
return new IPEndPoint(ipAddress, int.Parse(ss[1]));
}
}
} |
请求过程,是先添加RouterAddressComponent组件,在添加时填入对应的HTTP请求地址和端口号
之后调用routerAddressComponent的Init方法。
| C#
//获取RouterAddressComponent
RouterAddressComponent routerAddressComponent = clientScene.GetComponent<RouterAddressComponent>();
if (routerAddressComponent == null)
{
//如果RouterAddressComponent不存在,就添加RouterAddressComponent组件,并且填入HTTP请求的地址和端口号
routerAddressComponent = clientScene.AddComponent<RouterAddressComponent, string, int>(ConstValue.RouterHttpHost, ConstValue.RouterHttpPort);
await routerAddressComponent.Init();
clientScene.AddComponent<NetClientComponent, AddressFamily>(routerAddressComponent.RouterManagerIPAddress.AddressFamily);
} |
| C#
public static async ETTask Init(this RouterAddressComponent self)
{
self.RouterManagerIPAddress = NetworkHelper.GetHostAddress(self.RouterManagerHost);
await self.GetAllRouter();
}
|
Protobuf的使用
proto文件
Proto文件放在Unity/Assets/Config/Proto之下
并且文件名有特定的命名规范,以InnerMessage_S_20001.proto为例,以"_"为分割符,第一个字符串"InnerMessage"是文件名,第二个字符串"S"是用于区分Server还是Client,第三个字符串"20001"为协议起始的编号
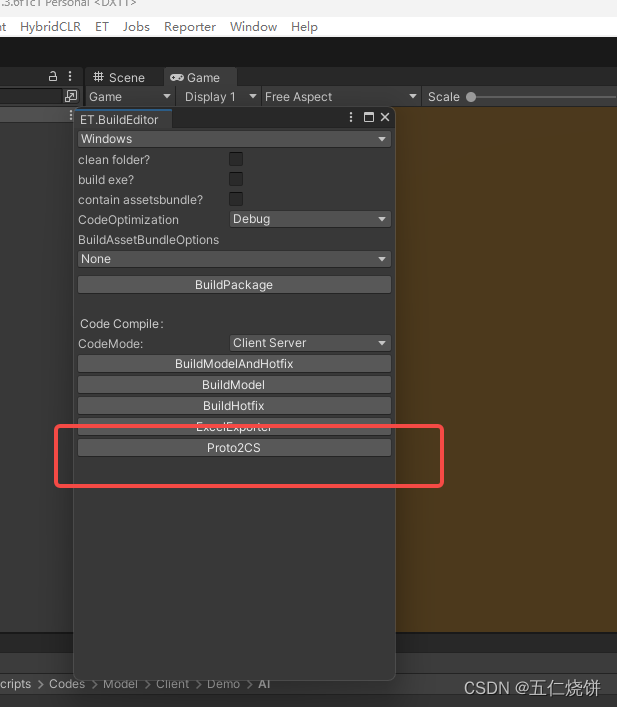
生成Proto的c#文件
点击菜单栏ET->Build Tool->Proto2CS,生成成功之后会在Scripts/Codes/Model/Generate
需要注意的是et使用的是protobuf-net
https://github.com/protobuf-net/protobuf-net
区别于google的protocolbuffers的c#版本
https://github.com/protocolbuffers/protobuf
问题解决
1.当前 .NET SDK 不支持将 .NET 6.0 设置为目标。请将 .NET 5.0 或更低版本设置为目标,或使用支持 .NET 6.0 的 .NET SDK 版本。 C:\Program Files\dotnet\sdk\5.0.414\Sdks\Microsoft.NET.Sdk\targets\Microsoft.NET.TargetFrameworkInference.targets 141
解决方案:这个问题是由于visiual studio 2019 不支持.NET 6.0。需要将开发软件升级到visual studio 2022