文章目录
1、了解 XML 使用和布局
本节主要介绍 DuiLib 中 XML 关键字的使用和一些特性,通过构建一个简单的带标题栏和简单结构的窗口,目的为了了解 XML 的布局系统、基本控件和一些全局属性。在介绍之前我们先改造一下程序,让程序在 Debug 模式下使用本地的 XML 文件,只有在发布为 Release 版本时才使用打包到程序中的 ZIP 资源文件。修改 GetSkinFolder 和 GetResourceType 两个方法,如下所示。
DuiLib::CDuiString MainWndFrame::GetSkinFolder()
{


	#if _DEBUG
		return _T("theme");
	#else
		return m_PaintManager.GetInstancePath();
	#endif
}
.....
.....
DuiLib::UILIB_RESOURCETYPE MainWndFrame::GetResourceType() const
{


	#if _DEBUG
		return UILIB_FILE;
	#else
		return UILIB_ZIPRESOURCE;
	#endif
}
这样我们程序在 Debug 模式下使用的就是本地的 theme 文件夹内的资源了,主要是方便我们进行更新即时查看。接下来我们先从主要的几个布局开始,DuiLib 中重要的几个布局分别如下:
- VerticalLayout。
- HorizontalLayout。
- TabLayout。
- Container。
- ChildLayout。
使用频率由上到下,下面我们分别介绍几种布局的特点。
2、VerticalLayout和HorizontalLayout
DuiLib 的布局系统类似于 Qt 的布局系统, HorizontalLayout 和 VerticalLayout(垂直布局)来给界面划分整体区域。 HorizontalLayout 顾名思义,就是让其包含的控件以水平位置排布。而 VerticalLayout 则是让起包含的控件以垂直方向进行排布。两种布局在界面中最终体现为什么样子?我们可以做一个实现来验证一下效果。但无论我们使用什么布局,最少要有一个最外部的布局。如下所示:
<?xml version="1.0" encoding="UTF-8"?>
<Window size="640,480" caption="0,0,0,35">
  <VerticalLayOut>
    <!--窗口内容-->
  </VerticalLayOut>
</Window>
第一行是 xml 描述,这个必须要有的,不了解的同学可以搜索一些 XML 相关的介绍教程,十几分钟就看的差不多了。Window 标签也是必须要有的外部标签,size 属性决定了这个窗口的大小,caption 属性决定了这个窗口的标题栏有效范围是多大的,我们设置了 35 像素,也就是整个窗口最上方的 35 像素是可以用鼠标点击拖动的,更多的属性我们后面再来看 属性列表xml,这里先不多介绍。
DuiLib 通过这个Window 标签来识别窗口。Window 里面的 VerticalLayout是一个最外部的布局,我们要写窗体的内部构成,都是基于这个最基本的窗体布局系统来完成的。当然你并不一定必须用 VerticalLayout来做最外部的布局,这要看你窗口的实际布局效果。如果窗体是从左到右的水平布局模式,那你应该用 HorizontalLayout 。
首先我们在这个上下布局基本的布局系统中添加三个左右布局的子布局 HorizontalLayout并设置成三种不同的颜色(通过 bkcolor 属性)来看一下效果是什么样子的。
<?xml version="1.0" encoding="UTF-8"?>
<Window size="640,480" caption="0,0,0,35">
  <VerticalLayOut>
    <!--窗口内容-->
      <HorizontalLayout bkcolor="#FFD81E06" />
      <HorizontalLayout bkcolor="#FF1AFA29" />
      <HorizontalLayout bkcolor="#FF1296DB" />
  </VerticalLayOut>
</Window>
以上效果在程序运行后显示如下效果。
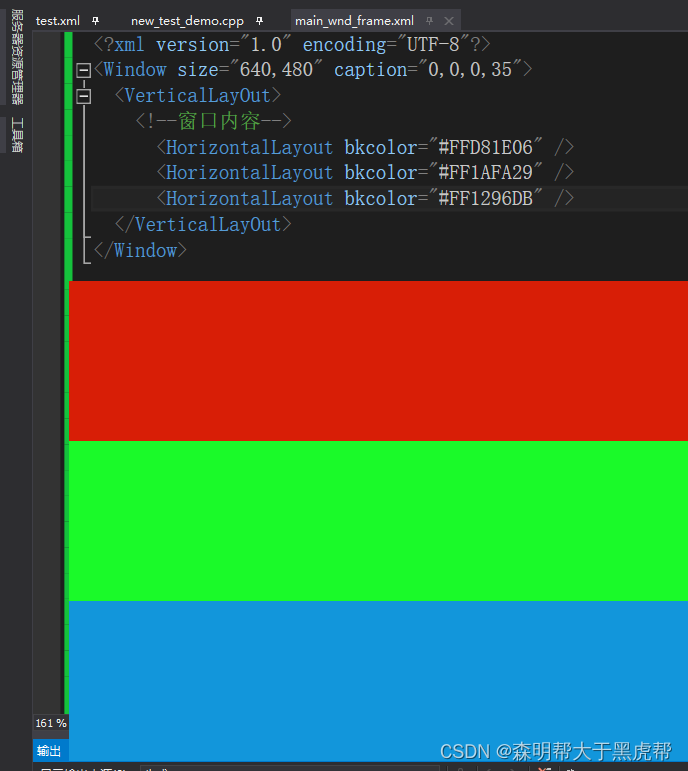
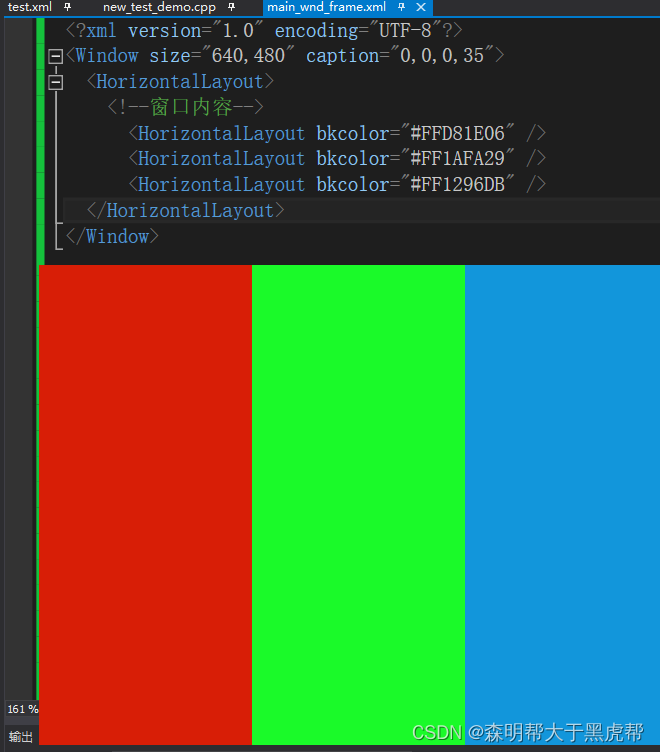
可以看出,三个 HorizontalLayout被父控件规定为以垂直方式布局,从上到下依次排列,垂直布局不关心控件宽度,如果我们把外部的 VerticalLayout 修改为 HorizontalLayout。那么下面的三个控件应该是水平的从做到右以此排列。如下所示:
<?xml version="1.0" encoding="UTF-8"?>
<Window size="640,480" caption="0,0,0,35">
  <HorizontalLayout>
    <!--窗口内容-->
      <HorizontalLayout bkcolor="#FFD81E06" />
      <HorizontalLayout bkcolor="#FF1AFA29" />
      <HorizontalLayout bkcolor="#FF1296DB" />
  </HorizontalLayout>
</Window>
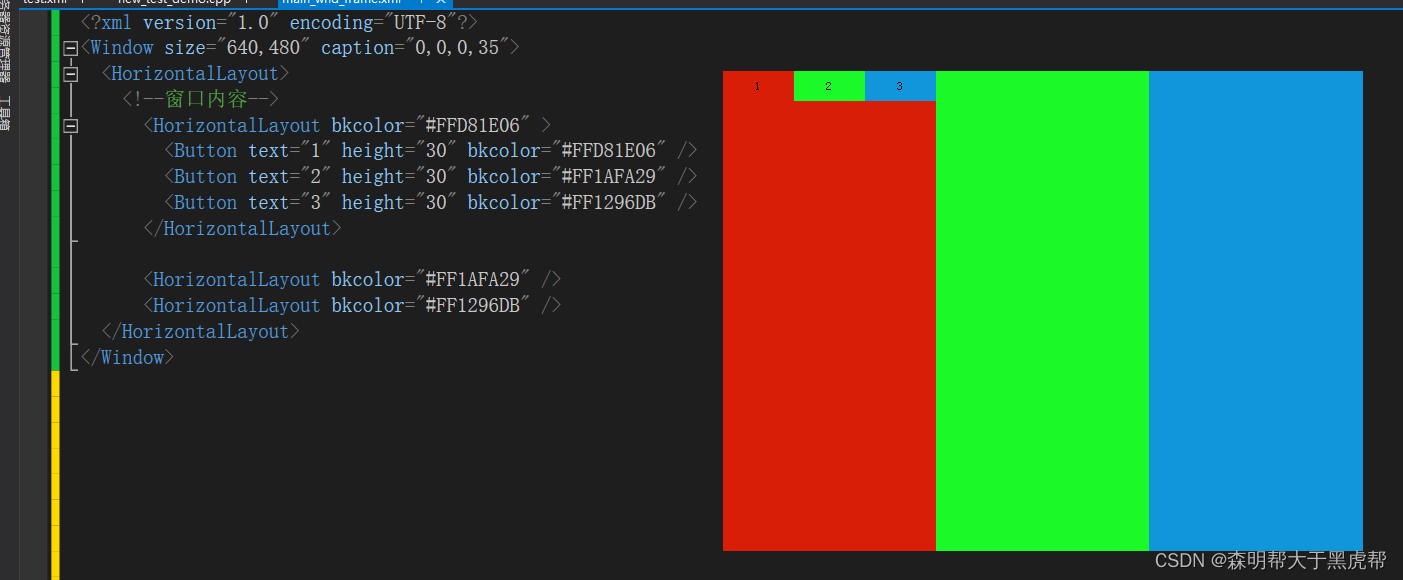
如果我们在子布局中再添加一些其他的控件,我们就能看出, HorizontalLayout下面的控件也是遵循它父级的规定来水平布局的。如下所示:
<?xml version="1.0" encoding="UTF-8"?>
<Window size="640,480" caption="0,0,0,35">
  <HorizontalLayout>
    <!--窗口内容-->
      <HorizontalLayout bkcolor="#FFD81E06" >
        <Button text="1" height="30" bkcolor="#FFD81E06" />
        <Button text="2" height="30" bkcolor="#FF1AFA29" />
        <Button text="3" height="30" bkcolor="#FF1296DB" />
      </HorizontalLayout>

      <HorizontalLayout bkcolor="#FF1AFA29" />
      <HorizontalLayout bkcolor="#FF1296DB" />
  </HorizontalLayout>
</Window>
控件的排布效果如下:
这就是基本的水平和垂直布局系统的简单介绍,这两种布局是使用频率最高的了,基本上界面的布局需求都可以通过这两种布局来实现了。但是总会有个别的布局场景是需要个性化一点的,就像下面的TabLayout。
3、TabLayout
TabLayout 实现了一个 Tab 标签页方式的布局系统,其下包含的内容只能显示一个。如下所示,默认显示第一个红色的布局。
<?xml version="1.0" encoding="UTF-8"?>
<Window size="640,480" caption="0,0,0,35">
  <TabLayout>
    <!--窗口内容-->
      <HorizontalLayout bkcolor="#FFD81E06" >
        <Button text="1" height="30" bkcolor="#FFD81E06" />
        <Button text="2" height="30" bkcolor="#FF1AFA29" />
        <Button text="3" height="30" bkcolor="#FF1296DB" />
      </HorizontalLayout>

      <HorizontalLayout bkcolor="#FF1AFA29" />
      <HorizontalLayout bkcolor="#FF1296DB" />
  </TabLayout>
</Window>
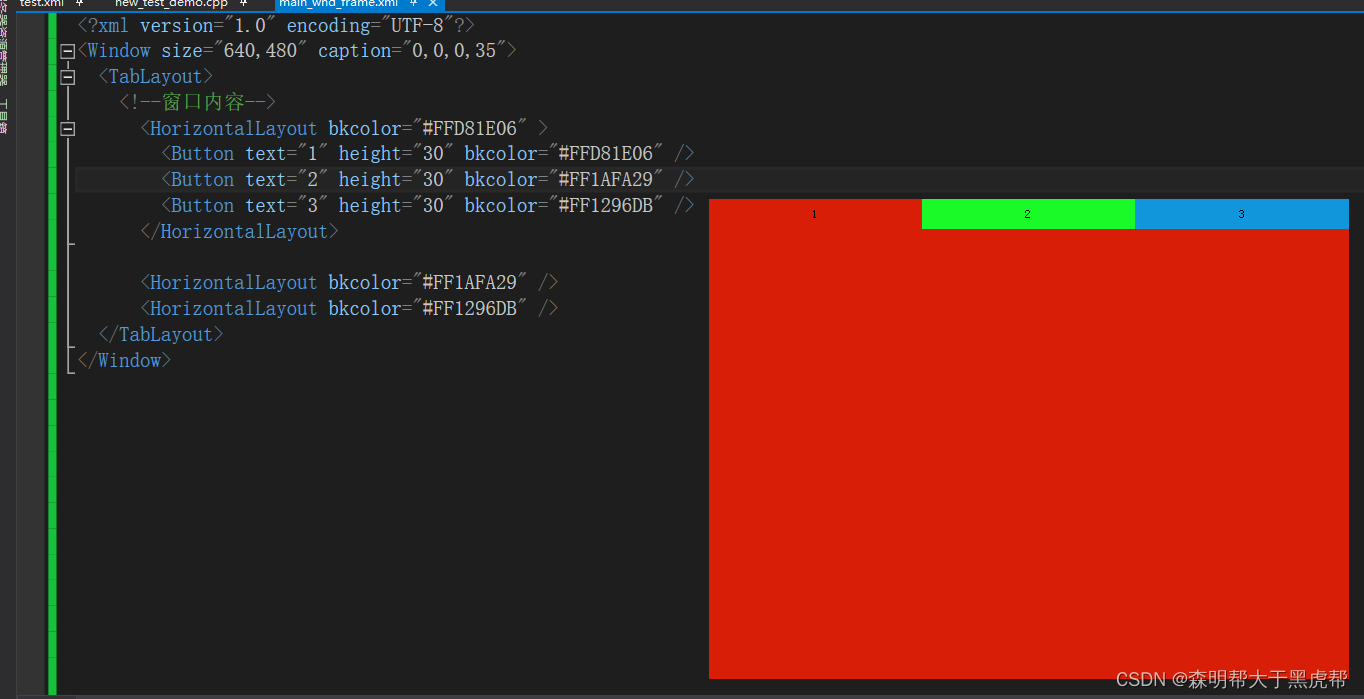
而想显示另外的两个布局,我们需要通过代码来控制。这里大家只需要有一个概念,后面我们模仿其他 Demo 的时候会用到这个布局。
4、TileLayout
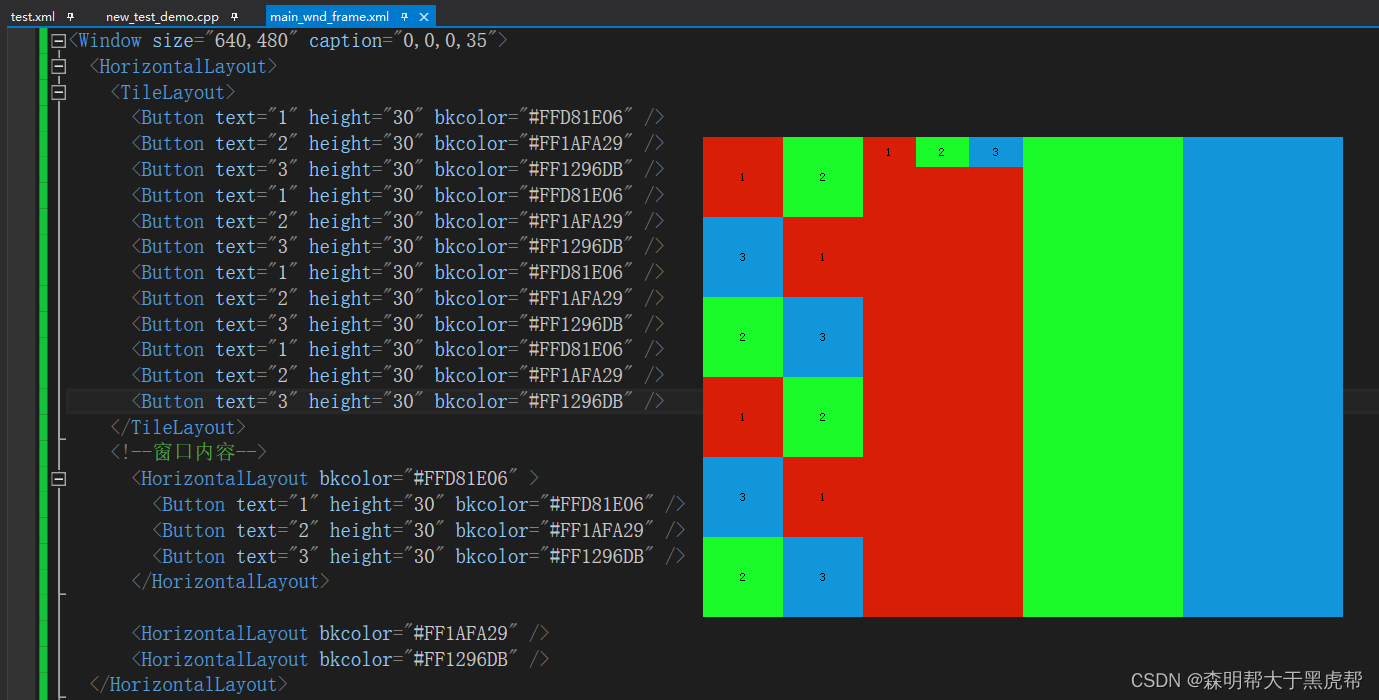
TileLayout 是一个块级的布局,它下面的控件都会以块为单位,像麻将一样一排一排的组合,测试代码:
<Window size="640,480" caption="0,0,0,35">
  <HorizontalLayout>
    <TileLayout>
      <Button text="1" height="30" bkcolor="#FFD81E06" />
      <Button text="2" height="30" bkcolor="#FF1AFA29" />
      <Button text="3" height="30" bkcolor="#FF1296DB" />
      <Button text="1" height="30" bkcolor="#FFD81E06" />
      <Button text="2" height="30" bkcolor="#FF1AFA29" />
      <Button text="3" height="30" bkcolor="#FF1296DB" />
      <Button text="1" height="30" bkcolor="#FFD81E06" />
      <Button text="2" height="30" bkcolor="#FF1AFA29" />
      <Button text="3" height="30" bkcolor="#FF1296DB" />
      <Button text="1" height="30" bkcolor="#FFD81E06" />
      <Button text="2" height="30" bkcolor="#FF1AFA29" />
      <Button text="3" height="30" bkcolor="#FF1296DB" />
    </TileLayout>
    <!--窗口内容-->
      <HorizontalLayout bkcolor="#FFD81E06" >
        <Button text="1" height="30" bkcolor="#FFD81E06" />
        <Button text="2" height="30" bkcolor="#FF1AFA29" />
        <Button text="3" height="30" bkcolor="#FF1296DB" />
      </HorizontalLayout>

      <HorizontalLayout bkcolor="#FF1AFA29" />
      <HorizontalLayout bkcolor="#FF1296DB" />
  </HorizontalLayout>
</Window>
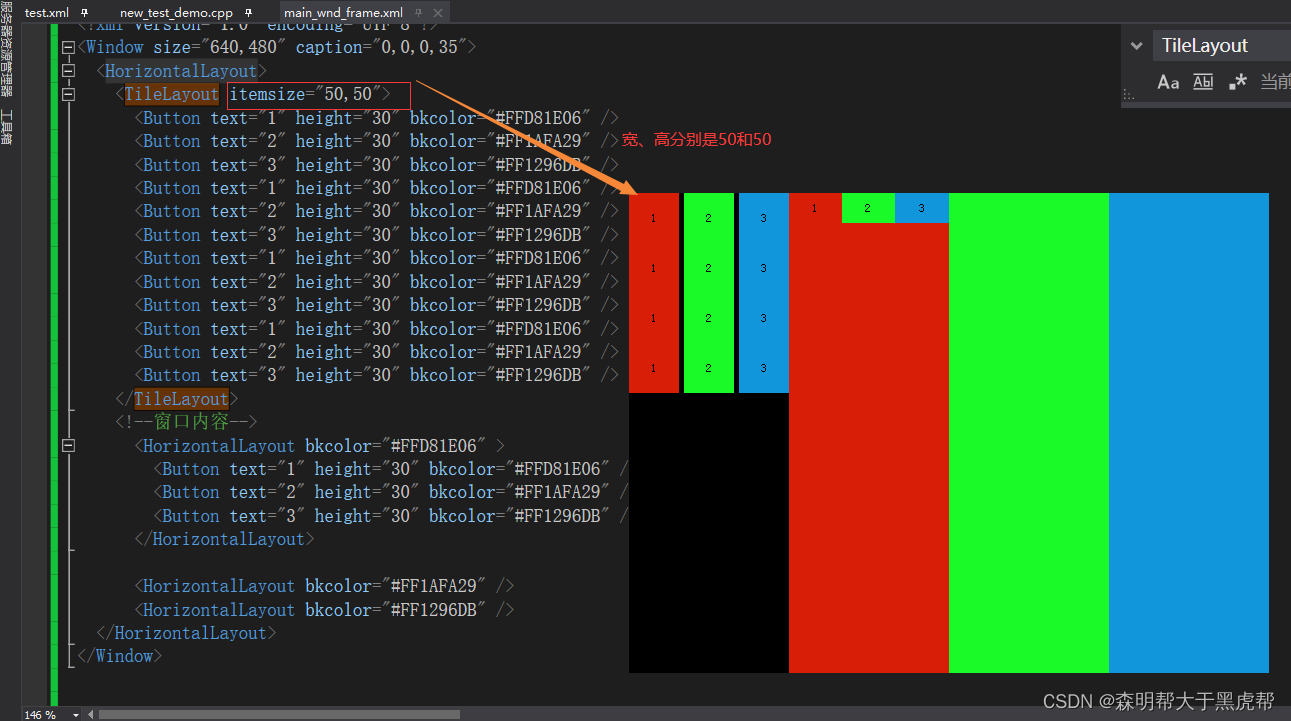
TileLayout 有两个比较关键的属性,itemsize 和 columns,两者不能同时使用。前者决定 TileLayout 包含的子控件以多大尺寸来排列,后者决定了TileLayout 有几列数据,我们先将 itemsize 指定为 “50,50”,就是告诉 TileLayout 让子控件以宽度和高度分别 50 的大小来进行排列。效果如下:
<?xml version="1.0" encoding="UTF-8"?>
<Window size="640,480" caption="0,0,0,35">
  <HorizontalLayout>
    <TileLayout itemsize="50,50">
      <Button text="1" height="30" bkcolor="#FFD81E06" />
      <Button text="2" height="30" bkcolor="#FF1AFA29" />
      <Button text="3" height="30" bkcolor="#FF1296DB" />
      <Button text="1" height="30" bkcolor="#FFD81E06" />
      <Button text="2" height="30" bkcolor="#FF1AFA29" />
      <Button text="3" height="30" bkcolor="#FF1296DB" />
      <Button text="1" height="30" bkcolor="#FFD81E06" />
      <Button text="2" height="30" bkcolor="#FF1AFA29" />
      <Button text="3" height="30" bkcolor="#FF1296DB" />
      <Button text="1" height="30" bkcolor="#FFD81E06" />
      <Button text="2" height="30" bkcolor="#FF1AFA29" />
      <Button text="3" height="30" bkcolor="#FF1296DB" />
    </TileLayout>
    <!--窗口内容-->
      <HorizontalLayout bkcolor="#FFD81E06" >
        <Button text="1" height="30" bkcolor="#FFD81E06" />
        <Button text="2" height="30" bkcolor="#FF1AFA29" />
        <Button text="3" height="30" bkcolor="#FF1296DB" />
      </HorizontalLayout>

      <HorizontalLayout bkcolor="#FF1AFA29" />
      <HorizontalLayout bkcolor="#FF1296DB" />
  </HorizontalLayout>
</Window>
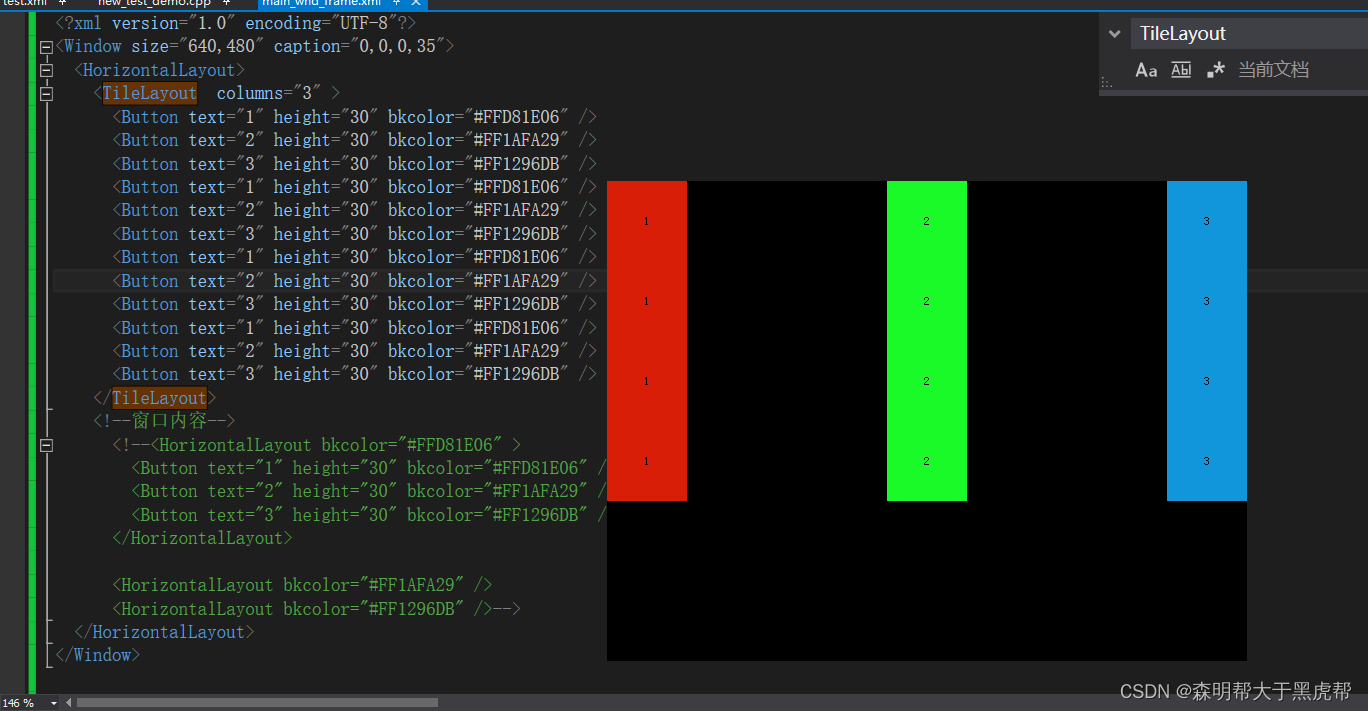
如果我们指定了 columns 为 3,那么行只有 3 列数据。
<?xml version="1.0" encoding="UTF-8"?>
<Window size="640,480" caption="0,0,0,35">
  <HorizontalLayout>
    <TileLayout  columns="3" >
      <Button text="1" height="30" bkcolor="#FFD81E06" />
      <Button text="2" height="30" bkcolor="#FF1AFA29" />
      <Button text="3" height="30" bkcolor="#FF1296DB" />
      <Button text="1" height="30" bkcolor="#FFD81E06" />
      <Button text="2" height="30" bkcolor="#FF1AFA29" />
      <Button text="3" height="30" bkcolor="#FF1296DB" />
      <Button text="1" height="30" bkcolor="#FFD81E06" />
      <Button text="2" height="30" bkcolor="#FF1AFA29" />
      <Button text="3" height="30" bkcolor="#FF1296DB" />
      <Button text="1" height="30" bkcolor="#FFD81E06" />
      <Button text="2" height="30" bkcolor="#FF1AFA29" />
      <Button text="3" height="30" bkcolor="#FF1296DB" />
    </TileLayout>
    <!--窗口内容-->
      <!--<HorizontalLayout bkcolor="#FFD81E06" >
        <Button text="1" height="30" bkcolor="#FFD81E06" />
        <Button text="2" height="30" bkcolor="#FF1AFA29" />
        <Button text="3" height="30" bkcolor="#FF1296DB" />
      </HorizontalLayout>

      <HorizontalLayout bkcolor="#FF1AFA29" />
      <HorizontalLayout bkcolor="#FF1296DB" />-->
  </HorizontalLayout>
</Window>
5、Container
Container 本来是所有 Layout 的基类,之所以没提前介绍它主要是它使用的场景比较少,它下面的子空间都是默认扩充整个容器的,这也就会导致所有子控件重叠在一起,除非你想实现这种效果,否则可能真的用不到它。
6、ChildLayout
ChildLayout 我基本没有用过,看过官方的一些例子和 Redrain 介绍,它的功能类似于 include 一个 XML。主要功能就是有些 XML 文件因为规划不合理代码写的又臭又长,使用这个布局可以将外部的 XML 引入到本 XML 文件中,指定它的 xmlfile 属性就可以了。