详解CommonsChunkPlugin的配置和用法
简介
CommonsChunkPlugin主要是用来提取第三方库和公共模块,避免首屏加载的bundle文件或者按需加载的bundle文件体积过大,从而导致加载时间过长,着实是优化的一把利器。
先来说一下各种教程以及文档中CommonsChunkPlugin提及到chunk有哪几种,主要有以下三种:
- entry chunk
webpack当中配置的入口文件(entry)是chunk。 - children chunk
入口文件以及它的依赖文件通过code split(代码分割)出来的也是chunk。 - commons chunk
通过CommonsChunkPlugin创建出来的文件也是chunk。
CommonsChunkPlugin可配置的属性:
- name
可以是已经存在的chunk(一般指入口文件)对应的name,那么就会把公共模块代码合并到这个chunk上;否则,会创建名字为name的commons chunk进行合并 - filename
指定commons chunk的文件名 - chunks
指定source chunk,即指定从哪些chunk当中去找公共模块,省略该选项的时候,默认就是entry chunks - minChunks
既可以是数字,也可以是函数,还可以是Infinity,具体用法和区别下面会说
children和async属于异步中的应用,放在了最后讲解。
可能这么说,大家会云里雾里,下面用demo来检验上面的属性。
实战应用
以下几个demo主要是测试以下几种情况:
- 不分离出第三方库和自定义公共模块
- 分离出第三方库、自定义公共模块、webpack运行文件,但它们在同一个文件中
- 单独分离第三方库、自定义公共模块、webpack运行文件,各自在不同文件
不分离出第三方库和自定义公共模块
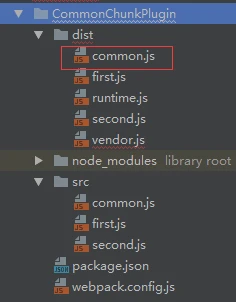
项目初始结构,后面打包后会生成dist目录:
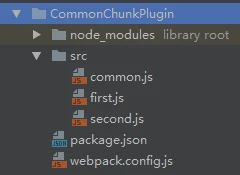
src目录下各个文件内容都很简洁的,如下:
common.js
export const common = 'common file';

first.js
import {

    common} from './common';
import $ from 'jquery';
console.log($,`first  ${

      common}`);

second.js
import {

    common} from './common';
import $ from 'jquery';
console.log($,`second ${

      common}`);
package.json文件:
{


  "name": "test",
  "version": "1.0.0",
  "description": "",
  "main": "index.js",
  "scripts": {


    "test": "echo \"Error: no test specified\" && exit 1",
    "build": "rimraf dist && webpack"
  },
  "author": "",
  "license": "ISC",
  "devDependencies": {


    "rimraf": "^2.6.2",
    "webpack": "^3.10.0",
    "webpack-dev-server": "^2.10.1"
  },
  "dependencies": {


    "jquery": "^3.2.1"
  }
}
webpack.config.js:
const path = require("path");
const webpack = require("webpack");

const config = {


    entry: {


        first: './src/first.js',
        second: './src/second.js'
    },
    output: {


        path: path.resolve(__dirname,'./dist'),
        filename: '[name].js'
    },
}

module.exports = config;
接着在命令行npm run build,此时项目中多了dist目录:
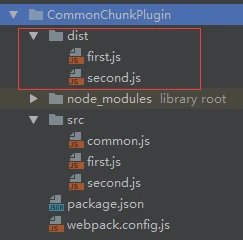
再来查看一下命令行中webpack的打包信息:

查看first.js和second.js,会发现共同引用的common.js文件和jquery都被打包进去了,这肯定不合理,公共模块重复打包,体积过大。
分离出第三方库、自定义公共模块、webpack运行文件
这时候修改webpack.config.js新增一个入口文件vendor和CommonsChunkPlugin插件进行公共模块的提取:

webpack.config.js:
const path = require("path");
const webpack = require("webpack");
const packagejson = require("./package.json");

const config = {


    entry: {


        first: './src/first.js',
        second: './src/second.js',
        vendor: Object.keys(packagejson.dependencies)//获取生产环境依赖的库
    },
    output: {


        path: path.resolve(__dirname,'./dist'),
        filename: '[name].js'
    },
    plugins: [
        new webpack.optimize.CommonsChunkPlugin({


            name: 'vendor',
            filename: '[name].js'
        }),
    ]
}

module.exports = config;
查看dist目录下,新增了一个vendor.js的文件:
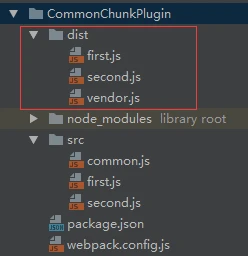
再来查看一下命令行中webpack的打包信息:

通过查看vendor.js文件,发现first.js和second.js文件中依赖的jquery和common.js都被打包进vendor.js中,同时还有webpack的运行文件。总的来说,我们初步的目的达到,提取公共模块,但是它们都在同一个文件中。
到这里,肯定有人希望自家的vendor.js纯白无瑕,只包含第三方库,不包含自定义的公共模块和webpack运行文件,又或者希望包含第三方库和公共模块,不包含webpack运行文件。
其实,这种想法是对,特别是分离出webpack运行文件,因为每次打包webpack运行文件都会变,如果你不分离出webpack运行文件,每次打包生成vendor.js对应的哈希值都会变化,导致vendor.js改变,但实际上你的第三方库其实是没有变,然而浏览器会认为你原来缓存的vendor.js就失效,要重新去服务器中获取,其实只是webpack运行文件变化而已,就要人家重新加载,好冤啊~
OK,接下来就针对这种情况来测试。
单独分离出第三方库、自定义公共模块、webpack运行文件
这里我们分两步走:
- 先单独抽离出webpack运行文件
- 接着单独抽离第三方库和自定义公共模块,这里利用minChunks有两种方法可以完成,往后看就知道了
抽离webpack运行文件
先来抽离webpack运行文件,修改webpack配置文件:
plugins: [
    new webpack.optimize.CommonsChunkPlugin({


        name: ['vendor','runtime'],
        filename: '[name].js'
    }),
]
其实上面这段代码,等价于下面这段:
 plugins: [
    new webpack.optimize.CommonsChunkPlugin({


        name: 'vendor',
        filename: '[name].js'
    }),
    new webpack.optimize.CommonsChunkPlugin({


        name: 'runtime',
        filename: '[name].js',
        chunks: ['vendor']
    }),
]
上面两段抽离webpack运行文件代码的意思是创建一个名为runtime的commons chunk进行webpack运行文件的抽离,其中source chunks是vendor.js。
查看dist目录下,新增了一个runtime.js的文件,其实就是webpack的运行文件:
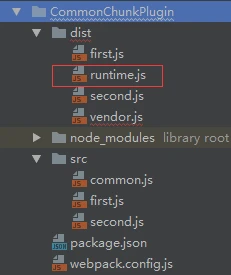
再来查看一下命令行中webpack的打包信息,你会发现vendor.js的体积已经减小,说明已经把webpack运行文件提取出来了:

可是,vendor.js中还有自定义的公共模块common.js,人家只想vendor.js拥有项目依赖的第三方库而已(这里是jquery),这个时候把minChunks这个属性引进来。
minChunks可以设置为数字、函数和Infinity,默认值是2,并不是官方文档说的入口文件的数量,下面解释下minChunks含义:
- 数字:模块被多少个chunk公共引用才被抽取出来成为commons chunk
- 函数:接受 (module, count) 两个参数,返回一个布尔值,你可以在函数内进行你规定好的逻辑来决定某个模块是否提取成为commons chunk
- Infinity:只有当入口文件(entry chunks) >= 3 才生效,用来在第三方库中分离自定义的公共模块
抽离第三方库和自定义公共模块
要在vendor.js中把第三方库单独抽离出来,上面也说到了有两种方法。
第一种方法
minChunks设为Infinity,修改webpack配置文件如下:
plugins: [
   new webpack.optimize.CommonsChunkPlugin({


        name: ['vendor','runtime'],
        filename: '[name].js',
        minChunks: Infinity
    }),
    new webpack.optimize.CommonsChunkPlugin({


        name: 'common',
        filename: '[name].js',
        chunks: ['first','second']//从first.js和second.js中抽取commons chunk
    }),
]
查看dist目录下,新增了一个common.js的文件:
再来查看一下命令行中webpack的打包信息,自定义的公共模块分离出来:
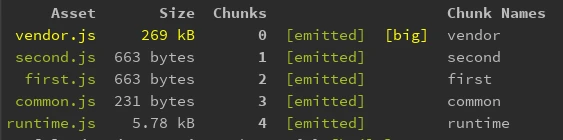
这时候的vendor.js就纯白无瑕,只包含第三方库文件,common.js就是自定义的公共模块,runtime.js就是webpack的运行文件。
第二种方法
把它们分离开来,就是利用minChunks作为函数的时候,说一下minChunks作为函数两个参数的含义:
- module:当前chunk及其包含的模块
- count:当前chunk及其包含的模块被引用的次数
minChunks作为函数会遍历每一个入口文件及其依赖的模块,返回一个布尔值,为true代表当前正在处理的文件(module.resource)合并到commons chunk中,为false则不合并。
继续修改我们的webpack配置文件,把vendor入口文件注释掉,用minChunks作为函数实现vendor只包含第三方库,达到和上面一样的效果:
const config = {


    entry: {


        first: './src/first.js',
        second: './src/second.js',
        //vendor: Object.keys(packagejson.dependencies)//获取生产环境依赖的库
    },
    output: {


        path: path.resolve(__dirname,'./dist'),
        filename: '[name].js'
    },
     plugins: [
        new webpack.optimize.CommonsChunkPlugin({


            name: 'vendor',
            filename: '[name].js',
            minChunks: function (module,count) {


                console.log(module.resource,`引用次数${

      count}`);
                //"有正在处理文件" + "这个文件是 .js 后缀" + "这个文件是在 node_modules 中"
                return (
                    module.resource &&
                    /\.js$/.test(module.resource) &&
                    module.resource.indexOf(path.join(__dirname, './node_modules')) === 0
                )
            }
        }),
        new webpack.optimize.CommonsChunkPlugin({


            name: 'runtime',
            filename: '[name].js',
            chunks: ['vendor']
        }),
    ]
}
上面的代码其实就是生成一个叫做vendor的commons chunk,那么有哪些模块会被加入到vendor中呢?就对入口文件及其依赖的模块进行遍历,如果该模块是js文件并且在node_modules中,就会加入到vendor当中,其实这也是一种让vendor只保留第三方库的办法。
再来查看一下命令行中webpack的打包信息:

你会发现,和上面minChunks设为Infinity的结果是一致的。
children和async属性
这两个属性主要是在code split(代码分割)和异步加载当中应用。
- children
1.1 指定为true的时候,就代表source chunks是通过entry chunks(入口文件)进行code split出来的children chunks。
1.2 children和chunks不能同时设置,因为它们都是指定source chunks的。
1.3 children 可以用来把 entry chunk 创建的 children chunks 的共用模块合并到自身,但这会导致初始加载时间较长。 - async
即解决children:true时合并到entry chunks自身时初始加载时间过长的问题。async设为true时,commons chunk 将不会合并到自身,而是使用一个新的异步的commons chunk。当这个children chunk 被下载时,自动并行下载该commons chunk。
修改webpack配置文件,增加chunkFilename,如下:
 output: {


        ...........
        chunkFilename: "[name].[hash:5].chunk.js",
    },
plugins: [
    new webpack.optimize.CommonsChunkPlugin({


        name: ['vendor','runtime'],
        filename: '[name].js',
        minChunks: Infinity
    }),
   new webpack.optimize.CommonsChunkPlugin({


        children: true,
        async: 'children-async'
    })
]
chunkFilename用来指定异步加载的模块名字,异步加载模块中的共同引用到的模块就会被合并到async中指定名字,上面就是children-async。
修改成异步截图出来太麻烦了,就简单说明一下:first和second是异步加载模块,同时它们共同引用了common.js这个模块,如果你不设置这一步:
 new webpack.optimize.CommonsChunkPlugin({


    children: true,
    async: 'children-async'
})
那么共同引用的common.js都被打包进各自的模块当中,就重复打包了。
OK,你设置之后,也得看children的脸色怎么来划分:
- children为true,共同引用的模块就会被打包合并到名为children-async的公共模块,当你懒加载first或者second的时候并行加载这和children-async公共模块
- children为false,共同引用的模块就会被打包到首屏加载的app.bundle当中,这就会导致首屏加载过长了,而且也不要用到,所以最好还是设为true
浏览器缓存的实现
先来说一下哈希值的不同:
- hash 是 build-specific ,即每次编译都不同——适用于开发阶段
- chunkhash 是 chunk-specific,是根据每个 chunk 的内容计算出的 hash——适用于生产
所以,在生产环境,要把文件名改成’[name].[chunkhash]’,最大限度的利用浏览器缓存。
最后,写这篇文章,自己测试了很多demo,当然不可能全部贴上,但还是希望自己多动手测试以下,真的坑中带坑。
https://github.com/creeperyang/blog/issues/37
https://segmentfault.com/q/1010000008726439/revision#r4
https://segmentfault.com/q/1010000009070061
https://www.jianshu.com/p/2b81262898a4
致谢
真诚的感谢 作者:Yanglinxiao 编写的优秀文章,解答了我对于“CommonsChunkPlugin”的困惑。
https://segmentfault.com/a/1190000012828879