感谢点赞和关注 ,每天进步一点点!加油!
目录
一、Ansible Roles概述
之前介绍了 Playbook 的使用方法,对于批量任务的部署和操作非常方便,但是耦合度比较高,不便于模块化、层次化的复用,为了层次性、结构化地组织playbook,我们可以使用roles来更加高效地组织playbooks;roles能够根据层次型结构自动装载变量文件、tasks以及handlers等。要使用roles只需要在playbook中使用include指令即可。
1.1.roles官方的目录结构
roles
    ├── test
    │   ├── README.md
    │   ├── defaults
    │   │   └── main.yml
    │   ├── files
    │   ├── handlers
    │   │   └── main.yml
    │   ├── meta
    │   │   └── main.yml
    │   ├── tasks
    │   │   └── main.yml
    │   ├── templates
    │   ├── tests
    │   │   ├── inventory
    │   │   └── test.yml
    │   └── vars
    │       └── main.yml
通过目录结构说明:
- templates:template模块查找所需要模板文件的目录
- tasks:定义task,role的基本元素,至少有一个名为main.yml的文件;其它的文件需要在此文件中通过include引入
- handlers:至少有一个名为main.yml的文件;其它的文件需要在此文件中通过include引
- vars:定义变量,至少有一个名为main.yml的文件;其它的文件需要在此文件中通过include引入
- meta:定义当前角色的特殊设定及其依赖关系,至少有一个名为main.yml的文件,其它文件需在此文件中通过include引入
- default:设定默认变量时使用此目录中的main.yml文件,比vars的优先级低
1.2.Ansible Roles依赖关系
roles允许您在使用role时自动引入其他 role。role依赖关系存储在role目录中meta/main.yml文件中。
例如:安装wordpress需要先确保nginx与PHP都能正常运行,此时可以在 wordpress的role中定义,依赖Nginx与PHP-fpm的roles。
[root@devops ~]# cat /root/roles/wordpress/meta/main.yml
---
dependencies:
  - { role: nginx }
  - { role: [php-fpm }
此时 wordpress 的role 会先执行 nginx的role、然后执行php-fpm的role,最后执行wordpress本身的role。
二、Ansible Roles案例实战
2.1.Ansible Roles NFS服务
[root@hdp101 roles]# cat nfs/tasks/install.yml
- name: Install NFS-utils Server
yum: name=nfs-utils state=present
[root@hdp101 roles]# cat nfs/tasks/config.yml
- name: Configuration NFS-utils Server
template: src=./export.j2 dest=/etc/exports owner=root group=root mode=0644
notify: Restart NFS Server
[root@hdp101 roles]# cat nfs/tasks/start.yml
- name: Start NFS Server
service: name=nfs state=started enabled=yes
[root@hdp101 roles]# cat nfs/templates/export.j2
{
{ nfs_dir }} 192.168.30.102(rw,all_squash,anonuid=666,anongid=666)
[root@hdp101 roles]#
[root@hdp101 roles]# cat group_vars/web01
nfs_dir: /data
[root@hdp101 roles]#
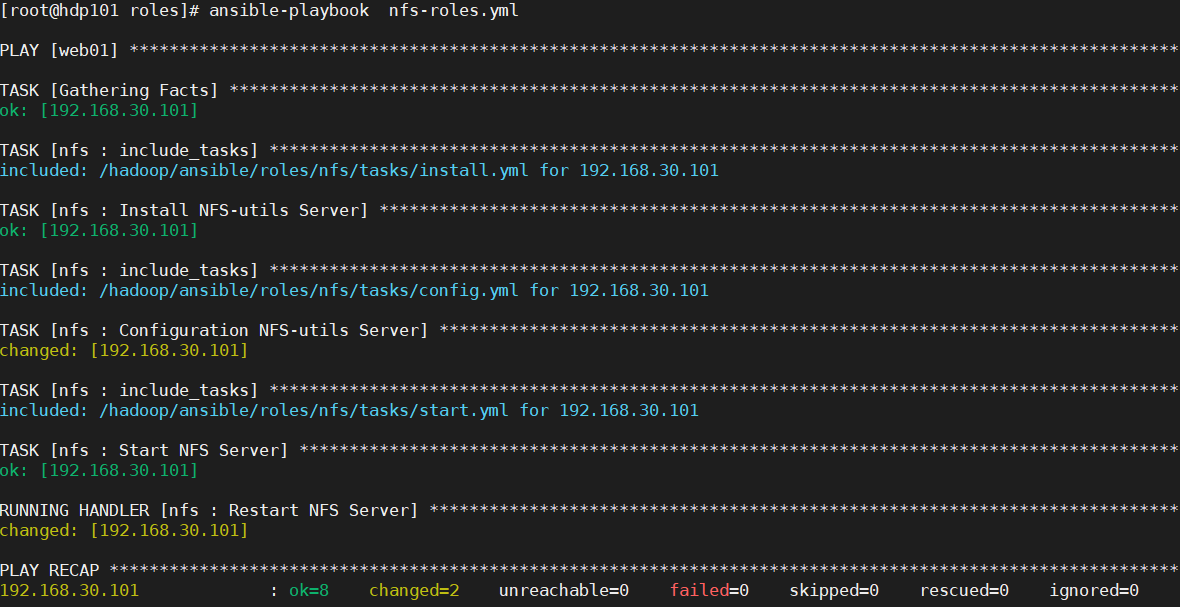
[root@hdp101 roles]# cat nfs-roles.yml
- hosts: web01
roles:
# nfs 就是刚才创建的目录
- nfs
[root@hdp101 roles]#NFS 文件夹目录树结构:

运行:
2.2 Roles Memcached
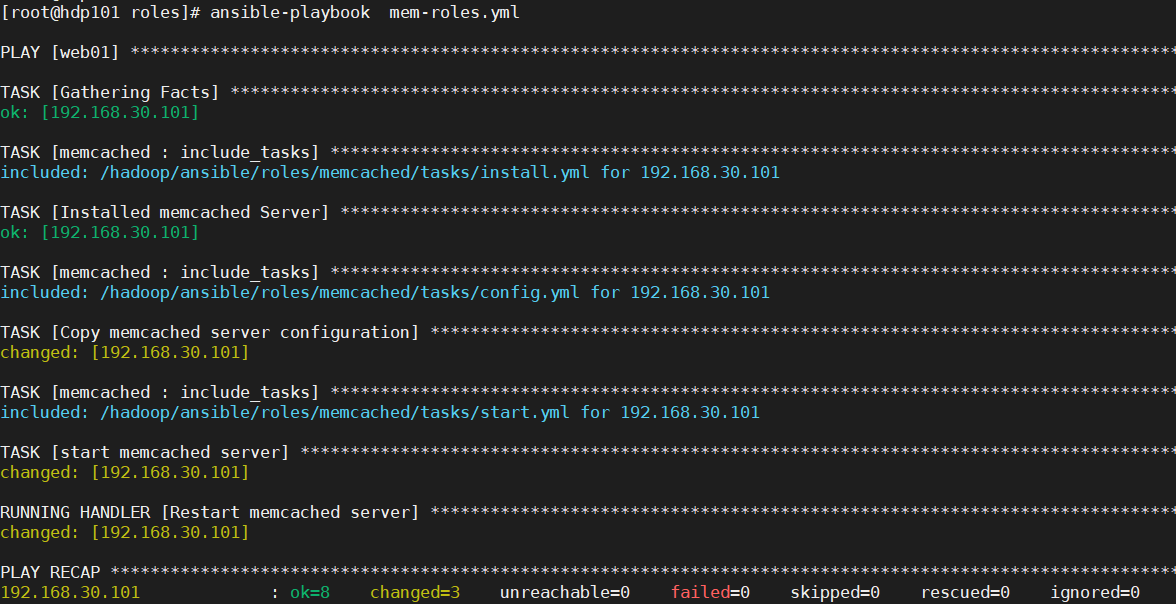
如下配置启动memcache:
[root@hdp101 roles]# cat memcached/tasks/install.yml
- name: Installed memcached Server
yum: name=memcached state=present
[root@hdp101 roles]# cat memcached/tasks/config.yml
- name: Copy memcached server configuration
template: src=memcached.j2 dest=/root/sysMemConfig
notify: Restart memcached server
[root@hdp101 roles]# cat memcached/tasks/start.yml
- name: start memcached server
service: name=memcached state=started enabled=yes
[root@hdp101 roles]# cat memcached/handlers/main.yml
- name: Restart memcached server
service: name=memcached state=restarted
[root@hdp101 roles]#
[root@hdp101 roles]# cat memcached/tasks/main.yml
- include_tasks: install.yml
- include_tasks: config.yml
- include_tasks: start.yml
[root@hdp101 roles]#
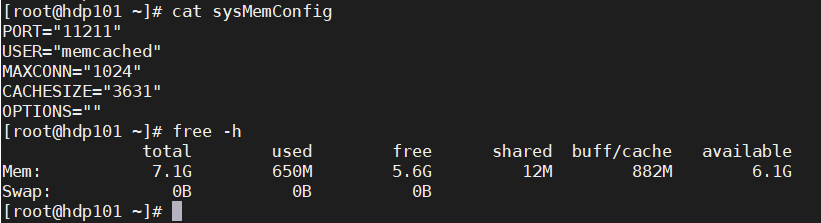
[root@hdp101 roles]# cat memcached/templates/memcached.j2
PORT="11211"
USER="memcached"
MAXCONN="1024"
CACHESIZE="{
{ ansible_memtotal_mb //2 }}"
OPTIONS=""memecached 目录树结构

运行一下:
看看设置的内存大小
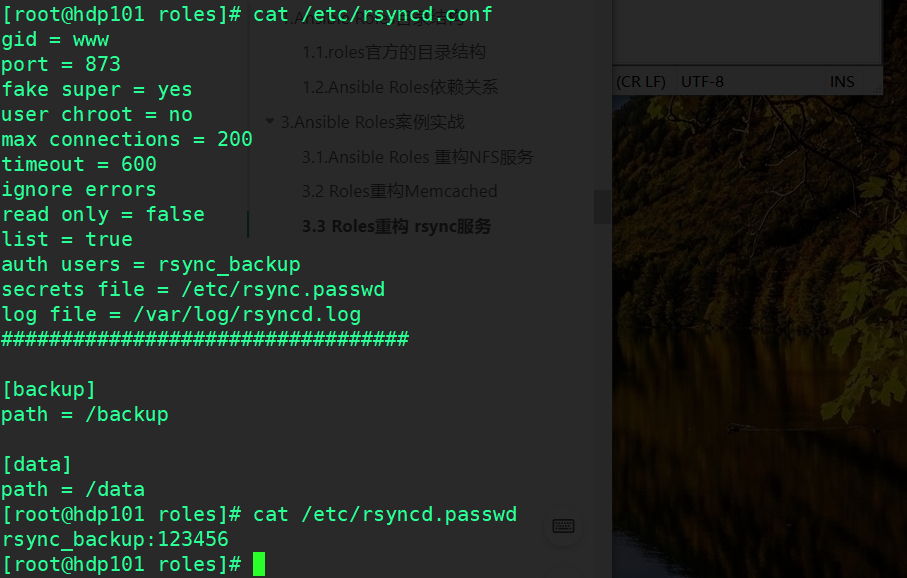
2.3 Roles-rsync服务
rsync 可以理解为 remote sync(远程同步),但它不仅可以远程同步数据(类似于 scp 命令),还可以本地同步数据(类似于 cp 命令)。不同于 cp 或 scp 的一点是,使用 rsync 命令备份数据时,不会直接覆盖以前的数据(如果数据已经存在),而是先判断已经存在的数据和新数据的差异,只有数据不同时才会把不相同的部分覆盖。
[root@hdp101 roles]# cat  rsync/tasks/main.yml
- name: Install rsync server
  yum: name=rsync state=present

- name: Configuration rsync server
  template: src={

   { item.src }} dest={

   { item.dest }} mode={

   { item.mode }}
  with_items:
    - { src: 'rsyncd.conf.j2', dest: '/etc/rsyncd.conf', mode: '0644' }
    - { src: 'rsyncd.passwd.j2', dest: '/etc/rsyncd.passwd', mode: '0600' }
  notify: Restart rsync server

- name: Start rsync server
  service: name=rsyncd state=started enabled=yes
[root@hdp101 roles]# cat  rsync/handlers/main.yml
- name: Restart rsync server
  service: name=rsyncd state=restarted

[root@hdp101 roles]# cat  rsync/templates/rsyncd.conf.j2
gid = www
port = 873
fake super = yes
user chroot = no
max connections = 200
timeout = 600
ignore errors
read only = false
list = true
auth users = rsync_backup
secrets file = /etc/rsync.passwd
log file = /var/log/rsyncd.log
##################################

[backup]
path = /backup

[data]
path = /data
[root@hdp101 roles]# cat  rsync/templates/rsyncd.passwd.j2
rsync_backup:123456
运行:

查看配置文件同步的结果