文章目录
前言
之前有听说过OAuth,了解到其常常用于三方登录
今天来学习一下
后面的实操需要了解VUE
学习参考自博客
oauth2基本概念
1 OAuth2基本概念
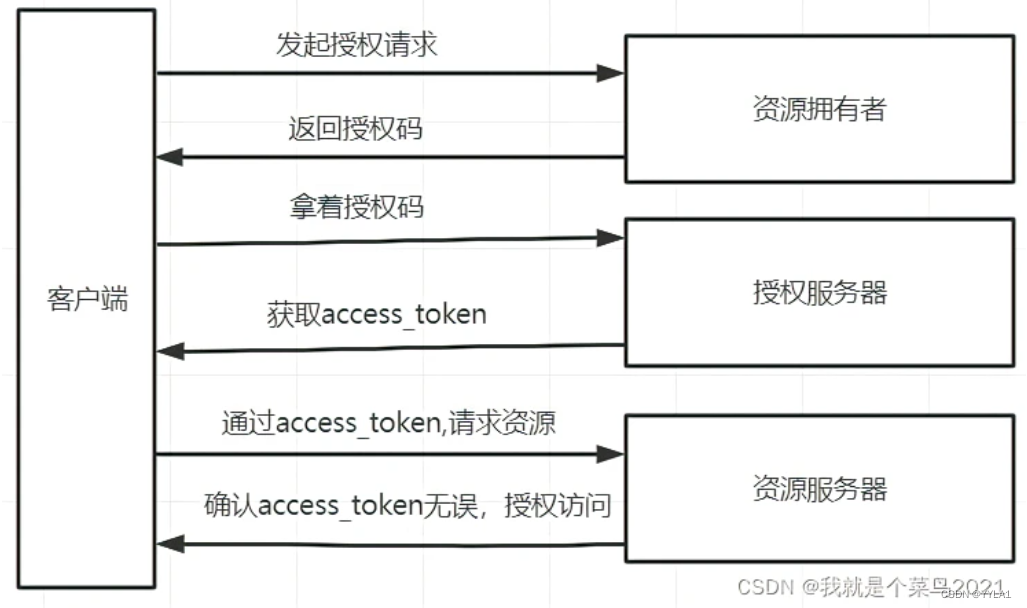
首先了解oauth协议的 四个角色
1 资源拥有者(用户)


2 资源服务器
托管受保护资源的服务器,能够使用访问令牌接受和响应受保护资源请求

3 Client 客户端
代表资源所有者并经其授权发出受保护资源请求的应用程序。“客户”一词确实 不暗示任何特定的实现特征(例如, 应用程序是否在服务器、桌面或其他 设备上执行)。

4 Authorization server 授权服务器
服务器在成功 验证资源所有者并获得授权后向客户端颁发访问令牌。授权服务器和资源服务器之间的交互超出了本规范的范围。授权服务器 可以是与资源服务器相同的服务器,也可以是单独的实体。 单个授权服务器可以发布多个资源服务器接受的访问令牌。
OAuth2.0介绍
OAuth是关于授权的开放网络标准,
允许用户授权第三方应用
访问用户存储在 另外的资源服务器上 的信息
,而不需要将用户名和密码提供给第三方应用。
认证流程如下
2 网站应用微信登录
2.1 大概流程
微信官方参考链接
参考链接
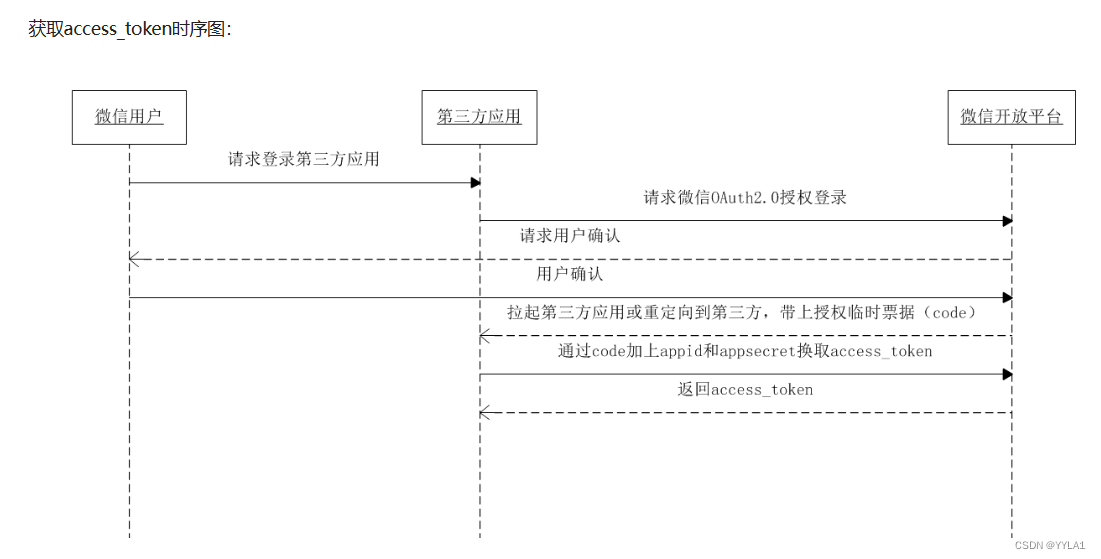
1. 第三方发起微信授权登录请求,微信用户允许授权第三方应用后,微信会拉起应用或重定向到第三方网站,并且带上授权临时票据code参数;
2. 通过code参数加上AppID和AppSecret等,通过API换取access_token;
3. 通过access_token进行接口调用,获取用户基本数据资源或帮助用户实现基本操作
也就是说 最终三方应用要使用这个access_token授权令牌
通过这个access_token拿到用户存储到微信服务器上的一些信息数据
2.2 前期准备
1、注册
微信开放平台:https://open.weixin.qq.com
2、邮箱激活
3、完善开发者资料
4、开发者资质认证
准备营业执照,1-2个工作日审批、300元
5、创建网站应用
提交审核,7个工作日审批
6、内网穿透
ngrok的使用
准备好配置数据 放到properties文件中

wx.open.app_id=wxed9954c01bb8xxxx
wx.open.app_secret=a7482517235173ddb4083788dexxxx
//redirect_uri配置 要与 微信公众号 订阅号或者服务号上配置的域名一致
wx.open.redirect_url=http://localhost:8160/api/ucenter/wx/callback
yygh.baseUrl=http://localhost:3000
YAML格式
wx:
  open:
    app_id: wxed9954c01bbxxxx
    app_secret: a7482517235173ddb408378xxxxx
    //redirect_uri配置 要与 微信公众号 订阅号或者服务号上配置的域名一致
    redirect_url: http://localhost:8160/api/ucenter/wx/callback
创建工具类 能够快速获取配置文件中的这些相关信息
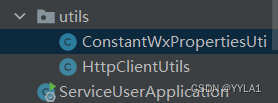
package com.atguigu.yygh.user.utils;

import org.springframework.beans.factory.InitializingBean;
import org.springframework.beans.factory.annotation.Value;
import org.springframework.stereotype.Component;

@Component
public class ConstantWxPropertiesUtils implements InitializingBean {


    @Value("${wx.open.app_id}")
    private String appId;

    @Value("${wx.open.app_secret}")
    private String appSecret;

    @Value("${wx.open.redirect_url}")
    private String redirectUrl;

    @Value("${yygh.baseUrl}")
    private String yyghBaseUrl;


    public static String WX_OPEN_APP_ID;
    public static String WX_OPEN_APP_SECRET;
    public static String WX_OPEN_REDIRECT_URL;
    public static String YYGH_BASE_URL;


    @Override
    public void afterPropertiesSet() throws Exception {


        WX_OPEN_APP_ID = appId;
        WX_OPEN_APP_SECRET = appSecret;
        WX_OPEN_REDIRECT_URL = redirectUrl;
        YYGH_BASE_URL = yyghBaseUrl;
    }
}
2.3 将微信登录二维码内嵌到自己页面
2.3.1 后端接口编写(向前端提供参数)
首先编写后端接口
返回前端显示二维码所必须的参数

我们已经编写好工具类

二维码所必须的参数在配置文件中——》工具类获取——》封装返回给前端

//微信操作的接口
@Controller
@RequestMapping("/testOauth")
public class TestOauth {
//1 生成微信扫描二维码
//返回生成二维码需要参数
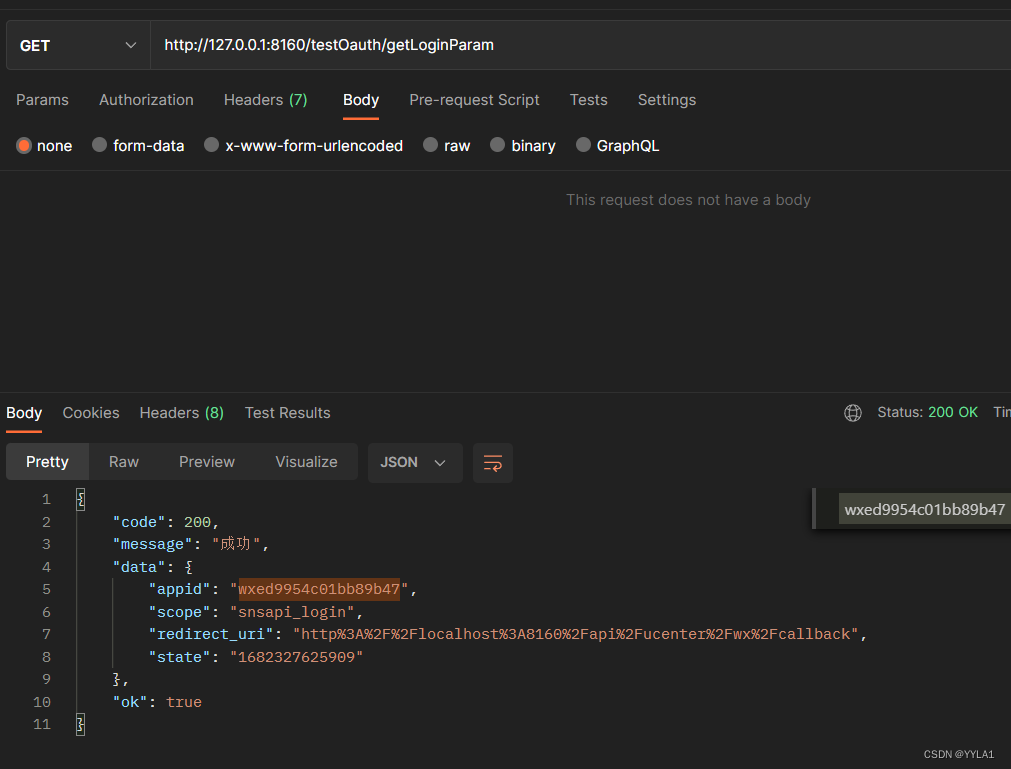
@GetMapping("/getLoginParam")
@ResponseBody
public Result genQrConnect() {
try {
Map<String, Object> map = new HashMap<>();
//ID
map.put("appid", ConstantWxPropertiesUtils.WX_OPEN_APP_ID);
//默认值
map.put("scope","snsapi_login");
//回调地址 根据要求需要对其进行编码
String wxOpenRedirectUrl = ConstantWxPropertiesUtils.WX_OPEN_REDIRECT_URL;
wxOpenRedirectUrl = URLEncoder.encode(wxOpenRedirectUrl, "utf-8");
map.put("redirect_uri",wxOpenRedirectUrl);
//防止攻击
map.put("state",System.currentTimeMillis()+"");
return Result.ok(map);
} catch (UnsupportedEncodingException e) {
e.printStackTrace();
return null;
}
}
}
POSTman测试
2.3.2 前端显示二维码页面
前端如何显示二维码?
1 引入JS文件
http://res.wx.qq.com/connect/zh_CN/htmledition/js/wxLogin.js
2 初始化 WXLOGIN JS
请求后端刚才编写的接口 获得参数 根据这些参数
new WxLogin对象

采用一个VUE文件的方式进行创建
<template>
<div>
// 这里的按钮整合了element-ui 不想整合的话 直接写button
  <el-button type="primary" size=""  autocomplete="off" @click="weixinLogin">微信登录</el-button>

  <div id="weixinLogin"></div>
</div>

</template>

<script>
import axios from "axios";


export default {


  name: "Oauth",

  data() {


    return {

    }
  },

  mounted() {


    // 注册全局登录事件对象
    // window.loginEvent = new Vue();
    // // 监听登录事件
    // loginEvent.$on('loginDialogEvent', function () {


    //   document.getElementById("loginDialog").click();
    // })
    // 触发事件,显示登录层:loginEvent.$emit('loginDialogEvent')

    //初始化微信js
    const script = document.createElement('script')
    script.type = 'text/javascript'
    script.src = 'https://res.wx.qq.com/connect/zh_CN/htmledition/js/wxLogin.js'
    document.body.appendChild(script)

    // 微信登录回调处理
    // let self = this;
    // window["loginCallback"] = (name,token, openid) => {


    //   debugger
    //   self.loginCallback(name, token, openid);
    // }
  },
  methods: {


    //微信登录函数 点击后显示二维码
    weixinLogin() {


      //创建axios 准备向后端发请求
      const request = axios.create({


        baseURL: 'http://localhost:8160',  // 注意!! 这里是全局统一加上了 '/api' 前缀,也就是说所有接口都会加上'/api'前缀在,页面里面写接口的时候就不要加 '/api'了,否则会出现2个'/api',类似 '/api/api/user'这样的报错,切记!!!
        // baseURL: 'http://139.224.237.247:8081/',  // 注意!! 这里是全局统一加上了 '/api' 前缀,也就是说所有接口都会加上'/api'前缀在,页面里面写接口的时候就不要加 '/api'了,否则会出现2个'/api',类似 '/api/api/user'这样的报错,切记!!!
        timeout: 5000
      })

      //发请求 把后端返回的  生成二维码所需要的参数 给WxLogin对象
      request.get("/testOauth/getLoginParam", this.user).then(response => {


        console.log(response)
        console.log(response.data.data.appid)
        console.log(response.data.data.redirect_uri)

        var obj = new WxLogin({


          self_redirect:true,
          id: 'weixinLogin', // 需要显示的容器id
          appid: response.data.data.appid, // 公众号appid wx*******
          scope: response.data.data.scope, // 网页默认即可
          redirect_uri: response.data.data.redirect_uri, // 授权成功后回调的url
          state: response.data.data.state, // 可设置为简单的随机数加session用来校验
          style: 'black', // 提供"black"、"white"可选。二维码的样式
          href: '' // 外部css文件url,需要https
        })
      })

    },
  }
}
</script>

<style scoped>

</style>
最终测试 点击微信登录 二维码生成成功

2.4 编写回调接口
2.4.1 回调接口根据code获取access_token 这个令牌
当我们微信扫码确认以后
微信会请求我们传递的回调地址  并传递一个code
我们拿到code
准备请求微信接口换取 access_token
也就是Oauth协议中 获取 access_token 这个令牌

由于需要请求微信接口 导入OKHTTP工具类

        <dependency>
            <groupId>com.squareup.okhttp3</groupId>
            <artifactId>okhttp</artifactId>
            <version>3.6.0</version>
        </dependency>
//微信扫描后回调的方法
//回调地址
// http://localhost:8160/api/ucenter/wx/callback?
@GetMapping("/api/ucenter/wx/callback")
@ResponseBody
@CrossOrigin
public String callback(String code,String state) throws Exception {
//第一步 获取临时票据 code
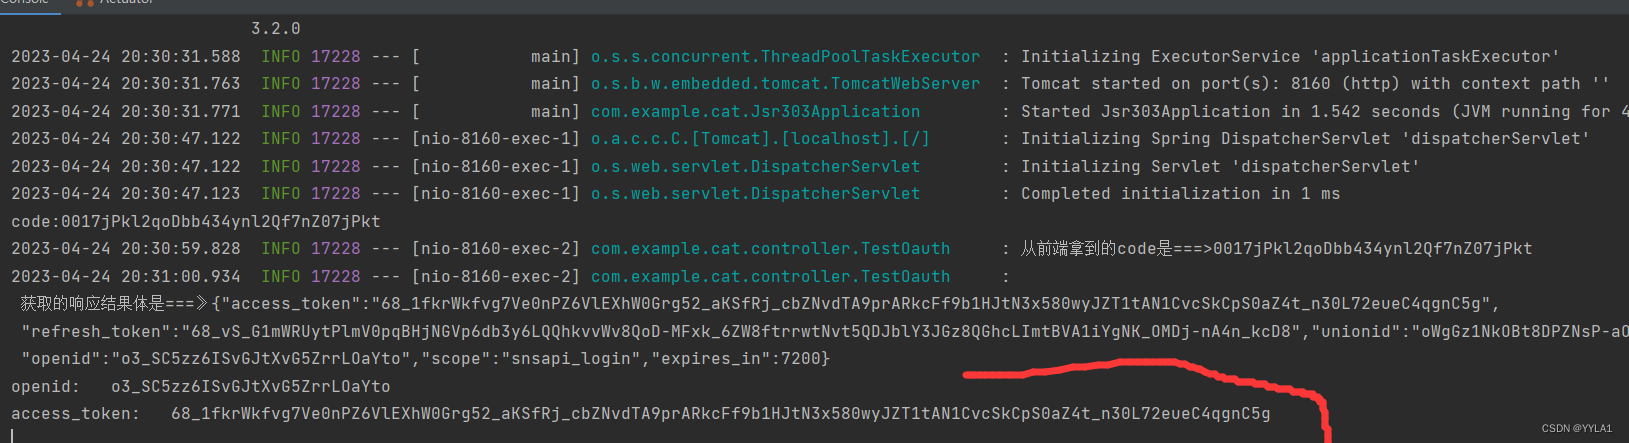
System.out.println("code:"+code);
//第二步 拿着code和微信id和秘钥,请求微信固定地址 ,得到两个值
//使用code和appid以及appscrect换取access_token
//创建OKhttpclient 封装参数请求微信系统接口
OkHttpClient okHttpClient = new OkHttpClient();
log.info("从前端拿到的code是===>{}",code);
String url = "https://api.weixin.qq.com/sns/oauth2/access_token?appid=" + ConstantWxPropertiesUtils.WX_OPEN_APP_ID
+ "&secret=" + ConstantWxPropertiesUtils.WX_OPEN_APP_SECRET + "&code=" + code + "&grant_type=authorization_code";
Request request = new Request.Builder().url(url).build();
Response response = okHttpClient.newCall(request).execute();
if (response.isSuccessful()) {
JSONObject jsonResult = JSONObject.parseObject(response.body().string());
log.info("获取的响应结果体是===》{}", jsonResult);
String openid = jsonResult.getString("openid");
String access_token = jsonResult.getString("access_token");
System.out.println("openid: " + openid);
System.out.println("access_token: " + access_token);
}
return "";
}
前端扫码 扫码后查看后端控制台
测试 获取token成功
2.4.2 回调接口根据access_token 这个令牌获取用户信息并且保存到数据库 实现微信登录
拿access_token 请求用户接口 能够
返回用户的一些信息 拿这些信息和oppenid存储到数据库
实现微信登录

存到数据库的代码就自己实现吧
请求用户接口前 可以先根据oppeid(用户唯一表示)查数据库
看这个用户添加过没 有的话就不让请求就可以了 直接返回这个用户
供前端显示
  //微信扫描后回调的方法
    //回调地址
    // http://localhost:8160/api/ucenter/wx/callback?
    @GetMapping("/api/ucenter/wx/callback")
    @ResponseBody
    @CrossOrigin
    public String callback(String code,String state) throws Exception {


        //第一步 获取临时票据 code
        System.out.println("code:"+code);


        //第二步 拿着code和微信id和秘钥,请求微信固定地址 ,得到两个值
        //使用code和appid以及appscrect换取access_token
        OkHttpClient okHttpClient = new OkHttpClient();
        log.info("从前端拿到的code是===>{}",code);


        String url = "https://api.weixin.qq.com/sns/oauth2/access_token?appid=" + ConstantWxPropertiesUtils.WX_OPEN_APP_ID
                + "&secret=" + ConstantWxPropertiesUtils.WX_OPEN_APP_SECRET + "&code=" + code + "&grant_type=authorization_code";

        Request request = new Request.Builder().url(url).build();
        Response response = okHttpClient.newCall(request).execute();


            JSONObject jsonResult = JSONObject.parseObject(response.body().string());

            log.info("获取的响应结果体是===》{}", jsonResult);

            String openid = jsonResult.getString("openid");
            String access_token = jsonResult.getString("access_token");

            System.out.println("openid:   " + openid);
            System.out.println("access_token:   " + access_token);

        //第三步 拿着openid  和  access_token请求微信地址,得到扫描人信息
        String baseUserInfoUrl = "https://api.weixin.qq.com/sns/userinfo" +
                        "?access_token=" + access_token +
                        "&openid="+ openid;

        Request request1 = new Request.Builder().url(baseUserInfoUrl).build();
        Response response1 = okHttpClient.newCall(request1).execute();

        if (response.isSuccessful()) {


            JSONObject jsonResultuserInfo = JSONObject.parseObject(response1.body().string());

            log.info("请求用户信息获取的响应结果体是===》{}", jsonResultuserInfo);

        }

        return "";
    }
