OAuth2
OAuth2是OAuth(Open Authorization,开放授权)协议的延续版本。用来授权第三方应用获取用户数据,是目前最流行的授权机制,它当前的版本是2.0。
一共定义了四种角色:
1.资源所有者(Resource Owner):即代表用户本身
2.资源服务器(Resource Server):存储受保护的账号信息
3.授权服务器(Authorization Server):在成功验证用户身份,并获得授权后,给客户端派发访问资源令牌
4.客户端(Client):即代表你访问的第三方应用
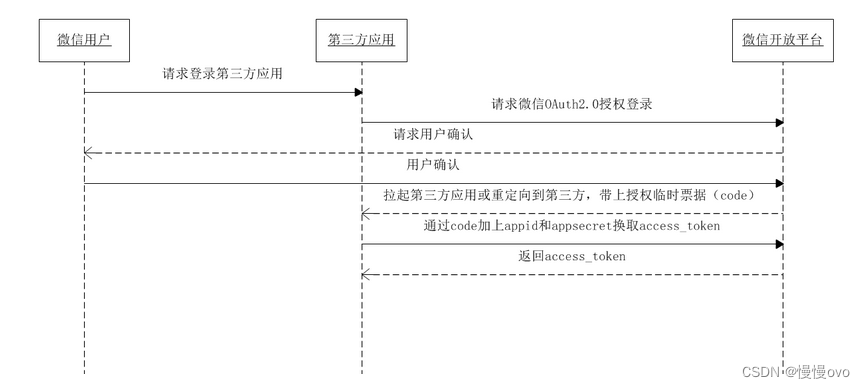
微信登录流程
微信 OAuth2.0 授权登录让微信用户使用微信身份安全登录第三方应用或网站,第三方可以获取到用户的接口调用凭证(access_token),通过凭证可以进行微信开放平台授权关系接口调用,从而可实现获取微信用户基本开放信息和帮助用户实现基础开放功能等。
如果一个网站要使用微信登录,必然是要去微信公众号后台申请 appid 的,并且在申请的时候,还要填写一个获取 code的域名,而微信后台也会返回appsecret,appid,secret,code,域名。想要获取微信申请扫码所需可以看网址:neh微信s开放平台
第一步:微信用户扫描二维码请求登录第三方应用
第二步:第三方应用携带 appid 以及 redirect_uri 通过重定向的方式请求微信OAuth2.0授权登录(最常见的就是生成一个二维码给微信用户扫描),注意这一步并没有发送appsecret;
- 注意:
此时微信开放平台是无法确定第三方应用身份的,因为这时微信开放平台只有一个appid,但没有任何手段来确认 第三方应用使用的是自己的 appid;- 用户授权后,微信会立即发送 code 和 state(自己设定的字段) 到 redirect_uri 中。
第三步:微信用户在微信开放平台上认证身份(扫码认证),并统一授权给 第三方应用;
第四步:微信用户允许授权第三方应用 后,微信 会 302 跳转到第三方网站 的 redirect_uri 上,并且带上授权临时票据 code(authorization code);
按 OAuth2.0 的协议约定,该 code 通过浏览器的 302 重定向发送给第三方应用,这意味着 code 值从浏览器就能看到了,非常危险。
第五步:第三方应用 拿 code 以及 appid、appsecret 换取 accsess_token 和 openid;
首先,这个过程是 第三方应用 后台 对 微信开放平台 后台 的,不依赖浏览器,所以access_token不会像 code 那样会暴露出去。
其次,第三方应用 需要提供自己的 appsecret,这样就为 微信开放平台 提供了一种验证 第三方应用 的机制。
微信登录流程具体参考了这篇文章:微信OAuth2.0 登录流程以及安全性分析_一个小码农的进阶之旅的博客-CSDN博客_微信oauth2.0
前端代码实现
<template>
<div class="wechat-wrapper" @click="weixinLogin()">
<span class="iconfont icon"></span>
</div>
</template>
<script>
export default{
data(){
return{}
}
mounted:{
//初始化微信js
const script = document.createElement('script')
script.type = 'text/javascript'
script.src = 'https://res.wx.qq.com/connect/zh_CN/htmledition/js/wxLogin.js'
document.body.appendChild(script)
//微信登录回调处理
let self = this;
window["loginCallback"] = (name,token, openid) => {
self.loginCallback(name, token, openid);
}
},
methods:{
//使用微信扫码回调的方法
loginCallback(name, token, openid) {
this.setCookies(name, token);//方便后面的token拦截
},
weixinLogin() {
//调用后端查询微信需要的参数
axios.get("http://localhost:8160/wx/getLoginParam").then(response => {
new WxLogin({
self_redirect:true,
id: 'weixinLogin', // 需要显示的容器id
appid: response.data.appid, // 公众号appid wx*******
scope: response.data.scope, // 网页默认即可
redirect_uri: response.data.redirect_uri, // 授权成功后回调的url
state: response.data.state, // 可设置为简单的随机数加session用来校验
style: 'black', // 提供"black"、"white"可选。二维码的样式
href: '' // 外部css文件url,需要https
})
})
},
//设置Cookie中的name与token
setCookies(name, token) {
cookie.set('token', token, { domain: 'localhost' })
cookie.set('name', name, { domain: 'localhost' })
window.location.reload()
}
}
}
</script><!--这里是回调方法到/weixin/callback.vue中的-->
<script>
export default {
data() {
return {
}
},
mounted() {
let token = this.$route.query.token
let name = this.$route.query.name
let openid = this.$route.query.openid
// 调用父vue方法
window.parent['loginCallback'](name, token, openid)
}
}
</script>后端代码实现
导入依赖
<!--web-->
<dependency>
    <groupId>org.springframework.boot</groupId>
    <artifactId>spring-boot-starter-web</artifactId>
</dependency>
<!--mybatis-plus-->
<dependency>
    <groupId>com.baomidou</groupId>
    <artifactId>mybatis-plus-boot-starter</artifactId>
</dependency>
<!--mysql-->
<dependency>
    <groupId>mysql</groupId>
    <artifactId>mysql-connector-java</artifactId>
</dependency>
<!--利用JWT生成Token-->
<dependency>
    <groupId>io.jsonwebtoken</groupId>
    <artifactId>jjwt</artifactId>
</dependency>
<!--使用PoolingHttpClientConnectionManager HTTP线程池-->
<dependency>
    <groupId>org.apache.httpcomponents</groupId>
    <artifactId>httpclient</artifactId>
</dependency>
<!-- 服务调用feign -->
<dependency>
    <groupId>org.springframework.cloud</groupId>
    <artifactId>spring-cloud-starter-openfeign</artifactId>
</dependency>
<!--服务注册 -->
<dependency>
    <groupId>com.alibaba.cloud</groupId>
    <artifactId>spring-cloud-starter-alibaba-nacos-discovery</artifactId>
</dependency>
yml
server:
  port: 8160    #必须使用这个端口号
spring:
  application:
    name: service-user
  profiles:
    active: dev
  datasource:
    driver-class-name: com.mysql.cj.jdbc.Driver
    url: jdbc:mysql://localhost:3306/yygh_user?characterEncoding=utf8&useSSL=false&allowPublicKeyRetrieval=true
    username: root
    password: 123456
  #返回Json的全局时间格式
  jackson:
    date-format: yyyy-MM-dd HH:mm:ss
    time-zone: GMT+8
  #Nacos服务地址
  cloud:
    nacos:
      discovery:
        server-addr: localhost:8848

mybatis-plus:
  mapper-locations: classpath:mapper/*.xml

wx:
  open:
    app_id: wxed9954c01bb89b47
    app_secret: a7482517235173ddb4083788de60b90e
    redirect_url: http://localhost:8160/wx/callback

#前端对应的网址
item:
  baseUrl: http://localhost:3000
实体类以及返回结果
@TableName("user_info")
public class UserInfo extends BaseEntity {

	private static final long serialVersionUID = 1L;

	@ApiModelProperty(value = "微信openid")
	@TableField("openid")
	private String openid;

	@ApiModelProperty(value = "微信昵称")
	@TableField("nick_name")
	private String nickName;

	@ApiModelProperty(value = "状态(0:锁定 1:正常)")
	@TableField("status")
	private Integer status;
}
/**
* 全局统一返回结果类
*/
@Data
public class R<T> {
private Integer code;//返回的状态码
private String message;//返回的信息
private T data;//返回的数据
public static <T> R<T> ok(){
return R.ok(null);
}
/**
* 操作成功
* @param data
* @param <T>
* @return
*/
public static <T> R<T> ok(T data){
R<T> result = new R<T>();
result.setCode(200);
result.setMessage("成功");
if(data != null) result.setData(data);
return result;
}
}工具类
微信配置信息
/**
 * 从配置文件中获取阿里云服务的工具类
 * 这个配置类让我学到两个东西:
 *      第一个是程序的OCP原则 open close principle    使用Value注解可以不改变Java代码从而改变配置文件即yml来提高扩展
 *      第二个是Value注解不能使用静态也就是static来对属性进行读取 否则读取到会为null
 *      原因是:@Value方法是通过set方式注入的,只能作用在字段,set方法,方法入参上
 * 既然如此那就使用Spring 提供的InitializingBean接口,它是Spring提供的Bean初始化方式
 * 在容器初始化的时候,会先通过@Value注解去读取配置文件中的信息,然后再执行afterPropertiesSet方法,
 * 将Bean注入到容器中,这里就相当于初始化了一个,ConstantPropertiesUtils类,并且其属性都是静态属性,可以直接调用
 */
@Component
public class ConstantWxPropertiesUtil implements InitializingBean {
    @Value("${wx.open.app_id}")
    private String appId;
    @Value("${wx.open.app_secret}")
    private String appSecret;
    @Value("${wx.open.redirect_url}")
    private String redirectUrl;
    @Value("${item.baseUrl}")
    private String BaseUrl;

    public static String WX_OPEN_APP_ID;
    public static String WX_OPEN_APP_SECRET;
    public static String WX_OPEN_REDIRECT_URL;
    public static String ITEM_BASE_URL;

    @Override
    public void afterPropertiesSet() throws Exception {
        WX_OPEN_APP_ID = this.appId;
        WX_OPEN_APP_SECRET = this.appSecret;
        WX_OPEN_REDIRECT_URL = this.redirectUrl;
        ITEM_BASE_URL = this.BaseUrl;
    }
}
HTTP客户端连接池
public class HttpClientUtil {

    public static final int connTimeout = 10000;
    public static final int readTimeout = 10000;
    public static final String charset = "UTF-8";
    private static HttpClient client = null;

    static {
        PoolingHttpClientConnectionManager cm
                = new PoolingHttpClientConnectionManager();
        cm.setMaxTotal(128);
        cm.setDefaultMaxPerRoute(128);
        client = HttpClients.custom().setConnectionManager(cm).build();
    }

    public static String get(String url) throws Exception {
        return get(url, charset, null, null);
    }

    /**
     * 发送一个 GET 请求
     */
    public static String get(String url, String charset, Integer connTimeout,Integer readTimeout)
        throws ConnectTimeoutException,SocketTimeoutException, Exception {
        HttpClient client = null;
        HttpGet get = new HttpGet(url);
        String result = "";
        try {
            // 设置参数
            Builder customReqConf = RequestConfig.custom();
            if (connTimeout != null) {
                customReqConf.setConnectTimeout(connTimeout);
            }
            if (readTimeout != null) {
                customReqConf.setSocketTimeout(readTimeout);
            }
            get.setConfig(customReqConf.build());
            HttpResponse res = null;
            if (url.startsWith("https")) {
                // 执行 Https 请求.
                client = createSSLInsecureClient();
                res = client.execute(get);
            } else {
                // 执行 Http 请求.
                client = HttpClientUtil.client;
                res = client.execute(get);
            }
            result = IOUtils.toString(res.getEntity().getContent(), charset);
        } finally {
            get.releaseConnection();//释放连接
            if (client != null && url.startsWith("https") && client instanceof CloseableHttpClient) {
                ((CloseableHttpClient) client).close();
            }
        }
        return result;
    }
}
JWT
public class JwtUtil {
    //过期时间24小时
    private static long tokenExpiration = 24 * 60 * 60 * 1000;
    //签名秘钥
    private static String tokenSignKey = "123456";

    /**
     * 根据参数生成token
     * @param userId 用户Id
     * @param userName 用户名称
     * @return
     */
    public static String createToken(Long userId, String userName) {
        String token = Jwts.builder()
                .setSubject("USER")
                .setExpiration(new Date(System.currentTimeMillis() + tokenExpiration))
                .claim("userId", userId)
                .claim("userName", userName)
                .signWith(SignatureAlgorithm.HS512, tokenSignKey)
                .compressWith(CompressionCodecs.GZIP)
                .compact();
        return token;
    }
}
控制层
@Controller
@RequestMapping("/wx")
public class WeiXinController {
    @Autowired
    private UserInfoService userInfoService;

    /**
     * 微信生成二维码返回需要的参数
     * @return
     */
    @GetMapping("/getLoginParam")
    @ResponseBody //为了返回数据
    public R getQrConnect(){
        try {
            Map<String,Object> map = new HashMap<>();
            map.put("appid", ConstantWxPropertiesUtil.WX_OPEN_APP_ID);
            map.put("scope", "snsapi_login");
            String wxOpenRedirectUrl = ConstantWxPropertiesUtil.WX_OPEN_REDIRECT_URL;
            wxOpenRedirectUrl = URLEncoder.encode(wxOpenRedirectUrl,"utf-8");
            map.put("redirect_uri",wxOpenRedirectUrl);
            map.put("state",System.currentTimeMillis() + "");
            return R.ok(map);
        } catch (UnsupportedEncodingException e) {
            e.printStackTrace();
            return null;
        }
    }

    /**
     * 微信扫码后回调的方法
     * @param code 临时票据
     * @param state
     * @return
     */
    @GetMapping("/callback")
    public String callback(String code,String state){
        //将临时票据(code)和微信id及密钥 请求微信固定地址
        //https://api.weixin.qq.com/sns/oauth2/access_token?appid=??&secret=??&code=??&grant_type=authorization_code
        StringBuffer stringBuffer = new StringBuffer()
                .append("https://api.weixin.qq.com/sns/oauth2/access_token")
                .append("?appid=%s")
                .append("&secret=%s")
                .append("&code=%s")
                .append("&grant_type=authorization_code");
        String accessTokenUrl = String.format(stringBuffer.toString(),
                ConstantWxPropertiesUtil.WX_OPEN_APP_ID,
                ConstantWxPropertiesUtil.WX_OPEN_APP_SECRET,
                code);
        try {
            //通过HttpClient请求这个地址
            String accessTokenInfo = HttpClientUtil.get(accessTokenUrl);
            //从返回的这个字符串获取openid和access_token
            JSONObject object = JSONObject.parseObject(accessTokenInfo);
            String openid = object.getString("openid");
            String accessToken = object.getString("access_token");
            //根据openid判断数据库中是否存有扫码人信息
            UserInfo wxInfo = userInfoService.selectWxInfoOpenId(openid);
            if(wxInfo == null) {
                //请求微信地址 得到扫码人信息
                String baseUserInfoUrl = "https://api.weixin.qq.com/sns/userinfo" +
                        "?access_token=%s" + "&openid=%s";
                String userInfoUrl = String.format(baseUserInfoUrl,accessToken,openid);
                String resultInfo = HttpClientUtil.get(userInfoUrl);//扫码人信息
                JSONObject jsonObject = JSONObject.parseObject(resultInfo);
                String nickname = jsonObject.getString("nickname");//获得扫码人的昵称
                //将扫码人信息(昵称、微信id、状态)添加进数据库
                wxInfo = new UserInfo();
                wxInfo.setNickName(nickname);
                wxInfo.setOpenid(openid);
                wxInfo.setStatus(1);
                userInfoService.save(wxInfo);
            }
            //返回name和token字符串
            Map<String,Object> map = new HashMap<>();
            map.put("name",wxInfo.getNickName());
            String token = JwtUtil.createToken(wxInfo.getId(), name);
            map.put("token",token);
            //跳转到前端页面
            return "redirect:" + ConstantWxPropertiesUtil.ITEM_BASE_URL +
                    "/weixin/callback?token=" + map.get("token") + "&openid=" +
                    map.get("openid") + "&name=" + URLEncoder.encode((String) map.get("name"),"utf-8");
        } catch (Exception e) {
            e.printStackTrace();
            return null;
        }
    }
}
业务层
@Service
public class UserInfoServiceImpl extends ServiceImpl<UserInfoMapper,UserInfo> implements UserInfoService {

    /**
     * 根据openid判断数据库中是否存有扫码人信息
     * @param openid
     * @return
     */
    @Override
    public UserInfo selectWxInfoOpenId(String openid) {
        QueryWrapper wrapper = new QueryWrapper();
        wrapper.eq("openid",openid);
        UserInfo userInfo = baseMapper.selectOne(wrapper);
        return userInfo;
    }
}
持久层
public interface UserInfoMapper extends BaseMapper<UserInfo> {
}