使用Jetpack Compose在canvas上制作一个酷炫的时钟
在这篇博文中,我将解释我们如何使用Compose Canvas API来实现这一点。我还将介绍与计算圆上坐标以及在这些坐标周围绘制形状和文本相关的数学概念。这里使用的许多公式都是通过试验和错误推导出来的,因此一开始理解它们可能会有些困难。然而,我会通过图表来简化解释,以便更容易理解。希望你喜欢阅读这篇文章。
1.术语介绍
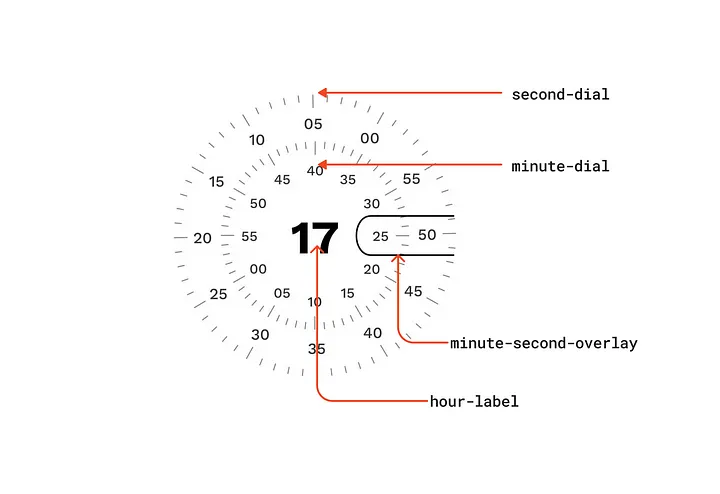
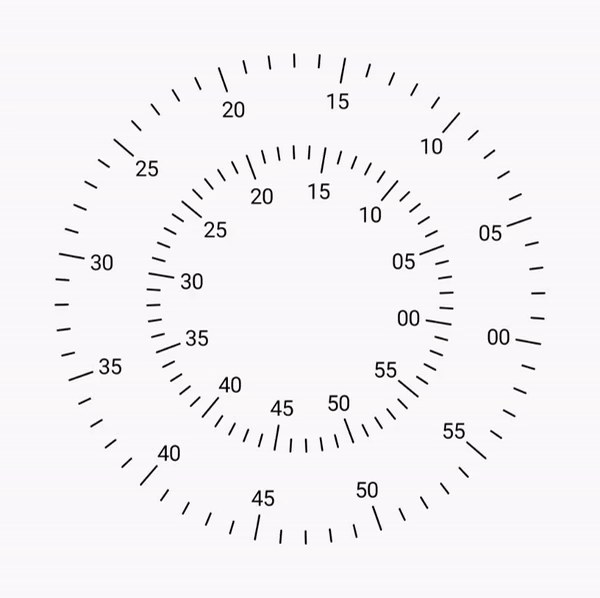
- 秒和分钟刻度盘(seconds and minutes dials):这些是手表表盘上的旋转圆圈。两个刻度盘是相同的,只是半径不同。
- 步数(steps):刻度盘被分为60个步骤,有两种类型的步骤:普通步和五步。
- 步数标签(step Labels):五步间隔上标有值,例如[00,05,10…]。
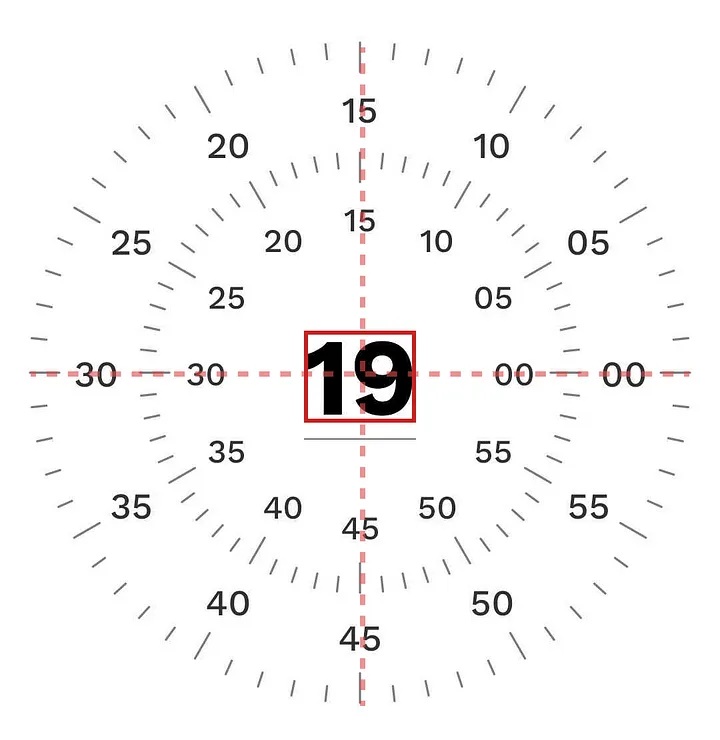
- 小时标签(hour Label):中央标签以24小时制表示当天的小时数。
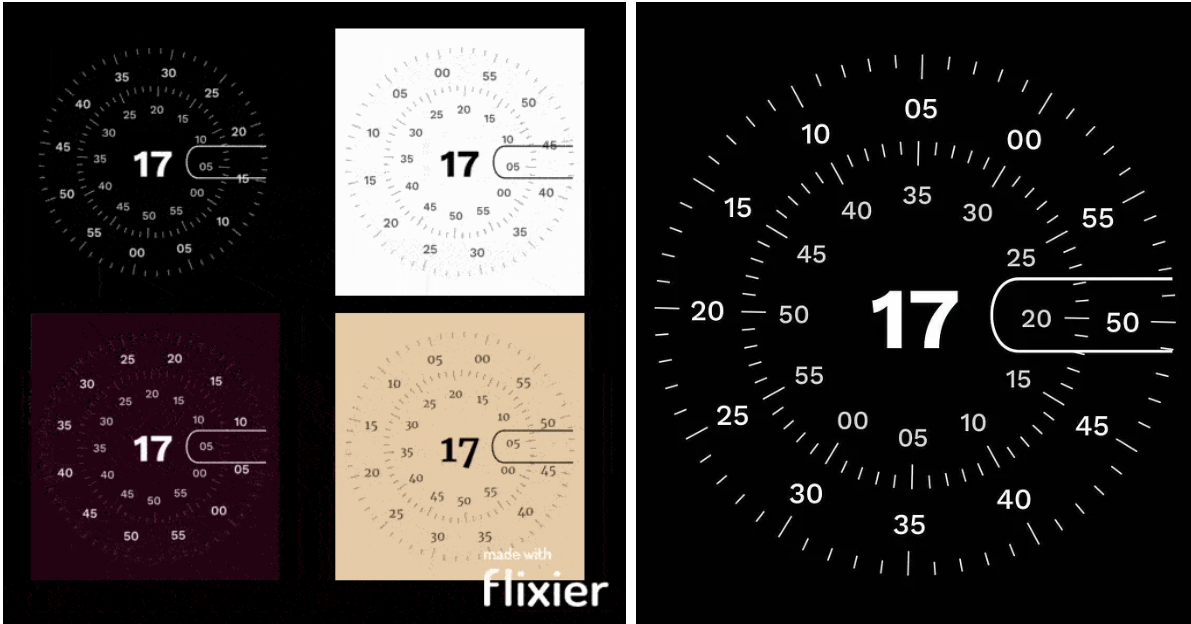
- 分钟-秒钟叠加(minutes-Second Overlay):为了突出当前的分钟和秒钟,一个圆角矩形被放置在表盘右侧中心位置。
2. 绘制秒和分钟刻度盘
本节再次分为三个子部分
- 理解刻度盘
- 绘制步骤
- 绘制步骤标签
2.1 理解刻度盘
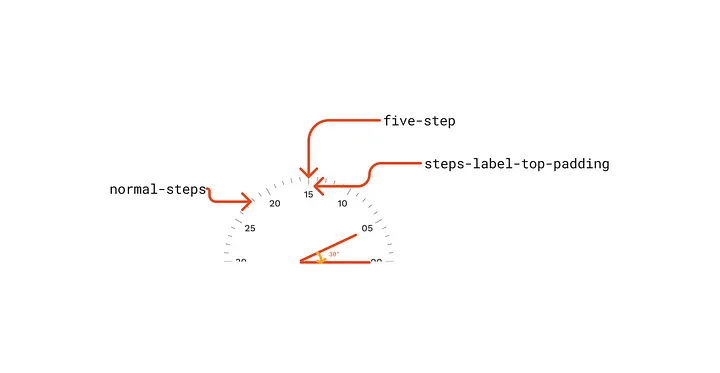
- 秒针和分针的步数相同,但半径和每秒旋转速度不同。
- 秒针每秒旋转6度,而分针每分钟旋转6度。
- 每个表盘都由60个普通步骤和12个刻度为5的步骤组成。
- 相邻两个普通步骤之间的夹角为6度。
- 相邻两个刻度为5的步骤之间的夹角为30度。
- 五个刻度标签(如[00, 05, 10…])具有一些额外间距,称为stepsLabelTopPadding,以确保适当间隔。
2.2 绘制步数
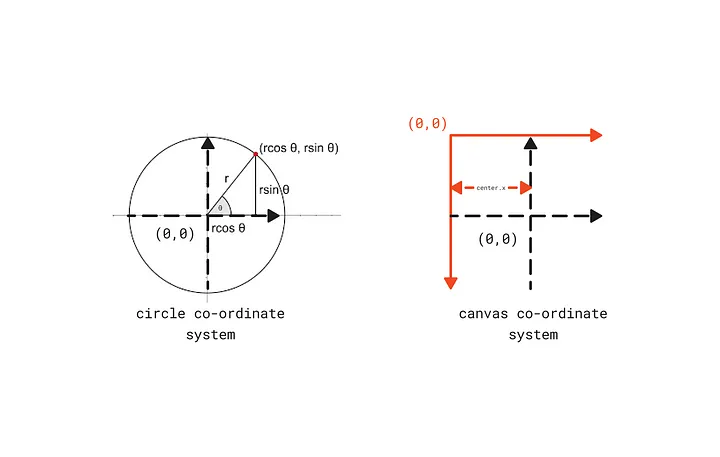
为了画出步骤,我们需要每个单独步骤的起始和结束偏移量,这可以使用以下公式计算得出:
x = r * cos(θ)
y = r * sin(θ)
然而,圆的坐标系与画布的坐标系不同,因此我们需要修改上述公式以获得画布上的x、y坐标。
x = center.x + r * cos(θ)
y = center.y - r * sin(θ)
在公式中,我们需要用弧度表示角度。我们需要将角度乘以π/180来得到弧度。因此,修改后的公式为:
x = center.x + r * cos(angleInDegrees * (π / 180))
y = center.y - r * sin(angleInDegrees * (π / 180))
每秒钟,每个步骤都会以一定的角度旋转,因此我们将在上述公式中加入一个“rotation”状态,该状态每秒钟被修改一次,以便旋转每个步骤。
x = center.x + r * cos((angleInDegrees + rotation) * (π / 180))
y = center.y - r * sin((angleInDegrees + rotation) * (π / 180))
2.3 绘制步骤标签
- 为了在画布上绘制文本,我们需要绘制文本的左上角偏移位置。
- 在计算时,我们还需要考虑标签的宽度和高度,以便将标签正确位置于步骤中心。
绘制秒钟和分钟刻度的代码片段和输出结果。
//data class for wrapping dial customization
data class DialStyle(
    val stepsWidth: Dp = 1.2.dp,
    val stepsColor: Color = Color.Black,
    val normalStepsLineHeight: Dp = 8.dp,
    val fiveStepsLineHeight: Dp = 16.dp,
    val stepsTextStyle: TextStyle = TextStyle(),
    val stepsLabelTopPadding: Dp = 12.dp,
)

data class ClockStyle(
    val secondsDialStyle: DialStyle = DialStyle(),
)

@OptIn(ExperimentalTextApi::class)
@Composable
fun Clock(
    modifier: Modifier = Modifier.size(320.dp),
    clockStyle: ClockStyle = ClockStyle()
) {


    val textMeasurer = rememberTextMeasurer()

    var minuteRotation by remember {

     mutableStateOf(0f) }

    var secondRotation by remember {

     mutableStateOf(0f) }

    //secondRotation is updated by 6 degree clockwise every one second
    //here rotation is in negative, in order to get clockwise rotation
    LaunchedEffect(key1 = true) {


        while (true) {


            //in-order to get smooth transition we are updating rotation angle every 16ms
            //1000ms -> 6 degree
            //16ms -> 0.096
            delay(16)
            secondRotation -= 0.096f
        }
    }

    //minuteRotation is updated by 0.1 degree clockwise every one second
    //here rotation is in negative, in order to get clockwise rotation
    LaunchedEffect(key1 = true) {


        while (true) {


            delay(1000)
            minuteRotation -= 0.1f
        }
    }

    Canvas(
        modifier = modifier
    ) {


        val outerRadius = minOf(this.size.width, this.size.height) / 2f
        val innerRadius = outerRadius - 60.dp.toPx()

        //Seconds Dial
        dial(
            radius = outerRadius,
            rotation = secondRotation,
            textMeasurer = textMeasurer,
            dialStyle = clockStyle.secondsDialStyle
        )

        //Minute Dial
        dial(
            radius = innerRadius,
            rotation = minuteRotation,
            textMeasurer = textMeasurer,
            dialStyle = clockStyle.minutesDialStyle
        )
    }
}


@OptIn(ExperimentalTextApi::class)
fun DrawScope.dial(
    radius: Float,
    rotation: Float,
    textMeasurer: TextMeasurer,
    dialStyle: DialStyle = DialStyle()
) {


    var stepsAngle = 0

    //this will draw 60 steps
    repeat(60) {

     steps ->

        //fiveStep lineHeight > normalStep lineHeight
        val stepsHeight = if (steps % 5 == 0) {


            dialStyle.fiveStepsLineHeight.toPx()
        } else {


            dialStyle.normalStepsLineHeight.toPx()
        }

        //calculate steps, start and end offset
        val stepsStartOffset = Offset(
            x = center.x + (radius * cos((stepsAngle + rotation) * (Math.PI / 180f))).toFloat(),
            y = center.y - (radius * sin((stepsAngle + rotation) * (Math.PI / 180))).toFloat()
        )
        val stepsEndOffset = Offset(
            x = center.x + (radius - stepsHeight) * cos(
                (stepsAngle + rotation) * (Math.PI / 180)
            ).toFloat(),
            y = center.y - (radius - stepsHeight) * sin(
                (stepsAngle + rotation) * (Math.PI / 180)
            ).toFloat()
        )

        //draw step
        drawLine(
            color = dialStyle.stepsColor,
            start = stepsStartOffset,
            end = stepsEndOffset,
            strokeWidth = dialStyle.stepsWidth.toPx(),
            cap = StrokeCap.Round
        )

        //draw steps labels
        if (steps % 5 == 0) {


            //measure the given label width and height
            val stepsLabel = String.format("%02d", steps)
            val stepsLabelTextLayout = textMeasurer.measure(
                text = buildAnnotatedString {

     append(stepsLabel) },
                style = dialStyle.stepsTextStyle
            )

            //calculate the offset
            val stepsLabelOffset = Offset(
                x = center.x + (radius - stepsHeight - dialStyle.stepsLabelTopPadding.toPx()) * cos(
                    (stepsAngle + rotation) * (Math.PI / 180)
                ).toFloat(),
                y = center.y - (radius - stepsHeight - dialStyle.stepsLabelTopPadding.toPx()) * sin(
                    (stepsAngle + rotation) * (Math.PI / 180)
                ).toFloat()
            )

            //subtract the label width and height to position label at the center of the step
            val stepsLabelTopLeft = Offset(
                stepsLabelOffset.x - ((stepsLabelTextLayout.size.width) / 2f),
                stepsLabelOffset.y - (stepsLabelTextLayout.size.height / 2f)
            )

            drawText(
                textMeasurer = textMeasurer,
                text = stepsLabel,
                topLeft = stepsLabelTopLeft,
                style = dialStyle.stepsTextStyle
            )
        }
        stepsAngle += 6
    }
}
3. 绘制小时标签
- 为了绘制叠加层,我们将利用路径函数
lineTo和cubicTo,这使我们能够创建圆角。 - 在绘制圆角时,我们需要考虑分钟和秒标签的宽度,以及步长大小。
//draw hour
val hourString = String.format("%02d", hour)

val hourTextMeasureOutput = textMeasurer.measure(
    text = buildAnnotatedString {

     append(hourString) },
    style = clockStyle.hourLabelStyle
)

val hourTopLeft = Offset(
    x = this.center.x - (hourTextMeasureOutput.size.width / 2),
    y = this.center.y - (hourTextMeasureOutput.size.height / 2)
)

drawText(
    textMeasurer = textMeasurer,
    text = hourString,
    topLeft = hourTopLeft,
    style = clockStyle.hourLabelStyle
)
3. 绘制分钟秒叠加层
- 为了绘制叠加层,我们将利用路径函数lineTo和cubicTo,这些函数可以让我们创建圆角。
- 在绘制圆角时,我们需要考虑分钟和秒标签的宽度,以及步长。
//drawing minute-second overlay
val minuteHandOverlayPath = Path().apply {


    val startOffset = Offset(
        x = center.x + (outerRadius * cos(8f * Math.PI / 180f)).toFloat(),
        y = center.y - (outerRadius * sin(8f * Math.PI / 180f)).toFloat(),
    )
    val endOffset = Offset(
        x = center.x + (outerRadius * cos(-8f * Math.PI / 180f)).toFloat(),
        y = center.y - (outerRadius * sin(-8f * Math.PI / 180f)).toFloat(),
    )
    val overlayRadius = (endOffset.y - startOffset.y) / 2f

    val secondsLabelMaxWidth = textMeasurer.measure(
        text = buildAnnotatedString {

     append("60") },
        style = clockStyle.secondsDialStyle.stepsTextStyle
    ).size.width

    val minutesLabelMaxWidth = textMeasurer.measure(
        text = buildAnnotatedString {

     append("60") },
        style = clockStyle.minutesDialStyle.stepsTextStyle
    ).size.width

    val overlayLineX =
        size.width - clockStyle.secondsDialStyle.fiveStepsLineHeight.toPx() - clockStyle.secondsDialStyle.stepsLabelTopPadding.toPx() - secondsLabelMaxWidth - clockStyle.minutesDialStyle.fiveStepsLineHeight.toPx() - clockStyle.minutesDialStyle.stepsLabelTopPadding.toPx() - (minutesLabelMaxWidth /2f)
    moveTo(x = startOffset.x, y = startOffset.y)
    lineTo(x = overlayLineX, y = startOffset.y)
    cubicTo(
        x1 = overlayLineX - overlayRadius,
        y1 = startOffset.y,
        x2 = overlayLineX - overlayRadius,
        y2 = endOffset.y,
        x3 = overlayLineX,
        y3 = endOffset.y
    )
    lineTo(endOffset.x, endOffset.y)
}

drawPath(
  path = minuteHandOverlayPath,
  color = clockStyle.overlayStrokeColor,
  style = Stroke(width = clockStyle.overlayStrokeWidth.toPx(),)
)
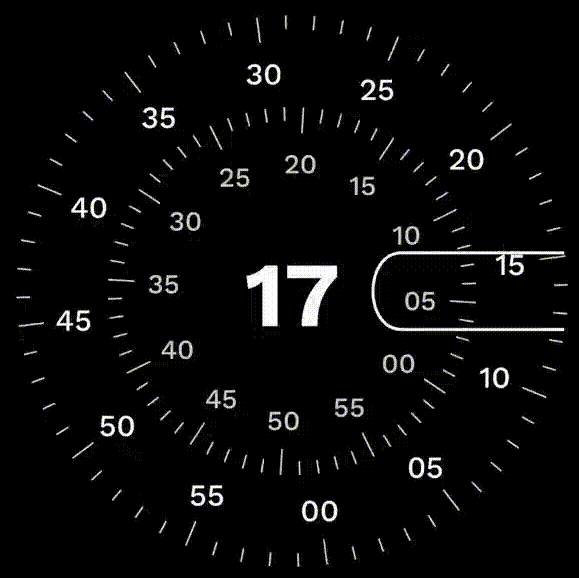
您可以根据您的喜好自定义clockStyle来更新标签的字体家族、大小和颜色。
最后来一张酷炫效果图
GitHub
https://github.com/nikhil-mandlik-dev/watchface