一、前言
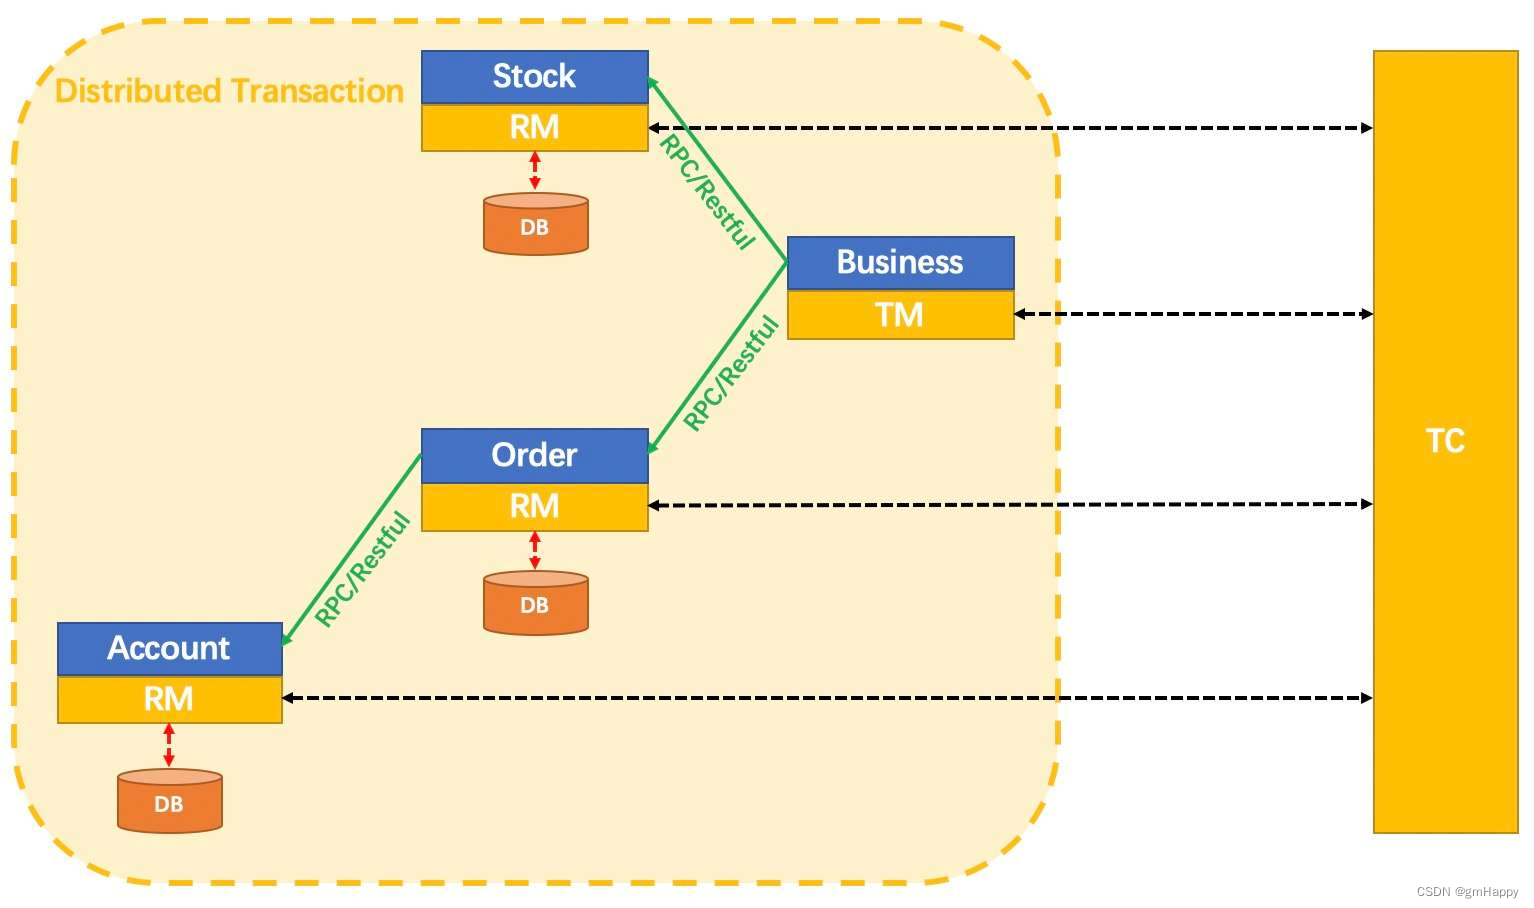
Seata 是一款开源的分布式事务解决方案,致力于提供高性能和简单易用的分布式事务服务。Seata 将为用户提供了 AT、TCC、SAGA 和 XA 事务模式,为用户打造一站式的分布式解决方案。
-
TC (Transaction Coordinator)- 事务协调者
维护全局和分支事务的状态,驱动全局事务提交或回滚。 -
TM (Transaction Manager)- 事务管理器
定义全局事务的范围:开始全局事务、提交或回滚全局事务。 -
RM (Resource Manager)- 资源管理器
管理分支事务处理的资源,与TC交谈以注册分支事务和报告分支事务的状态,并驱动分支事务提交或回滚。
其中 TC(Server端)为单独服务端部署,TM和RM(Client端)由业务系统集成。
Seata Server高可用部署说明:
Seata Server高可用依赖于注册中心、数据库,可不依赖配置中心。- 请保证多个
Seata Server使用同一个注册中心和同一个存储中心,这样才能形成高可用部署
本章对TC(Server端) —— Seata Server(1.6.1版本)的高可用部署方式进行讲解。
- 基于
db存储模式 - 使用
nacos注册中心和配置中心
二、Seata Server存储模式
Seata Server存储模式(store.mode)现有file、db、redis三种(后续将引入raft,mongodb)
-
file模式为单机模式,无需改动,直接启动即可,全局事务会话信息内存中读写并持久化本地文件root.data,性能较高 -
db模式为高可用模式,全局事务会话信息通过db共享,相应性能差些 -
redis模式性能较高,存在事务信息丢失风险,请提前配置合适当前场景的redis持久化配置redis模式Seata-Server 1.3及以上版本支持
三、部署
以下全部操作均基于
Seata-Server 1.6.1版本
3.1 准备数据库
已完成数据库安装和创建,可参照:Mysql8 数据库安装及主从配置 | Spring Cloud 2
数据库脚本下载地址:https://github.com/seata/seata/blob/1.6.1/script/server/db/mysql.sql
3.2 准备nacos
已完成
nacos搭建,可参照:Nacos 单机集群搭建及常用生产环境配置 | Spring Cloud 3
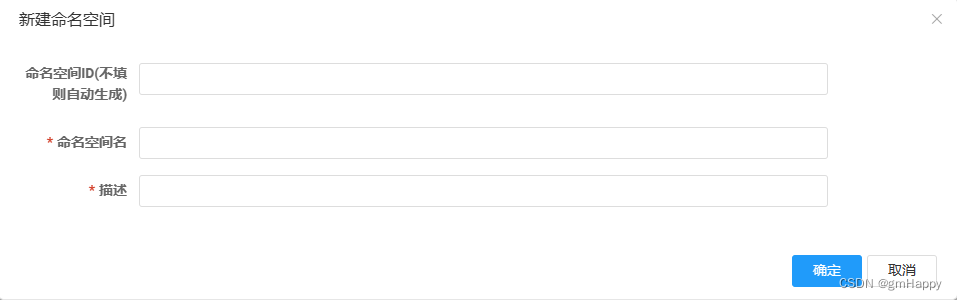
3.2.1 新建namespace
在nacos新建namespace命名空间:
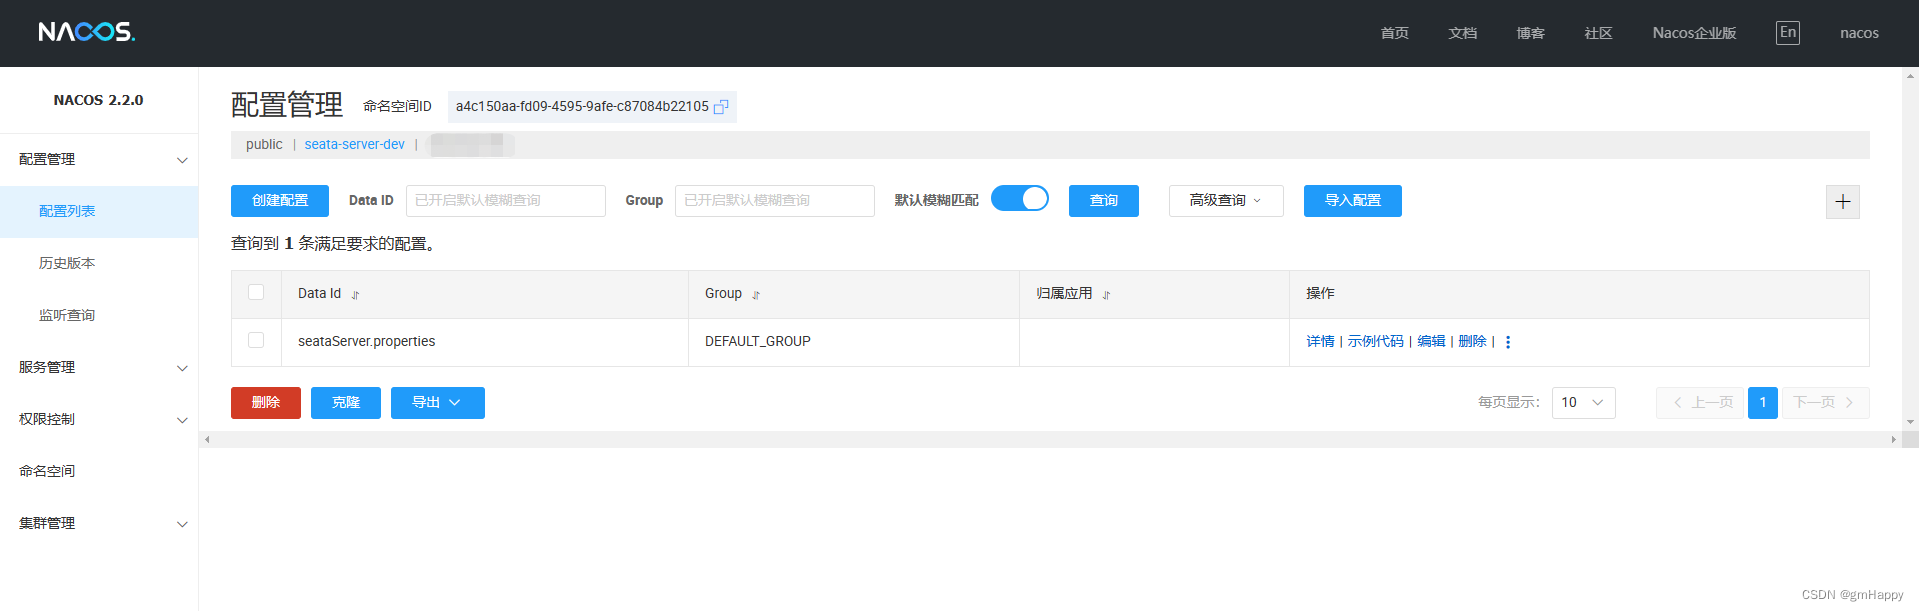
3.2.2 配置中心配置
- 手动配置
在上述namespace下新建配置,此处dataId为seataServer.properties:
#For details about configuration items, see https://seata.io/zh-cn/docs/user/configurations.html
#Transport configuration, for client and server
transport.type=TCP
transport.server=NIO
transport.heartbeat=true
transport.enableTmClientBatchSendRequest=false
transport.enableRmClientBatchSendRequest=true
transport.enableTcServerBatchSendResponse=false
transport.rpcRmRequestTimeout=30000
transport.rpcTmRequestTimeout=30000
transport.rpcTcRequestTimeout=30000
transport.threadFactory.bossThreadPrefix=NettyBoss
transport.threadFactory.workerThreadPrefix=NettyServerNIOWorker
transport.threadFactory.serverExecutorThreadPrefix=NettyServerBizHandler
transport.threadFactory.shareBossWorker=false
transport.threadFactory.clientSelectorThreadPrefix=NettyClientSelector
transport.threadFactory.clientSelectorThreadSize=1
transport.threadFactory.clientWorkerThreadPrefix=NettyClientWorkerThread
transport.threadFactory.bossThreadSize=1
transport.threadFactory.workerThreadSize=default
transport.shutdown.wait=3
transport.serialization=seata
transport.compressor=none

#Transaction routing rules configuration, only for the client
# 此处的mygroup名字可以自定义,只修改这个值即可
service.vgroupMapping.mygroup=default
#If you use a registry, you can ignore it
#service.default.grouplist=192.168.0.31:8091
service.enableDegrade=false
service.disableGlobalTransaction=false

#Transaction rule configuration, only for the client
client.rm.asyncCommitBufferLimit=10000
client.rm.lock.retryInterval=10
client.rm.lock.retryTimes=30
client.rm.lock.retryPolicyBranchRollbackOnConflict=true
client.rm.reportRetryCount=5
client.rm.tableMetaCheckEnable=true
client.rm.tableMetaCheckerInterval=60000
client.rm.sqlParserType=druid
client.rm.reportSuccessEnable=true
client.rm.sagaBranchRegisterEnable=false
client.rm.sagaJsonParser=fastjson
client.rm.tccActionInterceptorOrder=-2147482648
client.tm.commitRetryCount=5
client.tm.rollbackRetryCount=5
client.tm.defaultGlobalTransactionTimeout=60000
client.tm.degradeCheck=false
client.tm.degradeCheckAllowTimes=10
client.tm.degradeCheckPeriod=2000
client.tm.interceptorOrder=-2147482648
client.undo.dataValidation=true
client.undo.logSerialization=jackson
client.undo.onlyCareUpdateColumns=true
server.undo.logSaveDays=7
server.undo.logDeletePeriod=86400000
client.undo.logTable=undo_log
client.undo.compress.enable=true
client.undo.compress.type=zip
client.undo.compress.threshold=64k
#For TCC transaction mode
tcc.fence.logTableName=tcc_fence_log
tcc.fence.cleanPeriod=1h

#Log rule configuration, for client and server
log.exceptionRate=100

#Transaction storage configuration, only for the server. The file, db, and redis configuration values are optional.
# 默认为file,一定要改为db,我们自己的服务启动会连接不到seata
store.mode=db
store.lock.mode=db
store.session.mode=db
#Used for password encryption

#These configurations are required if the `store mode` is `db`. If `store.mode,store.lock.mode,store.session.mode` are not equal to `db`, you can remove the configuration block.
# 修改mysql的配置
store.db.datasource=druid
store.db.dbType=mysql
store.db.driverClassName=com.mysql.cj.jdbc.Driver
# 指定seata的数据库,下面会提
store.db.url=jdbc:mysql://192.168.0.35:3306/seata-server?useUnicode=true&rewriteBatchedStatements=true
store.db.user=root
store.db.password=1qaz@WSX
store.db.minConn=5
store.db.maxConn=30
store.db.globalTable=global_table
store.db.branchTable=branch_table
store.db.distributedLockTable=distributed_lock
store.db.queryLimit=100
store.db.lockTable=lock_table
store.db.maxWait=5000


#Transaction rule configuration, only for the server
server.recovery.committingRetryPeriod=1000
server.recovery.asynCommittingRetryPeriod=1000
server.recovery.rollbackingRetryPeriod=1000
server.recovery.timeoutRetryPeriod=1000
server.maxCommitRetryTimeout=-1
server.maxRollbackRetryTimeout=-1
server.rollbackRetryTimeoutUnlockEnable=false
server.distributedLockExpireTime=10000
server.xaerNotaRetryTimeout=60000
server.session.branchAsyncQueueSize=5000
server.session.enableBranchAsyncRemove=false
server.enableParallelRequestHandle=false

#Metrics configuration, only for the server
metrics.enabled=false
metrics.registryType=compact
metrics.exporterList=prometheus
metrics.exporterPrometheusPort=9898
注意事项:
- 修改
service.vgroupMapping.mygroup=default该值,其中mygroup为事务分组名称可以自定义,后面我们自己的服务(TM和RM)启动时,配置文件中需要指定该事务分组。- 修改
store.mode、store.lock.mode、store.session.mode这三个值为db,才能让Seata-Server连接到下面的数据库中。- 修改
store.db配置项下的配置,连接到自己的数据库。- 配置源文件:https://github.com/seata/seata/blob/develop/script/config-center/config.txt
seata更多配置说明,请见官网:http://seata.io/zh-cn/docs/user/configurations.html
seata事务分组介绍,请见官网:http://seata.io/zh-cn/docs/user/txgroup/transaction-group.html
seata事务分组与高可用介绍,请见官网:http://seata.io/zh-cn/docs/user/txgroup/transaction-group-and-ha.html
- 脚本同步
脚本位于 releases发布包 中,在线地址:https://github.com/seata/seata/tree/develop/script/config-center/nacos
sh ${SEATAPATH}/script/config-center/nacos/nacos-config.sh -h 192.168.0.31 -p 8848 -g DEFAULT_GROUP -t a4c150aa-fd09-4595-9afe-c87084b22105
参数说明:
-h:host,默认值localhost-p:port,默认值8848-g: 配置分组,默认值为SEATA_GROUP-t: 租户信息,对应nacos的命名空间id字段,默认值为空- 配置源文件:https://github.com/seata/seata/blob/develop/script/config-center/config.txt
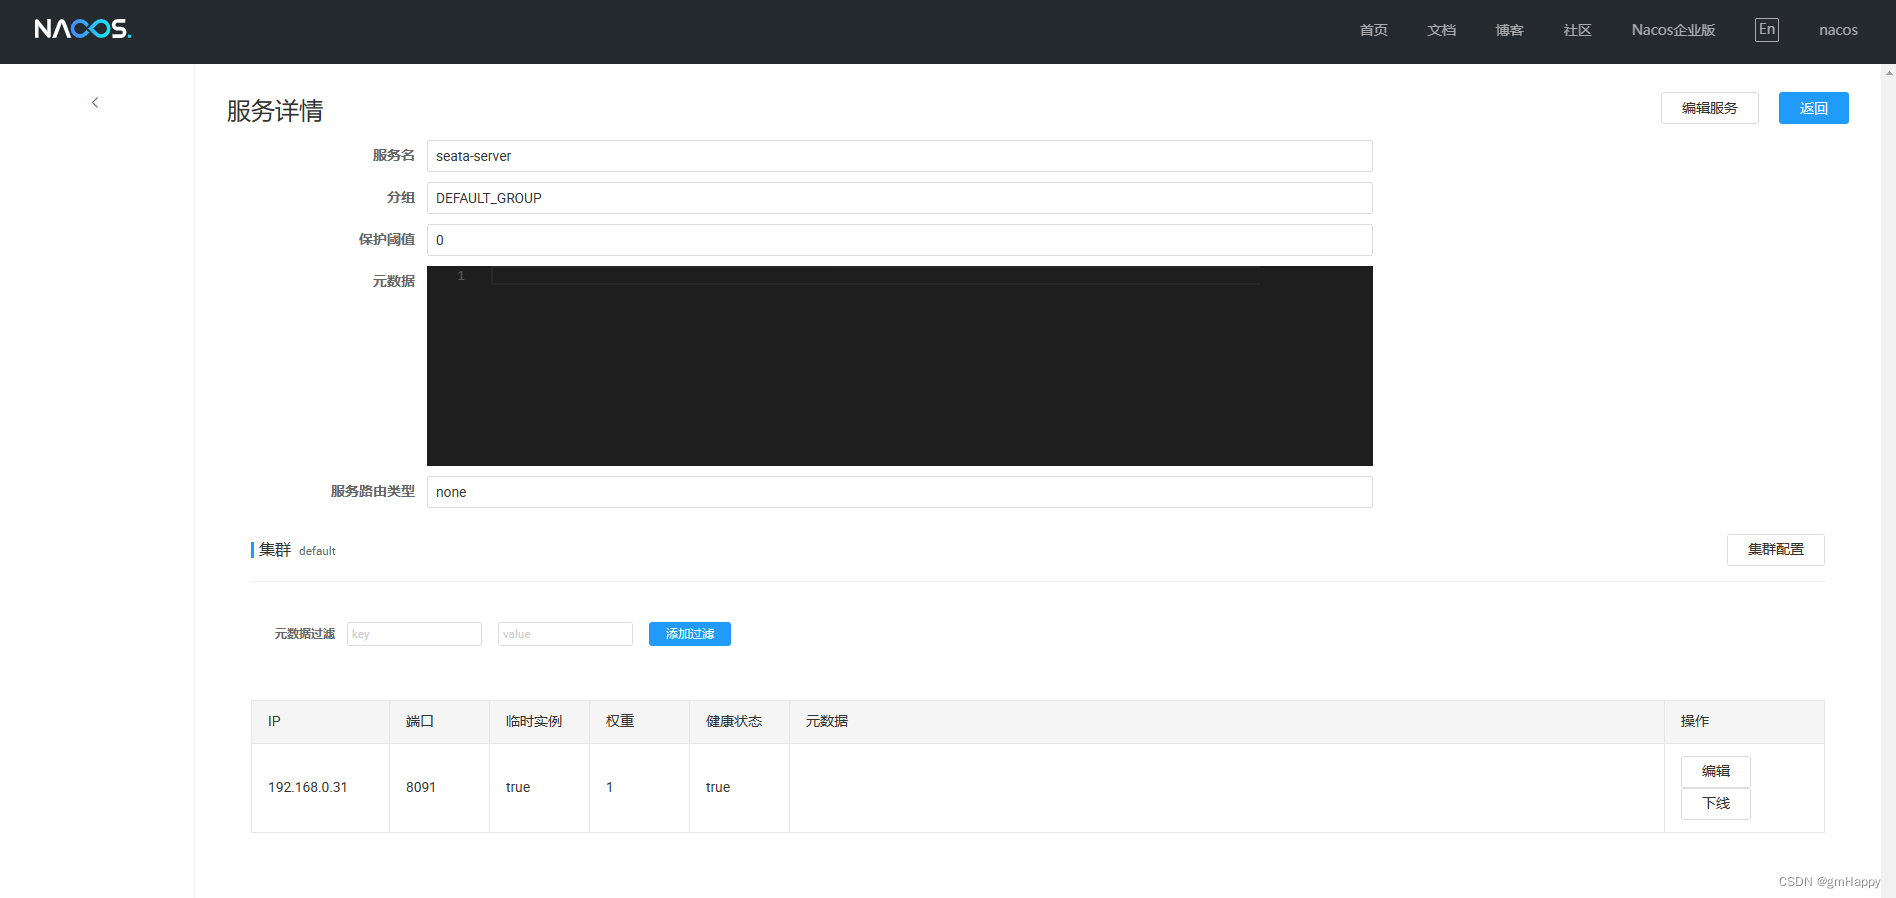
3.2.2 最终效果
3.3 准备Seata配置
3.3.1 准备自定义配置文件
为了获取Seata-Server的配置文件,我们需要先启动一个Seata-Server的服务,然后再从启动的容器实例中把默认的配置文件复制出来,再进行修改。
docker run --name seata-server -p 8091:8091 -p 7091:7091 seataio/seata-server:1.6.1
docker cp seata-server:/seata-server/resources /root/apps/seata-server/
docker rm -f seata-server
3.3.2 application.yml配置文件
我的
application.yml配置文件位于:/root/apps/seata-server/resources,该位置由3.3.1 章节操作决定
application.yml:
server:
  port: 7091

spring:
  application:
    name: seata-server

logging:
  config: classpath:logback-spring.xml
  file:
    path: ${

    user.home}/logs/seata

console:
  user:
    username: seata
    password: seata

seata:
  config:
    # support: nacos, consul, apollo, zk, etcd3
    type: nacos
    nacos:
      server-addr: 192.168.0.31:8848,192.168.0.41:8848,192.168.0.42:8848
      namespace: a4c150aa-fd09-4595-9afe-c87084b22105
      group: DEFAULT_GROUP
      username: nacos
      password: nacos
      data-id: seataServer.properties

  registry:
    # support: nacos, eureka, redis, zk, consul, etcd3, sofa
    type: nacos
    nacos:
      application: seata-server
      server-addr: 192.168.0.31:8848,192.168.0.41:8848,192.168.0.42:8848
      group: DEFAULT_GROUP
      namespace: a4c150aa-fd09-4595-9afe-c87084b22105
      # tc集群名称
      cluster: default
      username: nacos
      password: nacos
#  server:
#    service-port: 8091 #If not configured, the default is '${server.port} + 1000'
  security:
    secretKey: SeataSecretKey0c382ef121d778043159209298fd40bf3850a017
    tokenValidityInMilliseconds: 1800000
    ignore:
      urls: /,/**/*.css,/**/*.js,/**/*.html,/**/*.map,/**/*.svg,/**/*.png,/**/*.ico,/console-fe/public/**,/api/v1/auth/login
注意事项:
seata.config.type与seata.registry.type均修改为nacos- 修改
config与registry中nacos的配置,其中namespace与group须与3.2章节一致Seata-Server默认用户名与密码为seata,请在console.user中修改
3.4 准备docker-compose.yml文件
version: "3.8"
# 通用日志设置
x-logging:
    &default-logging
    # 日志大小和数量
    options:
        max-size: "100m"
        max-file: "3"
    # 文件存储类型
    driver: json-file
services:
  seata-server:
    container_name: seata-server
    image: seataio/seata-server:1.6.1
    ports:
      - "7091:7091"
      - "8091:8091"
    environment:
      - STORE_MODE=db
      # 以SEATA_IP作为host注册seata server
      - SEATA_IP=192.168.0.31
      - SEATA_PORT=8091
    volumes:
      - "/usr/share/zoneinfo/Asia/Shanghai:/etc/localtime"  #设置系统时区
      - "/usr/share/zoneinfo/Asia/Shanghai:/etc/timezone"  #设置时区
      # 假设我们通过docker cp命令把资源文件拷贝到相对路径`./seata-server/resources`中
      # 如有问题,请阅读上面的[注意事项]以及[准备自定义配置文件]
      - "/root/apps/seata-server/resources:/seata-server/resources"
    logging: *default-logging
Seata-Server 支持以下环境变量:
SEATA_IP可选,指定Seata-Server启动的IP, 该IP用于向注册中心注册时使用, 如nacos等SEATA_PORT可选,指定Seata-Server启动的端口, 默认为8091STORE_MODE可选,指定Seata-Server的事务日志存储方,默认是fileSERVER_NODE可选,用于指定Seata-Server节点ID, 如1、2、3..., 默认为根据ip生成SEATA_ENV可选,指定Seata-Server运行环境, 如dev、test等,服务启动时会使用registry-dev.conf这样的配置或从配置中心拉取对应的配置SEATA_CONFIG_NAME可选,指定配置文件位置,如file:/root/registry,将会加载/root/registry.conf作为配置文件,如果需要同时指定file.conf文件,需要将registry.conf的config.file.name的值改为类似file:/root/file.conf
3.5 启动服务
docker-compose up -d
至此
Seata-Server单机部署完,高可用配置即:部署多个Seata-Server使用同一个注册中心和同一个存储中心即可,请自行根据上述章节进行适当修改部署即可。
3.6 事务分组与高可用
关于事务分组与高可用,请参照官网最佳实践:http://seata.io/zh-cn/docs/user/txgroup/transaction-group-and-ha.html