目录
概述
上章我们实现了deployment等列表显示,并且当有部分资源发生了增删改时,会自动重新渲染加载新列表。
这章要实现的是通过go-client将Pod的中的Container(可选择)的日志抓取出来,并且持续输出到控制台。
后端
日志的获取同样是通过api接口获取,
只不过该接口定义的是一个长连接,不返回任何数据
需要的传参有namespace,pod名称,container名称
然后根据go-client获取到rest.request
再获取request的流得到io.Reader
func (this *PodLogsCtl) GetLogs(c *gin.Context) {
	ns := c.DefaultQuery("ns", "default")
	podname := c.DefaultQuery("podname", "")
	cname := c.DefaultQuery("cname", "")
	req := this.Client.CoreV1().Pods(ns).GetLogs(podname, &v1.PodLogOptions{
		Container: cname,
        //follow为true代表的是流式获取,否则只返回单次日志
		Follow:    true,
	})
	//单次获取
	//res, err := req.DoRaw(context.Background())
	//goft.Error(err)
	//return gin.H{
	//	"code": 20000,
	//	"data": string(res),
	//}
	//流式获取
	//gin会给每个请求都起一个协程,不设超时时间就会阻塞在read,导致每刷新一次多一个协程
	cc, _ := context.WithTimeout(context.Background(), time.Minute*5)
    //通过request的流获取到ioReader
	reader,_ := req.Stream(cc)
    //延迟reader的关闭
	defer reader.Close()
	for {
		b := make([]byte, 1024)
		n, err := reader.Read(b)
		if err != nil && err == io.EOF {
			break
		}
		if n > 0 {
			//长连接分段传输
			c.Writer.Write(b[0:n])
			c.Writer.(http.Flusher).Flush()
		}
	}
	return
}
接下来只要使用字节切片去从reader中取,并把这部分数据写进上下文的Writer里并用Flush推流过去,前端即可接收到信息
前端
接下来看前端部分
因为是长连接,所以对于前后端联调部分的前端请求,我的做法是新建一个专用的长连接longrequest.js
import axios from 'axios'
import { MessageBox, Message } from 'element-ui'
import store from '@/store'
import { getToken } from '@/utils/auth'

// create an axios instance
const service = axios.create({
  baseURL: process.env.VUE_APP_BASE_API, // url = base url + request url
  // withCredentials: true, // send cookies when cross-domain requests
  timeout: 0 // request timeout
})

// request interceptor
service.interceptors.request.use(
  config => {
    // do something before request is sent

    if (store.getters.token) {
      // let each request carry token
      // ['X-Token'] is a custom headers key
      // please modify it according to the actual situation
      config.headers['X-Token'] = getToken()
    }
    return config
  },
  error => {
    // do something with request error
    console.log(error) // for debug
    return Promise.reject(error)
  }
)

// response interceptor
service.interceptors.response.use(
  /**
   * If you want to get http information such as headers or status
   * Please return  response => response
  */

  /**
   * Determine the request status by custom code
   * Here is just an example
   * You can also judge the status by HTTP Status Code
   */
  response => {
    const res = response.data

    // if the custom code is not 20000, it is judged as an error.
    if (res.code !== 20000) {
      Message({
        message: res.message || 'Error',
        type: 'error',
        duration: 5 * 1000
      })

      // 50008: Illegal token; 50012: Other clients logged in; 50014: Token expired;
      if (res.code === 50008 || res.code === 50012 || res.code === 50014) {
        // to re-login
        MessageBox.confirm('You have been logged out, you can cancel to stay on this page, or log in again', 'Confirm logout', {
          confirmButtonText: 'Re-Login',
          cancelButtonText: 'Cancel',
          type: 'warning'
        }).then(() => {
          store.dispatch('user/resetToken').then(() => {
            location.reload()
          })
        })
      }
      return Promise.reject(new Error(res.message || 'Error'))
    } else {
      return res
    }
  },
  error => {
    console.log('err' + error) // for debug
    Message({
      message: error.message,
      type: 'error',
      duration: 5 * 1000
    })
    return Promise.reject(error)
  }
)

export default service
和原文件request.js的区别就是用于请求的axios的timout设置成了0(默认是5000,0代表无超时时间)
因此,在Vue文件中有一段这样的引入
//这里使用了长连接,无超时时间
import request from '@/utils/longrequest';
我在Pod列表中加入了操作列,其中有转向日志页面的链接,点击即可跳转到对应Pod的日志查看界面,这个界面在index导航栏中是隐藏的

标签是这样定义:
<router-link :to="{name:'Podlogs',params:{ns:scope.row.NameSpace,name:scope.row.Name}}"> <el-link >日志<i class="el-icon-view el-icon--right"></i></el-link></router-link>转向了名为Podlogs的component的,并将当行数据中的namespace和name作为参数传到Vue组件中去 。
在Podlogs组件的created系统函数中,需要接一下路由过来的参数
this.Name = this.$route.params.name
this.NameSpace = this.$route.params.ns
根据这些参数,我们可以再去请求一次后端api,获取对应Pod中的Container列表,供用户在界面上选择需要查看Log的容器。
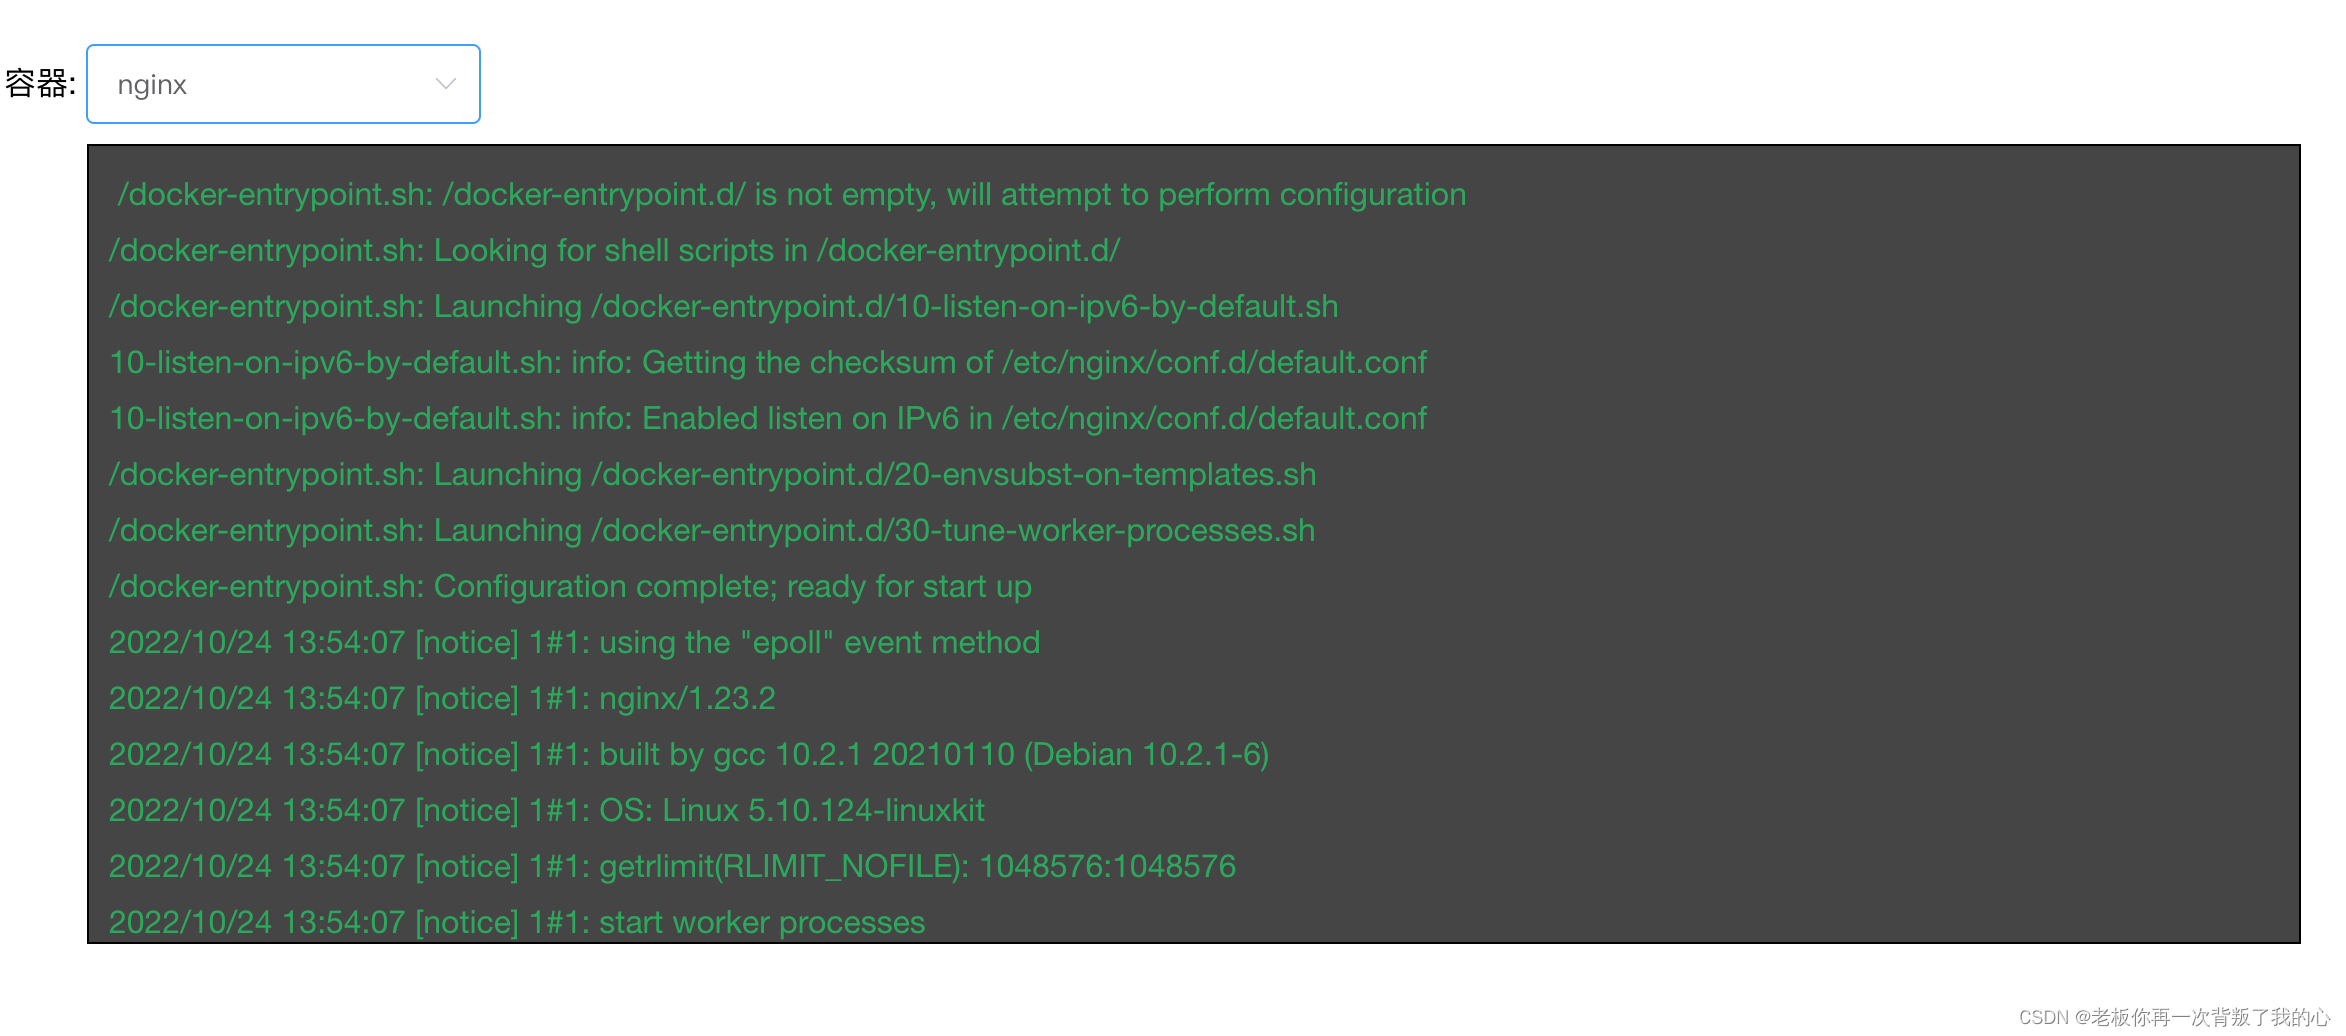
由此引出我们的界面布局,非常的简单。后期可以通过引入第三方的样式来进行显示优化。
<template>
  <div>
    <div style="padding-left: 20px;padding-top:30px">
      容器: <el-select  @change="containerChange"  placeholder="选择容器"
                      v-model="selectedContainer">
      <el-option v-for="c in containers "
                 :label="c.Name"
                 :value="c.Name"/>
    </el-select>
    </div>
    <div class="logs">
      {

   {logs}}
    </div>
  </div>
</template>
<style>
    .logs{
      overflow: auto;

      margin:10px auto;
      min-height: 200px;
      max-height: 400px;
      border: solid 1px black;
      background-color: #454545;
      padding: 10px;

      color:#27aa5e;
      line-height: 21pt;
      white-space: pre;
      width: 90%
    }
</style>
其中,当容器选择框中的值发生变动时,会自动调用绑定的函数
这个函数即会请求我们在后端实现好的长连接获取日志api。该函数见下
containerChange(){
  const ns=this.NameSpace
  const podname=this.Name
  const cname=this.selectedContainer
  request({
    url: '/v1/pods/logs?ns=' + ns + '&podname=' +podname + '&cname=' +cname,
    method: 'GET',
    //长连接等待后端传输数据,常用于下载进度条
    onDownloadProgress: e => {
      const dataChunk = e.currentTarget.response;
      this.logs+=dataChunk
    }
  });

}
这里会通过我们前面定义好的request去请求。
值得一提的事,这里用到了onDownloadProgress方法,该方法常用于前端与后端通过长连接来显示进度条,这里一样适用,只需要在触发时把获取到的日志内容增加到data中作用于插值表达式的变量即可。
实现效果
总结
Pod的Log抓取可通过长连接即可简单实现,下章中我们将通过websocket和xterm库取实现Pod的远程终端