在上一篇文章中,我们介绍了一些关于 WebGPU 的非常基础的知识。在本文中,我们将回顾阶段间变量( inter-stage)的基础知识。
Inter-stage variables come into play between a vertex shader and a fragment shader.
阶段间变量在顶点着色器和片段着色器之间发挥作用。
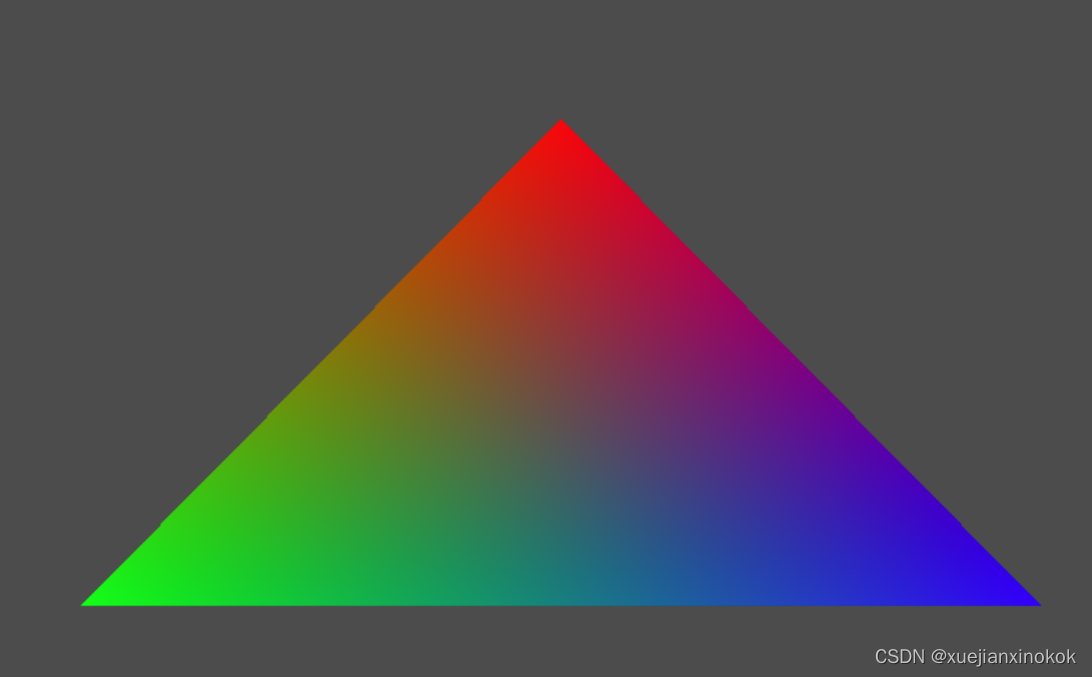
When a vertex shader outputs 3 positions a triangle gets rasterized. The vertex shader can output extra values at each of those positions and by default, those values will be interpolated between the 3 points.
当顶点着色器输出 3 个位置时,三角形会被光栅化。顶点着色器可以在每个位置输出额外的值,默认情况下,这些值将在 3 个点之间进行插值。
让我们举一个小例子。我们将从上一篇文章中的三角形着色器开始。我们要做的就是更改着色器。
  const module = device.createShaderModule({


    // label: 'our hardcoded red triangle shaders', //改行被删除
    label: 'our hardcoded rgb triangle shaders',
    code: `
      struct OurVertexShaderOutput {
        @builtin(position) position: vec4f,
        @location(0) color: vec4f,
      };

      @vertex fn vs(
        @builtin(vertex_index) vertexIndex : u32
      // ) -> @builtin(position) vec4f { //改行被删除
      ) -> OurVertexShaderOutput {
        var pos = array<vec2f, 3>(
          vec2f( 0.0,  0.5),  // top center
          vec2f(-0.5, -0.5),  // bottom left
          vec2f( 0.5, -0.5)   // bottom right
        );
        var color = array<vec4f, 3>(
          vec4f(1, 0, 0, 1), // red
          vec4f(0, 1, 0, 1), // green
          vec4f(0, 0, 1, 1), // blue
        );

        // return vec4f(pos[vertexIndex], 0.0, 1.0);//改行被删除
        var vsOutput: OurVertexShaderOutput;
        vsOutput.position = vec4f(pos[vertexIndex], 0.0, 1.0);
        vsOutput.color = color[vertexIndex];
        return vsOutput;
      }

     // @fragment fn fs() -> @location(0) vec4f { //改行被删除
     //   return vec4f(1, 0, 0, 1);               //改行被删除
      @fragment fn fs(fsInput: OurVertexShaderOutput) -> @location(0) vec4f {
        return fsInput.color;
      }
    `,
  });
首先我们声明一个 struct 。这是协调顶点着色器和片段着色器之间的阶段间变量的一种简单方法。
      struct OurVertexShaderOutput {


        @builtin(position) position: vec4f,
        @location(0) color: vec4f,
      };
然后声明顶点着色器返回这种类型的结构
      @vertex fn vs(
        @builtin(vertex_index) vertexIndex : u32
      //) -> @builtin(position) vec4f {


      ) -> OurVertexShaderOutput {
我们创建了一个包含 3 种颜色的数组。
        var color = array<vec4f, 3>(
          vec4f(1, 0, 0, 1), // red
          vec4f(0, 1, 0, 1), // green
          vec4f(0, 0, 1, 1), // blue
        );
然后我们不是只返回一个 vec4f 作为位置,而是声明一个结构的实例,填充它,然后返回它
        //return vec4f(pos[vertexIndex], 0.0, 1.0);
        var vsOutput: OurVertexShaderOutput;
        vsOutput.position = vec4f(pos[vertexIndex], 0.0, 1.0);
        vsOutput.color = color[vertexIndex];
        return vsOutput;
在片段着色器中,使用这个结构作为函数的参数
      @fragment fn fs(fsInput: OurVertexShaderOutput) -> @location(0) vec4f {


        return fsInput.color;
      }
并返回颜色
如果运行它,我们会看到,每次 GPU 调用我们的片段着色器时,它都会传入一种在所有 3 个点之间插值的颜色。

Inter-stage variables are most often used to interpolate texture coordinates across a triangle which we’ll cover in the article on textures. Another common use is interpolating normals cross a triangle which will cover in the first article on lighting.
阶段间(Inter-stage)变量最常用于跨三角形插入纹理坐标,我们将在有关纹理的文章中介绍。另一个常见的用途是跨三角形插值 法线 ,这将在第一篇关于光照的文章中介绍。
1. 阶段间变量通过 location 连接( Inter-stage variables connect by location)
An important point, like nearly everything in WebGPU, the connection between the vertex shader and the fragment shader is by index. For inter-stage variables they connect by location index.
重要的一点,就像 WebGPU 中的几乎所有内容一样,顶点着色器和片段着色器之间的连接是通过索引进行的。对于阶段间变量,它们通过位置索引连接。
为了说清楚我的意思,让我们只更改片段着色器以在 location(0) 处获取 vec4f 参数而不是结构
           //struct OurVertexShaderOutput {


             //      @builtin(position) position: vec4f,
             //      @location(0) color: vec4f,  //<<<===此处
             //};         //||
                          //||
      @fragment fn fs(@location(0) color: vec4f) -> @location(0) vec4f {


        return color;
      }
运行我们看到它仍然有效。
2. @builtin(position)
这有助于指出另一个怪事。我们在顶点着色器和片段着色器中使用相同结构的原始着色器有一个名为 position 的字段,但position没有位置location。相反,它被声明为
@builtin(position) 。

      struct OurVertexShaderOutput {


        @builtin(position) position: vec4f,
        @location(0) color: vec4f,
      };
That field is NOT an inter-stage variable. Instead, it’s a builtin. It happens that @builtin(position) has a different meaning in a vertex shader vs a fragment shader.
该position字段不是阶段间变量。相反,它是一个 builtin 。但是恰好 @builtin(position) 在顶点着色器和片段着色器中具有不同的含义。
In a vertex shader @builtin(position) is the output that the GPU needs to draw triangles/lines/points
在顶点着色器中, @builtin(position) 是 GPU 绘制三角形/直线/点所需的输出
In a fragment shader @builtin(position) is an input. It’s the pixel coordinate of the pixel the fragment shader is currently being asked to compute a color for.
在片段着色器中, @builtin(position) 是一个输入。它是当前要求片段着色器为其计算颜色的像素的像素坐标。
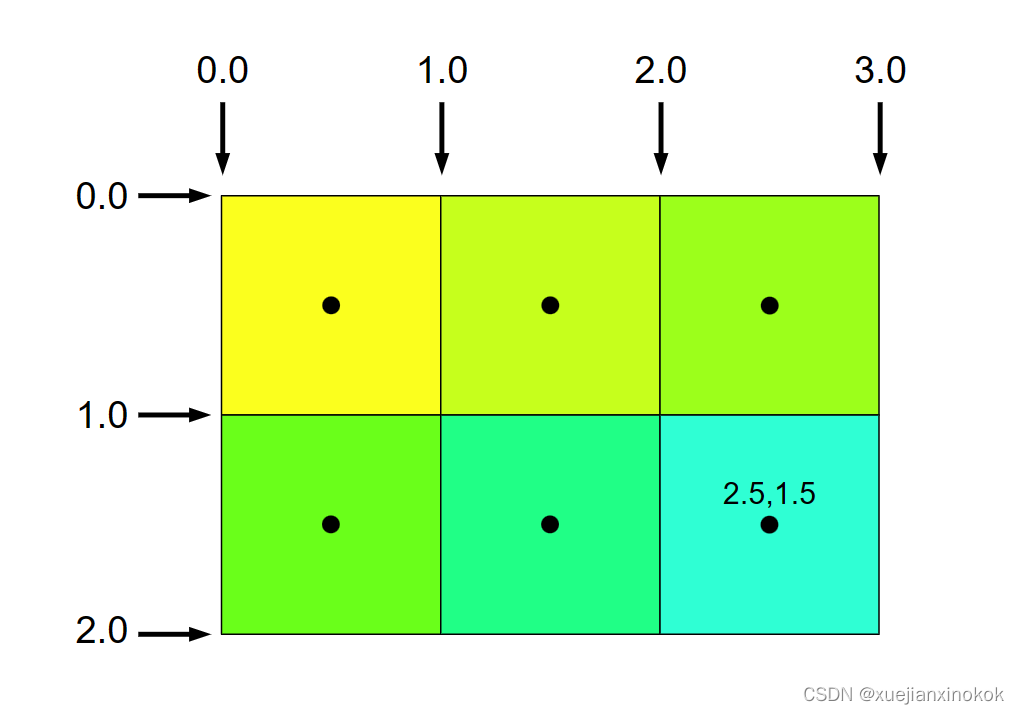
Pixel coordinates are specified by the edges of pixels. The values provided to the fragment shader are the coordinates of the center of the pixel
像素坐标由像素的边缘指定。提供给片段着色器的值是像素中心的坐标
If the texture we were drawing to was 3x2 pixels in size these we be the coordinate.
如果我们绘制的纹理大小为 3x2 像素,那么下图就是坐标
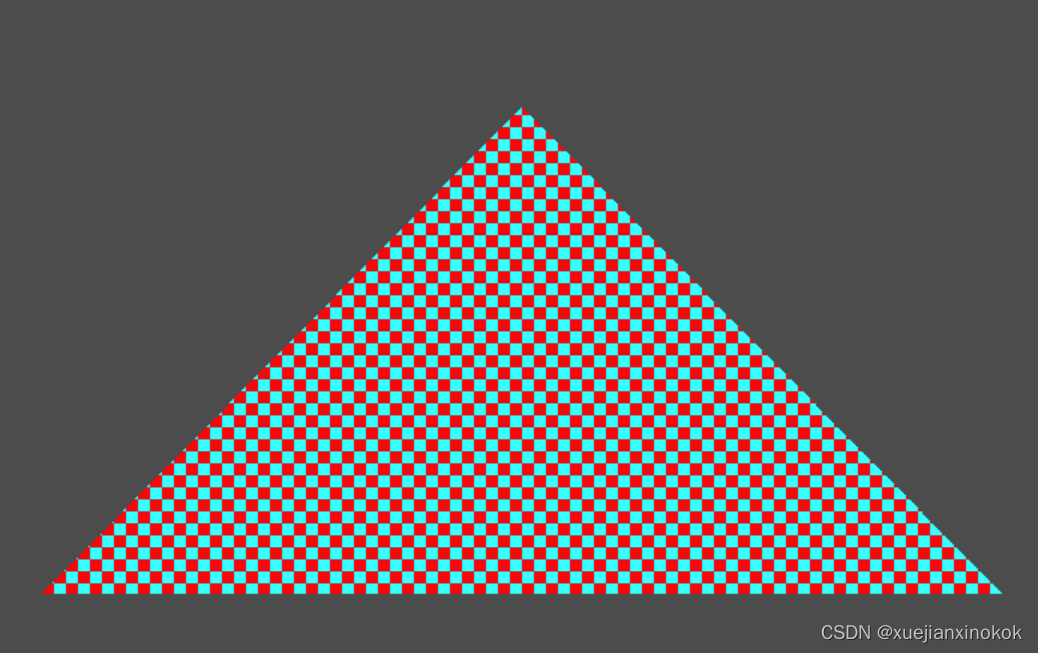
我们可以改变我们的着色器来使用这个位置。例如,让我们画一个棋盘。
  const module = device.createShaderModule({


    label: 'our hardcoded checkerboard triangle shaders',
    code: `
      struct OurVertexShaderOutput {
        @builtin(position) position: vec4f,
        // @location(0) color: vec4f,
      };

      @vertex fn vs(
        @builtin(vertex_index) vertexIndex : u32
      ) -> OurVertexShaderOutput {
        var pos = array<vec2f, 3>(
          vec2f( 0.0,  0.5),  // top center
          vec2f(-0.5, -0.5),  // bottom left
          vec2f( 0.5, -0.5)   // bottom right
        );
       // var color = array<vec4f, 3>(
       //   vec4f(1, 0, 0, 1), // red
       //   vec4f(0, 1, 0, 1), // green
       //   vec4f(0, 0, 1, 1), // blue
       // );

        var vsOutput: OurVertexShaderOutput;
        vsOutput.position = vec4f(pos[vertexIndex], 0.0, 1.0);
       // vsOutput.color = color[vertexIndex];
        return vsOutput;
      }

      @fragment fn fs(fsInput: OurVertexShaderOutput) -> @location(0) vec4f {
       // return fsInput.color;
        let red = vec4f(1, 0, 0, 1);
        let cyan = vec4f(0, 1, 1, 1);

        let grid = vec2u(fsInput.position.xy) / 8;
        let checker = (grid.x + grid.y) % 2 == 1;

        return select(red, cyan, checker);
      }
    `,
  });
The code above takes fsInput.position, which was declared as @builtin(position), and converts its xy coordinates to a vec2u which is 2 unsigned integers. It then divides them by 8 giving us a count that increases every 8 pixels. It then adds the x and y grid coordinates together, computes module 2, and compares the result to 1. This will give us a boolean that is true or false every other pixel. Finally it uses the WGSL function select which given 2 values, selects one or the other based on a boolean condition. In JavaScript select would be written like this
上面的代码采用声明为 @builtin(position) 的 fsInput.position ,并将其 xy 坐标转换为 vec2u ,即 2 个无符号整数。然后将它们除以 8,得到8 个像素为间隔的计数。然后将 x 和 y 网格坐标相加,对 2求余,并将结果与 1 进行比较。这将为我们提供一个布尔值,每隔一个像素为真或假。最后,它使用 WGSL 函数 select ,给定 2 个值,根据布尔条件选择一个或另一个。在 JavaScript 中 select 会这样写
// If condition is false return `a`, otherwise return `b`
select = (a, b, condition) => condition ? b : a;
Even if you don’t use @builtin(position) in a fragment shader, it’s convenient that it’s there because it means we can use the same struct for both a vertex shader and a fragment shader. What was important to takeaway is that the position struct field in the vertex shader vs the fragment shader is entire unrelated. They’re entirely different variables.
即使你不在 片段着色器 中使用 @builtin(position) ,它在那里也很方便,因为这意味着我们可以对顶点着色器和片段着色器使用相同的结构。重要的是,顶点着色器与片段着色器中的 position struct 字段是完全不相关的。它们是完全不同的变量。
As pointed out above though, for inter-stage variables, all that matters is the @location(?). So, it’s not uncommon to declare different structs for a vertex shader’s output vs a fragment shaders input.
正如上面所指出的,对于阶段间变量,重要的是 @location(?) 。因此,为顶点着色器的输出和片段着色器的输入声明不同的结构并不少见。
Note: It is not that common to generate a checkerboard using the @builtin(position). Checkerboards or other patterns are far more commonly implemented using textures. In fact you’ll see an issue if you size the window. Because the checkerboard is based on the pixel coordinates of the canvas it’s relative to the canvas, not relative to the triangle.
注意:使用 @builtin(position) 生成棋盘并不常见。棋盘或其他图案更常使用纹理来实现。事实上,如果调整窗口大小,您会看到一个问题。因为棋盘是基于画布的像素坐标,它是相对于画布的,而不是相对于三角形的。
3. Interpolation Settings 插值设置
We saw above that inter-stage variables, the outputs from a vertex shader are interpolated when passed to the fragment shader. There are 2 sets of settings that can be changed for the interpolation happens. Setting them to anything other than the defaults is not extremely common but there are use cases which will be covered in other articles.
我们在上面看到阶段间变量,顶点着色器的输出在传递给片段着色器时被插值。有 2 组设置可以更改以进行插值。将它们设置为默认值以外的任何值并不是很常见,但有些用例将在其他文章中介绍。
插值类型( Interpolation type):
- perspective :值以透视正确的方式进行插值(默认)
- linear :值以线性、非透视正确的方式进行插值。
- flat :不对值进行插值。插值采样不与平面插值一起使用
插值采样(Interpolation sampling):
-
center : 在像素中心进行插值(默认)
-
centroid :在位于当前基元内片段覆盖的所有样本内的点执行插值。该值对于图元中的所有样本都是相同的。
-
sample :对每个样本执行插值。应用此属性时,每个样本调用一次片段着色器。
您将这些指定为属性。例如
  @location(2) @interpolate(linear, center) myVariableFoo: vec4f;
  @location(3) @interpolate(flat) myVariableBar: vec4f;
请注意,如果阶段间变量是整数类型,则必须将其插值设置为 flat 。
If you set the interpolation type to flat, the value passed to the fragment shader is the value of the inter-stage variable for the first vertex in that triangle.
如果将插值类型设置为 flat ,则传递给片段着色器的值是该三角形中第一个顶点的阶段间变量的值。
在下一篇文章中,我们将介绍uniforms 作为将数据传递到着色器的另一种方式。