前言
本篇主要用来实现将YOLOv5输出的标签转成中文,并且自定义标签颜色的需求。
我所使用的是YOLOv5-5.0版本。
源码逻辑分析
在detect.py中,这两行代码设置标签名字和颜色。
# Get names and colors
names = model.module.names if hasattr(model, 'module') else model.names
colors = [[random.randint(0, 255) for _ in range(3)] for _ in names]
可以发现,类别名字并不是在运行检测时导入的,而是内嵌在保存的模型参数文件中。
新建一个load_model.py文件,加载训练好的模型:
import torch
ckpt1 = torch.load('runs/train/exp21/weights/best.pt')
print("Done")
启动断点调试:

可以看到,类别名称包含在了模型内部:

而至于颜色,每次运行,程序会随机生成RGB三个数值,并不稳定。
思路分析
了解了上面的加载逻辑之后,为了实现中文显示的需求,主要有两种思路。
思路一
思路一:直接在data.yaml中,将names改成中文。
这种思路需要注意,文件默认打开并不是UTF-8编码,需要对文件读取编码进行修改。
在train.py中,将
with open(opt.data) as f:
改为
with open(opt.data, encoding='UTF-8') as f:
在test.py中,将
with open(data) as f:
改为
with open(data, encoding='UTF-8') as f:
这种思路意味着模型需要重新训练,并且后面还是会存在一些小问题。
思路二
思路二:直接在渲染标签的时候进行文字转换。
但是opencv默认不支持中文,因此需要下列步骤:
- 将opencv图片格式转换成PIL的图片格式;
- 使用PIL绘制文字;
- PIL图片格式转换成oepncv的图片格式;
思路实现
采用思路二进行操作。
下载字体
首先是下载支持中文的字体,我所采用的是SimHei这款字体,下载链接:
http://www.font5.com.cn/ziti_xiazai.php?id=151&part=1237887120&address=0
混淆矩阵字体修改
在utils/metrics.py文件中,开头添加代码:
plt.rcParams['font.sans-serif'] = ['SimHei']
plt.rcParams['axes.unicode_minus'] = False
之后,将这段代码
sn.set(font_scale=1.0 if self.nc < 50 else 0.8) # for label size
改为
sn.set(font='SimHei', font_scale=1.0 if self.nc < 50 else 0.8) # for label size
中文标签/颜色修改
在detect.py的Write results中,添加这部分
 # Write results
for *xyxy, conf, cls in reversed(det):
    if save_txt:  # Write to file
        xywh = (xyxy2xywh(torch.tensor(xyxy).view(1, 4)) / gn).view(-1).tolist()  # normalized xywh
        line = (cls, *xywh, conf) if opt.save_conf else (cls, *xywh)  # label format
        with open(txt_path + '.txt', 'a') as f:
            f.write(('%g ' * len(line)).rstrip() % line + '\n')

    if save_img or view_img:  # Add bbox to image
        # label = f'{names[int(cls)]} {conf:.2f}'
        # label = None  # 修改隐藏标签
        # plot_one_box(xyxy, im0, label=label, color=colors[int(cls)], line_thickness=3)

        # 增加中文标签
        label = '%s %.2f' % (names[int(cls)], conf)
        # 设置固定颜色
        color_dict = {

    '1': [0, 131, 252], '2': [190, 90, 92], '3': [142, 154, 78], '4': [2, 76, 82], '5': [119, 80, 5], '6': [189, 163, 234]}
        # 中文输出
        if names[int(cls)] == 'truck':
            ch_text = '%s %.2f' % ('卡车', conf)
            color_single = color_dict['1']
        elif names[int(cls)] == 'SUV':
            ch_text = '%s %.2f' % ('越野车', conf)
            color_single = color_dict['2']

        im0 = plot_one_box(xyxy, im0, label=label, ch_text=ch_text, color=color_single, line_thickness=3)
其中,颜色我根据自己整理的调色盘进行吸取筛选。

之后,在utils/plots.py中导入库
from PIL import Image, ImageDraw, ImageFont
修改plot_one_box这个函数:
def cv2ImgAddText(img, text, left, top, textColor=(0, 255, 0), textSize=25):
    # 图像从OpenCV格式转换成PIL格式
    if (isinstance(img, np.ndarray)):  # 判断是否OpenCV图片类型
        img = Image.fromarray(cv2.cvtColor(img, cv2.COLOR_BGR2RGB))
    draw = ImageDraw.Draw(img)
    fontText = ImageFont.truetype("Font/simhei.ttf", textSize, encoding="utf-8")
    draw.text((left, top - 2), text, textColor, font=fontText)
    return cv2.cvtColor(np.asarray(img), cv2.COLOR_RGB2BGR)


def plot_one_box(x, img, color=None, label=None, ch_text=None, line_thickness=None):
    # Plots one bounding box on image img
    tl = line_thickness or round(0.002 * (img.shape[0] + img.shape[1]) / 2) + 1  # line/font thickness
    color = color or [random.randint(0, 255) for _ in range(3)]
    c1, c2 = (int(x[0]), int(x[1])), (int(x[2]), int(x[3]))
    cv2.rectangle(img, c1, c2, color, thickness=tl, lineType=cv2.LINE_AA)
    if label:
        tf = max(tl - 1, 1)  # font thickness
        t_size = cv2.getTextSize(label, 0, fontScale=tl / 3, thickness=tf)[0]
        c2 = c1[0] + t_size[0], c1[1] - t_size[1]
        cv2.rectangle(img, c1, c2, color, -1, cv2.LINE_AA)  # filled
        # cv2.putText(img, label, (c1[0], c1[1] - 2), 0, tl / 3, [225, 255, 255], thickness=tf, lineType=cv2.LINE_AA)
        img_text = cv2ImgAddText(img, ch_text, c1[0], c2[1], (255, 255, 255), 25)
    return img_text
查看效果
修改之前:

修改之后:

结果能够成功显示,不过存在标签宽度过长的小问题,后续有空再进行优化。
2022.8.9更
自定义宽度优化
又研究了下这个绘图函数的逻辑,下面这个函数getTextSize中是用来计算字符的尺寸,似乎也并不支持中文,于是我想根据不同类别的名称长度来自定义标签宽度调整。
下面的函数中有两个画框操作cv2.rectangle,第一个绘制的是目标的矩形框,第二个是用来填充标签的背景。主要修改的地方在第二个框的填充参数上,可以根据不同的类别,调整缩减长度,改进代码如下:
def plot_one_box(x, img, color=None, label=None, ch_text=None, line_thickness=None):
    # Plots one bounding box on image img
    tl = line_thickness or round(0.002 * (img.shape[0] + img.shape[1]) / 2) + 1  # line/font thickness
    color = color or [random.randint(0, 255) for _ in range(3)]
    c1, c2 = (int(x[0]), int(x[1])), (int(x[2]), int(x[3]))
    cv2.rectangle(img, c1, c2, color, thickness=tl, lineType=cv2.LINE_AA)   # 绘制目标框
    if label:
        tf = max(tl - 1, 1)  # font thickness
        t_size = cv2.getTextSize(label, 0, fontScale=tl / 3, thickness=tf)[0]
        if label.split()[0] == "类别一":
            sublength = 50  # 缩减方框的长度
            c2 = c1[0] + t_size[0] - sublength, c1[1] - t_size[1]
        elif label.split()[0] == "类别二":
            sublength = 30  # 缩减方框的长度
            c2 = c1[0] + t_size[0] - sublength, c1[1] - t_size[1]
        cv2.rectangle(img, c1, c2, color, -1, cv2.LINE_AA)  # 填充方框背景色
        img_text = cv2ImgAddText(img, ch_text, c1[0], c2[1], (255, 255, 255), 25)
    return img_text
2022.8.13更
YOLOv5-6.x版本添加中文
有读者问道TPH-YOLOv5如何添加中文标签,TPH-YOLOv5的绘图代码和YOLOv5-6.0版本一样。
先来看绘图源码,同样位于utils/plots.py文件中:
class Annotator:
    if RANK in (-1, 0):
        check_font()  # download TTF if necessary

    # YOLOv5 Annotator for train/val mosaics and jpgs and detect/hub inference annotations
    def __init__(self, im, line_width=None, font_size=None, font='Arial.ttf', pil=False, example='abc'):
        assert im.data.contiguous, 'Image not contiguous. Apply np.ascontiguousarray(im) to Annotator() input images.'
        self.pil = pil or not is_ascii(example) or is_chinese(example)
        if self.pil:  # use PIL
            self.im = im if isinstance(im, Image.Image) else Image.fromarray(im)
            self.draw = ImageDraw.Draw(self.im)
            self.font = check_font(font='Arial.Unicode.ttf' if is_chinese(example) else font,
                                   size=font_size or max(round(sum(self.im.size) / 2 * 0.035), 12))
        else:  # use cv2
            self.im = im
        self.lw = line_width or max(round(sum(im.shape) / 2 * 0.003), 2)  # line width

    def box_label(self, box, label='', color=(128, 128, 128), txt_color=(255, 255, 255)):
        # Add one xyxy box to image with label
        if self.pil or not is_ascii(label):
            self.draw.rectangle(box, width=self.lw, outline=color)  # box
            if label:
                w, h = self.font.getsize(label)  # text width, height
                outside = box[1] - h >= 0  # label fits outside box
                self.draw.rectangle([box[0],
                                     box[1] - h if outside else box[1],
                                     box[0] + w + 1,
                                     box[1] + 1 if outside else box[1] + h + 1], fill=color)
                self.draw.text((box[0], box[1] - h if outside else box[1]), label, fill=txt_color, font=self.font)
        else:  # cv2
            p1, p2 = (int(box[0]), int(box[1])), (int(box[2]), int(box[3]))
            cv2.rectangle(self.im, p1, p2, color, thickness=self.lw, lineType=cv2.LINE_AA)
            if label:
                tf = max(self.lw - 1, 1)  # font thickness
                w, h = cv2.getTextSize(label, 0, fontScale=self.lw / 3, thickness=tf)[0]  # text width, height
                outside = p1[1] - h - 3 >= 0  # label fits outside box
                p2 = p1[0] + w, p1[1] - h - 3 if outside else p1[1] + h + 3
                cv2.rectangle(self.im, p1, p2, color, -1, cv2.LINE_AA)  # filled
                self.draw.text((box[0], box[1] - h if outside else box[1]), label, fill=txt_color, font=self.font)
                cv2.putText(self.im, label, (p1[0], p1[1] - 2 if outside else p1[1] + h + 2), 0, self.lw / 3, txt_color,
                            thickness=tf, lineType=cv2.LINE_AA)
可以看到,在6.x版本中,作者进行了一个绘图优化,即输入的标签会先进行判断,如果是中文,则走self.pil or not is_ascii(label)这个分支,调用PIL进行绘制,如果是英文,则走下面这个分支,也就是说,如果模型训练时标签是中文,它默认是支持的。
那么如果训练时标签是英文,想把它变成中文显示怎么做呢?也很容易。
将第一个分支的绘制代码复制到第二分支即可,翻译判断在后面的分支进行。注意这里的字体仍和上面一样,需要下载修改。
修改后的代码:
class Annotator:
if RANK in (-1, 0):
check_font() # download TTF if necessary
# YOLOv5 Annotator for train/val mosaics and jpgs and detect/hub inference annotations
def __init__(self, im, line_width=None, font_size=None, font='Font/simhei.ttf', pil=False, example='abc'):
assert im.data.contiguous, 'Image not contiguous. Apply np.ascontiguousarray(im) to Annotator() input images.'
self.pil = pil or not is_ascii(example) or is_chinese(example)
if self.pil: # use PIL
self.im = im if isinstance(im, Image.Image) else Image.fromarray(im)
self.draw = ImageDraw.Draw(self.im)
self.font = check_font(font='Arial.Unicode.ttf' if is_chinese(example) else font,
size=font_size or max(round(sum(self.im.size) / 2 * 0.035), 12))
else: # use cv2
# 补充
self.im = im if isinstance(im, Image.Image) else Image.fromarray(im)
self.draw = ImageDraw.Draw(self.im)
self.font = check_font(font='Arial.Unicode.ttf' if is_chinese(example) else font,
size=font_size or max(round(sum(self.im.size) / 2 * 0.035), 12))
# self.im = im
self.lw = line_width or max(round(sum(im.shape) / 2 * 0.003), 2) # line width
def box_label(self, box, label='', color=(128, 128, 128), txt_color=(255, 255, 255)):
# Add one xyxy box to image with label
if self.pil or not is_ascii(label):
self.draw.rectangle(box, width=self.lw, outline=color) # box
if label:
w, h = self.font.getsize(label) # text width, height
outside = box[1] - h >= 0 # label fits outside box
self.draw.rectangle([box[0],
box[1] - h if outside else box[1],
box[0] + w + 1,
box[1] + 1 if outside else box[1] + h + 1], fill=color)
# self.draw.text((box[0], box[1]), label, fill=txt_color, font=self.font, anchor='ls') # for PIL>8.0
# print(label)
self.draw.text((box[0], box[1] - h if outside else box[1]), label, fill=txt_color, font=self.font)
else: # cv2
# p1, p2 = (int(box[0]), int(box[1])), (int(box[2]), int(box[3]))
# cv2.rectangle(self.im, p1, p2, color, thickness=self.lw, lineType=cv2.LINE_AA)
# if label:
# tf = max(self.lw - 1, 1) # font thickness
# w, h = cv2.getTextSize(label, 0, fontScale=self.lw / 3, thickness=tf)[0] # text width, height
# outside = p1[1] - h - 3 >= 0 # label fits outside box
# p2 = p1[0] + w, p1[1] - h - 3 if outside else p1[1] + h + 3
# cv2.rectangle(self.im, p1, p2, color, -1, cv2.LINE_AA) # filled
# self.draw.text((box[0], box[1] - h if outside else box[1]), label, fill=txt_color, font=self.font)
# cv2.putText(self.im, label, (p1[0], p1[1] - 2 if outside else p1[1] + h + 2), 0, self.lw / 3, txt_color,
# thickness=tf, lineType=cv2.LINE_AA)
self.draw.rectangle(box, width=self.lw, outline=color) # box
if label:
w, h = self.font.getsize(label) # text width, height
outside = box[1] - h >= 0 # label fits outside box
self.draw.rectangle([box[0],
box[1] - h if outside else box[1],
box[0] + w + 1,
box[1] + 1 if outside else box[1] + h + 1], fill=color)
# self.draw.text((box[0], box[1]), label, fill=txt_color, font=self.font, anchor='ls') # for PIL>8.0
# print(label.split()[0])
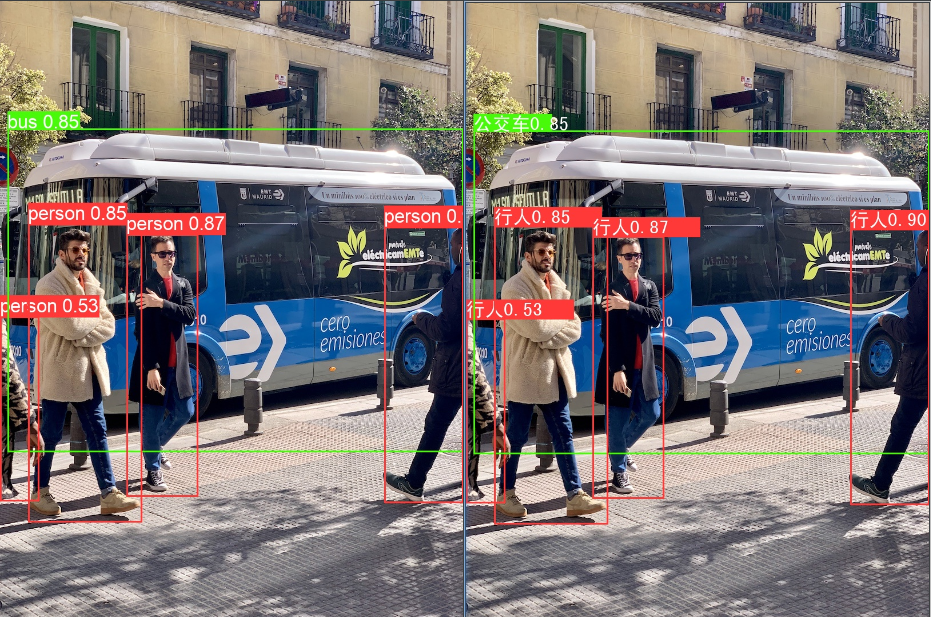
if label.split()[0] == "person":
label = "行人" + label.split()[1]
elif label.split()[0] == "bus":
label = "公交车" + label.split()[1]
self.draw.text((box[0], box[1] - h if outside else box[1]), label, fill=txt_color, font=self.font)
修改前后效果对比:
注:这里的颜色框宽度没有再去调,调整方式和上一节类似。
References
[1]https://blog.csdn.net/bu_fo/article/details/114668184
[2]https://blog.csdn.net/oJiWuXuan/article/details/109337713
2022.10.15更
后记
在项目中又遇到了添加中文这个问题,回看两个月前的方法觉得太蠢了,一个个修改标签宽度存在的一个问题是,如果换一台电脑,在不同分辨率下,宽度显示仍然是不同的。问题的根源在于OpenCV无法计算中文的宽度,但是,用PIL中的font.getsize,可以计算中文的宽度,而YOLOv5-6.0版本开始,就用该方式对中文进行了适配。
下面是6.0版本的核心方法,5.0版本的YOLOv5直接将绘制标签的函数替换成6.0即可。
6.0版本在plots.py中将绘图函数封装成了一个类:
class Annotator:
    if RANK in (-1, 0):
        check_font()  # download TTF if necessary

    # YOLOv5 Annotator for train/val mosaics and jpgs and detect/hub inference annotations
    def __init__(self, im, line_width=None, font_size=None, font='Arial.ttf', pil=False, example='abc'):
        assert im.data.contiguous, 'Image not contiguous. Apply np.ascontiguousarray(im) to Annotator() input images.'
        self.pil = pil or not is_ascii(example) or is_chinese(example)
        if self.pil:  # use PIL
            self.im = im if isinstance(im, Image.Image) else Image.fromarray(im)
            self.draw = ImageDraw.Draw(self.im)
            self.font = check_font(font='Font/simhei.ttf' if is_chinese(example) else font,
                                   size=font_size or max(round(sum(self.im.size) / 2 * 0.035), 12))
        else:  # use cv2
            self.im = im
        self.lw = line_width or max(round(sum(im.shape) / 2 * 0.003), 2)  # line width

    def box_label(self, box, label='', color=(128, 128, 128), txt_color=(255, 255, 255)):
        # Add one xyxy box to image with label
        if self.pil or not is_ascii(label):
            self.draw.rectangle(box, width=self.lw, outline=color)  # box
            if label:
                w, h = self.font.getsize(label)  # text width, height
                outside = box[1] - h >= 0  # label fits outside box
                self.draw.rectangle([box[0],
                                     box[1] - h if outside else box[1],
                                     box[0] + w + 1,
                                     box[1] + 1 if outside else box[1] + h + 1], fill=color)
                # self.draw.text((box[0], box[1]), label, fill=txt_color, font=self.font, anchor='ls')  # for PIL>8.0
                self.draw.text((box[0], box[1] - h if outside else box[1]), label, fill=txt_color, font=self.font)
        else:  # cv2
            p1, p2 = (int(box[0]), int(box[1])), (int(box[2]), int(box[3]))
            cv2.rectangle(self.im, p1, p2, color, thickness=self.lw, lineType=cv2.LINE_AA)
            if label:
                tf = max(self.lw - 1, 1)  # font thickness
                w, h = cv2.getTextSize(label, 0, fontScale=self.lw / 3, thickness=tf)[0]  # text width, height
                outside = p1[1] - h - 3 >= 0  # label fits outside box
                p2 = p1[0] + w, p1[1] - h - 3 if outside else p1[1] + h + 3
                cv2.rectangle(self.im, p1, p2, color, -1, cv2.LINE_AA)  # filled
                cv2.putText(self.im, label, (p1[0], p1[1] - 2 if outside else p1[1] + h + 2), 0, self.lw / 3, txt_color,
                            thickness=tf, lineType=cv2.LINE_AA)

    def rectangle(self, xy, fill=None, outline=None, width=1):
        # Add rectangle to image (PIL-only)
        self.draw.rectangle(xy, fill, outline, width)

    def text(self, xy, text, txt_color=(255, 255, 255)):
        # Add text to image (PIL-only)
        w, h = self.font.getsize(text)  # text width, height
        self.draw.text((xy[0], xy[1] - h + 1), text, fill=txt_color, font=self.font)

    def result(self):
        # Return annotated image as array
        return np.asarray(self.im)
可以看到,代码中,对于label进行了一个中文判断 is_chinese(example),如果是中文,就走上面的PIL分支。因此,只需要在检测之前,将英文的label转换成中文即可。
修改detect.py部分如下:
# names读取的是模型的英文names,这里强制改成中文,直接定义自己的类别
# names = model.module.names if hasattr(model, 'module') else model.names
names = ['类别一', '类别二']

# 在len前面添加
annotator = Annotator(im0, line_width=3, example=str(names))
if len(det):
   # Rescale boxes from img_size to im0 size
   det[:, :4] = scale_coords(img.shape[2:], det[:, :4], im0.shape).round()

   # Print results
   for c in det[:, -1].unique():
       n = (det[:, -1] == c).sum()  # detections per class
       s += f"{

      n} {

      names[int(c)]}{

      's' * (n > 1)}, "  # add to string

   # Write results
   for *xyxy, conf, cls in reversed(det):
       if save_img:
           c = int(cls)
           label = f'{

      names[int(cls)]} {

      conf:.2f}'
           # print(label)
           annotator.box_label(xyxy, label, color=colors(c, True))
print(f'{

      s}')


# 不要忘了在保存图片前添加这一句
im0 = annotator.result()
# Save results (image with detections)
if save_img:
这样就能完美得将英文替换成中文了。