大多数模型都是黑盒,其内部逻辑对最终用户是隐藏的。为了鼓励透明度,我们通过简单地将Interface类中的interpretation关键字设置为default,使得向模型添加解释变得非常容易。这允许您的用户了解输入的哪些部分负责输出。
1、Interpret解释
我们来一个图片的分类器,带一个Interpret解释,这里将会下载人类可读的ImageNet标签,是在站点https://git.io/JJkYN上面返回的标签,所以需要用到科学上网。
import requests
import tensorflow as tf
import gradio as gr
inception_net = tf.keras.applications.MobileNetV2() # 加载模型
# 下载人类可读的ImageNet标签
response = requests.get("https://git.io/JJkYN")
labels = response.text.split("\n")
def classify_image(inp):
inp = inp.reshape((-1, 224, 224, 3))
inp = tf.keras.applications.mobilenet_v2.preprocess_input(inp)
prediction = inception_net.predict(inp).flatten()
return {labels[i]: float(prediction[i]) for i in range(1000)}
image = gr.Image(shape=(224, 224))
label = gr.Label(num_top_classes=3)
#demo = gr.Interface(fn=classify_image, inputs=image, outputs=label, interpretation="default")
demo = gr.Interface(fn=classify_image, inputs=image, outputs=label, interpretation="shap", num_shap=5)
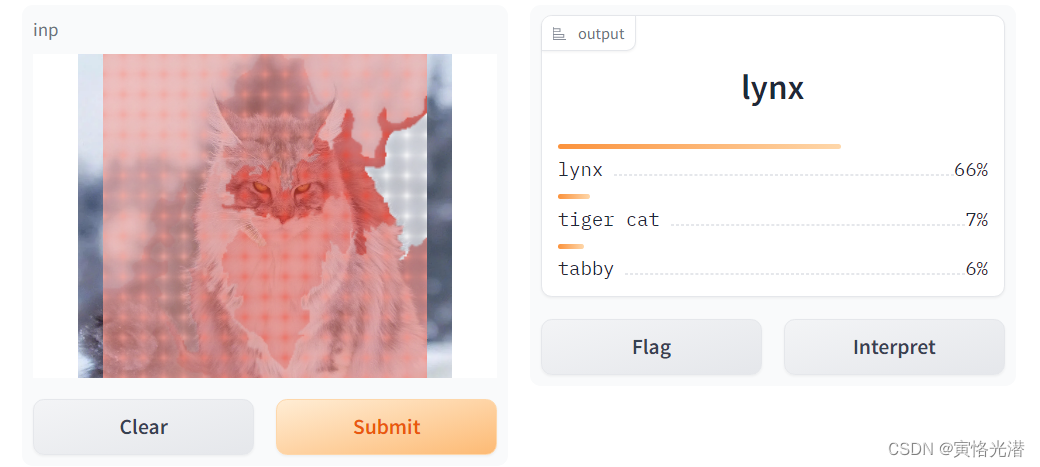
demo.launch()如下图,输入一张猫(猞猁)的图片,然后右边输出3个概率从大到小排序的分类标签:

然后点击Interpret,我们来看下效果,对重要部分进行了遮罩突出显示,也就是输出重要性判别的输入的地方做个解释。
2、高亮显示
适用于任何函数,即使在内部,模型是一个复杂的神经网络或其他黑盒子。如果使用Gradio的默认解释或形状解释,则输出组件必须是Label。支持所有常用输入组件。
下面是一个文本输入的示例:
import gradio as gr

male_words, female_words = ["he", "his", "him"], ["she", "hers", "her"]

def gender_of_sentence(sentence):
    male_count = len([word for word in sentence.split() if word.lower() in male_words])
    female_count = len(
        [word for word in sentence.split() if word.lower() in female_words]
    )
    total = max(male_count + female_count, 1)
    return {"male": male_count / total, "female": female_count / total}

demo = gr.Interface(
    fn=gender_of_sentence,
    inputs=gr.Textbox(value="She went to his house to get her keys."),
    outputs="label",
    interpretation="default",
)

demo.launch()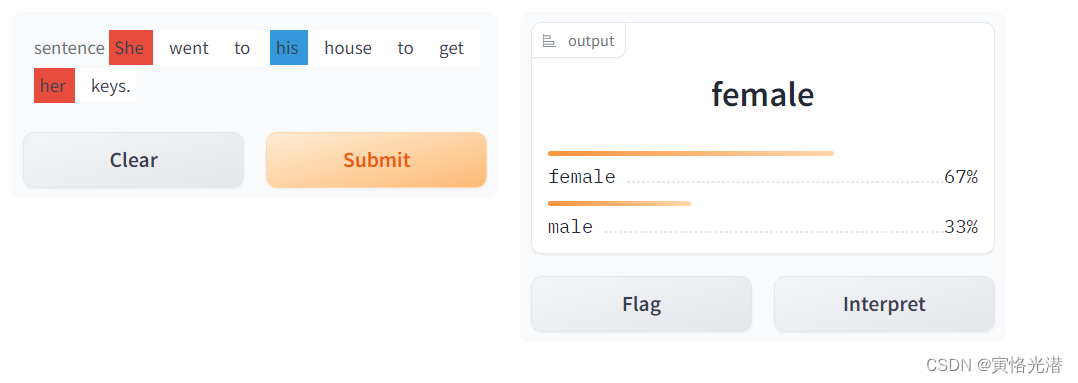 将显示男女比例,然后我们点击Interpret,将会看到界面会自动突出显示文本(或图像等)中重要部分。颜色的强度与输入部分的重要性相对应。降低类置信度的部分用蓝色突出显示。
3、常见错误处理
3.1、安装tensorflow
我们安装任何包,个人依然推荐加豆瓣镜像
pip install -i http://pypi.douban.com/simple/ --trusted-host pypi.douban.com tensorflow这里有个比较奇怪的问题,最开始我是这么安装,也是一直以来的常见安装方法:
pip install tensorflow -i http://pypi.douban.com/simple/ --trusted-host pypi.douban.com看到区别了吗,就是将tensorflow放在了install后面,这样的情况会出现下面这样的错误:
WARNING: Ignoring invalid distribution -sonschema (d:\anaconda3\envs\pygpu\lib\site-packages)
WARNING: Ignoring invalid distribution -sonschema (d:\anaconda3\envs\pygpu\lib\site-packages)
Collecting http://pypi.douban.com/simple/
Downloading http://pypi.douban.com/simple/ (24.7 MB)
---------------------------------------- 24.7/24.7 MB 11.9 MB/s eta 0:00:00
ERROR: Cannot unpack file C:\Users\Tony\AppData\Local\Temp\pip-unpack-2d7n8372\simple.html (downloaded from C:\Users\Tony\AppData\Local\Temp\pip-req-build-5xqb8otu, content-type: text/html); cannot detect archive format
ERROR: Cannot determine archive format of C:\Users\Tony\AppData\Local\Temp\pip-req-build-5xqb8otu
WARNING: Ignoring invalid distribution -sonschema (d:\anaconda3\envs\pygpu\lib\site-packages)
WARNING: Ignoring invalid distribution -sonschema (d:\anaconda3\envs\pygpu\lib\site-packages)
WARNING: Ignoring invalid distribution -sonschema (d:\anaconda3\envs\pygpu\lib\site-packages)
翻译过来的意思就是:无法解包文件,无法检测存档格式,无法确定归档格式。
在以前安装tensorflow是在一个新的虚拟环境,没有问题,这个是在有MXNet的里面安装的,出现上述错误,然后试着将tensorflow放到最后面,没有想到竟然成功安装。
3.2、安装scikit-image
其中点击Interpret,需要安装skimage
ModuleNotFoundError: No module named 'skimage'
同样的方法安装即可,只不过这里需要注意名称
pip install -i http://pypi.douban.com/simple/ --trusted-host pypi.douban.com scikit-image 3.3、安装shap
指定一些参数,interpretation设置为shap,可以修改num_shap参数,该参数控制精度和运行时之间的权衡(增加该值通常会提高精度)。
demo = gr.Interface(fn=classify_image, inputs=image, outputs=label, interpretation="shap", num_shap=5)在指定interpretation="shap"参数的时候,我们如果没有安装shape,也将报shap不存在的错误。
ModuleNotFoundError: No module named 'shap'
pip install -i http://pypi.douban.com/simple/ --trusted-host pypi.douban.com shap4、并行与串行
4.1、并行Parallel
Gradio可以让你很容易地使用Gradio来混合界面。
Parallel允许你将两个相似的模型(如果它们具有相同的输入类型)并行放置以比较模型预测
generator1 = gr.load("huggingface/gpt2")
generator2 = gr.load("huggingface/EleutherAI/gpt-neo-2.7B")
generator3 = gr.load("huggingface/EleutherAI/gpt-j-6B")

gr.Parallel(generator1, generator2, generator3).launch()
这样就可以比较几个模型的输出效果。
4.2、串行Series
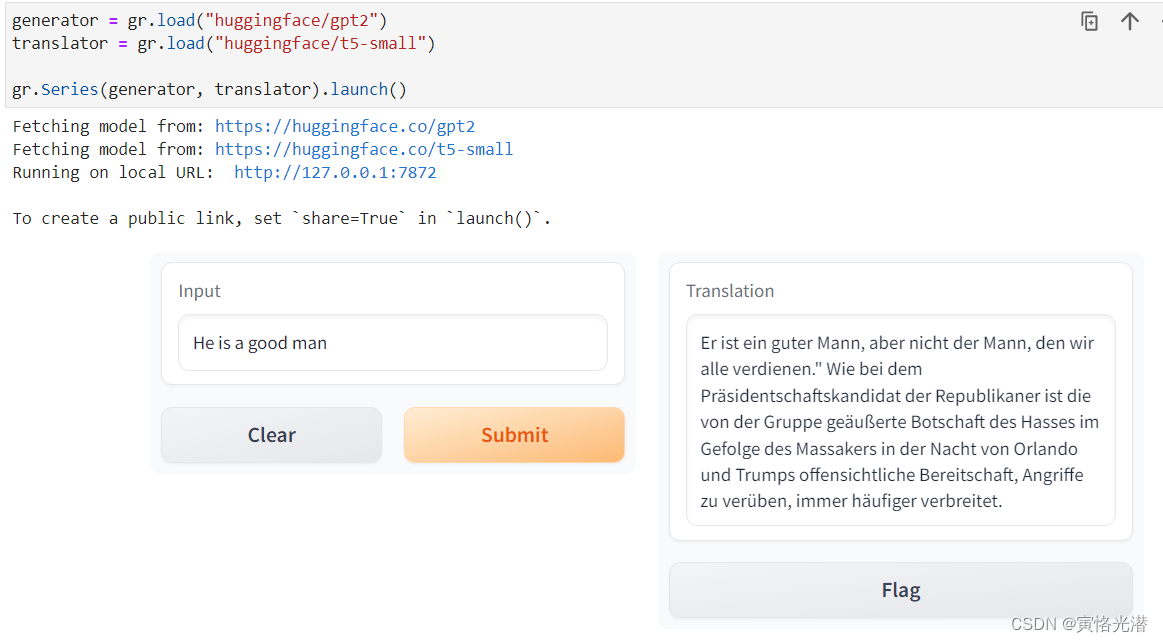
我们也可以使用Series将两个模型串联起来,比如将第一个模型的输出作为第二个模型的输入,下面就是通过gpt2得到输出的信息,然后这些输出信息作为输入,进入t5-small模型,处理成德语进行最终的输出。
generator = gr.load("huggingface/gpt2")
translator = gr.load("huggingface/t5-small")

gr.Series(generator, translator).launch()
如图,输出的英文再翻译成德语:
有兴趣的可以查阅其余章节:
Gradio的web界面演示与交互机器学习模型,安装和使用《1》
Gradio的web界面演示与交互机器学习模型,主要特征《2》
Gradio的web界面演示与交互机器学习模型,分享应用《3》
Gradio的web界面演示与交互机器学习模型,全局状态与会话状态《4》
Gradio的web界面演示与交互机器学习模型,接口自动刷新或连续刷新数据流《5》