一、为什么需要Schema-Registry
1.1、注册表
无论是 使用传统的Avro API自定义序列化类和反序列化类 还是 使用Twitter的Bijection类库实现Avro的序列化与反序列化,这两种方法都有一个缺点:在每条Kafka记录里都嵌入了schema,这会让记录的大小成倍地增加。但是不管怎样,在读取记录时仍然需要用到整个 schema,所以要先找到 schema。有没有什么方法可以让数据共用一个schema?
我们遵循通用的结构模式并使用"schema注册表"来达到目的。"schema注册表"的原理如下:
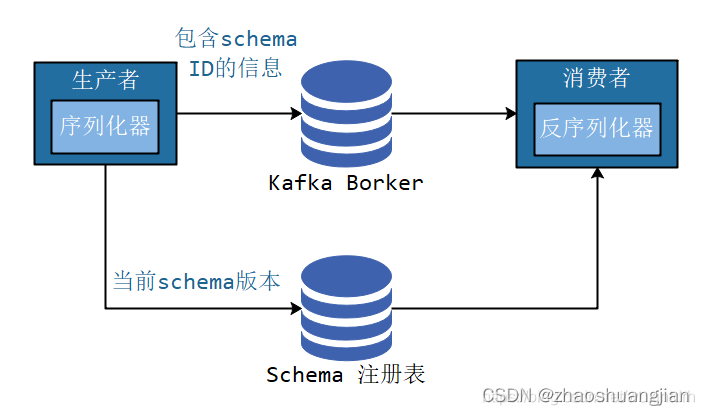
- 把所有写入数据需要用到的 schema 保存在注册表里,然后在记录里引用 schema ID。
- 负责读取数据的应用程序使用 ID 从注册表里拉取 schema 来反序列化记录。
- 序列化器和反序列化器分别负责处理 schema 的注册和拉取。
schema注册表并不属于Kafka,现在已经有一些开源的schema 注册表实现。比如本文要讨论的Confluent Schema Registry。
1.2、为什么使用 Avro
Avro 序列化相比常见的序列化(比如 json)会更快,序列化的数据会更小。相比 protobuf ,它可以支持实时编译,不需要像 protobuf 那样先定义好数据格式文件,编译之后才能使用。
1.3、Confluent Schema-Registry
Confluent公司为了能让 Kafka 支持 Avro 序列化,创建了 Kafka Schema Registry 项目,项目地址为 https://github.com/confluentinc/schema-registry 。对于存储大量数据的 kafka 来说,使用 Avro 序列化,可以减少数据的存储空间提高了存储量,减少了序列化时间提高了性能。 Kafka 有多个topic,里面存储了不同种类的数据,每种数据都对应着一个 Avro schema 来描述这种格式。Registry 服务支持方便的管理这些 topic 的schema,它还对外提供了多个 `restful 接口,用于存储和查找。
二、Confluent Schema-Registry 安装与使用
2.1、安装
- Schema Registry的各个发现行版本的下载链接
- 上传到linux系统进行解压安装。
- 本教程使用外部以安装好的Kafka集群不使用内部默认的。
- 修改confluent-5.3.1/etc/schema-registry/schema-registry.properties配置文件
# 注册服务器的监听地址及其端口号
listeners=http://0.0.0.0:8081

# 有关连接外部集群的地址有两种方式:1 通过zk连接 2 通过kafka的控制器 。 本教程采用zk连接
kafkastore.connection.url=henghe-042:2181

# The name of the topic to store schemas in
kafkastore.topic=_schemas

# If true, API requests that fail will include extra debugging information, including stack traces
debug=false
- 注册服务器的启动…/…/bin/schema-registry-start -daemon …/…/etc/schema-registry/schema-registry.properties
2.2、RestAPI使用
# Register a new version of a schema under the subject "Kafka-key"
$ curl -X POST -H "Content-Type: application/vnd.schemaregistry.v1+json" \
    --data '{"schema": "{\"type\": \"string\"}"}' \
    http://localhost:8081/subjects/Kafka-key/versions
  {"id":1}

# Register a new version of a schema under the subject "Kafka-value"
$ curl -X POST -H "Content-Type: application/vnd.schemaregistry.v1+json" \
    --data '{"schema": "{\"type\": \"string\"}"}' \
     http://localhost:8081/subjects/Kafka-value/versions
  {"id":1}

# List all subjects
$ curl -X GET http://localhost:8081/subjects
  ["Kafka-value","Kafka-key"]

# List all schema versions registered under the subject "Kafka-value"
$ curl -X GET http://localhost:8081/subjects/Kafka-value/versions
  [1]

# Fetch a schema by globally unique id 1
$ curl -X GET http://localhost:8081/schemas/ids/1
  {"schema":"\"string\""}

# Fetch version 1 of the schema registered under subject "Kafka-value"
$ curl -X GET http://localhost:8081/subjects/Kafka-value/versions/1
  {"subject":"Kafka-value","version":1,"id":1,"schema":"\"string\""}

# Fetch the most recently registered schema under subject "Kafka-value"
$ curl -X GET http://localhost:8081/subjects/Kafka-value/versions/latest
  {"subject":"Kafka-value","version":1,"id":1,"schema":"\"string\""}

# Delete version 3 of the schema registered under subject "Kafka-value"
$ curl -X DELETE http://localhost:8081/subjects/Kafka-value/versions/3
  3

# Delete all versions of the schema registered under subject "Kafka-value"
$ curl -X DELETE http://localhost:8081/subjects/Kafka-value
  [1, 2, 3, 4, 5]

# Check whether a schema has been registered under subject "Kafka-key"
$ curl -X POST -H "Content-Type: application/vnd.schemaregistry.v1+json" \
    --data '{"schema": "{\"type\": \"string\"}"}' \
    http://localhost:8081/subjects/Kafka-key
  {"subject":"Kafka-key","version":1,"id":1,"schema":"\"string\""}

# Test compatibility of a schema with the latest schema under subject "Kafka-value"
$ curl -X POST -H "Content-Type: application/vnd.schemaregistry.v1+json" \
    --data '{"schema": "{\"type\": \"string\"}"}' \
    http://localhost:8081/compatibility/subjects/Kafka-value/versions/latest
  {"is_compatible":true}

# Get top level config
$ curl -X GET http://localhost:8081/config
  {"compatibilityLevel":"BACKWARD"}

# Update compatibility requirements globally
$ curl -X PUT -H "Content-Type: application/vnd.schemaregistry.v1+json" \
    --data '{"compatibility": "NONE"}' \
    http://localhost:8081/config
  {"compatibility":"NONE"}

# Update compatibility requirements under the subject "Kafka-value"
$ curl -X PUT -H "Content-Type: application/vnd.schemaregistry.v1+json" \
    --data '{"compatibility": "BACKWARD"}' \
    http://localhost:8081/config/Kafka-value
  {"compatibility":"BACKWARD"}
2.2、Java 代码
2.2.0、注册
curl -X POST -H "Content-Type: application/vnd.schemaregistry.v1+json" \
--data '{"schema": "{\"type\": \"record\", \"name\": \"User\", \"fields\": [{\"name\": \"id\", \"type\": \"int\"}, {\"name\": \"name\",  \"type\": \"string\"}, {\"name\": \"age\", \"type\": \"int\"}]}"}' \
http://localhost:8081/subjects/chb_test/versions
2.2.1、添加依赖
我们需要 confluent-common 目录下的common-config-4.1.1.jar、common-utils-4.1.1.jar和全部以jackson开头的 jar 包以及 kafka-serde-tools 目录下的kafka-schema-registry-client-4.1.1.jar和kafka-avro-serializer-4.1.1.jar
将本地jar包导入到本地仓库
mvn install:install-file -Dfile=G:\迅雷下载\kafka-avro-serializer-6.2.0.jar -DgroupId=io.confluent -DartifactId=kafka-avro-serializer -Dversion=6.2.0 -Dpackaging=jar
添加到pom.xml
<dependency>
			<groupId>org.apache.kafka</groupId>
			<artifactId>kafka-clients</artifactId>
			<version>2.3.0</version>
		</dependency>
		<!--此依赖是通过本地依赖库导入的,有关如何把jar放入本地依赖库自行搜索-->
		<!--本人的jar文件是在编译源码时自动到依赖库中的所以直接引用-->
		<dependency>
			<groupId>io.confluent</groupId>
			<artifactId>kafka-avro-serializer</artifactId>
			<version>5.3.2</version>
		</dependency>
		<dependency>
			<groupId>io.confluent</groupId>
			<artifactId>kafka-schema-registry-client</artifactId>
			<version>5.3.2</version>
		</dependency>
		<dependency>
			<groupId>io.confluent</groupId>
			<artifactId>common-config</artifactId>
			<version>5.3.2</version>
		</dependency>
		<dependency>
			<groupId>io.confluent</groupId>
			<artifactId>common-utils</artifactId>
			<version>5.3.2</version>
		</dependency>

		<dependency>
			<groupId>org.apache.avro</groupId>
			<artifactId>avro</artifactId>
			<version>1.8.2</version>
		</dependency>

		<!-- jaskson start -->
		<dependency>
			<groupId>com.fasterxml.jackson.core</groupId>
			<artifactId>jackson-core</artifactId>
			<version>2.9.10</version>
		</dependency>
		<dependency>
			<groupId>com.fasterxml.jackson.core</groupId>
			<artifactId>jackson-databind</artifactId>
			<version>2.9.10</version>
		</dependency>
		<!-- jaskson end -->
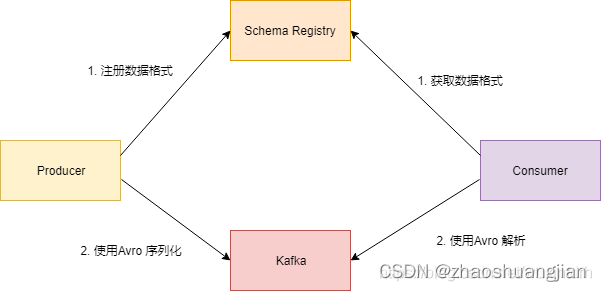
2.2.2、Kafka 客户端使用原理
Kafka Schema Registry 提供了 KafkaAvroSerializer 和 KafkaAvroDeserializer 两个类。Kafka 如果要使用 Avro 序列化, 在实例化 KafkaProducer 和 KafkaConsumer 时, 指定序列化或反序列化的配置。
客户端发送数据的流程图如下所示:

2.2.2.1、KafkaProducer
package com.chb.common.kafka.schema;


import java.util.Properties;
import java.util.Random;

import org.apache.avro.Schema;
import org.apache.avro.generic.GenericData;
import org.apache.avro.generic.GenericRecord;
import org.apache.kafka.clients.producer.KafkaProducer;
import org.apache.kafka.clients.producer.Producer;
import org.apache.kafka.clients.producer.ProducerRecord;

public class ConfluentProducer {
    public static final String USER_SCHEMA = "{\"type\": \"record\", \"name\": \"User\", " +
            "\"fields\": [{\"name\": \"id\", \"type\": \"int\"}, " +
            "{\"name\": \"name\",  \"type\": \"string\"}, {\"name\": \"age\", \"type\": \"int\"}]}";

    public static void main(String[] args) throws InterruptedException {
        Properties props = new Properties();
        props.put("bootstrap.servers", "localhost:6667");
        props.put("key.serializer", "org.apache.kafka.common.serialization.StringSerializer");
        // 使用Confluent实现的KafkaAvroSerializer
        props.put("value.serializer", "io.confluent.kafka.serializers.KafkaAvroSerializer");
        // 添加schema服务的地址,用于获取schema
        props.put("schema.registry.url", "http://localhost:8081");
        Producer<String, GenericRecord> producer = new KafkaProducer<>(props);
        Schema.Parser parser = new Schema.Parser();
        Schema schema = parser.parse(USER_SCHEMA);
        Random rand = new Random();
        int id = 0;
        while (id < 100) {
            id++;
            String name = "name" + id;
            int age = rand.nextInt(40) + 1;
            GenericRecord user = new GenericData.Record(schema);
            user.put("id", id);
            user.put("name", name);
            user.put("age", age);
            ProducerRecord<String, GenericRecord> record = new ProducerRecord<>("test-topic", user);
            System.out.println(user);
            producer.send(record);
            Thread.sleep(1000);
        }

        producer.close();
    }
}
2.2.2.2、KafkaConsumer
package com.chb.common.kafka.schema;

import org.apache.avro.generic.GenericRecord;
import org.apache.kafka.clients.consumer.ConsumerRecord;
import org.apache.kafka.clients.consumer.ConsumerRecords;
import org.apache.kafka.clients.consumer.KafkaConsumer;

import java.time.Duration;
import java.util.Collections;
import java.util.Properties;


public class ConfluentConsumer {


    public static void main(String[] args) throws Exception {

        Properties props = new Properties();
        props.put("bootstrap.servers", "localhost:6667");
        props.put("group.id", "test1");
        props.put("enable.auto.commit", "false");
        // 配置禁止自动提交,每次从头消费供测试使用
        props.put("auto.offset.reset", "earliest");
        props.put("key.deserializer", "org.apache.kafka.common.serialization.StringDeserializer");
        // 使用Confluent实现的KafkaAvroDeserializer
        props.put("value.deserializer", "io.confluent.kafka.serializers.KafkaAvroDeserializer");
        // 添加schema服务的地址,用于获取schema
        props.put("schema.registry.url", "http://localhost:8081");
        KafkaConsumer<String, GenericRecord> consumer = new KafkaConsumer<>(props);
        consumer.subscribe(Collections.singletonList("test-topic"));

        try {
            while (true) {
                ConsumerRecords<String, GenericRecord> records = consumer.poll(Duration.ofMillis(1000));
                for (ConsumerRecord<String, GenericRecord> record : records) {
                    GenericRecord user = record.value();
                    System.out.println("value = [user.id = " + user.get("id") + ", " + "user.name = "
                            + user.get("name") + ", " + "user.age = " + user.get("age") + "], "
                            + "partition = " + record.partition() + ", " + "offset = " + record.offset());
                }
            }
        } finally {
            consumer.close();
        }
    }
}
2.2.2.3、Consumer的消费结果
value = [user.id = 98, user.name = name98, user.age = 38], partition = 0, offset = 97
value = [user.id = 99, user.name = name99, user.age = 30], partition = 0, offset = 98
value = [user.id = 100, user.name = name100, user.age = 39], partition = 0, offset = 99