通常使用的动画比一个属性的动画更加复杂。例如你想同时运行几个动画并把他们连接起来,或者在一个一个的运行,或者在两个动画之间执行一个脚本。动画分组提供了很好的帮助,作为命名建议可以叫做一组动画。有两种方法来分组:平行与连续。你可以使用SequentialAnimation(连续动画)和ParallelAnimation(平行动画)来实现它们,它们作为动画的容器来包含其它的动画元素。

当开始时,平行元素的所有子动画都会平行运行,它允许你在同一时间使用不同的属性来播放动画。
1.// parallelanimation.qml
2.import QtQuick 2.0
3.
4.BrightSquare {
5.    id: root
6.    width: 300
7.    height: 200
8.    property int duration: 3000
9.
10.    ClickableImageV3 {
11.        id: rocket
12.        x: 20; y: 120
13.        source: "assets/rocket2.png"
14.        onClicked: anim.restart()
15.    }
16.
17.    ParallelAnimation {
18.        id: anim
19.        NumberAnimation {
20.            target: rocket
21.            properties: "y"
22.            to: 20
23.            duration: root.duration
24.        }
25.        NumberAnimation {
26.            target: rocket
27.            properties: "x"
28.            to: 160
29.            duration: root.duration
30.        }
31.    }
32.} 
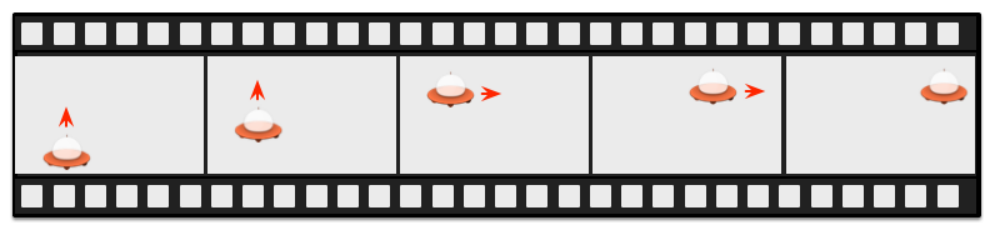
一个连续的动画将会一个一个的运行子动画。
1.// sequentialanimation.qml
2.import QtQuick 2.0
3.
4.BrightSquare {
5.    id: root
6.    width: 300
7.    height: 200
8.    property int duration: 3000
9.
10.    ClickableImageV3 {
11.        id: rocket
12.        x: 20; y: 120
13.        source: "assets/rocket2.png"
14.        onClicked: anim.restart()
15.    }
16.
17.    SequentialAnimation {
18.        id: anim
19.        NumberAnimation {
20.            target: rocket
21.            properties: "y"
22.            to: 20
23.            // 60% of time to travel up
24.            duration: root.duration*0.6
25.        }
26.        NumberAnimation {
27.            target: rocket
28.            properties: "x"
29.            to: 160
30.            // 40% of time to travel sideways
31.            duration: root.duration*0.4
32.        }
33.    }
34.} 
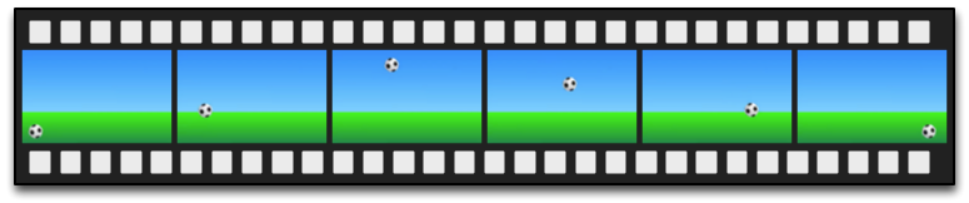
分组动画也可以被嵌套,例如一个连续动画可以拥有两个平行动画作为子动画。我们来看看这个足球的例子。这个动画描述了一个从左向右扔一个球的行为:

要弄明白这个动画我们需要剖析这个目标的运动过程。我们需要记住这个动画是通过属性变化来实现的动画,下面是不同部分的转换:
从左向右的x坐标转换(X1)。
从下往上的y坐标转换(Y1)然后跟着一个从上往下的Y坐标转换(Y2)。
整个动画过程中360度旋转。
这个动画将会花掉3秒钟的时间。

我们使用一个空的基本元素对象(Item)作为根元素,它的宽度为480,高度为300。
1.import QtQuick 1.1
2.
3.Item {
4.    id: root
5.    width: 480
6.    height: 300
7.    property int duration: 3000
8.
9.    ...
10.}
我们定义动画的总持续时间作为参考,以便更好的同步各部分的动画。
下一步我们需需要添加一个背景,在我们这个例子中有两个矩形框分别使用了绿色渐变和蓝色渐变填充。
1. Rectangle {
2.        id: sky
3.        width: parent.width
4.        height: 200
5.        gradient: Gradient {
6.            GradientStop { position: 0.0; color: "#0080FF" }
7.            GradientStop { position: 1.0; color: "#66CCFF" }
8.        }
9.    }
10.    Rectangle {
11.        id: ground
12.        anchors.top: sky.bottom
13.        anchors.bottom: root.bottom
14.        width: parent.width
15.        gradient: Gradient {
16.            GradientStop { position: 0.0; color: "#00FF00" }
17.            GradientStop { position: 1.0; color: "#00803F" }
18.        }
19.    }
上面部分的蓝色区域高度为200像素,下面部分的区域使用上面的蓝色区域的底作为锚定的顶,使用根元素的底作为底。
让我们将足球加入到屏幕上,足球是一个图片,位于路径“assets/soccer_ball.png”。首先我们需要将它放置在左下角接近边界处。
1.    Image {
2.        id: ball
3.        x: 20; y: 240
4.        source: "assets/soccer_ball.png"
5.
6.        MouseArea {
7.            anchors.fill: parent
8.            onClicked: {
9.                ball.x = 20; ball.y = 240
10.                anim.restart()
11.            }
12.        }
13. } 
图片与鼠标区域连接,点击球将会重置球的状态,并且动画重新开始。
首先使用一个连续的动画来播放两次的y轴变换。
1.   SequentialAnimation {
2.        id: anim
3.        NumberAnimation {
4.            target: ball
5.            properties: "y"
6.            to: 20
7.            duration: root.duration * 0.4
8.        }
9.        NumberAnimation {
10.            target: ball
11.            properties: "y"
12.            to: 240
13.            duration: root.duration * 0.6
14.        }
15.    }
在动画总时间的40%的时间里完成上升部分,在动画总时间的60%的时间里完成下降部分,一个动画完成后播放下一个动画。目前还没有使用任何缓冲曲线。缓冲曲线将在后面使用easing curves来添加,现在我们只关心如何使用动画来完成过渡。
现在我们需要添加x轴坐标转换。x轴坐标转换需要与y轴坐标转换同时进行,所以我们需要将y轴坐标转换的连续动画和x轴坐标转换一起压缩进一个平行动画中。
1.    ParallelAnimation {
2.        id: anim
3.        SequentialAnimation {
4.            // ... our Y1, Y2 animation
5.        }
6.        NumberAnimation { // X1 animation
7.            target: ball
8.            properties: "x"
9.            to: 400
10.            duration: root.duration
11.        }
12.    }
最后我们想要旋转这个球,我们需要向平行动画中添加一个新的动画,我们选择RotationAnimation来实现旋转。
1.   ParallelAnimation {
2.        id: anim
3.        SequentialAnimation {
4.            // ... our Y1, Y2 animation
5.        }
6.        NumberAnimation { // X1 animation
7.            // X1 animation
8.        }
9.        RotationAnimation {
10.            target: ball
11.            properties: "rotation"
12.            to: 720
13.            duration: root.duration
14.        }
15.    }
我们已经完成了整个动画链表,然后我们需要给动画提供一个正确的缓冲曲线来描述一个移动的球。对于Y1动画我们使用Easing.OutCirc缓冲曲线,它看起来更像是一个圆周运动。Y2使用了Easing.OutBounce缓冲曲线,因为在最后球会发生反弹。(试试使用Easing.InBounce,你会发现反弹将会立刻开始。)。X1和ROT1动画都使用线性曲线。
下面是这个动画最后的代码,提供给你作为参考:
    ParallelAnimation {
        id: anim
        SequentialAnimation {
            NumberAnimation {
                target: ball
                properties: "y"
                to: 20
                duration: root.duration * 0.4
                easing.type: Easing.OutCirc
            }
            NumberAnimation {
                target: ball
                properties: "y"
                to: 240
                duration: root.duration * 0.6
                easing.type: Easing.OutBounce
            }
        }
        NumberAnimation {
            target: ball
            properties: "x"
            to: 400
            duration: root.duration
        }
        RotationAnimation {
            target: ball
            properties: "rotation"
            to: 720
            duration: root.duration * 1.1
        }
    }