目录
一. 创建 Spring 项目
- 如何创建一个Spring项目并使用
- 添加 Spring 框架(Spring-context、Spring-beans)
- 添加启动类
1. 创建一个 Maven 项目
对于初学可以暂时不是用以上模板, 简单的创建一个 Maven 项目即可

最后点击 Finish 就简单的创建好了一个 Maven 项目
2. 添加 Spring 框架
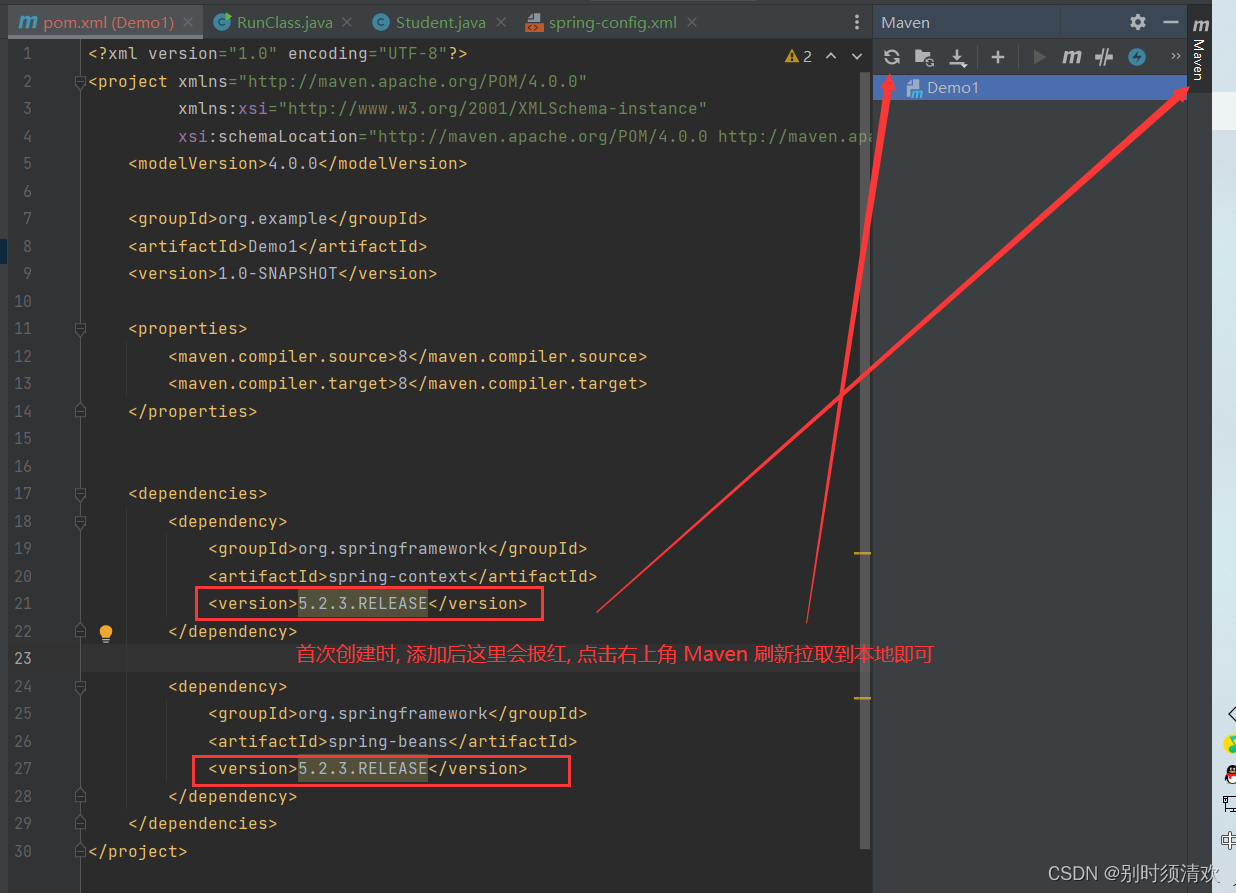
添加依赖到 pom.xml 中
<dependencies>
        <dependency>
            <groupId>org.springframework</groupId>
            <artifactId>spring-context</artifactId>
            <version>5.2.3.RELEASE</version>
        </dependency>

        <dependency>
            <groupId>org.springframework</groupId>
            <artifactId>spring-beans</artifactId>
            <version>5.2.3.RELEASE</version>
        </dependency>
</dependencies>上述添加的框架有 spring-context:spring 上下⽂, 以及spring-beans:管理对 象的模块
3. 添加启动类
创建一个启动类, 包含 main 方法即可
完成上述三步以后, 则算简单完成了一个Spring项目的创建, 下面就可以简单的在该项目中进行存储 Bean 和 使用 Bean 了
二. Spring 项目中的 Bean 的存储
在 Spring 中, 最基本的就是 对 Bean 的创建和存储了
1. 创建 Bean 对象
想要存储到 Spring 容器, 需要创建一个 Bean 对象, 而所谓的 Bean对象其实就是一个普通的 Java 对象

2. 将 Bean 对象存储到 容器中
在添加之前到容器中之前, 需要在 resources 根目录下创建一个配置文件 spring-config.xml(该名称可以自己取)

该配置文件下的内容时固定的, 可以理解为 pom.xml 中, 一打开就有的固定内容
<?xml version="1.0" encoding="UTF-8"?>
<beans xmlns="http://www.springframework.org/schema/beans"
       xmlns:xsi="http://www.w3.org/2001/XMLSchema-instance"
       xmlns:content="http://www.springframework.org/schema/context"
       xsi:schemaLocation="http://www.springframework.org/schema/beans http://www.springframework.org/schema/beans/spring-beans.xsd
        http://www.springframework.org/schema/context https://www.springframework.org/schema/context/spring-context.xsd">
</beans>
然后, 就可以存取 Bean 对象了. 将 Student 对象注册到 Spring 中

三. Bean 对象的获取和使用
获取 Bean 对象大致分为以下几步
1. 获取 Spring 上下文对象
2. 通过 Spring 上下文获取指定 Bean 对象
3. 使用 Bean 对象
1. 获取 Spring 上下文对象
第一种方式
ApplicationContext context = new ClassPathXmlApplicationContext("spring-config.xml");
通过引入的 spring - context 提供的上下文对象

第二种方式
ClassPathXmlApplicationContext context1 = new ClassPathXmlApplicationContext("spring-config.xnl");
ClassPathXmlApplicationContext 是 BeanFactory 的子类

上述两种方式, 都是通过去读取配置文件获取 spring 上下文对象
那么, ApplicationCont 和 BeanFactory 有什么区别呢?
- ApplicationContext 是 BeanFactory 的一个子类
- BeanFactory 提供了基础的访问容器的能力, 而 ApplicationContext 除了继承了 BeanFactory 的功能之外, 还拥有独特的特性, 如资源访问支持, 国际化支持, 事件传播等
- 性能方面, ApplicationContext 是一次性加载并初始化所有的 Bean 对象, 属于单例模式, 而 BeanFactory 是需要那个才去加载那个, 属于懒加载, 因此更加轻量
2. 通过 Spring 上下文获取指定 Bean 对象
第一种
可以看到, getBean提供了两种方法, 对于第一种, 传入的是一个String s(为配置文件中所需的 Bean标签里的 id 名称), Class<T> aClass (Bean对象类名)
// 获取指定 Bean 对象
Student student = context.getBean("student", Student.class);
第二种
只需要提供 Bean 对象 id 即可获取, 获取的是一个 Object 对象, 需要强转为所需的类 类型

// 获取指定 Bean 对象
Student student2 = (Student) context.getBean("student");
第三种
只需要提供 Bean 对象的类
// 获取指定 Bean 对象
Student student1 = context.getBean(Student.class);
那么第二种和第三种有什么区别呢?
当一个对象被重复注入到 Spring 中时, 如果只根据 类 类型来获取 Bean 对象, 会找不到所需要的 Bean对象而报错

运行结果
 当同一个对象注入两次以后, 尝试去获取 Bean 对象, 无法获取唯一的 Bean 从而找不到 Bean对象, 此时可以通过加上 id 或只通过 id 来获取 Bean对象, 因此在后面的使用中, 更推荐使用第一种 id 和类对象的方式来获取 Bean 对象
需要注意的是, 获取 Bean 对象时, 提供的 Id 要和 spring-config.xml 文件中存的 Bean 对象的 Id一致
3. 使用 Bean 对象
可以成功的调用之前创建的 Bean 对象 Student 中的 fun 方法
