权限管理与Shiro入门
学习目标:
理解前端权限控制思路
理解有状态服务和无状态服务通过拦截器实现JWT鉴权
能够理解shiro以及shiro的认证和授权
前端权限控制
需求分析
需求说明
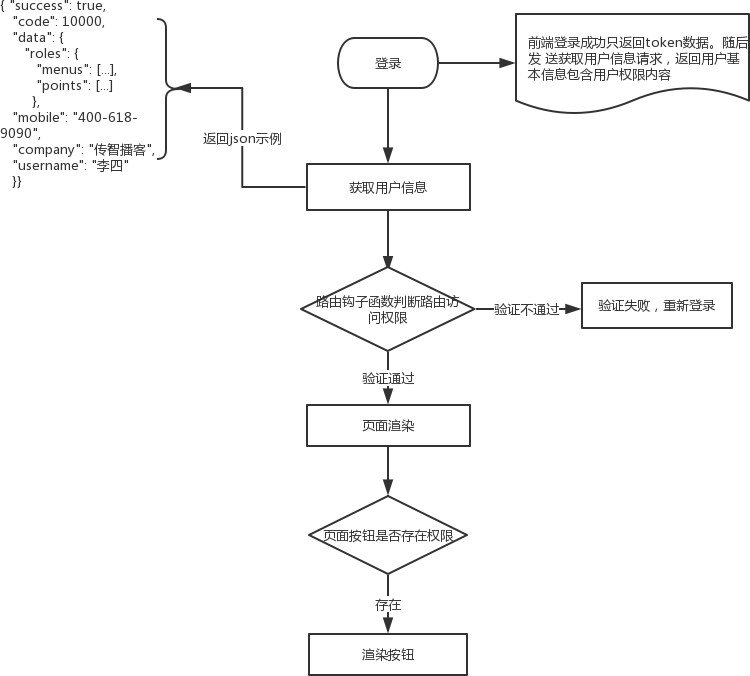
基于前后端分离的开发模式中,权限控制分为前端页面可见性权限与后端API接口可访问行权限。前端的权限控制 主要围绕在菜单是否可见,以及菜单中按钮是否可见两方面展开的。
实现思路
在vue工程中,菜单可以简单的理解为vue中的路由,只需要根据登录用户的权限信息动态的加载路由列表就可以 动态的构造出访问菜单。
- 登录成功后获取用户信息,包含权限列表(菜单权限,按钮权限)
- 根据用户菜单权限列表,动态构造路由(根据路由名称和权限标识比较)
- 页面按钮权限通过自定义方法控制可见性
服务端代码实现
对系统微服务的UserController的profile方法(获取用户信息接口)进行修改,添加权限信息
    /**
     * 用户登录成功之后,获取用户信息
     *      1.获取用户id
     *      2.根据用户id查询用户
     *      3.构建返回值对象
     *      4.响应
     */
    @RequestMapping(value="/profile",method = RequestMethod.POST)
    public Result profile(HttpServletRequest request) throws Exception {

        String userid = claims.getId();
        //获取用户信息
        User user = userService.findById(userid);
        //根据不同的用户级别获取用户权限

        ProfileResult result = null;

        if("user".equals(user.getLevel())) {
            result = new ProfileResult(user);
        }else {
            Map map = new HashMap();
            if("coAdmin".equals(user.getLevel())) {
                map.put("enVisible","1");
            }
            List<Permission> list = permissionService.findAll(map);
            result = new ProfileResult(user,list);
        }
        return new Result(ResultCode.SUCCESS,result);
    }
ProfileResult实体类
package com.ihrm.domain.system.response;

import com.ihrm.domain.system.Permission;
import com.ihrm.domain.system.Role;
import com.ihrm.domain.system.User;
import lombok.Getter;
import lombok.Setter;

import java.util.*;

@Setter
@Getter
public class ProfileResult {
    private String mobile;
    private String username;
    private String company;
    private Map<String,Object> roles = new HashMap<>();

    /**
     *
     * @param user
     */
    public ProfileResult(User user, List<Permission> list) {
        this.mobile = user.getMobile();
        this.username = user.getUsername();
        this.company = user.getCompanyName();

        Set<String> menus = new HashSet<>();
        Set<String> points = new HashSet<>();
        Set<String> apis = new HashSet<>();

        for (Permission perm : list) {
            String code = perm.getCode();
            if(perm.getType() == 1) {
                menus.add(code);
            }else if(perm.getType() == 2) {
                points.add(code);
            }else {
                apis.add(code);
            }
        }
        this.roles.put("menus",menus);
        this.roles.put("points",points);
        this.roles.put("apis",apis);
    }


    public ProfileResult(User user) {
        this.mobile = user.getMobile();
        this.username = user.getUsername();
        this.company = user.getCompanyName();

        Set<Role> roles = user.getRoles();
        Set<String> menus = new HashSet<>();
        Set<String> points = new HashSet<>();
        Set<String> apis = new HashSet<>();
        for (Role role : roles) {
            Set<Permission> perms = role.getPermissions();
            for (Permission perm : perms) {
                String code = perm.getCode();
                if(perm.getType() == 1) {
                    menus.add(code);
                }else if(perm.getType() == 2) {
                    points.add(code);
                }else {
                    apis.add(code);
                }
            }
        }

        this.roles.put("menus",menus);
        this.roles.put("points",points);
        this.roles.put("apis",apis);
    }
}
骚戴理解:这个构造方法其实就是根据User对象去构造出这个用户所具有的所有菜单、按钮、api权限返回给前端
前端代码实现
路由钩子函数
vue路由(src\router\index.js)提供的钩子函数(beforeEach)主要用来在加载之前拦截导航,让它完成跳转或取消。可以在路由钩子函数中进行校验是否对某个路由具有访问权限

router.beforeEach((to, from, next) => {
  NProgress.start() // start progress bar
  if (getToken()) {
    // determine if there has token
    /* has token */
    if (to.path === '/login') {
      next({path: '/'})
      NProgress.done() // if current page is dashboard will not trigger    afterEach hook, so manually handle it
    } else {
      if (store.getters.roles.length === 0) {
        // 判断当前用户是否已拉取完user_info信息
        store
          .dispatch('GetUserInfo')
          .then(res => {
            // 拉取user_info
            const roles = res.data.data.roles // note: roles must be a array! such as: ['editor','develop']
            store.dispatch('GenerateRoutes', {roles}).then(() => {
              // 根据roles权限生成可访问的路由表
              router.addRoutes(store.getters.addRouters) // 动态添加可访问路由表
              next({...to, replace: true}) // hack方法 确保addRoutes已完成 ,set the replace: true so the navigation will not leave a history record
            })
          })
          .catch(() => {
            store.dispatch('FedLogOut').then(() => {
              Message.error('验证失败, 请重新登录')
              next({path: '/login'})
            })
          })
      } else {
        next()
      }
    }
  } else {
    /* has no token */
    if (whiteList.indexOf(to.path) !== -1) {
      // 在免登录白名单,直接进入
      next()
    } else {
      next('/login') // 否则全部重定向到登录页
      NProgress.done() // if current page is login will not trigger afterEach hook, so manually handle it
    }
  }
})
配置菜单权限
在\src\module-dashboard\store\permission.js下进行修改,开启路由配置
  actions: {
    GenerateRoutes({ commit }, data) {
      return new Promise(resolve => {
        const { roles } = data
        //动态构造权限列表
        let accessedRouters = filterAsyncRouter(asyncRouterMap, roles)
        commit('SET_ROUTERS', accessedRouters)
        //commit('SET_ROUTERS', asyncRouterMap) // 调试开启全部路由
        resolve()
     })
   }
 }
配置验证权限的方法
找到\src\utils\permission.js配置验证是否具有权限的验证方法
import store from '@/store'

// 检查是否有权限
export function hasPermission(roles, route) {
  if (roles.menus && route.name) {
    return roles.menus.some(role => {
      return route.name.toLowerCase() === role.toLowerCase()
    })
  } else {
    return false
  }
}

// 检查是否有权限点
export function hasPermissionPoint(point) {
  let points = store.getters.roles.points
  if (points) {
    return points.some(it => it.toLowerCase() === point.toLowerCase())
  } else {
    return false
  }
}
修改登录和获取信息的请求接口
- 关闭模拟测试接口
\mock\index.js中不加载登录(login)以及(profile)的模拟测试
import Mock from 'mockjs' import TableAPI from './table'
import ProfileAPI from './profile' import LoginAPI from './login'

Mock.setup({
//timeout: '1000'
})

Mock.mock(/\/table\/list\.*/, 'get', TableAPI.list)
//Mock.mock(/\/frame\/profile/, 'post', ProfileAPI.profile)
//Mock.mock(/\/frame\/login/, 'post', LoginAPI.login)
权限测试
- 菜单测试
分配好权限之后,重新登录前端页面,左侧菜单已经发生了变化。
- 在src\module-employees\pages\index.vue里
import {hasPermissionPoint} from '@/utils/permission'骚戴理解:通过 import 关键字引入了一个名为 haspermissionpoint 的函数,该函数从 '@/utils/permission' 模块中导出。@ 是一个特殊符号,表示“根目录”,单个点(.)代表“当前目录”,而双个点(..)代表“父目录或上级目录”
- 对需要进行权限控制的(权限点)验证测试页面添加校验方法
methods: {
    checkPoint(point){
        return hasPermissionPoint(point);
    }
}
使用v-if验证权限是否存在,其中参数为配置的权限点标识
<el-button type="primary" v-if="checkPoint('POINT-USER-ADD')" size="mini" icon="el- icon-plus" @click="handlAdd">新增员工</el-button>骚戴理解:也就是通过在那里加v-if="checkPoint('POINT-USER-ADD')"来实现按钮的前端权限控制,这里其实可直接写成v-if="hasPermissionPoint('POINT-USER-ADD')",因为都是hasPermissionPoint
这个方法来实现的按钮权限控制,当然这只是前端的权限控制,我直接用postman发请求给后端就拦截不了,所以还要在后端做API权限控制
有状态服务和无状态服务
什么是服务中的状态
有状态和无状态服务是两种不同的服务架构,两者的不同之处在于对于服务状态的处理。服务状态是服务请求所需的数据,它可以是一个变量或者一个数据结构。无状态服务不会记录服务状态,不同请求之间也是没有任何关系; 而有状态服务则反之。对服务器程序来说,究竟是有状态服务,还是无状态服务,其判断依据——两个来自相同发 起者的请求在服务器端是否具备上下文关系。
无状态服务
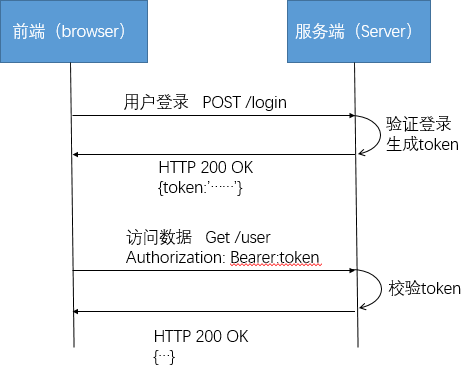
无状态请求,服务器端所能够处理的数据全部来自于请求所携带的信息,无状态服务对于客户端的单次请求的处理,不依赖于其他请求,处理一次请求的信息都包含在该请求里。最典型的就是通过cookie保存token的方式传输请求数据。也可以理解为Cookie是通过客户端保持状态的解决方案。
有状态服务
有状态服务则相反,服务会存储请求上下文相关的数据信息,先后的请求是可以有关联的。例如,在Web 应用中,经常会使用Session 来维系登录用户的上下文信息。虽然http 协议是无状态的,但是借助Session,可以使http 服务转换为有状态服务
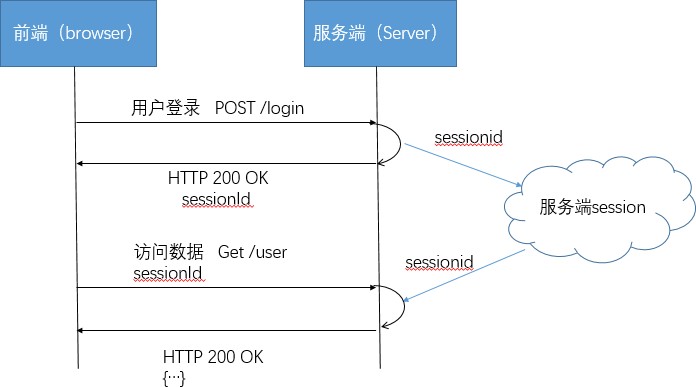
骚戴理解:无状态服务其实就是前后端交互的数据交给前端来保存,后端不存这些数据,例如像token,后端生成后直接扔给前端,这就是无状态服务,有状态就是这些数据是由后端来存储的,例如把这个token放在session里面,然后返回sessionid给前端的方式就是有状态服务
基于JWT的API鉴权
基于拦截器的token与鉴权
如果我们每个方法都去写一段代码,冗余度太高,不利于维护,那如何做使我们的代码看起来更清爽呢?我们可以 将这段代码放入拦截器去实现
Spring中的拦截器
Spring为我们提供了org.springframework.web.servlet.handler.HandlerInterceptorAdapter这个适配器,继承此 类,可以非常方便的实现自己的拦截器。他有三个方法:分别实现预处理、后处理(调用了Service并返回ModelAndView,但未进行页面渲染)、返回处理(已经渲染了页面)
- 在preHandle中,可以进行编码、安全控制等处理;
- 在postHandle中,有机会修改ModelAndView;
- 在afterCompletion中,可以根据ex是否为null判断是否发生了异常,进行日志记录。
签发用户API权限
在系统微服务的com.ihrm.system.controller.UserController修改签发token的登录服务添加API权限
  /**
     * 用户登录
     *  1.通过service根据mobile查询用户
     *  2.比较password
     *  3.生成jwt信息
     *
     */
    @RequestMapping(value="/login",method = RequestMethod.POST)
    public Result login(@RequestBody Map<String,String> loginMap) {
        String mobile = loginMap.get("mobile");
        String password = loginMap.get("password");
        User user = userService.findByMobile(mobile);
        //登录失败
        if(user == null || !user.getPassword().equals(password)) {
            return new Result(ResultCode.MOBILEORPASSWORDERROR);
        }else {
            //登录成功
            //api权限字符串
            StringBuilder sb = new StringBuilder();
            //获取到所有的可访问API权限
            for (Role role : user.getRoles()) {
                for (Permission perm : role.getPermissions()) {
                    if(perm.getType() == PermissionConstants.PERMISSION_API) {
                        sb.append(perm.getCode()).append(",");
                    }
                }
            }
            Map<String,Object> map = new HashMap<>();
            map.put("apis",sb.toString());//可访问的api权限字符串
            map.put("companyId",user.getCompanyId());
            map.put("companyName",user.getCompanyName());
            String token = jwtUtils.createJwt(user.getId(), user.getUsername(), map);
            return new Result(ResultCode.SUCCESS,token);
        }
    }
骚戴理解: map.put("apis",sb.toString());这里记得调用toString方法
拦截器中鉴权
- 在ihrm-common下添加拦截器 JwtInterceptor
package com.ihrm.common.interceptor;

import com.ihrm.common.entity.ResultCode;
import com.ihrm.common.exception.CommonException;
import com.ihrm.common.utils.JwtUtils;
import io.jsonwebtoken.Claims;
import org.springframework.beans.factory.annotation.Autowired;
import org.springframework.stereotype.Component;
import org.springframework.util.StringUtils;
import org.springframework.web.bind.annotation.RequestMapping;
import org.springframework.web.method.HandlerMethod;
import org.springframework.web.servlet.ModelAndView;
import org.springframework.web.servlet.handler.HandlerInterceptorAdapter;

import javax.servlet.http.HttpServletRequest;
import javax.servlet.http.HttpServletResponse;

/**
 * 自定义拦截器
 *      继承HandlerInterceptorAdapter
 *
 *      preHandle:进入到控制器方法之前执行的内容
 *          boolean:
 *              true:可以继续执行控制器方法
 *              false:拦截
 *      posthandler:执行控制器方法之后执行的内容
 *      afterCompletion:响应结束之前执行的内容
 *
 * 1.简化获取token数据的代码编写
 *      统一的用户权限校验(是否登录)
 * 2.判断用户是否具有当前访问接口的权限
 *
 */
@Component
public class JwtInterceptor extends HandlerInterceptorAdapter {

    /**
     * 简化获取token数据的代码编写(判断是否登录)
     *  1.通过request获取请求token信息
     *  2.从token中解析获取claims
     *  3.将claims绑定到request域中
     */

    @Autowired
    private JwtUtils jwtUtils;

    @Override
    public boolean preHandle(HttpServletRequest request, HttpServletResponse response, Object handler) throws Exception {
        // 1.通过request获取请求token信息
        String authorization = request.getHeader("Authorization");
        //判断请求头信息是否为空,或者是否已Bearer开头
        if(!StringUtils.isEmpty(authorization) && authorization.startsWith("Bearer")) {
            //获取token数据
            String token = authorization.replace("Bearer ","");
            //解析token获取claims
            Claims claims = jwtUtils.parseJwt(token);
            if(claims != null) {
                //通过claims获取到当前用户的可访问API权限字符串
                String apis = (String) claims.get("apis");  //api-user-delete,api-user-update
                //通过handler
                HandlerMethod h = (HandlerMethod) handler;
                //获取接口上的reqeustmapping注解
                RequestMapping annotation = h.getMethodAnnotation(RequestMapping.class);
                //获取当前请求接口中的name属性
                String name = annotation.name();
                //判断当前用户是否具有响应的请求权限
                if(apis.contains(name)) {
                    request.setAttribute("user_claims",claims);
                    return true;
                }else {
                    throw new CommonException(ResultCode.UNAUTHORISE);
                }
            }
        }
        throw new CommonException(ResultCode.UNAUTHENTICATED);
    }
}
骚戴理解:这里是可以在拦截器中获取后端控制器中RequestMapping注解中的信息的,通过下面三行diam去获取RequestMapping请求中的name值
//通过handler
HandlerMethod h = (HandlerMethod) handler;
//获取接口上的reqeustmapping注解
RequestMapping annotation = h.getMethodAnnotation(RequestMapping.class);
//获取当前请求接口中的name属性
String name = annotation.name();
注意这里的HandlerMethod h = (HandlerMethod) handler;我一开始写成了MethodHandle methodHandle = (MethodHandle) handler;
- 修改ihrm_common服务的BaseController.java
package com.ihrm.common.controller;

import io.jsonwebtoken.Claims;
import org.springframework.web.bind.annotation.ModelAttribute;

import javax.servlet.http.HttpServletRequest;
import javax.servlet.http.HttpServletResponse;

public class BaseController {

    protected HttpServletRequest request;
    protected HttpServletResponse response;
    protected String companyId;
    protected String companyName;
    protected Claims claims;

    @ModelAttribute
    public void setResAnReq(HttpServletRequest request,HttpServletResponse response) {
        this.request = request;
        this.response = response;

        Object obj = request.getAttribute("user_claims");

        if(obj != null) {
            this.claims = (Claims) obj;
            this.companyId = (String)claims.get("companyId");
            this.companyName = (String)claims.get("companyName");
        }
    }

}
骚戴理解:这个API权限控制的逻辑是在登录的时候去查询出这个用户的所有API权限,然后把他放在token里面,然后把这个token返回给前端,假如前端要进行删除操作的时候就会把这个token带上一起发给后端,然后被拦截器拦截,拦截后拿到这个请求中RequestMapping注解里的name,这个name就是这个操作的API权限的编码标识,然后去和token里的这个api字符串比较,看看这个字符串里面有没有包括这次请求API的name,如果有就说明有权限,否则就没权限,思路大致是这样的
- 修改UserController的profile方法
- 用户登录成功之后,获取用户信息
- 获取用户id
- 根据用户id查询用户
- 构建返回值对象
- 响应
- 用户登录成功之后,获取用户信息
    /**
     * 用户登录成功之后,获取用户信息
     *      1.获取用户id
     *      2.根据用户id查询用户
     *      3.构建返回值对象
     *      4.响应
     */
    @RequestMapping(value="/profile",method = RequestMethod.POST)
    public Result profile(HttpServletRequest request) throws Exception {

        String userid = claims.getId();
        //获取用户信息
        User user = userService.findById(userid);
        //根据不同的用户级别获取用户权限

        ProfileResult result = null;

        if("user".equals(user.getLevel())) {
            result = new ProfileResult(user);
        }else {
            Map map = new HashMap();
            if("coAdmin".equals(user.getLevel())) {
                map.put("enVisible","1");
            }
            List<Permission> list = permissionService.findAll(map);
            result = new ProfileResult(user,list);
        }
        return new Result(ResultCode.SUCCESS,result);
    }
}
骚戴理解:这里改造后profile方法里的claims是直接从父控制器BaseController里面获取的,这时的claims是经过了拦截器拦截的,所以是有足够的权限才能走到这里,通过拦截器拦截来实现后端API权限的控制
- 配置拦截器类,创建com.ihrm.system.SystemConfig
package com.ihrm.system;

import com.ihrm.common.interceptor.JwtInterceptor;
import org.springframework.beans.factory.annotation.Autowired;
import org.springframework.context.annotation.Configuration;
import org.springframework.web.servlet.config.annotation.InterceptorRegistry;
import org.springframework.web.servlet.config.annotation.WebMvcConfigurationSupport;

@Configuration
public class SystemConfig extends WebMvcConfigurationSupport {

    @Autowired
    private JwtInterceptor jwtInterceptor;

    /**
     * 添加拦截器的配置
     */
    @Override
    protected void addInterceptors(InterceptorRegistry registry) {
        //1.添加自定义拦截器
        registry.addInterceptor(jwtInterceptor).
                addPathPatterns("/**").//2.指定拦截器的url地址
                excludePathPatterns("/sys/login","/frame/register/**");//3.指定不拦截的url地址
    }
}
骚戴理解:这里的拦截器我写的少,不过也不难,记住HandlerInterceptorAdapter和WebMvcConfigurationSupport就可以了,通过ctrl+o快捷键实现方法的继承
- 在SystemApplication中添加bean解决no session问题
    //解决no session
    @Bean
    public OpenEntityManagerInViewFilter openEntityManagerInViewFilter() {
        return new OpenEntityManagerInViewFilter();
    }
骚戴理解:openentitymanagerinviewfilter 是 java web 框架 spring 中的一部分,它的作用是在 spring mvc 框架中将 entitymanager 身份上下文与 http 请求周期绑定。这个过滤器应该被放置在其它回话开启前的请求处理组件(如spring mvc的 dispatcherservlet)之前。
当用户从浏览器发起一个请求时,openentitymanagerinviewfilter 创建或者获取一个 entitymanager 对象,并将其与当前线程进行绑定。这个 entitymanager 对象一直处于打开的状态,一直到渲染响应给浏览器并且线程结束时才关闭。
如果没有使用 openentitymanagerinviewfilter 过滤器,在页面显示时可能会报出 lazyinitializationexception 异常,这是因为数据库懒加载的特性,对实体类关联的延迟加载数据进行访问时,会超出“session/connection”的范围引发异常。
openentitymanagerinviewfilter 的出现就是解决上述问题的。它使用了***的机制,在一个请求周期内使得两个模块协同工作:mvc 层可以通过打开的 entitymanager 获取持久化对象,而 entitymanager 管理器又可以将返回到控制器中的更改反映到单个事务中。
因此,openentitymanagerinviewfilter 能够确保在 web 应用处理请求过程中,统一管理不同的数据库业务操作。
Shiro安全框架
什么是Shiro
什么是Shiro
Apache Shiro是一个强大且易用的Java安全框架,执行身份验证、授权、密码和会话管理。使用Shiro的易于理解的API,您可以快速、轻松地获得任何应用程序,从最小的移动应用程序到最大的网络和企业应用程序。
Apache Shiro 的首要目标是易于使用和理解。安全有时候是很复杂的,甚至是痛苦的,但它没有必要这样。框架应该尽可能掩盖复杂的地方,露出一个干净而直观的 API,来简化开发人员在使他们的应用程序安全上的努力。以下是你可以用 Apache Shiro 所做的事情:
- 验证用户来核实他们的身份对用户执行访问控制,如:
- 判断用户是否被分配了一个确定的安全角色
- 判断用户是否被允许做某事
- 在任何环境下使用 Session API,即使没有 Web 或 EJB 容器。
- 在身份验证,访问控制期间或在会话的生命周期,对事件作出反应。
- 聚集一个或多个用户安全数据的数据源,并作为一个单一的复合用户“视图”。 启用单点登录(SSO)功能。为没有关联到登录的用户启用"Remember Me"服务
与Spring Security的对比
Shiro
Shiro较之 Spring Security,Shiro在保持强大功能的同时,还在简单性和灵活性方面拥有巨大优势。
-
- 易于理解的 Java Security API;
- 简单的身份认证(登录),支持多种数据源(LDAP,JDBC,Kerberos,ActiveDirectory 等);
- 对角色的简单的签权(访问控制),支持细粒度的签权;
- 支持一级缓存,以提升应用程序的性能;
- 内置的基于 POJO 企业会话管理,适用于 Web 以及非 Web 的环境;
- 异构客户端会话访问;
- 非常简单的加密 API;
- 不跟任何的框架或者容器捆绑,可以独立运行
Spring Security
除了不能脱离Spring,shiro的功能它都有。而且Spring Security对Oauth、OpenID也有支持,Shiro则需要自己手动实现。Spring Security的权限细粒度更高。
Shiro的功能模块
Shiro可以非常容易的开发出足够好的应用,其不仅可以用在JavaSE环境,也可以用在JavaEE环境。Shiro可以帮助我们完成:认证、授权、加密、会话管理、与Web集成、缓存等。这不就是我们想要的嘛,而且Shiro的API也是非 常简单;其基本功能点如下图所示:

- Authentication:身份认证/登录,验证用户是不是拥有相应的身份。
- Authorization:授权,即权限验证,验证某个已认证的用户是否拥有某个权限;即判断用户是否能做事情。
- SessionManagement:会话管理,即用户登录后就是一次会话,在没有退出之前,它的所有信息都在会话中 ; 会 话 可 以 是 普 通 JavaSE 环 境 的 , 也 可 以 是 如 Web 环 境 的 。
- Cryptography:加密,保护数据的安全性,如密码加密存储到数据库,而不是明文存储。
- Web Support:Shiro的web支持的API能够轻松地帮助保护Web应用程序。
- Caching:缓存,比如用户登录后,其用户信息、拥有的角色/权限不必每次去查,这样可以提高效率。
- Concurrency:Apache Shiro利用它的并发特性来支持多线程应用程序。
- Testing:测试支持的存在来帮助你编写单元测试和集成测试,并确保你的能够如预期的一样安全。
- "Run As":一个允许用户假设为另一个用户身份(如果允许)的功能,有时候在管理脚本很有用。
- "Remember Me":记住我。
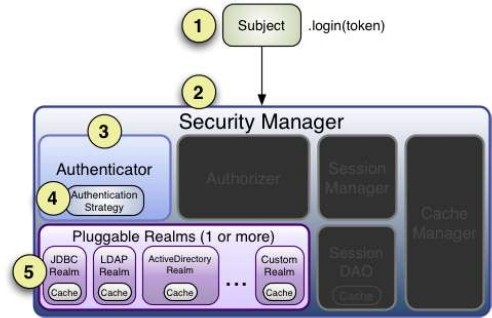
Shiro的内部结构

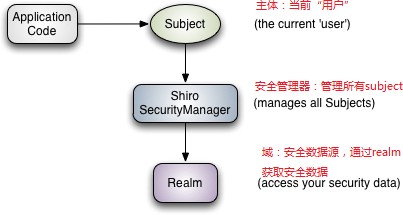
- Subject:主体,可以看到主体可以是任何可以与应用交互的“用户”;
- SecurityManager:相当于SpringMVC中的DispatcherServlet或者Struts2中的FilterDispatcher;是Shiro的心脏;所有具体的交互都通过SecurityManager进行控制;它管理着所有Subject、且负责进行认证和授权、及会 话、缓存的管理。
- Authenticator:认证器,负责主体认证的,这是一个扩展点,如果用户觉得Shiro默认的不好,可以自定义实 现;其需要认证策略(Authentication Strategy),即什么情况下算用户认证通过了;
- Authrizer:授权器,或者访问控制器,用来决定主体是否有权限进行相应的操作;即控制着用户能访问应用中的 哪些功能;
- Realm:可以有1个或多个Realm,可以认为是安全实体数据源,即用于获取安全实体的;可以是JDBC实现,也可 以是LDAP实现,或者内存实现等等;由用户提供;注意:Shiro不知道你的用户/权限存储在哪及以何种格式存储; 所以我们一般在应用中都需要实现自己的Realm;
- SessionManager:如果写过Servlet就应该知道Session的概念,Session呢需要有人去管理它的生命周期,这个 组件就是SessionManager;而Shiro并不仅仅可以用在Web环境,也可以用在如普通的JavaSE环境、EJB等环境; 所有呢,Shiro就抽象了一个自己的Session来管理主体与应用之间交互的数据;
- SessionDAO:DAO大家都用过,数据访问对象,用于会话的CRUD,比如我们想把Session保存到数据库,那么可 以实现自己的SessionDAO,通过如JDBC写到数据库;比如想把Session放到Memcached中,可以实现自己的Memcached SessionDAO;另外SessionDAO中可以使用Cache进行缓存,以提高性能;
- CacheManager:缓存控制器,来管理如用户、角色、权限等的缓存的;因为这些数据基本上很少去改变,放到 缓存中后可以提高访问的性能
- Cryptography:密码模块,Shiro提高了一些常见的加密组件用于如密码加密/解密的。
应用程序使用Shiro
也就是说对于我们而言,最简单的一个Shiro应用:
1、应用代码通过Subject来进行认证和授权,而Subject又委托给SecurityManager;
2、我们需要给Shiro的SecurityManager注入Realm,从而让SecurityManager能得到合法的用户及其权限进行判断。
从以上也可以看出,Shiro不提供维护用户/权限,而是通过Realm让开发人员自己注入。
Shiro的入门
搭建基于ini的运行环境
(1)创建工程导入shiro坐标
    <dependencies>
        <dependency>
            <groupId>org.apache.shiro</groupId>
            <artifactId>shiro-core</artifactId>
            <version>1.3.2</version>
        </dependency>
        <dependency>
            <groupId>junit</groupId>
            <artifactId>junit</artifactId>
            <version>4.12</version>
            <scope>test</scope>
        </dependency>
    </dependencies>
用户认证
认证:身份认证/登录,验证用户是不是拥有相应的身份。基于shiro的认证,是通过subject的login方法完成用户认证工作的
- 在resource目录下创建shiro的ini配置文件构造模拟数据(shiro-auth.ini)
[users]
#模拟从数据库查询的用户
#数据格式   用户名=密码
zhangsan=123456
lisi=654321- 测试用户认证
package cn.itcast.shiro;

import org.apache.shiro.SecurityUtils;
import org.apache.shiro.authc.UsernamePasswordToken;
import org.apache.shiro.config.IniSecurityManagerFactory;
import org.apache.shiro.subject.Subject;
import org.apache.shiro.util.Factory;
import org.apache.shiro.mgt.SecurityManager;
import org.junit.Test;

public class ShiroTest01 {

    /**
     * 测试用户认证:
     *      认证:用户登录
     *
     *      1.根据配置文件创建SecurityManagerFactory
     *      2.通过工厂获取SecurityManager
     *      3.将SecurityManager绑定到当前运行环境
     *      4.从当前运行环境中构造subject
     *      5.构造shiro登录的数据
     *      6.主体登陆
     */

    @Test
    public void testLogin() {
        //1.根据配置文件创建SecurityManagerFactory
        Factory<SecurityManager> factory = new IniSecurityManagerFactory("classpath:shiro-test-1.ini");
        //2.通过工厂获取SecurityManager
        SecurityManager securityManager = factory.getInstance();
        //3.将SecurityManager绑定到当前运行环境
        SecurityUtils.setSecurityManager(securityManager);
        //4.从当前运行环境中构造subject
        Subject subject = SecurityUtils.getSubject();
        //5.构造shiro登录的数据
        String username = "zhangsan";
        String password = "1234561";
        UsernamePasswordToken token = new UsernamePasswordToken(username,password);
        //6.主体登陆
        subject.login(token);
        //7.验证用户是否登录成功
        System.out.println("用户是否登录成功="+subject.isAuthenticated());
        //8.获取登录成功的数据
        System.out.println(subject.getPrincipal());
    }

}
用户授权
授权,即权限验证,验证某个已认证的用户是否拥有某个权限;即判断用户是否能做事情,常见的如:验证某个用 户是否拥有某个角色。或者细粒度的验证某个用户对某个资源是否具有某个权限
- 在resource目录下创建shiro的ini配置文件构造模拟数据(shiro-prem.ini)
[users]
#模拟从数据库查询的用户
#数据格式   用户名=密码,角色1,角色2..
zhangsan=123456,role1,role2
lisi=654321,role2
[roles]
#模拟从数据库查询的角色和权限列表
#数据格式   角色名=权限1,权限2
role1=user:save,user:update
role2=user:update,user.delete
role3=user.find- 完成用户授权
package cn.itcast.shiro;

import org.apache.shiro.SecurityUtils;
import org.apache.shiro.authc.UsernamePasswordToken;
import org.apache.shiro.config.IniSecurityManagerFactory;
import org.apache.shiro.mgt.SecurityManager;
import org.apache.shiro.subject.Subject;
import org.apache.shiro.util.Factory;
import org.junit.Before;
import org.junit.Test;

public class ShiroTest02 {

    private SecurityManager securityManager;

    @Before
    public void init() {
        //1.根据配置文件创建SecurityManagerFactory
        Factory<SecurityManager> factory = new IniSecurityManagerFactory("classpath:shiro-test-2.ini");
        //2.通过工厂获取SecurityManager
        SecurityManager securityManager = factory.getInstance();
        //3.将SecurityManager绑定到当前运行环境
        SecurityUtils.setSecurityManager(securityManager);
    }

    @Test
    public void testLogin() {
        Subject subject = SecurityUtils.getSubject();
        String username = "lisi";
        String password = "123456";
        UsernamePasswordToken token = new UsernamePasswordToken(username,password);
        subject.login(token);

        //登录成功之后,完成授权
        //授权:检验当前登录用户是否具有操作权限,是否具有某个角色
        System.out.println(subject.hasRole("role1"));
        System.out.println(subject.isPermitted("user:save"));

    }

}
自定义Realm
Realm域:Shiro从Realm获取安全数据(如用户、角色、权限),就是说SecurityManager要验证用户身份,那么 它需要从Realm获取相应的用户进行比较以确定用户身份是否合法;也需要从Realm得到用户相应的角色/权限进行 验证用户是否能进行操作;可以把Realm看成DataSource,即安全数据源
- 自定义Realm
package cn.itcast.shiro;

import org.apache.shiro.authc.*;
import org.apache.shiro.authz.AuthorizationInfo;
import org.apache.shiro.authz.SimpleAuthorizationInfo;
import org.apache.shiro.realm.AuthorizingRealm;
import org.apache.shiro.subject.PrincipalCollection;

import java.util.ArrayList;
import java.util.List;

/**
 * 自定义realms对象
 *      继承AuthorizingRealm
 *          重写方法
 *              doGetAuthorizationInfo:授权
 *                  获取到用户的授权数据(用户的权限数据)
 *              doGetAuthenticationInfo:认证
 *                  根据用户名密码登录,将用户数据保存(安全数据)
 *
 */
public class PermissionRealm extends AuthorizingRealm {

    /**
     * 自定义realm名称
     */
    public void setName(String name) {
        super.setName("permissionRealm");
    }

    //授权:授权的主要目的就是根据认证数据获取到用户的权限信息

    /**
     * principalCollection:包含了所有已认证的安全数据
     * AuthorizationInfoInfo:授权数据
     */
    protected AuthorizationInfo doGetAuthorizationInfo(PrincipalCollection principalCollection) {
        System.out.println("执行授权方法");
        //1.获取安全数据  username,用户id
        String username = (String)principalCollection.getPrimaryPrincipal();
        //2.根据id或者名称查询用户
        //3.查询用户的角色和权限信息
        List<String> perms = new ArrayList<>();
        perms.add("user:save");
        perms.add("user:update");
        List<String> roles = new ArrayList<>();
        roles.add("role1");
        roles.add("role2");
        //4.构造返回
        SimpleAuthorizationInfo info = new SimpleAuthorizationInfo();
        //设置权限集合
        info.addStringPermissions(perms);
        //设置角色集合
        info.addRoles(roles);
        return info;
    }

    //认证:认证的主要目的,比较用户名和密码是否与数据库中的一致
    //将安全数据存入到shiro进行保管
    //参数:authenticationToken登录构造的usernamepasswordtoken
    protected AuthenticationInfo doGetAuthenticationInfo(AuthenticationToken authenticationToken) throws AuthenticationException {
        System.out.println("执行认证方法");
        //1.构造uptoken
        UsernamePasswordToken upToken = (UsernamePasswordToken) authenticationToken;
        //2.获取输入的用户名密码
        String username = upToken.getUsername();
        String password = new String(upToken.getPassword());
        //3.根据用户名查询数据库,正式系统查询
        //4.比较密码和数据库中的密码是否一致(密码可能需要加密)
        if("123456".equals(password)) {
            //5.如果成功,向shiro存入安全数据
            SimpleAuthenticationInfo info = new SimpleAuthenticationInfo(username,password,getName());//1.安全数据,2.密码。3。当前realm域名称
            return info;
        }else{
            //6.失败,抛出异常或返回null
            throw new RuntimeException("用户名或密码错误");
        }
    }
}
- 配置shiro的ini配置文件(shiro-realm.ini)
[main]
#声明realm
permReam=cn.itcast.shiro.PermissionRealm
#注册realm到securityManager中
securityManager.realms=$permReam- 验证
package cn.itcast.shiro;

import org.apache.shiro.SecurityUtils;
import org.apache.shiro.authc.UsernamePasswordToken;
import org.apache.shiro.config.IniSecurityManagerFactory;
import org.apache.shiro.mgt.SecurityManager;
import org.apache.shiro.subject.Subject;
import org.apache.shiro.util.Factory;
import org.junit.Before;
import org.junit.Test;

public class ShiroTest03 {

    private SecurityManager securityManager;

    @Before
    public void init() {
        //1.根据配置文件创建SecurityManagerFactory
        Factory<SecurityManager> factory = new IniSecurityManagerFactory("classpath:shiro-test-3.ini");
        //2.通过工厂获取SecurityManager
        SecurityManager securityManager = factory.getInstance();
        //3.将SecurityManager绑定到当前运行环境
        SecurityUtils.setSecurityManager(securityManager);
    }

    @Test
    public void testLogin() {
        Subject subject = SecurityUtils.getSubject();
        String username = "zhangsan";
        String password = "123456";
        UsernamePasswordToken token = new UsernamePasswordToken(username,password);

        //执行login-->realm域中的认证方法
        subject.login(token);

        //授权:-->realm域中的授权方法
        System.out.println(subject.hasRole("role1"));
        System.out.println(subject.isPermitted("user:save"));

    }

}
认证与授权的执行流程分析
认证流程
- 首先调用Subject.login(token)进行登录,其会自动委托给Security Manager,调用之前必须通过SecurityUtils. setSecurityManager()设置;
- SecurityManager负责真正的身份验证逻辑;它会委托给Authenticator进行身份验证;
- Authenticator才是真正的身份验证者,Shiro API中核心的身份认证入口点,此处可以自定义插入自己的实现;
- Authenticator可能会委托给相应的AuthenticationStrategy进行多Realm身份验证,默认ModularRealmAuthenticator会调用AuthenticationStrategy进行多Realm身份验证;
- Authenticator会把相应的token传入Realm,从Realm获取身份验证信息,如果没有返回/抛出异常表示身份验证失败了。此处可以配置多个Realm,将按照相应的顺序及策略进行访问。
授权流程

- 首先调用Subject.isPermitted/hasRole接口,其会委托给SecurityManager,而SecurityManager接着会委托给Authorizer;
- Authorizer是真正的授权者,如果我们调用如isPermitted(“user:view”),其首先会通过PermissionResolver
- 把字符串转换成相应的Permission实例;
- 在进行授权之前,其会调用相应的Realm获取Subject相应的角色/权限用于匹配传入的角色/权限;
- Authorizer会判断Realm的角色/权限是否和传入的匹配,如果有多个Realm,会委托给ModularRealmAuthorizer进行循环判断,如果匹配如isPermitted/hasRole会返回true,否则返回false表示授权失败。